블루투스
| Classic Bluetooth | Bluetooth Low Energy |
|---|---|
| 오디오나 미디어 등 대용량 데이터를 지속적으로 전송 | IoT 센서 값, 상태 정보와 같이 데이터가 작고 단거리 저전력 연결 |
| 연결 후 계속 통신 하는 구조 | 필요할 때만 짧게 통신하는 구조 |
| 스트리밍에 적합 | 이벤트 기반 |
| 페어링 기반 | GATT 기반 구조 |
| 무선 이어폰, 헤드셋, 키보드, 마우스 | 스마트 워치, 헬스케어 센서, 비콘 |
미러링이나 캐스팅과 같이 미디어 데이터 전송에서는 Wifi 계열 통신을 사용하는 경우가 많고, 초기 페어링, 기기 발견 등은 Bluetooth를 사용한다.
BLE
기본적으로 비동기 콜백으로 동작
scan -> connect -> service 발견 -> GATT 통신
권한
Android 12 이상 부터는
BLUETOOTH_ADVERTISE, BLUETOOTH_SCAN, BLUETOOTH_CONNECT 권한이 3개로 나누어져있음
GATT
- GAP(General Access Profile): GATT보다 더 로우레벨의 상호작용을 정의
Advertising(광고, 게시)과 connection(연결)을 제어
특정 장치가 다른 장치들에게 어떻게 보여지도록 할 것인가, 어떻게 두 장치를 연결할 것인가
Advertising을 하는 Peripheral장치와 Connection을 하는 Centeral로 구분해 설명 - GATT: BLE 통신에서 장치 간에 데이터를 주고 받을때 쓰는 프로토콜.
데이터 전송 절차와 데이터 형식을 다룸.
서비스와 특성으로 정의됨
모든 표준 BLE Profile은 GATT를 기반으로 해야함- GATT Client: 서버한테 요청 보내고 응답 받음. 서버의 특성에 대해 알지 못함으로 먼저 서비스 검색을 수행하고, 해당 특성의 존재 여부를 조회해야함.
- GATT Server: 요청 수신하고 응답 모냄.
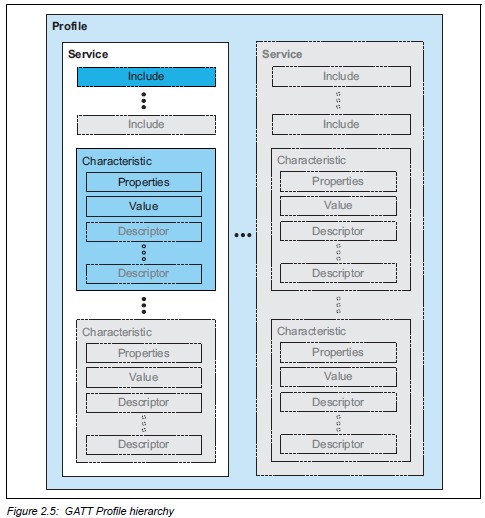
- Profile 최상위 개념. 한 기기의 기능 묶음 전체
- Service 서비스: 실제 기능 단위
프라이빗/퍼블릭으로 나뉨 - Characteristic 특성: 데이터 정의
- Properties: 값에 대해 가능한 동작 (read/write/notify/indicate)
- value : 실제 데이터 값
- descriptor: 부가 정보(설명, 설정, 포맷)
기기 연결
Central <-> Peripheral
기기 연결 단계에서는 Client <-> Server가 아니라
Central <-> Peripheral로 구분된다.
센서 장치가 Peripheral
센서 장치를 스캔하는 것이 Central
Peripheral은 하나의 Central 장치에만 연결할 수 있다.
Peripheral이 Central에 연결되면 Advertising을 중지 하기 때문이다.
advertising (광고, 게시)
BLE Peripheral 역할로 자신을 주변에 광고
다른 기기가 스캔했을때 기기 이름이랑 Service UUID를 확인하게 한다.
.setConnectable(true)를 통해서 다른 기기가 연결하는 하게 한다
- val adapter = BluetoothAdapter.getDefaultAdapter()
스마트폰 안에 있는 블루투스 모듈 관리자
- bluetoothLeAdvertiser = adapter.bluetoothLeAdvertiser
BluetoothAdapter 안에 BluetoothLeAdvertiser가 있다.
BluetoothLeAdvertiser는 Advertising packet을 송출하는 클래스
package com.eddy.nrf.bluetooth

import android.annotation.SuppressLint
import android.bluetooth.BluetoothAdapter
import android.bluetooth.le.AdvertiseCallback
import android.bluetooth.le.AdvertiseData
import android.bluetooth.le.AdvertiseSettings
import android.bluetooth.le.BluetoothLeAdvertiser
import android.os.ParcelUuid
import com.eddy.nrf.utils.Uuid
import timber.log.Timber

class AdvertisingManager(private val bluetoothAdapter: BluetoothAdapter) {

    private var bluetoothLeAdvertiser: BluetoothLeAdvertiser? = null

    @SuppressLint("MissingPermission")
    fun startAdvertising() {
        // 블루투스 어댑터의 이름을 "trimm e-bike"로 변경
        bluetoothAdapter.name = "trimm e-bike"

        bluetoothLeAdvertiser = bluetoothAdapter.bluetoothLeAdvertiser

        bluetoothLeAdvertiser?.let {
            val settings = AdvertiseSettings.Builder()
                .setAdvertiseMode(AdvertiseSettings.ADVERTISE_MODE_BALANCED)
                .setConnectable(true)
                .setTimeout(0)
                .setTxPowerLevel(AdvertiseSettings.ADVERTISE_TX_POWER_MEDIUM)
                .build()

            val data = AdvertiseData.Builder()
                .setIncludeDeviceName(true)
                .setIncludeTxPowerLevel(false)
                .addServiceUuid(ParcelUuid(Uuid.HEART_RATE_SERVICE))
                .build()

            it.startAdvertising(settings, data, advertiseCallback)
        } ?: Timber.w("Failed to create advertiser")
    }

    @SuppressLint("MissingPermission")
    fun stopAdvertising() {
        bluetoothLeAdvertiser?.stopAdvertising(advertiseCallback)
    }

    private val advertiseCallback = object : AdvertiseCallback() {
        override fun onStartSuccess(settingsInEffect: AdvertiseSettings) {
            Timber.i("LE Advertise Started.")
        }

        override fun onStartFailure(errorCode: Int) {
            Timber.w("LE Advertise Failed: $errorCode")
        }
    }
}
scan
BLE Advertising 패킷을 수신해 주변 기기를 탐색한다.
스캔 결과를 보고 기기 이름, MAC 주소, 서비스 UUID 등을 보고 원하는 기기를 찾으면 scan을 중지하고 connectGatt()로 GATT연결을 시도한다
private val bluetoothLeScanner = bluetoothAdapter.bluetoothLeScanner
private var scanning = false
private val handler = Handler()

// Stops scanning after 10 seconds.
private val SCAN_PERIOD: Long = 10000

private fun scanLeDevice() {
    if (!scanning) { // Stops scanning after a pre-defined scan period.
        handler.postDelayed({
            scanning = false
            bluetoothLeScanner.stopScan(leScanCallback)
        }, SCAN_PERIOD)
        scanning = true
        bluetoothLeScanner.startScan(leScanCallback)
    } else {
        scanning = false
        bluetoothLeScanner.stopScan(leScanCallback)
    }
}
timeout을 걸기 위해서 핸들러를 사용
connect
  fun connectToFixedMac(onConnected: () -> Unit, onFailed: () -> Unit) {
        val macAddress = "C8:47:8C:70:73:F0"
        val adapter = BluetoothAdapter.getDefaultAdapter()
        val device = adapter?.getRemoteDevice(macAddress)

        if (device == null) {
            Log.e("BLE", "MAC 주소로 디바이스 찾기 실패")
            return
        }

        gatt?.disconnect()
        gatt?.close()
        gatt = null

        gatt = if (Build.VERSION.SDK_INT >= Build.VERSION_CODES.M) {
            device.connectGatt(context, false, gattCallback, BluetoothDevice.TRANSPORT_LE)
        } else {
            device.connectGatt(context, false, gattCallback)
        }

        this.onConnectedCallback = onConnected
        this.onFailedCallback = onFailed
}- scan을 안하고 Mac 주소를 기반으로 BluetoothDevice 객체를 얻는다.
- 해당 디바이스에 GATT 연결 시도
- 연결 성공 후 MTU 요청
- MTU 설정이 끝나면 UUID를 기준으로 원하는 Service 찾음
- 그 서비스 안에서 UUID를 기준으로 원하는 Characteristic이 있는지를 찾는다.
- Notify Characteristic은 CCCD를 설정해서 Notification을 구독한다
- 이후 서버가 Nofity를 보내면 onCharacteristicChanged()에서 수신한다.
- 앱에서 데이터를 보낼 때는 writeCharacteristic()을 호출
- writeCharacteristic()의 callback으로 전송 성공 여부 확인
통신
GATT Client <-> GATT Server
장치가 연결되면 GATT Client <-> GATT Server의 역할로 구분된다
GATT서버의 경우 advertising 을 통해 상대 기기 (client)에서 연결 요청을 받는다.
GATT클라이언트의 경우 Scan이나 MAC 주소 등을 기반으로 연결할 기기를 찾고 connectGatt()를 통해 연결을 맺는다.
패킷 단위로 통신하며 기본 MTU는 20이고 최대 517까지 설정 가능
Read - gatt.readCharacteristic()
Write - gatt.writeCharacteristic()
Notify - gatt.setCharacteristicNotification()
Notify는 클라이언트가 서버한테 구독 요청을 보내면 클라이언트가 매번 READ 요청을 보내지 않아도 서버가 클라이언트에게 Characteristic 값 변경을 알려준다.
클라이언트는 먼저 Service Discovery를 통해 원하는 Characteristic을 찾고 CCCD를 설정해 Notification 수신을 구독한다. 이후 서버는 값이 변경될때 마다 클라이언트에게 데이터를 전송한다.
Notification, Indication 둘 다 서버 -> 클라이언트 데이터 전송 방식이다.
| Notification | Indication |
|---|---|
| Ack 없음 | Ack 필수 |
| 서버-> 클라이언트 데이터 전송 후 바로 완료 | 서버 -> 클라이언트 데이터 전송 후 클라이언트로부터 확인 응답을 받아야 다음 데이터를 보냄 |
| 빠르고 전력 소모 적음 | 통신 주기가 길어지고 전력 소모가 상대적으로 큼 |
| 데이터 유실 가능성 있음 | 데이터 유실 없이 확실한 수신이 보장 |
Android GATT Server API에서는 notifyCharacteristicChanged(device, characteristic, confirm)의 confirm 값이 false면 Notification, true면 Indication 방식으로 동작한다.
package com.eddy.nrf.bluetooth

import android.os.Handler
import android.os.Looper
import com.eddy.nrf.presentation.ui.BikeUiState
import com.eddy.nrf.utils.Util.floatTo4ByteArray
import com.eddy.nrf.utils.Uuid
import kotlinx.coroutines.flow.StateFlow
import timber.log.Timber
import java.nio.ByteBuffer

class HeartRateNotificationManager(
    private val gattServerManager: GattServerManager,
    private val uiStateFlow: StateFlow<BikeUiState>
) {

    private val notificationHandler = Handler(Looper.getMainLooper())

    fun startNotifications() {
        notificationHandler.post(notificationRunnable)
    }

    fun stopNotifications() {
        notificationHandler.removeCallbacks(notificationRunnable)
    }

    private val notificationRunnable = object : Runnable {
        override fun run() {
            val distance = uiStateFlow.value.distance
            val speed = uiStateFlow.value.speed
            val gear = uiStateFlow.value.gear
            val battery = uiStateFlow.value.battery

            val buffer = ByteBuffer.allocate(13)//4+4+1+4
            buffer.put(floatTo4ByteArray(distance))
            buffer.put(floatTo4ByteArray(speed))
            buffer.put(gear.toByte())
            buffer.put(floatTo4ByteArray(battery))
            val resultArray = buffer.array()

            notifyHeartRate(resultArray)
            notificationHandler.postDelayed(this, 1000)
        }
    }

    private fun notifyHeartRate(heartRate: ByteArray) {
        if (gattServerManager.registeredDevices.isEmpty()) return

        Timber.i(
            "Sending heart rate update to ${gattServerManager.registeredDevices.size} subscribers"
        )
        val heartRateCharacteristic = gattServerManager.bluetoothGattServer
            ?.getService(Uuid.HEART_RATE_SERVICE)
            ?.getCharacteristic(Uuid.HEART_RATE_MEASUREMENT)
        heartRateCharacteristic?.value = heartRate

        gattServerManager.notifyCharacteristicChanged(heartRateCharacteristic!!)
    }
}-
Handler와 Looper는 1초마다 Notification을 보내기 위한 주기적 작업 스케줄링에 사용했다.
Handler는 Runnable을 메시지 큐에 등록하고, Looper는 큐에서 작업을 꺼내 실행한다.
현재 코드는 MainLooper를 사용하므로 해당 Runnable은 메인 스레드에서 실행된다. -
ByteArray는 BLE로 보낼 데이터를 바이트 단위로 표현한 배열이다.
ByteBuffer는 여러 값을 순서대로 ByteArray에 넣기 위해 사용했다.
reference
https://developer.android.com/develop/connectivity/bluetooth/ble/find-ble-devices?hl=ko
https://odomm.tistory.com/entry/Android-%ED%81%B4%EB%9E%98%EC%8B%9D-%EB%B8%94%EB%A3%A8%ED%88%AC%EC%8A%A4%EB%9E%91-ble-%EC%B0%A8%EC%9D%B4%EC%A0%90#google_vignette
https://wowon.tistory.com/375
https://seosh817.tistory.com/415#GATT%20%ED%94%84%EB%A1%9C%ED%95%84%20%EC%98%88%EC%8B%9C-1-14
https://dev-ahn.tistory.com/91