
스프링 IoC 컨테이너와 빈
-
스프링 : 동적 웹사이트를 개발, 자바 플랫폼을 위한 오픈소스 프레임워크
-
Inversion of Control : 의존 관계 주입(Dependency Injection)이라고도 하며, 어떤 객체가 사용하는 의존 객체를 직접 만들어 사용하는게 아니라, 주입 받아 사용하는 방법
-
스프링 IoC 컨테이너
- BeanFactory
- Application 컴포넌트의 중앙 저장소
- 빈을 읽고 구성하고 제공한다.
-
빈
-
스프링 IoC 컨테이너가 관리하는 객체
-
스프링 IoC 컨테이너를 사용하는 이유(=Bean의 장점)?
-
(1) 빈으로 등록되어야 의존성 주입이 가능하다.
-
(2) 싱글톤 객체를 사용하기 위해. (Scope)
- 싱글톤 : 하나
- 프로토 타입 : 매번 다른 객체
-
라이프 사이클 인터페이스
-
빈 생명주기

-
-
-
단위 테스트 가능?
-
\java\book\Bookpackage book; import java.util.Date; public class Book { private Date created; private BookStatus bookStatus; public Date getCreated() { return created; } public void setCreated(Date created) { this.created = created; } public BookStatus getBookStatus() { return bookStatus; } public void setBookStatus(BookStatus bookStatus) { this.bookStatus = bookStatus; } } -
java\book\BookServicepackage book; import org.springframework.stereotype.Service; import java.util.Date; @Service public class BookSerivce { BookRepository bookRepository; public BookSerivce(BookRepository bookRepository) { this.bookRepository = bookRepository; } public Book save(Book book){ book.setCreated(new Date()); book.setBookStatus(BookStatus.DRAFT); return bookRepository.save(book); } } -
java\book\BookRepositorypackage book; import org.springframework.stereotype.Repository; @Repository public class BookRepository { public Book save(Book book){ return null; } } -
test\java\book\BookServiceTestpackage book; import org.junit.Test; import static org.assertj.core.api.Assertions.assertThat; //@RunWith(SpringRunner.class) public class BookServiceTest { /*@Mock BookRepository bookRepository;*/ @Test public void save(){ Book book = new Book(); //when(bookRepository.save(book)).thenReturn(book); BookRepository bookRepository = new BookRepository(); BookService bookService = new BookService(bookRepository); Book result = bookService.save(book); assertThat(book.getCreated()).isNotNull(); assertThat(book.getBookStatus()).isEqualTo(BookStatus.DRAFT); assertThat(result).isNotNull(); } }-
실행 오류! (아래는 조금의 변화)
package book; import org.junit.Test; import static org.assertj.core.api.Assertions.assertThat; @RunWith(SpringRunner.class) public class BookServiceTest { @Mock BookRepository bookRepository; @Test public void save(){ Book book = new Book(); when(bookRepository.save(book)).thenReturn(book); //BookRepository bookRepository = new BookRepository(); BookService bookService = new BookService(bookRepository); Book result = bookService.save(book); assertThat(book.getCreated()).isNotNull(); assertThat(book.getBookStatus()).isEqualTo(BookStatus.DRAFT); assertThat(result).isNotNull(); } } -
실행된다. 설명) Mock을 통해서 단위 Test에 쓰일 가짜 객체(bookRepository) 생성.
-
-
-
ApplicationContext
- 실제로 가장 많이 사용할 BeanFactory
- BeanFactory보다 더 많은 기능
- 참고 사이트 (특히, All Superinterfaces)
ApplicationContext와 다양한 빈 설정 방법
(1) 스프링 IoC 컨테이너는 Bean 설정 파일이 있어야 한다. 빈 등록 방법
-
main\me\jinmin\springdemoalone\book\BookServicepackage me.jinmin.springdemoalone.book; public class BookSerivce { public BookRepository bookRepository; public void setBookRepository(BookRepository bookRepository) { this.bookRepository = bookRepository; } } -
\main\me\jinmin\springdemoalone\book\BookRepositorypackage me.jinmin.springdemoalone.book; public class BookRepository { public Book save(Book book){ return null; } } -
main\resources\applicaionContext.xml<?xml version="1.0" encoding="UTF-8"?> <beans xmlns="http://www.springframework.org/schema/beans" xmlns:xsi="http://www.w3.org/2001/XMLSchema-instance" xsi:schemaLocation="http://www.springframework.org/schema/beans http://www.springframework.org/schema/beans/spring-beans.xsd"> <bean id="bookService" class="me.jinmin.springdemoalone.book.BookSerivce"> <property name="bookRepository" ref="bookRepository"/> </bean> <bean id="bookRepository" class="me.jinmin.springdemoalone.book.BookRepository"/> </beans> -
<property name="bookRepository" ref="bookRepository"/>name : Setter에서 가져온 것 / ref : 다른 빈(다른 빈의 아이디)을 참조한다. -
main\java\org\DemoApplicationpackage me.jinmin.springdemoalone; import me.jinmin.springdemoalone.book.BookSerivce; import org.springframework.context.ApplicationContext; import org.springframework.context.support.ClassPathXmlApplicationContext; import java.util.Arrays; public class SpringDemoAloneApplication { public static void main(String[] args) { ApplicationContext context = new ClassPathXmlApplicationContext("applicationContext.xml"); String[] beanDefinitionNames = context.getBeanDefinitionNames(); Arrays.stream(beanDefinitionNames).forEach(System.out::println); BookSerivce bookService = (BookSerivce) context.getBean("bookService"); System.out.println(bookService.bookRepository != null); } }print: bookService bookRepository true -
단점 :
application.xml에서 일일이 빈으로 등록하는 것은 여러모로 귀찮다. -
이를 보완하고자 등장한게 MODA?
applicationContext.xml<?xml version="1.0" encoding="UTF-8"?> <beans xmlns:context="http://www.springframework.org/schema/context" xmlns:xsi="http://www.w3.org/2001/XMLSchema-instance" xmlns="http://www.springframework.org/schema/beans" xsi:schemaLocation=" http://www.springframework.org/schema/beans http://www.springframework.org/schema/beans/spring-beans-2.5.xsd http://www.springframework.org/schema/context http://www.springframework.org/schema/context/spring-context.xsd"> <context:component-scan base-package="me.jinmin.springdemoalone"/> </beans> -
바로
@Component!! 패키지 전체를component-scan을 통해 아래와 같이 빈으로 등록할 클래스를@Service나@Repository를 통해 빈으로 등록package me.jinmin.springdemoalone; import org.springframework.beans.factory.annotation.Autowired; import org.springframework.stereotype.Service; @Service public class BookService { @Autowired BookRepository bookRepository; public void setBookRepository(BookRepository bookRepository) { this.bookRepository = bookRepository; } }package me.jinmin.springdemoalone; import org.springframework.stereotype.Repository; @Repository public class BookRepository { }@Service,@Repository는@Component
-
main\java\me\DemoApplicationpackage me.jinmin.springdemoalone; import org.springframework.context.ApplicationContext; import org.springframework.context.support.ClassPathXmlApplicationContext; import java.util.Arrays; public class SpringDemoAloneApplication { public static void main(String[] args) { ApplicationContext context = new ClassPathXmlApplicationContext("applicationContext.xml"); String[] beanDefinitionNames = context.getBeanDefinitionNames(); Arrays.stream(beanDefinitionNames).forEach(System.out::println); BookService bookService = (BookService) context.getBean("bookService"); System.out.println(bookService.bookRepository != null); } }print: bookRepository bookService true
(2) 자바 설정 파일을 통해 빈으로 등록하고 ApplicationContext로 관리(사용)하는 방법
package me.jinmin.springdemoalone;

import org.springframework.context.annotation.Bean;
import org.springframework.context.annotation.Configuration;

@Configuration
public class ApplicationConfig {

    @Bean
    public BookRepository bookRepository(){
        return new BookRepository();
    }

    @Bean
    public BookService bookService(){
        BookService bookService = new BookService();
        bookService.setBookRepository(bookRepository());

        return bookService;
    }
}-
main\java\me\jinmin\..\SpringDemoAloneApplicationpackage me.jinmin.springdemoalone; import org.springframework.context.ApplicationContext; import org.springframework.context.annotation.AnnotationConfigApplicationContext; import java.util.Arrays; public class SpringDemoAloneApplication { public static void main(String[] args) { ApplicationContext context = new AnnotationConfigApplicationContext(ApplicationConfig.class); //1 //ApplicationContext context = new ClassPathXmlApplicationContext("applicationContext.xml"); //2 String[] beanDefinitionNames = context.getBeanDefinitionNames(); System.out.println(Arrays.toString(beanDefinitionNames)); BookService bookService = (BookService) context.getBean("bookService"); System.out.println(bookService.bookRepository != null); } } -
실행 결과 같음
-
주석 2 대신 ⇒ 1 사용
-
자바 설정 파일 또한 위에서 진행했던
.xml의component-scan과 같이 묶을 수가 있다.@ComponentScan을 통해. -
main\java\org\ApplicationConfigpackage me.jinmin.springdemoalone; import org.springframework.context.annotation.ComponentScan; import org.springframework.context.annotation.Configuration; @Configuration @ComponentScan(basePackageClasses = SpringDemoAloneApplication.class) public class ApplicationConfig { } -
❤사실, SpringBoot에서는 main이 속한 클래스에
@SpringBootApplication을 명시하면 지금껏 설명했던 Spring에서의ApplicationConfig클래스가 필요없다.ㅎㄷㄷ
-
-
ApplicationContext를 사용한 방법 2가지
- 위의 (1) ClassPathXmlApplicationContext
- 위의 (2) AnnotationConfigApplicationContext
About @Autowired.
-
: 필요한 의존 객체의 "Type"에 해당하는 빈을 찾아 주입.
-
📤사용할 수 있는 위치
-
생성자 (스프링 4.3부터는 생략 가능)
-
Setter
-
필드
-
🔔
@Autowire(required = false)를 사용하면 해당하는 의존성 없이도 등록 가능하다.package me.jinmin.demospring51; import org.springframework.beans.factory.annotation.Autowired; import org.springframework.stereotype.Service; @Service public class BookService { BookRepository bookRepository; @Autowired(required = false) public void setBookRepository(BookRepository bookRepository) { this.bookRepository = bookRepository; } }
-
-
@Autowired의 경우의 수-
해당 타입의 빈이 없는 경우(ERROR)
-
해당 타입의 빈이 한 개인 경우
-
해당 타입의 빈이 여러 개인 경우
package me.jinmin.demospring51;

public interface BookRepository {
}
package me.jinmin.demospring51; import org.springframework.stereotype.Repository; @Repository public class JinminBookRepository implements BookRepository{ }package me.jinmin.demospring51; import org.springframework.stereotype.Repository; @Repository public class MyBookRepository implements BookRepository{ }-
(1) 오류가 난다. 그럴땐 빈 이름으로 시도‼
- 같은 이름의 빈 찾으면 사용
- 같은 이름 찾지 못하면 실패
-
(2) 오류가 난다.
-
@Primary사용 : 이 빈 객체를 주로 주입 사용하겠다. 💋(추천)package me.jinmin.demospring51; import org.springframework.context.annotation.Primary; import org.springframework.stereotype.Repository; @Repository @Primary public class JinminBookRepository implements BookRepository{ } -
@Qualifier("${Bean name}")package me.jinmin.demospring51; import org.springframework.beans.factory.annotation.Autowired; import org.springframework.beans.factory.annotation.Qualifier; import org.springframework.stereotype.Service; @Service public class BookService { @Autowired @Qualifier("jinminBookRepository") BookRepository bookRepository; } -
타입 안정성 Primary > Qualifier
-
✨아니면 List를 사용해서 모두 받자
package me.jinmin.demospring51;

import org.springframework.beans.factory.annotation.Autowired;
import org.springframework.boot.ApplicationArguments;
import org.springframework.boot.ApplicationRunner;
import org.springframework.stereotype.Service;

import java.util.List;

@Service
public class BookService implements ApplicationRunner {

    @Autowired
    List<BookRepository> bookRepositories;

    /*@PostConstruct
    public void print() {
        this.bookRepositories.forEach(System.out::println);
    }*/

    @Override
    public void run(ApplicationArguments args) throws Exception {
        this.bookRepositories.forEach(System.out::println);
    }
}
-
Application이 전부 실행되고 코드가 출력된다.
-
-
-
-
동작 원리
-
BeanPostProcessor: 새로 만든 빈 인스턴스를 수정할 수 있는 라이프 사이클 인터페이스@PostConstructpackage me.jinmin.demospring51; import org.springframework.beans.factory.annotation.Autowired; import org.springframework.stereotype.Service; import javax.annotation.PostConstruct; import java.util.List; @Service public class BookService { @Autowired List<BookRepository> bookRepositories; @PostConstruct public void print() { this.bookRepositories.forEach(System.out::println); } }
- Spring Boot 프로그램이 채 끝나기 전에 코드가 출력됨을 볼 수 있다.
-
AutowiredAnnotationBeanPostProcessor extends BeanProcessor가 자동적으로 .. 매직..
-
@Component와 컴포넌트 스캔
-
@ComponentScan의 주요 Method.String[] basePackages() default {}; //Type-safe하지 않은 basePackages의 대안책 Class<?>[] basePackageClasses() default {};-
🎈
@SpringBootApplication🎈이 붙은 클래스부터 시작이 된고 구동 클래스와 그 클래스를 포함한 패키지(이하 전부)가 전부 스캔된다. (아래)package me.jinmin.demospring51; import org.springframework.boot.SpringApplication; import org.springframework.boot.autoconfigure.SpringBootApplication; @SpringBootApplication public class Demospring51Application { public static void main(String[] args) { SpringApplication.run(Demospring51Application.class, args); } }
-
-
✨
@ComponentScan이라고 다 스캔되는 것은 아니다.@ComponentScan(excludeFilters = { @Filter(type = FilterType.CUSTOM, classes = TypeExcludeFilter.class), @Filter(type = FilterType.CUSTOM, classes = AutoConfigurationExcludeFilter.class) })@Filter에 해당하는 타입을 거른다.
-
🎁
@Component의 종류@Repository@Service@Controller@Configuration
-
구동 Class가 속한 패키지 외의 패키지에서의 클래스를 빈으로 등록하고 스캔을 가능하도록 하는 방법
package me.jinmin.demospring51; import me.jinmin.out.MyService; import org.springframework.beans.factory.annotation.Autowired; import org.springframework.boot.ApplicationRunner; import org.springframework.boot.SpringApplication; import org.springframework.boot.autoconfigure.SpringBootApplication; import org.springframework.context.ApplicationContextInitializer; import org.springframework.context.support.GenericApplicationContext; @SpringBootApplication public class Demospring51Application { @Autowired MyService myService; public static void main(String[] args) { //instance를 만들어서 사용하는 방법 var app = new SpringApplication(Demospring51Application.class); app.addInitializers((ApplicationContextInitializer<GenericApplicationContext>) ctx -> { ctx.registerBean(MyService.class); ctx.registerBean(ApplicationRunner.class, () -> args1 -> System.out.println("Functional Bean Definition!!")); }); app.run(args); } }-
Instance를 생성해서 앱을 구동할때,
addInitializers를 이용해서 현재 패키지 밖에 있는MyService클래스나 Suplier를 🎁Functional🎁하게 빈으로 등록(스캔가능)하여 사용할 수 있다.package me.jinmin.out; public class MyService { ... } -
다만‼,
ComponentScan을 지향하고 Functional하게 빈을 등록하는 것은 지양하자.불편하니까
-
-
동작 원리
- 다시 말해,
@ComponentScan은 스캔할 패키지와@에 대한 정보 - 실제 스캐닝은
ConfigurationClassPostProcessor라는BeanFactoryPostProcessor에 의해 처리 됨.
- 다시 말해,
Bean의 Scope(영역)
-
싱글톤 Scope : App. 전반에 걸쳐서 해당 빈의 인스턴스가 오직 한 개 뿐.
-
❤Scope
-
싱글톤
(대체로 사용) -
프로토타입 : 매번 새로운 인스턴스를 생성해서 사용
- Request
- Session
- WebSocket
- (Application, Thread Scope etc.)package me.jinmin; import org.springframework.stereotype.Component; @Component public class Single { }package me.jinmin; import org.springframework.context.annotation.Scope; import org.springframework.stereotype.Component; @Component @Scope("prototype") public class Proto { }package me.jinmin; import org.springframework.beans.factory.annotation.Autowired; import org.springframework.boot.ApplicationArguments; import org.springframework.boot.ApplicationRunner; import org.springframework.context.ApplicationContext; import org.springframework.stereotype.Component; @Component public class AppRunner implements ApplicationRunner { @Autowired ApplicationContext context; @Override public void run(ApplicationArguments args) throws Exception { System.out.println("proto"); System.out.println(context.getBean(Proto.class)); System.out.println(context.getBean(Proto.class)); System.out.println(context.getBean(Proto.class)); System.out.println("single"); System.out.println(context.getBean(Single.class)); System.out.println(context.getBean(Single.class)); System.out.println(context.getBean(Single.class)); } } -
결과 ❓
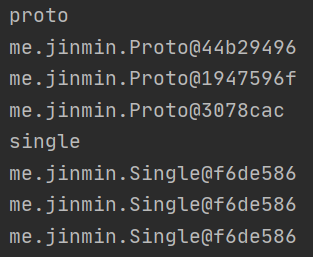
매번 다른 ProtoType의 인스턴스
매번 같은 SingleTone의 인스턴스
-
-
If, 프로토타입 빈이 싱글톤 빈 참조❓ ⇒ 아무런 문제가 없다.
-
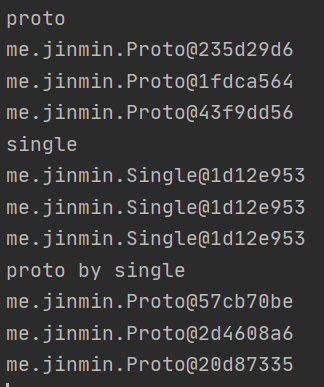
If, 싱글톤 빈이 프로토 타입 빈 참조❓
-
문제 발생.
package me.jinmin;

import org.springframework.beans.factory.annotation.Autowired;
import org.springframework.stereotype.Component;

@Component
public class Single {

    @Autowired
    Proto proto;

    public Proto getProto() {
        return proto;
    }
}
package me.jinmin; import org.springframework.beans.factory.annotation.Autowired; import org.springframework.boot.ApplicationArguments; import org.springframework.boot.ApplicationRunner; import org.springframework.context.ApplicationContext; import org.springframework.stereotype.Component; @Component public class AppRunner implements ApplicationRunner { @Autowired ApplicationContext context; @Override public void run(ApplicationArguments args) throws Exception { System.out.println("proto by single"); System.out.println(context.getBean(Single.class).getProto()); System.out.println(context.getBean(Single.class).getProto()); System.out.println(context.getBean(Single.class).getProto()); } } -
결과는 매번 같은 싱글톤의 결과와 같다..
원치 않는다.그렇다면 이를 사용하는 방법은??-
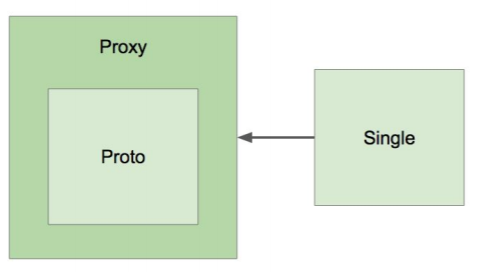
(1) Proxy-Scope를 설정한다.
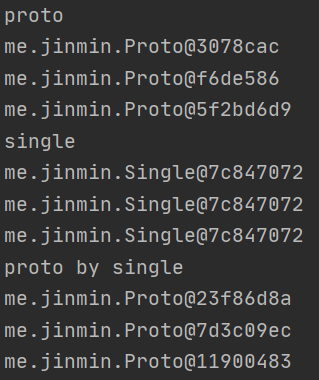
package me.jinmin; import org.springframework.beans.factory.annotation.Autowired; import org.springframework.context.annotation.Scope; import org.springframework.context.annotation.ScopedProxyMode; import org.springframework.stereotype.Component; @Component @Scope(value = "prototype", proxyMode = ScopedProxyMode.TARGET_CLASS) public class Proto { @Autowired Single single; }-
결과
-
Proto.class를 클래스 기반의 Proxy로 감싸서 Proxy기반의 빈으로 작용❗
Why? ⇒ 싱글톤이 다른 프로토타입의 빈을 직접 참조하면 안되고 Proxy를 거쳐야 한다!!
Why 프록시를 거칠까? ⇒ 직접 참조하면 Proto의 변경 여지가 없다.
-
-
(2) Object-Provider
package me.jinmin;

import org.springframework.beans.factory.annotation.Autowired;
import org.springframework.context.annotation.Scope;
import org.springframework.stereotype.Component;

@Component @Scope("prototype")
public class Proto {

    @Autowired
    Single single;
}
package me.jinmin; import org.springframework.beans.factory.ObjectProvider; import org.springframework.beans.factory.annotation.Autowired; import org.springframework.stereotype.Component; @Component public class Single { @Autowired private ObjectProvider<Proto> proto; public Proto getProto() { return proto.getIfAvailable(); } }- 결과
- 결과
-
-
-
싱글톤 타입 사용시 주의할 점
- Property가 공유. ⇒ Thread-Safe한 방법으로 코딩을 해야한다. (개발자의 몫)
- ApplicationContext 초기 구동시 인스턴스를 생성(App. 구동시 시간이 조금 걸린다는 점)