
(이전 내용) ApplicationContext 정리
- BeanFactory라는 기능만 있는 것이 아니라 여러 기능들을 갖추고 있다.꼭 꼼꼼히 살펴보자.
Resource 추상화
-
특징
- java.net.URL 추상화 (⇒ spring.core.io.resource 클래스로 감싸서 low level에 있는 기능을 감싼다.)
- Why 추상화?
- ClassPath 기준으로 Resource를 읽어 오는 기능 부재
- ServletContext 기준으로 상대 경로로 Resource를 읽어오는 기능 부재
- 스프링 내부에서 많이 사용하는 Interface
-
여러 인터페이스(기능)
- (참고) https://docs.spring.io/spring-framework/docs/current/javadoc-api/org/springframework/core/io/Resource.html
- 주요 메소드
getInputStream()exitst()isOpen()getDescription()etc.
- 주요 메소드
- (참고) https://docs.spring.io/spring-framework/docs/current/javadoc-api/org/springframework/core/io/Resource.html
-
구현체
-
UrlResource : 기본으로 지원하는 프로토콜(http, https, ftp, file, jar 등)
-
ClassPathResource :
classpath: -
FileSystemResource
-
ServletContextResource : 웹 App. 루트에서 상대 경로로 리소스 탐색.
-
...
-
간략한 예)
package me.jinmin; import org.springframework.boot.ApplicationArguments; import org.springframework.boot.ApplicationRunner; import org.springframework.context.support.ClassPathXmlApplicationContext; import org.springframework.context.support.FileSystemXmlApplicationContext; import org.springframework.stereotype.Component; @Component public class AppRunner implements ApplicationRunner { @Override public void run(ApplicationArguments args) throws Exception { var context = new ClassPathXmlApplicationContext("blabla.xml"); var context2 = new FileSystemXmlApplicationContext("blabla2.xml"); } }- (1)
var context = new ClassPathXmlApplicationContext("blabla.xml");: ClassPath기준으로 스트링에 해당하는 로케이션의 설정 파일을 찾는것. - (2)
var context2 = new FileSystemXmlApplicationContext("blabla2.xml");: FileSystem 경로 기준으로 스트링에 해당하는 로케이션의 설정 파일을 찾는것.
- (1)
-
-
-
Resource 읽어오기.
- Resource의 타입은 location의 문자열과 ✨ApplicationContext의 타입에 따라 결정
- ClassPathXmlApplicationContext → ClassPathResource
- FileSystemXmlApplicationContext → FileSystemResource
- WebApplicationContext → ServletContextResource
- 🎃ApplicationContext의 타입에 상관없이 Resource 타입을 강제하려면 java.net.URL 접두어를 사용하면 된다. (예시 아래)
classpath:me/jinmin/config.xml→ (강제) ClassPathResourcefile:///some/resource/path/config.xml→ (강제) FileSystemResource- 접두어를 사용하여 좀 더 명시적으로 표현하는 것을 추천.
- Resource의 타입은 location의 문자열과 ✨ApplicationContext의 타입에 따라 결정
-
타입 확인
package me.jinmin;

import org.springframework.beans.factory.annotation.Autowired;
import org.springframework.boot.ApplicationArguments;
import org.springframework.boot.ApplicationRunner;
import org.springframework.context.ApplicationContext;
import org.springframework.core.io.Resource;
import org.springframework.stereotype.Component;

@Component
public class AppRunner implements ApplicationRunner {

    @Autowired
    ApplicationContext resourceLoader;

    @Override
    public void run(ApplicationArguments args) throws Exception {

        System.out.println(resourceLoader.getClass());

        Resource resource = resourceLoader.getResource("classpath:test.txt");
        System.out.println(resource.getClass());
    }
}
-
resourceLoader: ServletContextResource -
resource: ClassPathResource -
📢If, 명시적으로 표현한
classpath:를 지운다면?package me.jinmin; import org.springframework.beans.factory.annotation.Autowired; import org.springframework.boot.ApplicationArguments; import org.springframework.boot.ApplicationRunner; import org.springframework.context.ApplicationContext; import org.springframework.core.io.Resource; import org.springframework.stereotype.Component; import java.nio.file.Files; import java.nio.file.Path; @Component public class AppRunner implements ApplicationRunner { @Autowired ApplicationContext resourceLoader; @Override public void run(ApplicationArguments args) throws Exception { System.out.println(resourceLoader.getClass()); Resource resource = resourceLoader.getResource("test.txt"); System.out.println(resource.getClass()); System.out.println(resource.exists()); System.out.println(resource.getDescription()); System.out.println(Files.readString(Path.of(resource.getURI()))); } }
resourceLoader,resource: ServletContextResourceresource.exists()의 결과 : false → 톰캣(8080 Server)에서 지정한 ContextPath가 없다.resource.getDescription()의 결과는 나타난다. (→ ServletContext resource [/test.txt])- 다만, 파일을 읽어오는 문자열(
System.out.println(Files.readString(Path.of(resource.getURI())));)은 없는 파일을 읽으려 하니 오류가 난다. - 🎈결론, 명시하자. (참고 문헌_명세서)
-
Validation 추상화
-
읽기 전 추가하기
<dependencies> <dependency> <groupId>org.springframework.boot</groupId> <artifactId>spring-boot-starter-validation</artifactId> </dependency> </dependencies> -
org.springframework.validation.ValidatorApp.에서 사용하는 객체 검증용 인터페이스 -
구현 인터페이스 2가지!
-
boolean supports(Class clazz): 어떤 타입의 객체를 검증할 때 사용할지 결정 -
void validate(Object obj, Errors e): 실제 검증 로직을 구현- 구현시, ValidationUtils 사용하며 편리함.
-
예제를 살펴보자.
-
java\me\jinmin\Eventpackage me.jinmin; public class Event { Integer id; String title; public Integer getId() { return id; } public void setId(Integer id) { this.id = id; } public String getTitle() { return title; } public void setTitle(String title) { this.title = title; } } -
java\me\jinmin\EventValidatorpackage me.jinmin; import org.springframework.validation.Errors; import org.springframework.validation.ValidationUtils; import org.springframework.validation.Validator; public class EventValidator implements Validator { @Override public boolean supports(Class<?> clazz) { return Event.class.equals(clazz); } @Override public void validate(Object target, Errors errors) { ValidationUtils.rejectIfEmptyOrWhitespace(errors, "title", "notempty", "Empty is not allowed"); } }ValidationUtils.rejectIfEmptyOrWhitespace(errors, "title", "notempty", "Empty is not allowed");title에 해당하는 변수가 비어있다면 오류가 발생.
-
java\me\jinmin\AppRunnerpackage me.jinmin; import org.springframework.boot.ApplicationArguments; import org.springframework.boot.ApplicationRunner; import org.springframework.stereotype.Component; import org.springframework.validation.BeanPropertyBindingResult; import org.springframework.validation.Errors; import java.util.Arrays; @Component public class AppRunner implements ApplicationRunner { @Override public void run(ApplicationArguments args) throws Exception { Event event = new Event(); //event.setTitle("event's Title"); //추가할시 false가 뜨고 이하 에러 코드는 발생하지 않는다. EventValidator eventValidator = new EventValidator(); Errors errors = new BeanPropertyBindingResult(event, "event"); //Spring MVC를 사용할때, Errors 인터페이스를 많이 볼 것이다. //But, 구현체(BeanPropertyBindingResult)는 Spring MVC가 자동으로 생성해서 파라미터에 Errors 타입을 전달한다. eventValidator.validate(event, errors); System.out.println(errors.hasErrors()); errors.getAllErrors().forEach(e -> { System.out.println("==== error code ===="); Arrays.stream(e.getCodes()).forEach(System.out::println); System.out.println(e.getDefaultMessage()); }); } }
-
ture: Event 클래스에 Title을 주지 않았기에 error가 있음. -
내가 추가한
errorCode인notempty외에 3가지가 추가되었다. -
Empty is not allowed와 같이 DefaultMessage도 추가. -
🎈
ValidationUtils를 사용하지 않고 직접 조건을 만들어errors를 구현할 수도 있다.-
\java\me\jinmin\EventValidatorpackage me.jinmin; import org.springframework.validation.Errors; import org.springframework.validation.ValidationUtils; import org.springframework.validation.Validator; public class EventValidator implements Validator { @Override public boolean supports(Class<?> clazz) { return Event.class.equals(clazz); } @Override public void validate(Object target, Errors errors) { //ValidationUtils.rejectIfEmptyOrWhitespace(errors, "title", "notempty", "Empty is not allowed"); Event event = (Event)target; if(event.getTitle() == null){ errors.rejectValue("title","notempty","Empty is not allowed"); } } }
-
-
-
-
-
위와 같이 원시적으로 코딩을 하지 말자! 스프링 부트 2.0.5 이상 버전을 사용할 때!
-
LocalValidatorFactoryBean을 빈으로 자동 등록 (→ 😁기존의 구현한EventValidator를 사용하지 않고)-
java\me\jinmin\Eventpackage me.jinmin; import javax.validation.constraints.*; public class Event { Integer id; @NotEmpty String title; @NotNull @Min(0) Integer limit; @Email String email; public Integer getId() { return id; } public void setId(Integer id) { this.id = id; } public String getTitle() { return title; } public void setTitle(String title) { this.title = title; } public Integer getLimit() { return limit; } public void setLimit(Integer limit) { this.limit = limit; } public String getEmail() { return email; } public void setEmail(String email) { this.email = email; } } -
java\me\jinmin\AppRunnerpackage me.jinmin; import org.springframework.beans.factory.annotation.Autowired; import org.springframework.boot.ApplicationArguments; import org.springframework.boot.ApplicationRunner; import org.springframework.stereotype.Component; import org.springframework.validation.BeanPropertyBindingResult; import org.springframework.validation.Errors; import org.springframework.validation.Validator; import java.util.Arrays; @Component public class AppRunner implements ApplicationRunner { @Autowired Validator validator; @Override public void run(ApplicationArguments args) throws Exception { System.out.println(validator.getClass()); Event event = new Event(); event.setLimit(-1); event.setEmail("aaa2"); Errors errors = new BeanPropertyBindingResult(event, "event"); validator.validate(event, errors); System.out.println(errors.hasErrors()); errors.getAllErrors().forEach(e -> { System.out.println("==== error code ===="); Arrays.stream(e.getCodes()).forEach(System.out::println); System.out.println(e.getDefaultMessage()); }); } } -
결과
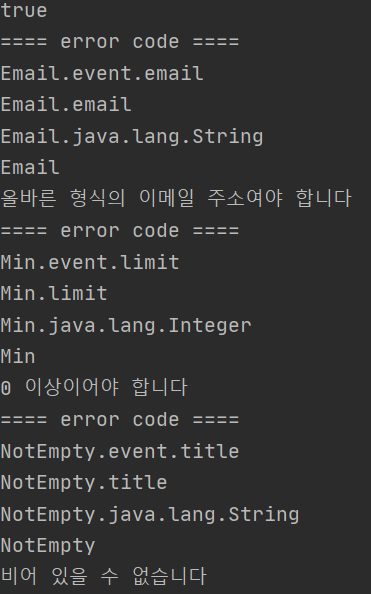
- Email, Min, NotEmpty에서 검증 오류가 확인된다.
- 🔔따라서, 간단한 검증은
@(Annotation)을 통해서 하자. 복잡한 검증의 Validator는EventValidator와 같이 구현하자.
-
-