네이티브 expo로 시작
-
display
기본적으로 flex 로 설정 -
expo는 교육용 - 처음 한 달 동안? 많이 쓰임
-
style 튜토리얼
expo 튜토리얼
리액트 네이티브
리액트 네이티브 컴포넌트 -
초기 세팅 (공식 문서 참조)
expo 공식 문서 -
터미널
template 선택할때 blank로!
jin@jin-17Z990-R-AAC9U1 ~ expo --version
3.22.3
jin@jin-17Z990-R-AAC9U1 ~ expo init rnPractice
? Choose a template: expo-template-blank
📦 Using npm to install packages. You can pass --yarn to use Yarn instead.
✔ Downloaded and extracted project files.
✔ Installed JavaScript dependencies.
✅ Your project is ready!
To run your project, navigate to the directory and run one of the following npm commands.
- cd rnPractice
- npm start # you can open iOS, Android, or web from here, or run them directly with the commands below.
- npm run android
- npm run ios # requires an iOS device or macOS for access to an iOS simulator
- npm run web
jin@jin-17Z990-R-AAC9U1 ~ cd rnPractice
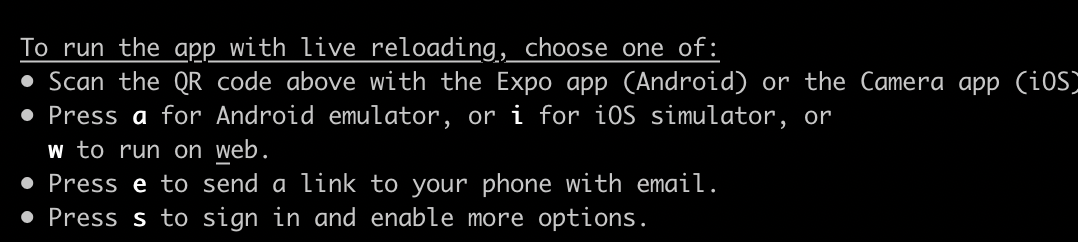
jin@jin-17Z990-R-AAC9U1 ~/rnPractice master expo start
Starting project at /home/jin/rnPractice
Expo DevTools is running at http://localhost:19002
Opening DevTools in the browser... (press shift-d to disable)
Starting Metro Bundler on port 19001.
exp://10.58.2.141:19000이렇게 뜨면 핸드폰으로 설치한 expo 앱으로 QR코드를 찍고 들어가면 된다!
expo start가 npm start

실습 코드
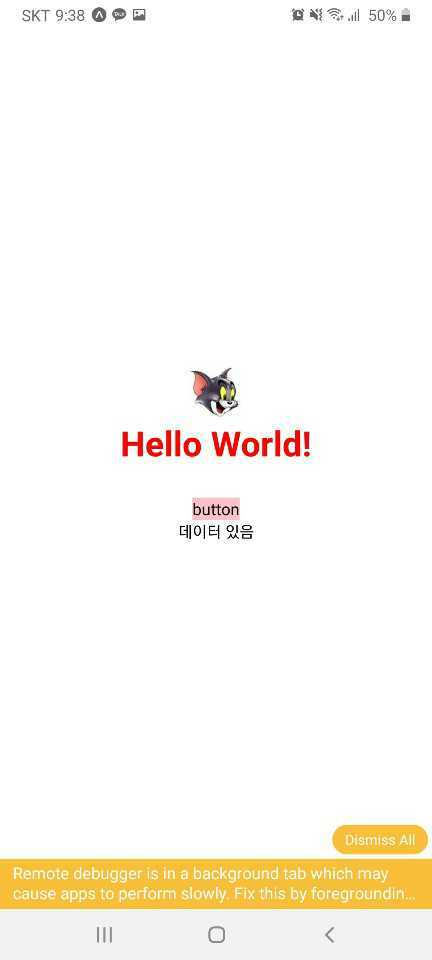
import { StatusBar } from 'expo-status-bar';
import React, { useState } from 'react';
import {
  StyleSheet,
  Text,
  View,
  Image,
  TouchableOpacity,
  Alert,
  ActivityIndicator,
} from 'react-native';

export default function App() {
  const [data, setData] = useState([]);
  const onPress = () => {
    console.log('onPress 눌러졌습니다');
    data.length > 0 ? setData([]) : setData([1]);
  };
  return (
    // rn에서 div는 view
    <View style={styles.container}>
      <Image
        source={require('./thumb-721.jpg')}
        style={{ width: 50, height: 50 }}
      />
      <Text style={{ color: 'red', fontSize: 30, fontWeight: '700' }}>
        Hello World!
      </Text>
      {/* text는 항상 Text태그 안에 */}
      <TouchableOpacity
        style={{ backgroundColor: 'pink', marginTop: 30, fontSize: 30 }}
        activeOpacity={1}
        onPress={onPress}
      >
        <Text>button</Text>
      </TouchableOpacity>
      {/* 로딩도는 동그라미 */}
      {data.length > 0 ? <Text>데이터 있음</Text> : <ActivityIndicator />}
      <StatusBar style='auto' />
    </View>
  );
}

// style을 줄 때
const styles = StyleSheet.create({
  container: {
    flex: 1, // height 100%
    backgroundColor: '#fff',
    alignItems: 'center',
    justifyContent: 'center',
  },
});

// 데이터 리스트 3가지 종류가 있는데
// scrollview는 한꺼번에 render해서 데이터가 한정적일때
// 페이지 네이션 flatlist
실습 코드 화면

android studio, xcode
- android studio, xcode 후 저 상태에서 i나 a 누르면 에뮬레이터, 시뮬레이터로 빌드 가능