이벤트란?
웹 브라우저가 알려주는 html요소의 이벤트의 발생을 의미한다.
자바스크립트는 이벤트에 반응하여 특정 동작을 수행할 수 있다.
자바스크립트를 비동기식 이벤트 중심의 프로그래밍 모델이라고한다
이벤트 리스너
이벤트가 발생했을때 그 처리를 담당하는 함수를 가르킨다 이벤트 핸들러라고 한다
지정된 타입의 이벤트가 특정 요소에서 발생하면, 웹 브라우저는 그 요소에 등록된 이벤트 리스너를 실행 시킨다.
메소드에 이벤트 리스너를 전달하는 방법
대상객체.addEventListener("이벤트명", 실행할 이벤트 리스너)
- 글자 위에 마우스를 올리면 배경색이 변경되는 예제
<!DOCTYPE html>
<html>
<head>
<meta charset="UTF-8">
<script>
	let p;
	function init() {// 문서가 완전히 로드되었을때 호출
		p = document.getElementById("p")
		//p라는 자바스크립트 변수에 p태그 요소 할당
		p.addEventListener("mouseover", over) // 이벤트 리스너 등록

		p.addEventListener("mouseout", out) //이벤트 리스너 등록

	}
	function over() {
		p.style.backgroundColor = "orchid";

	}
	function out() {
		p.style.backgroundColor = "white";
	}
</script>

</head>
<body onload="init()">
 <p id="p">마우스 올리면 orchid 색으로 변경</p>

</body>
</html>
위에서 over,out을 함수를 따로 설정했지만 익명함수를 통해서 설정하지 않고 사용할 수 있다.
- 익명함수를 사용한 예제
<!DOCTYPE html>
<html>
<head>
<meta charset="UTF-8">
<script>
	let p;
	function init() {// 문서가 완전히 로드되었을때 호출
		p = document.getElementById("p")
		//p라는 자바스크립트 변수에 p태그 요소 할당
		p.addEventListener("mouseover", function() {
			this.style.backgroundColor = "orchid";
		}) // 이벤트 리스너 등록

		p.addEventListener("mouseout", function() {
			this.style.backgroundColor = "white";
		}) //이벤트 리스너 등록

	}

</script>

</head>
<body onload="init()">
 <p id="p">마우스 올리면 orchid 색으로 변경</p>

</body>
</html>
위의 예제와 똑같이 작동한다
- confirm을 이용해서 페이지 이동
<!DOCTYPE html>
<html>
<head>
<meta charset="UTF-8">
<script>
	function query() {
		let ret = confirm("네이버로 이동 하시겠습니까?");
		//confirm은 예,아니오를 선택하는 창이 나온다

		return ret; // true나 false가 리턴된다

	}

	function noAction(e1){
		e1.preventDefault(); // 이벤트의 디폴트 행동 강제취소
	}

</script>

</head>
<body>
<a href="http://www.naver.com" onclick="return query()">네이버로 이동 </a>
<br>
<form>
 	<input type="checkbox">빵 (체크됨)<br>
 	<input type="checkbox" onclick="noAction(event)">술(체크안됨)

</form>

</body>
</html>

onclick 함수에도 return을 적어줘야한다 그렇지 않으면 취소를 눌러도 페이지 이동을 한다
마우스 이벤트
- 마우스를 이용한 이벤트 예제
<!DOCTYPE html>
<html>
<head>
<meta charset="UTF-8">
<script>
	let width=1; // 테두리 두께
	function down(obj) { //클릭한다면
		obj.style.fontStyle = "italic";
	}
	function up(obj){ // 클릭을뗐다면
		obj.style.fontStyle = "normal";
	}
	function over(obj) {  //마우스를 올려놨다면
		obj.style.borderColor = "violet";
	}
	function out(obj) { // 마우스를 밖으로 벗어난다면
		obj.style.borderColor = "lightgray";
	}
	function wheel(e, obj) { // e는 이벤트 객체, obj=span
		if(e.wheelDelta < 0) { // 휠을 아래로 굴릴 때
		width--; // 폭 1 감소
		if(width < 0) width = 0; // 폭이 0보다 작아지지 않게
		}
		else // 휠을 위로 굴릴 때
		width++; // 폭 1 증가
		obj.style.borderStyle = "ridge";
		obj.style.borderWidth = width+"px";
		}

</script>

</head>
<body>
<div>마우스 관련
 <span onmousedown="down(this)"
 onmouseup = "up(this)"
 onmouseover="over(this)"
 onmouseout="out(this)"
 onwheel="wheel(event,this)"
 style="display:inline-block">이벤트</span>가 발생합니다

</div>

</body>
</html>
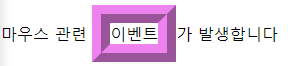
마우스를 클릭했을때는 글씨체가 변하고 마우스 휠을 돌리면 borderwidth가 늘어나고 스타일이 바뀐다 다시 반대로 돌리면 borderwidth가 작아진다
- 이미지 크기가 나타나는 예제
<!DOCTYPE html>
<html>
<head>
<meta charset="UTF-8">
<script src="https://code.jquery.com/jquery-3.6.0.js">
</script>
<script>
	function changeImage() {
		let sel = document.getElementById("sel");
		let img = document.getElementById("myImg");
		img.onload = function (){
			let mySpan = document.getElementById("mySpan")
			mySpan.innerHTML = img.width + "x" + img.height;

		}
		let index = sel.selectedIndex;
		img.src = sel.options[index].value;


	}
</script>

</style>

</head><body onload="changeImage()">
   <form>
   <select id="sel" onchange="changeImage()">
   		<option value="chaewon.jpg">이미지
   		<option value="chaewon1.jpg">이미지1

   </select>
   <span id="mySpan">이미지 크기</span>

   </form>
   <p><img id="myImg" src="chaewon,jpg" alt=","></p>
</body>
</html>
선택한 이미지의 크기가 나온다
- 라디오 버튼의 값 전달
<!DOCTYPE html>
<html>
<head>
<meta charset="UTF-8">
<script src="https://code.jquery.com/jquery-3.6.0.js">
</script>
<script>
	function findChecked(){
		let found = null;
		let kcity = document.getElementsByName("city");
		for(let i = 0; i<kcity.length; i++){
			if(kcity[i].checked == true)
				found = kcity[i];


		}
		if(found != null){
			alert(found.value + "이 선택되었음");
		}
		else{
			alert("선택된것이 없음")
		}
	}


</script>


</head><body>
   <form>
   	<input type="radio" name="city" value="서울" checked>서울
   	<input type="radio" name="city" value="busan">부산
   	<input type="radio" name="city" value="chunchen">춘천
   	<input type="button" value="find checked" onclick="findChecked()">


   </form>
</body>
</html>

city라는 이름의 라디오 버튼 요소들의 값을 넣을 kcity를 선언하고 for문을 이용해서 kcity의 checked가 true인값을 찾아서 found에 넣는다 alert를 이용해 found의 값을 출력한다
- 체크 박스 계산기
<!DOCTYPE html>
<html>
<head>
<meta charset="UTF-8">
<script src="https://code.jquery.com/jquery-3.6.0.js">
</script>
<script>
	let sum = 0;
	function calc(cBox){
		if(cBox.checked)
			sum += parseInt(cBox.value);
		else
			sum -= parseInt(cBox.value);

		document.getElementById("sumtext").value = sum;

	}
</script>


</head><body>
   <form>
   <input type="checkbox" name="hap" value="10000" onclick="calc(this)">모자 1만원
   <input type="checkbox" name="hap" value="30000" onclick="calc(this)">구두 3만원
   <input type="checkbox" name="hap" value="80000" onclick="calc(this)">명품가방 8만원<br>
   지불하실 금액 <input type="text" id="sumtext" value="0">


   </form>
</body>
</html>

- 체크박스를 선택하면 onClick이 실행되면서 calc(this)함수가 실행된다 여기서 디스는 value의 값이 들어간다
- if문으로 체크가 설정되어 있으면 sum 변수에 값이 합해지거나 빼지고 sumtext 텍스트 상자에 값이 들어간다
// setTimeout & clearTimeout
<!DOCTYPE html>
<html>
<head>
<meta charset="UTF-8">
<title>setTimeout()으로 웹 페이지 자동 연결</title>
</head>
<body>
<h3>이미지에 마우스를 올리고 5초간 그대로 있을 때 사이트로 이동합니다</h3>
<hr>
<img id="img" src="chaewon.jpg"
onmouseover="startTimer(5000)"
onmouseout="cancelTimer()">
<script>
let timerID=null;
function startTimer(time) {
// 타이머 시작, setTimeout(수행할 함수,밀리초)
timerID = setTimeout("load('http://www.naver.com')", time);
// 툴팁 메시지
document.getElementById("img").title = "타이머 작동 시작...";
}
function cancelTimer() {
if(timerID !=null)
clearTimeout(timerID); // 타이머 reset
}
function load(url) {
window.location = url; // 현재 윈도우에 url 사이트 로드
}
</script>
</body>
</html>
- 이미지위에 사진을 올려놓으면 settimeout메소드실행되서 url를 불러온다
- 이미지 밖으로 나가면 타이머가 reset된다
- 텍스트가 자동회전하는 메소드
<!DOCTYPE html>
<html>
<head>
<meta charset="UTF-8">
<script src="https://code.jquery.com/jquery-3.6.0.js">
</script>


</head><body>
  <div><span id="span" style="background-color:yellow">
  자동회전하는 텍스트 입니다
  </span></div>
  <script>
   let span = document.getElementById("span");
   let timerID = setInterval("doRotate()",200);
   // 200밀리초 주기로 dorotate()호출 구동된 메소드를 담고있다 함수형 변수
   span.onclick = function (e) {
	   clearInterval(timerID);
   }
   function doRotate(){
	   let str = span.innerHTML;
	   let firstChar = str.substr(0,1)//제일앞에 한글자 가져오기
	   let remains = str.substr(1, str.length-1); // 한글자 제외한 나머지 담기
	   str = remains + firstChar;
	   span.innerHTML = str;
   }

    </script>
</body>
</html>
- dorotate는 제일앞에 한글자를 가져오고 나머지 뒤에 글자에 붙이는 방식을 반복적으로 실행한다
- 글자를 클릭했을때는 타이머를 초기화한다
초보 개발자