https://www.cloudflare.com/ko-kr/products/cloudflare-stream/
스트리밍 소프트웨어.
- OBS(데스크탑으로 이용시)
2.Live Now (android) 어플(RTMP)
안드로이드 어플 Live Now를 열어서
RTMP를 클릭한 다음에
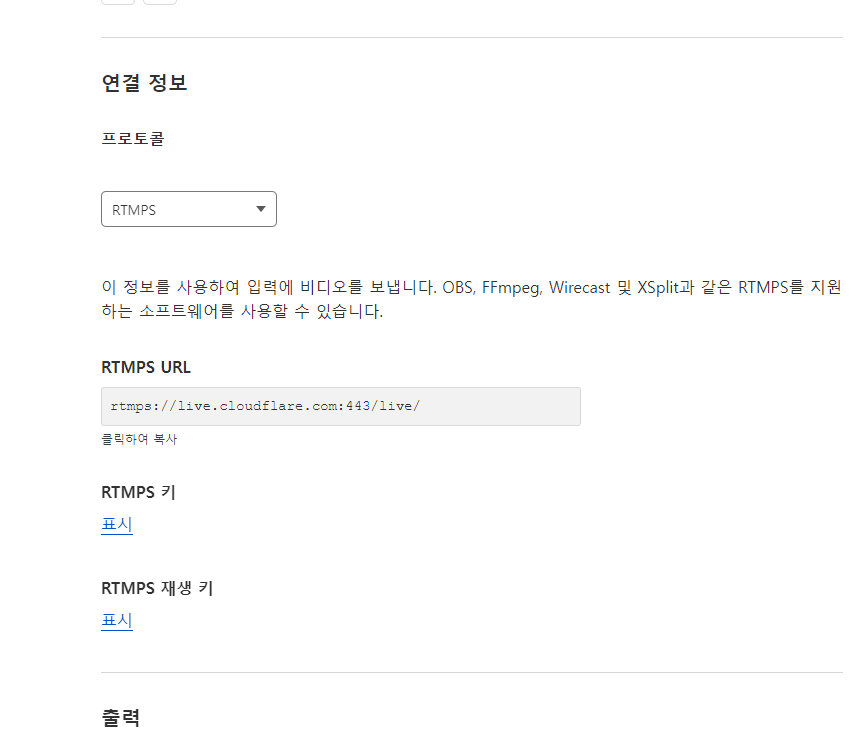
위에 나오는 RTMPS URL과
RTMPS 키를 입력하면
위의 화면에서 스트리밍이 시작됨.
근데, 30초정도 지연됨, 자연적으로 영상 만들어짐.(설정에서)
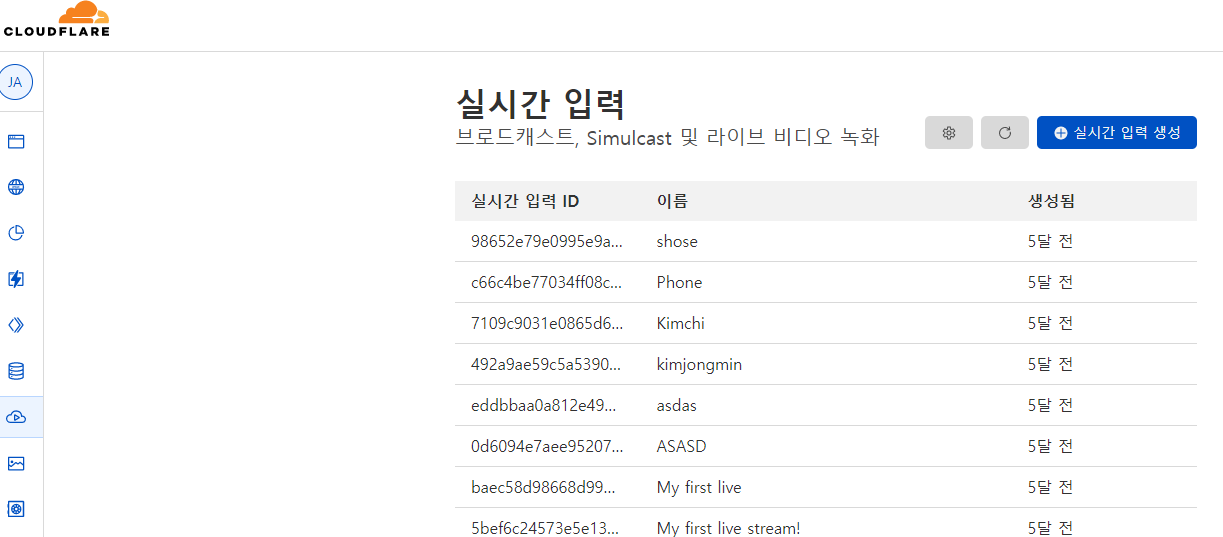
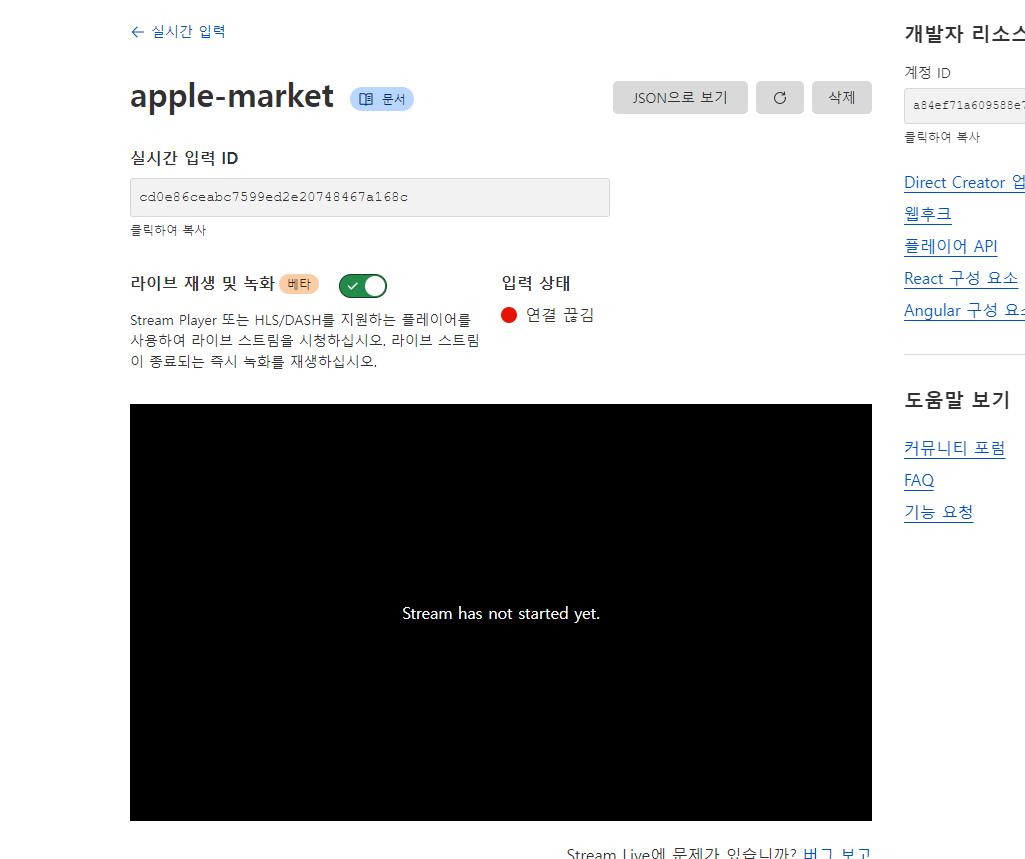
0. 실제로 apple-market에 연결해보기!!
https://developers.cloudflare.com/stream/stream-live/start-stream-live
https://dash.cloudflare.com/profile/api-tokens
여기로 가서 API token을 만든다.
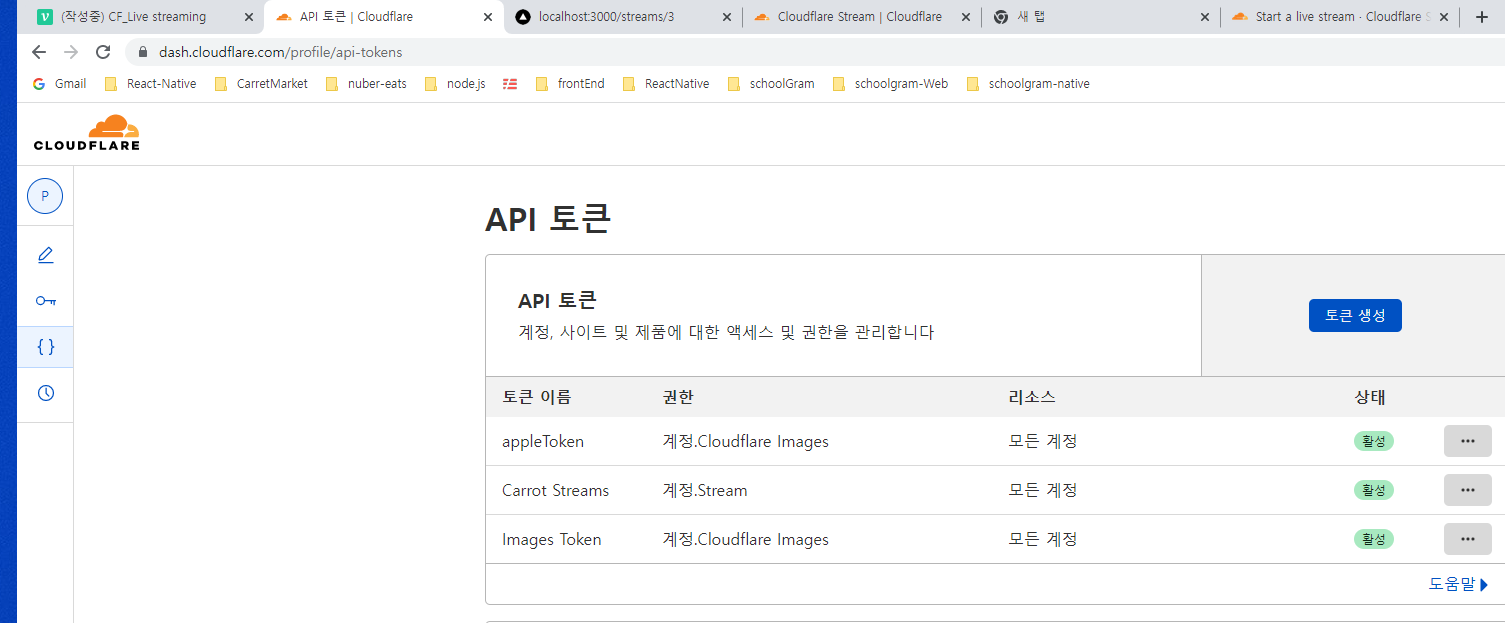

image Token과 다른 설정, 가운데를 Stream 으로할것!
Token이 만들어지면, copy해서 .env에 담아둔다.
https://developers.cloudflare.com/stream/viewing-videos/using-the-stream-player
비디오 플레이어 설정
1. schema.prisma
model Stream {
  id            Int       @id @default(autoincrement())
  createdAt     DateTime  @default(now())
  updatedAt     DateTime  @updatedAt
  name          String
  description   String    @db.MediumText
  price         Int
  user          User      @relation(fields: [userId], references: [id])
  userId        Int
  messages      Message[]
  cloudflareId  String    @default("aaaaa")
  cloudflareUrl String    @default("bbbbb")
  cloudflareKey String    @default("ccccc")
}
model schema에 cloudflareId, Url, Key를 만들어준다.
default값을 준 것은 미리 만들어진 Stream이 몇개 있어서 그렇다.
2. API_TOKEN 만들기
바로 위의 사진을 보고 API_TOKEN을 만들어서 .env에 넣기
https://developers.cloudflare.com/stream/stream-live/start-stream-live/
curl -X POST \ -H "Authorization: Bearer <API_TOKEN>" \https://api.cloudflare.com/client/v4/accounts/<ACCOUNT_ID>/stream/live_inputs --data '{"meta": {"name":"test stream 1"},"recording": { "mode": "automatic", "timeoutSeconds": 10, "requireSignedURLs": false, "allowedOrigins": ["*.example.com"] }}'
위 주소로 POST날림.
/api/streams/index.ts 에 구현할 예정
3. /pages/api/streams/index.ts
import withHandler, { ResponseType } from '@libs/server/withHandler'
import { NextApiRequest, NextApiResponse } from 'next'

import { withApiSession } from '@libs/server/withSession'
import client from '@libs/server/client'

async function handler(
  req: NextApiRequest,
  res: NextApiResponse<ResponseType>
) {
  const { user } = req.session
  const { name, price, description } = req.body

  if (req.method === 'POST') {
    const {
      result: {
        uid,
        rtmps: { streamKey, url },
      },
    } = await (
      await fetch(
        `https://api.cloudflare.com/client/v4/accounts/${process.env.CF_ID}/stream/live_inputs`,
        {
          method: 'POST',
          headers: {
            'Content-Type': 'application/json',
            Authorization: `Bearer ${process.env.STREAM_TOKEN}`,
          },
          body: `{"meta": {"name":"${name}"},"recording": { "mode": "automatic", "timeoutSeconds": 10}}`,
        }
      )
    ).json()
///위 주소로 fetch해서, result로 uid, rtmps:{streamKey, url}을 받아옴.
///그리고 아래에 model stream에 uid, streamKey, url을 보내줌.
///POST로 fetch해서 data(uid, streamKey, url)을 받아 오는것은
///위의 공식 Site가서 한번 더 확인 할 것!!!

    const stream = await client.stream.create({
      data: {
        cloudflareId: uid,
        cloudflareKey: streamKey,
        cloudflareUrl: url,
        name,
        price,
        description,
        user: {
          connect: {
            id: user?.id,
          },
        },
      },
    })
    res.json({ ok: true, stream })
  } else if (req.method === 'GET') {
    const streams = await client.stream.findMany({})
    res.json({ ok: true, streams })
  }
}

export default withApiSession(
  withHandler({
    methods: ['GET', 'POST'],
    handler,
  })
)
4. api/streams/[id]/index.tsx
스트리밍 디테일page에 uid, url, key를 보여줄 예정
당연히 방송을 만든 User에게
그리고 그 uid, url, key를 가지고 휴대폰의 Live Now로 방송할 수 있음.
stream Detail API
import withHandler, { ResponseType } from '@libs/server/withHandler'
import { NextApiRequest, NextApiResponse } from 'next'

import { withApiSession } from '@libs/server/withSession'
import client from '@libs/server/client'

async function handler(
  req: NextApiRequest,
  res: NextApiResponse<ResponseType>
) {
  const { id } = req.query
  const { user } = req.session
  const stream = await client.stream.findUnique({
    where: {
      id: Number(id),
    },
    select: {              ///일반 User에게는 url, uid를 공개하지 않고
                           ///ID만 공개한다..
      id: true,
      createdAt: true,
      updatedAt: true,
      name: true,
      description: true,
      price: true,
      userId: true,
      cloudflareId: true,
      messages: {
        select: {
          id: true,
          message: true,
          user: {
            select: {
              avatar: true,
              id: true,
            },
          },
        },
      },
    },
  })
  const isOwner = stream?.userId === user?.id  ///해당 stream을 만든 유저인지 확인

  const ownedStream = await client.stream.findUnique({
    where: {
      id: Number(id),  ///해당 Stream을 만든 User임이 확인되었다면,
                       ///stream의 모든 data를 가져오게 한다.
                       /// uid, Url, key 모두 포함되게!
    },
    include: {
      messages: {
        select: {
          id: true,
          message: true,
          user: {
            select: {
              avatar: true,
              id: true,
            },
          },
        },
      },
    },
  })
  res.json({ ok: true, stream: isOwner ? ownedStream : stream })
  ///Stream을 만든 유저가 맞으면, 모든 DATA를 보내주고,
  ///만든 User가 아니면, Url, Key 뺴고 Return해 준다.
}

export default withApiSession(
  withHandler({
    methods: ['GET'],
    handler,
  })
)
5. pages/streams/[id].tsx
return (
<Layout canGoBack>
<div className="py-10 px-4 space-y-4">
------------------------------------------------------
<div className="w-full rounded-md shadow-xl bg-slate-300 aspect-video">
///aspect-video안에 넣으면, 자동적으로 화면크기가 설정됨.
{data?.stream.cloudflareId ? (
<iframe
className="w-full aspect-video shadow-lg rounded-md"
src={`https://customer-w2elhfaba4eszvcm.cloudflarestream.com/${data?.stream.cloudflareId}/iframe`}
allow="accelerometer; gyroscope; autoplay; encrypted-media; picture-in-picture;"
allowFullScreen={true}
></iframe>
///ifram부분은 6번에 나오는 CF의 공식 문서에 따라 넣은 코딩.
///이걸로 Video Player설정됨.
) : null}
</div>
----------------------------------------------------
<div className="mt-5">
<h1 className="text-3xl font-bold border-b p-3 text-gray-900">
{data?.stream?.name}
</h1>
<span className="text-2xl block mt-3 text-gray-900">
{' '}
{data?.stream?.price}원
</span>
<p className=" my-6 text-gray-700">{data?.stream?.description}</p>
<div className="bg-orange-300 flex flex-col p-3 space-y-3 overflow-x-auto rounded-md">
<span>Stream Keys (secret)</span>
<span>
<span className="text-gray-600">URL : </span>
{data?.stream.cloudflareUrl}
</span>
<span>
<span className="text-gray-600">Key : </span>
{data?.stream.cloudflareKey}
</span>
</div>
/////Stream의 Url, key를 보여준다.
///그 Url과 key를 가지고 휴대폰의 Live Now를 가지고 Url와 Key를
///입력하여 Live방송을 시작한다.
</div>
<div className="mb-5">
<h2 className="text-2xl font-bold shadow-xl border-t- p-3 text-orange-500 ">
Live Chat!!
</h2>
<div
ref={boxRef}
className="py-28 pb-18 h-[50vh] overflow-y-scroll px-4 space-y-4"
>
{data?.stream?.messages.map((message) => (
<Message
key={message.id}
message={message.message}
reversed={message.user.id === user?.id}
/>
))}
</div>
<form
onSubmit={handleSubmit(onValid)}
className="fixed py-2 bg-white shadow-lg bottom-0 inset-x-0"
>
<div className="flex relative max-w-md items-center w-full mx-auto">
<input
{...register('message', { required: true })}
type="text"
className="shadow-sm rounded-full w-full border-gray-300 focus:ring-orange-500 focus:outline-none pr-12 focus:border-orange-500"
/>
<div className="absolute inset-y-0 flex py-1.5 pr-1.5 right-0">
<button className="flex focus:ring-2 focus:ring-offset-2 focus:ring-orange-500 items-center bg-orange-500 rounded-full px-3 hover:bg-orange-600 text-sm text-white">
→
</button>
</div>
</div>
</form>
</div>
</div>
</Layout>
)
}
export default Streams6. Video player && Thumnail
라이브방송이 끝나면 자동으로 비디오가 생성된다.
그 비디오의 thumnail을 자동적으로 만들어진게 한다.
thumnail은 해당 영상의 메인 화면.
6-1.Video Player
https://developers.cloudflare.com/stream/viewing-videos/using-the-stream-player/
공식 문서주소
위에서 같이 설명(5번에서)
6-2. Thumnail
https://developers.cloudflare.com/stream/edit-manage-videos/edit-videos/displaying-thumbnails/
6-3. pages/streams/index.tsx
import { Stream } from '@prisma/client'
import type { NextPage } from 'next'
import Image from 'next/image'
import Link from 'next/link'
import useSWR from 'swr'
import FloatingButton from '../../components/floating-button'
import Layout from '../../components/layout'

interface StreamResponse {
  ok: boolean
  streams: Stream[]
}

const Stream: NextPage = () => {
  const { data } = useSWR<StreamResponse>(`/api/streams`)
  console.log(data)
  return (
    <Layout hasTabBar title="라이브">
      <div className="py-10 divide-y-[1px] space-y-4">
        {data?.streams?.map((stream) => (
          <Link key={stream.id} href={`/streams/${stream.id}`}>
            <a className="pt-4 block px-4 border-b shadow-lg">
              <div className="w-full relative overflow-hidden rounded-md shadow-lg bg-slate-100 aspect-video">
                <Image
                  alt="asdasdasd"
                  width={200}
                  height={300}
                  src={`https://customer-m033z5x00ks6nunl.cloudflarestream.com/${stream.cloudflareId}/thumbnails/thumbnail.jpg?time=1s&height=270`}
                />
                ///src에 공식site에서 받아온 주소를 넣어주고 ${stream.cloudflareId}
                ///를 넣어준다.
                ///customer-m033z5x00ks6nunl.cloudflarestream.com은
                ///next.config.js에 domail으로 반드시 넣어준다.

              </div>
              <h1 className="text-2xl pb-5 mt-2 font-bold text-gray-900">
                {stream.name}
              </h1>
            </a>
          </Link>
        ))}
        <FloatingButton href="/streams/create">
          <svg
            className="w-6 h-6"
            fill="none"
            stroke="currentColor"
            viewBox="0 0 24 24"
            xmlns="http://www.w3.org/2000/svg"
          >
            <path
              strokeLinecap="round"
              strokeLinejoin="round"
              strokeWidth="2"
              d="M15 10l4.553-2.276A1 1 0 0121 8.618v6.764a1 1 0 01-1.447.894L15 14M5 18h8a2 2 0 002-2V8a2 2 0 00-2-2H5a2 2 0 00-2 2v8a2 2 0 002 2z"
            ></path>
          </svg>
        </FloatingButton>
      </div>
    </Layout>
  )
}
export default Stream
6-4. next.config.js
/** @type {import('next').NextConfig} */

module.exports = {
  reactStrictMode: true,
  images: {
    domains: ['imagedelivery.net', 'customer-m033z5x00ks6nunl.cloudflarestream.com'],
  },
}
NOTICE!!!!!
Stream은 상당히 어려운 부분이라서 마르고 닳도록 복습을 한다.
그리고 CF에는 VideoUplod등 상당히 좋은 것들이 많으니,
자주 접해본다.

Great insights on live streaming technology and its challenges! For anyone interested in building their own platform, here’s a helpful guide on how to create a video streaming site that covers all essential steps and best practices: create a video streaming site. It’s a solid resource to get started!