Github API를 활용해서 특정 키워드로 Github의 저장소들을 검색해 불러오는 안드로이드 앱을 구현할 예정이다.
Gradle을 이용한 의존성 프로젝트 추가
build.gradle (Module: app) 파일 dependencies 블록에 의존성 프로젝트를 추가하였다.
implementation 'com.github.bumptech.glide:glide:4.12.0'
annotationProcessor 'com.github.bumptech.glide:compiler:4.12.0'

implementation 'com.squareup.retrofit2:retrofit:2.9.0'
implementation 'com.squareup.retrofit2:converter-gson:2.9.0'
implementation 'com.squareup.okhttp3:logging-interceptor:3.12.5'
implementation 'com.google.code.gson:gson:2.8.6'

implementation 'io.reactivex.rxjava2:rxandroid:2.0.1'
implementation 'io.reactivex.rxjava3:rxjava:3.0.6'
implementation 'com.squareup.retrofit2:adapter-rxjava2:2.3.0'

implementation 'com.jakewharton:butterknife:10.2.3'
annotationProcessor 'com.jakewharton:butterknife-compiler:10.2.3'
AndroidManifest에 권한 설정 및 네트워크 통신 퍼미션 추가
Retrofit은 네트워크 통신 기능을 포함하고 있어 AndroidManifest.xml 파일에 네트워크 통신 퍼미션을 추가해준다.
<application
	...
</application>
	...
<uses-permission android:name="android.permission.INTERNET"/>
또한 API28 이후에서 Http에 접근하려면 cleartext HTTP를 활성화 시켜야 하기에 한 줄을 추가해준다.
<application
        ...
        ...
        android:usesCleartextTraffic="true">
API를 통해 받아올 model 정의_ GithubResponse.java
public class GithubResponse implements Serializable {
    @SerializedName("id")
    private int id;
    @SerializedName("full_name")
    private String fullName;

    @SerializedName("description")
    private String description;

    @SerializedName("owner")
    private Owner owner;

    ...
    // getter/setter 생략
}@SerializeName은 Annotation value에 해당하는 데이터를 변수에 바인딩한다.
여기까지의 자세한 내용은 이전 블로그에서 확인
데이터를 요청할 API 인터페이스 생성
public interface GithubApiService {
    @GET("/users/{username}/repos")
    Single<List<GithubResponse>> getGithubData(@Path("username") String username);
}
여기서 RxJava를 이용한다.
기존에 Call만 가능했던 코드를, RxJava를 이용하여 Observable, Flowable, Single, Maybe, Completable을 이용할 수 있게 된다.
값을 받아오는 GET의 경우 보통 Single을 이용하고, POST,DELETE,PUT의 경우 Completable을 이용합니다!
반드시는 아님!! 보통의 경우..
🖐🏻
Single은 Observable의 변형된 형태 🖐🏻
Observable과 비슷하지만, 여러 개의 데이터를 발행할 수 있는 Observable과 달리 Single은 한 개의 데이터(or 에러)만을 발행한다.
Single은 onSuccess, onError 2가지의 알림을 보낸다.
onSuccess: 데이터 하나를 발행함과 동시에 종료onError: 에러가 발생했음을 알림
Retrofit 객체 생성 | RetrofitApiManager.class
public static Retrofit GithubBuild() {
	Gson gson = new GsonBuilder()
				.setLenient()
				.create();

	if (retrofit == null) {
		retrofit = new Retrofit.Builder()
                    .baseUrl(Constant.GITHUB_URL)
                    .addConverterFactory(GsonConverterFactory.create(gson))
					.addCallAdapterFactory(RxJava2CallAdapterFactory.create())
                    .client(createOkHttpClient)
                    .build();
	}
	return retrofit;
}
addCallAdapterFactory(RxJava2CallAdapterFactory.create())
RxJava를 사용하기 위해 다음과 같이 addCallAdapterFactory에 RxJava2CallAdapterFactory.create()를 해주어 초기화를 시켜주었다.
RxJava Github 참고
addCallAdapterFactory(RxJava2CallAdapterFactory.create())
위의 코드는 Json 형태로 전달 받는 Response를 사용자가 정의해놓은 인자들에 매칭시키기 위한 Converter이다.
OkHTTP을 함께 사용하여 Retrofit의 로그 보기
public static OkHttpClient createOkHttpClient() {
	HttpLoggingInterceptor interceptor = new HttpLoggingInterceptor();
	interceptor.setLevel(HttpLoggingInterceptor.Level.BODY);
	OkHttpClient client = new OkHttpClient
                .Builder()
                .addInterceptor(interceptor)
                .readTimeout(10, TimeUnit.SECONDS)
                .connectTimeout(30, TimeUnit.SECONDS)
                .build();

	return client;
}HttpLoggingInterceptor을 생한 후 로그의 Level을 지정하고, 이를 OkHttpClient.Builder에 추가한다.
아래와 같은 로그를 확인할 수 있다.

사용하기 | MainActivity.class
mGithubApiService.getGithubData(username)
	.subscribeOn(Schedulers.io())
	.observeOn(AndroidSchedulers.mainThread())
	.subscribe(new SingleObserver<List<GithubResponse>>() {
    // method to implement
    }
subscribeOn 에서 백그라운드 쓰레드를 이용해 작업도록 만들어주며, 변경은 메인 쓰레드에서 할 수 있도록 한다.
통신 성공과 에러시에 작업을 분기해주고, compositeDisposable에 추가하여 마지막에 모두 구독을 취소해줄 수 있도록 합니다!
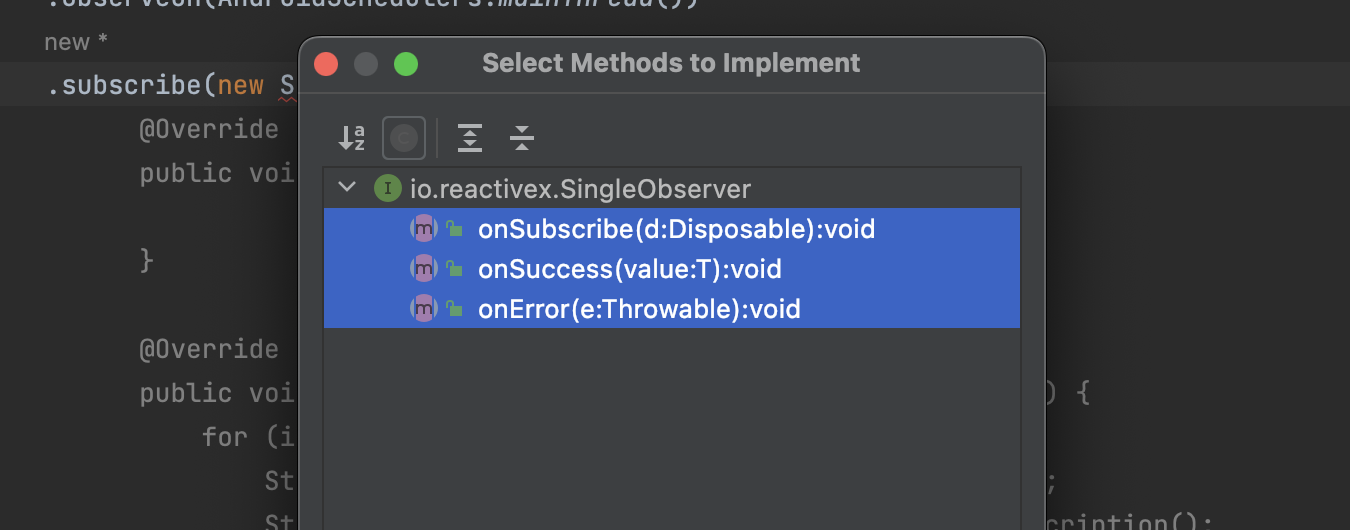
@Override
public void onSubscribe(Disposable d) { }

@Override
public void onSuccess(List<GithubResponse> githubResponses) {
	// githubResponses 사이즈 만틈 이름, 설명, 이미지 url을 받아오기
	for (int i = 0; i < githubResponses.size(); i++) {
		String name = githubResponses.get(i).getFullName();
		String description = githubResponses.get(i).getDescription();
		String url = githubResponses.get(i).getOwner().getAvatarUrl();

        	// description == null 이라면 '비어있음' 텍스트 삽입
			if (description == null) {
				description = getString(R.string.description_is_null);
			}

		repoList.add(new Repo(name, description, url));
	}

	if (repoList != null && !repoList.isEmpty()) {
		mGithubRepoAdapter = new GithubRepoAdapter(context, repoList, null);
		recyclerView.setAdapter(mGithubRepoAdapter);
		mGithubRepoAdapter.notifyDataSetChanged();
	} else {
		// 로그
	}
}

@Override
public void onError(Throwable e) {
	e.printStackTrace();
	if (Objects.equals(e.getCause(), IOError.class) || e.getCause() == null) {
		// 로그
	}
}
결과 확인

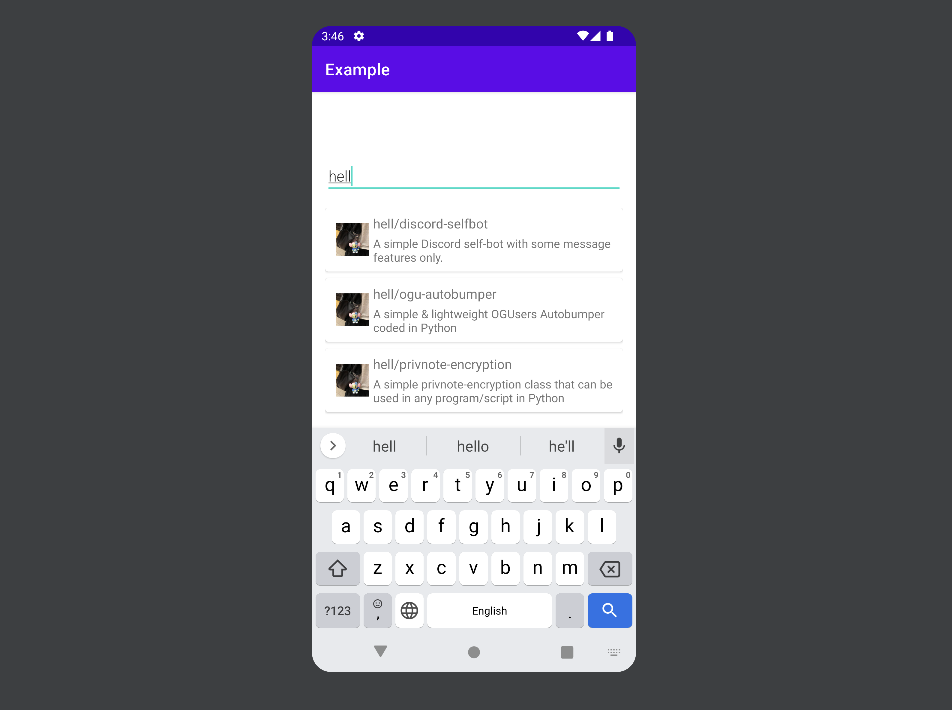
예상대로 Repository가 잘 넘어왔다!
잘 실행이 되지 않는다면 에러 코드를 통해 디버깅을 해보거나, Interceptor를 통해 에러 코드를 분기해줄 수도 있음.
