개요
아래의 내용은 java_grammer 레파지토리 C07ExceptionFileParsing 디렉터리에 저장되어있는 내용을 정리함
- C04Json
- C05HttpJsonParsing
JSON 파싱 → HttpClient 요청 → 객체 변환 워크플로우
JSON이란?
현대 데이터 교환 포맷. Map과 똑같은 key:value 구조.
{ "id": 1, "name": "hong1", "city": "seoul" }
[ {객체1}, {객체2} ] // 리스트 형태Parsing(역직렬화): JSON → Java 객체
직렬화: Java 객체 → JSON
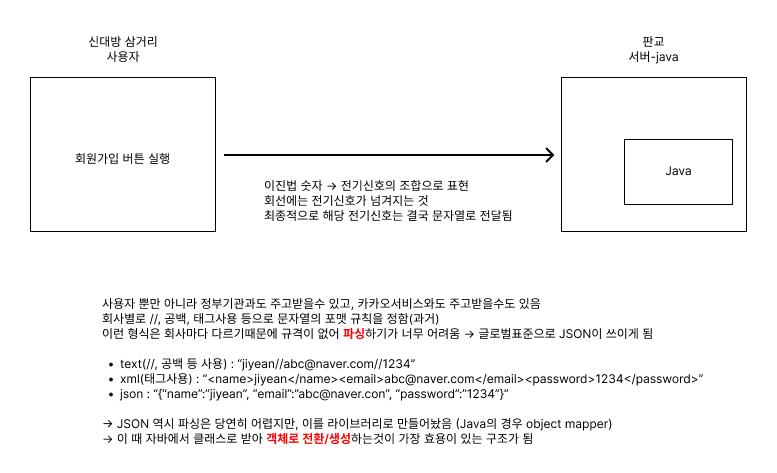
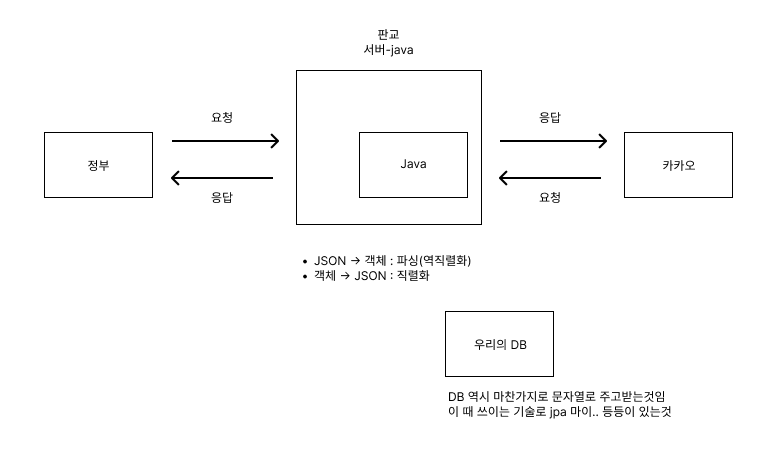
Jackson 라이브러리 - ObjectMapper
Spring엔 기본 내장, 순수 Java는 Maven/Gradle 의존성이나 직접 jar 추가가 필요하다.
라이브러리 설치
로컬 Java 프로젝트 기준으로, Jackson은 아래 3개를 한 세트로 깔아야 한다.
jackson-core: JSON 파서/생성기 (엔진)jackson-databind:ObjectMapper가 들어있는 핵심 모듈jackson-annotations:@JsonIgnore,@JsonProperty같은 애노테이션 모음
1) jar 직접 추가 (순수 Java 프로젝트)
Maven 프로젝트가 아니라면, 아래 링크에서 jar 파일을 다운받아서 lib 폴더 등에 넣고,
IDE(Project Structure)에서 라이브러리로 등록해주면 된다.
- Core: Jackson Core » 2.20.1
- Databind: Jackson Databind » 2.20.1
- Annotations: Jackson Annotations » 2.20
대부분 IDE에서는:
Project Structure→Modules→Dependencies탭 →+→JARs or directories...선택- 위에서 받은 3개 jar를 추가 → 적용
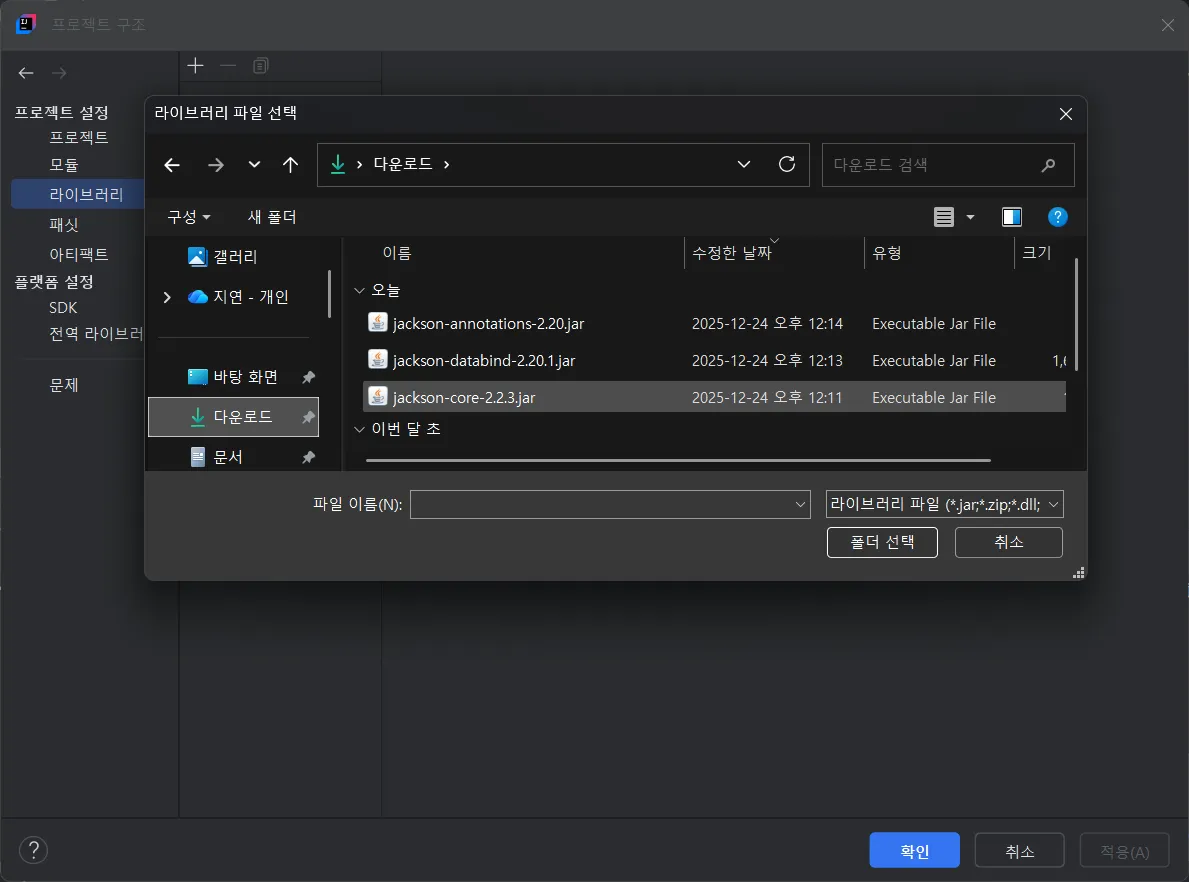
이렇게까지 해두면, 코드에서 바로:
import com.fasterxml.jackson.databind.ObjectMapper;

ObjectMapper mapper = new ObjectMapper();
처럼 ObjectMapper를 문제 없이 사용할 수 있다.
파일 JSON 파싱
1. 파일 읽기 - nio 패키지의 File 클래스 활용
Path filePath = Paths.get("myjson1.json");
String jsonString = Files.readString(filePath);
// {"id":1,"name":"hong1","classNumber":"1","city":"seoul"}
2. Map으로 파싱 (간단하지만 타입 분기 불가)
ObjectMapper o1 = new ObjectMapper();
Map<String, String> myMap = o1.readValue(jsonString, Map.class);
System.out.println(myMap.get("name")); // hong1 (숫자도 String으로 변환)
3. 클래스 객체로 파싱 (실무 표준)
Student myStudent = o1.readValue(jsonString, Student.class);
System.out.println(myStudent.getName()); // hong1
필수 조건: 기본생성자 + getter 메서드
Student 클래스 요구사항
class Student {
    private long id;           // 타입 일치 필수
    private String name;

    public Student() {}        // 기본생성자 필수
    public long getId() { ... } // getter 필수
}
리스트 JSON 파싱 (트리 방식)
JsonNode jsonNodes = o2.readTree(jsonString1); // 트리 구조로 변환
List<Student> studentList = new ArrayList<>();
for (JsonNode j : jsonNodes) {
    Student s = o2.readValue(j.toString(), Student.class);
    studentList.add(s);
}
빈번 케이스: 주문메뉴 리스트 [{"name":"돈까스","price":10000}, ...]
객체 → JSON 직렬화
Student s2 = new Student(4, "jiyean", "1", "gyung-gi");
String result = o2.writeValueAsString(s2);
// {"id":4,"name":"jiyean","classNumber":"1","city":"gyung-gi"}
HTTP 프로토콜과 통신 규약
HTTP(HyperText Transfer Protocol): 웹에서 데이터를 주고받는 표준 통신 규약
- 요청(Request): 클라이언트 → 서버 (GET, POST, PUT, DELETE 등)
- 응답(Response): 서버 → 클라이언트 (200 OK, 404 Not Found 등)
HTTP 요청 구조
GET /posts/1 HTTP/1.1          <- 요청라인 (메서드 + 경로 + 버전)
Host: jsonplaceholder.typicode.com  <- 헤더
Content-Type: application/json     <- 데이터 형식
                                    <- 빈줄
{"title": "foo", "body": "bar"}    <- 바디 (POST일 때)
HTTP 메서드
| 메서드 | 용도 | 특징 |
|---|---|---|
| GET | 데이터 조회 | 바디 없음, 캐싱 가능, idempotent(동일 결과) |
| POST | 데이터 생성 | 바디 있음, 캐싱 불가 |
| PUT | 데이터 전체 수정 | idempotent |
| DELETE | 데이터 삭제 | idempotent |
HTTP 응답 구조
HTTP/1.1 200 OK                 <- 상태라인
Content-Type: application/json  <- 헤더
Content-Length: 125             <- 데이터 길이

{"id":1,"title":"..."}          <- 바디 (JSON 데이터)
왜 HttpResponse<String>인가?
- 응답은 HTTP 문서 (Header + Body)
BodyHandlers.ofString()으로 Body만 String 추출
외부 API 요청 라이브러리
외부 API 요청을 하기 위한 라이브러리
- API 요청: 외부 서버에 데이터를 요청하는 행위
- HttpClient: Java 11+ 내장 클래스 (순수 Java 최적)
- RestTemplate: Spring Legacy (Spring Boot 1.x~2.x)
- RestClient: Spring Boot 3.x+ 최신 (RestTemplate 대체)
순수 Java → HttpClient
Spring → RestClient (권장)
HttpClient + JSON 실전
외부 API 요청
HttpClient client = HttpClient.newHttpClient();
HttpRequest request = HttpRequest.newBuilder()
    .uri(URI.create("https://jsonplaceholder.typicode.com/posts/1"))
    .GET().build();

HttpResponse<String> response = client.send(request, HttpResponse.BodyHandlers.ofString());
String data = response.body(); // JSON 문자열 추출
HttpResponse 구조
- Header: 메타데이터 (상태코드, Content-Type 등)
- Body: 실제 데이터 (JSON, XML, 텍스트)
Http 객체로 받는 이유 = Header와 Body 전체를 String으로 받아 개별적으로 파싱하기보다는 해당 객체로 받아서 파싱하기 위해서
파싱
ObjectMapper op = new ObjectMapper();
Post p1 = op.readValue(data, Post.class);
System.out.println(p1); // {userId=1, id=1, title=..., body=...}
리스트 파싱
// https://jsonplaceholder.typicode.com/posts (전체 리스트)
JsonNode jsonNodes2 = op2.readTree(data2);
List<Post> posts = new ArrayList<>();
for (JsonNode j : jsonNodes2) {
    posts.add(op2.readValue(j.toString(), Post.class));
}
Post 클래스 요구사항
class Post {
    private Long userId, id;
    private String title, body;

    public Post() {}  // 기본생성자
    // getter들...
}
실무 워크플로우
1. HttpClient 요청 → HttpResponse.body() (JSON 문자열)
2. ObjectMapper.readValue(json, Class.class) → 객체 변환
3. 리스트: readTree() → for문 + readValue()
4. 응답: writeValueAsString(객체) → JSON 문자열
정리
- Jackson ObjectMapper: JSON ↔ 객체 변환 핵심
- HttpClient: Java 내장 API 요청
- 클래스 요구사항: 기본생성자 + getter (reflection으로 private 접근)
- 실무:
readValue(json, Class.class)
프론트가 JSON 보내고 백엔드가 객체로 받는 게 표준