[Java] Thread 우선 순위, Daemon Thread, Thread 실행 제어, sleep(), interrupt(), yield(), join()
Java
목록 보기
11/20

4. start() & run()
- 실제 Thread가 수행해야 하는 코드는 run() method를 overriding해서 구현한다.
- 이 method를 우리가 직접 호출하는 게 아니라 start()라는 non-blocking method를 호출해서 Thread를 동작시킨다.
5. Thread의 우선 순위(priority)
- Thread에는 우선 순위라는 게 있다. 기본적으로 5라는 값을 가진다.
- 1부터 10까지 범위 내에서 값을 설정해서 사용한다.
- main thread는 우선 순위 5를 가진다.
- Thread의 우선순위는 자기를 만든 Thread의 우선 순위를 물려 받아서 사용한다.
- 당연히 single core에서는 이 우선 순위가 Thread Scheduler에게 영향을 준다.
- 하지만 multi core에서는 이 값이 Thread 선택에 영향을 주지 않는다.
- 이 우선순위는 Thread가 일단 시작(start)하면 변경할 수 없다.
- Thread 객체 상태에서 변경할 수 있다.
package test;

public class ThreadPriorityTest {
    public static void main(String[] args) {

        // 추상 메소드를 가진 인터페이스이므로 객체를 생성할 수 없다.
        // 따라서 run() 메소드를 오버라이딩하면 쓸 수 있다.
        Thread t1 = new Thread(() -> {
            for(int i=0; i<10; i++) {
                System.out.println(Thread.currentThread().getName());
            }
        });
        t1.setPriority(1);

        Thread t2 = new Thread(() -> {
            for(int i=0; i<10; i++) {
                System.out.println(Thread.currentThread().getName());
            }
        });
        t2.setPriority(10);

        t1.start();
        t2.start();
    }
}
6. Daemon Thread(데몬 쓰레드)
- 우리가 사용하는 일반 Thread와는 다르게 보조적인 역할을 수행하는 Thread.
- JVM의 garbage collector, 워드 프로세서의 auto save 기능 같은 것을 생각하자.
- 일반 Thread가 모두 종료되면 당연히 Daemon Thread도 존재의 의미가 없어지기 때문에 같이 종료된다.
package test;

public class DaemonThreadTest implements Runnable {

    static boolean autuSave = false;
    public static void main(String[] args) {
        Thread t = new Thread(new DaemonThreadTest());
        t.setDaemon(true); // 내가 만든 Thread는 DaemaonThread로 사용할 것이다.

        t.start(); // 언젠가는 이 Thread가 동작하게 될 것이다.

        for (int i=0; i<10; i++) {
            try {
                Thread.sleep(1000);
            } catch (Exception e) {

            }
            System.out.println("i의 값은: "+ i);
            if (i==5) {
                autuSave = true;
            }
        }

    }

    @Override
    public void run() {
        while (true) {

            try {
                Thread.sleep(3000); // 3초가 지나면 or 중간에 누군가 방해하면 Interrupt를 걸면 깬다.
            } catch (Exception e) {
                System.out.println("오류 발생");
            }

            if (autuSave) { // 3초 중지 -> 자동 저장 -> 3초 중지 -> 자동 저장
                System.out.println("자동 저장");
            }

        }
    }
}
7. Thread의 실행 제어
- 원래 Thread의 상태를 제어하는 쉬운 method가 있었다.
- stop(), suspend(), resume() 이다.
- 하지만 이런 method는 사용하기 편하지만 코드를 잘못 작성하면 dead-lock에 빠질 확률이 많다.
- 따라서 이 method들은
deprecated되었다. - 대신 실행 제어를 위한 다른 method를 제공한다.
7.1 sleep()
- sleep은 지정된 시간 동안 Thread를 멈추는 역할을 수행한다.
- sleep()에 의해서 일시 정지된 Thread는 지정된 시간이 다 되거나 혹은 interrupt()라는 method가 호출되면 이때 Exception이 발생하면서 잠에서 깬다.
- 따라서 예외 처리(try~catch) 구문이 강제로 사용된다.
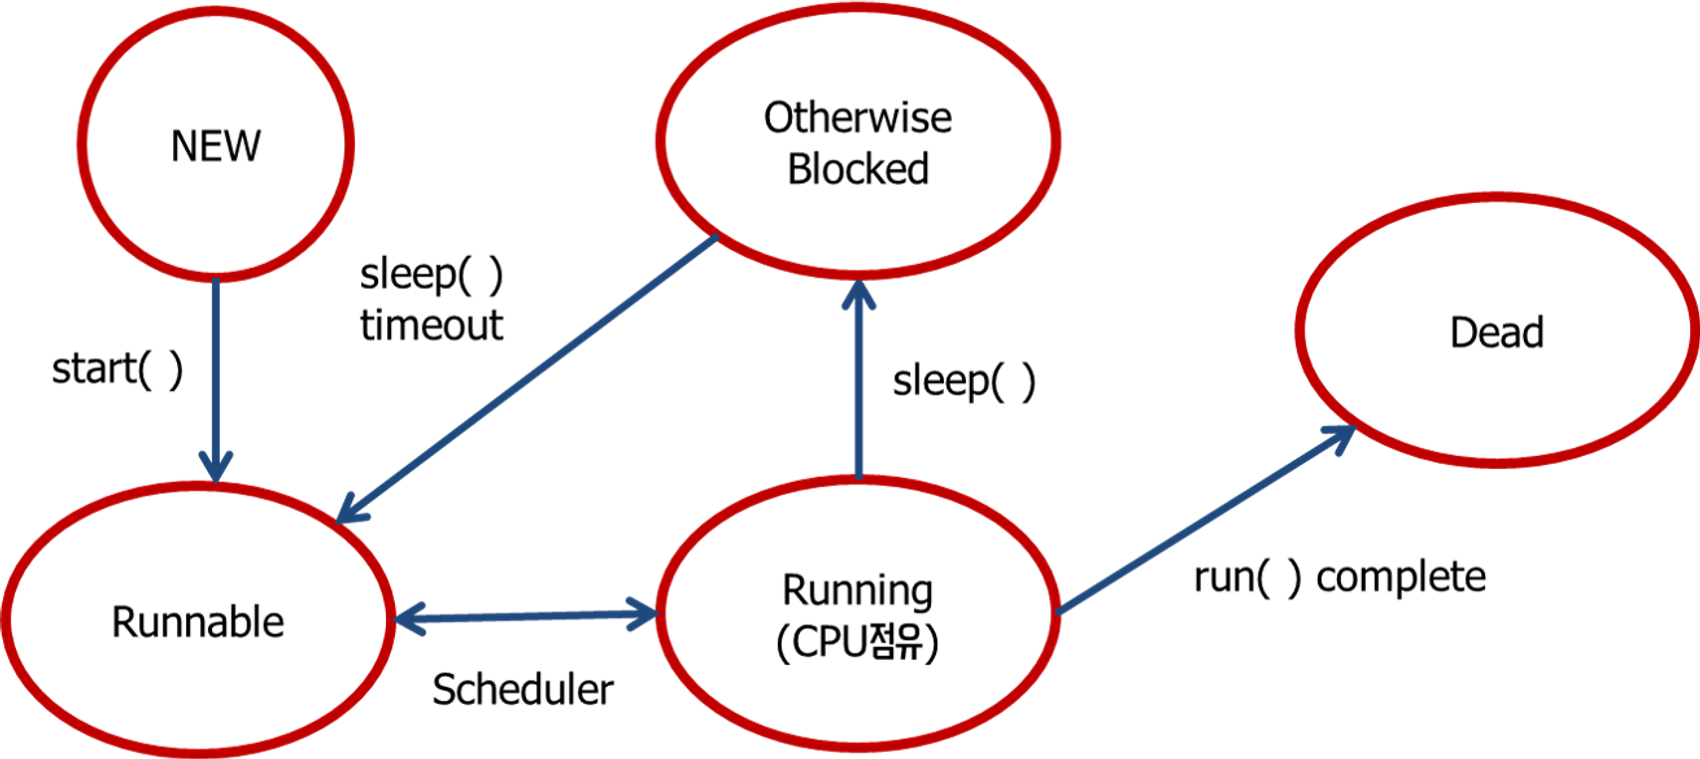
- 다음과 같은 Thread의 상태 전이가 일어난다.
package test;

class Sleep_1 extends Thread {
    @Override
    public void run() {
        try {
            Thread.sleep(2000);
        } catch (Exception e) { }

        for (int i=0; i<300; i++) {
            System.out.print("-");
        }
        System.out.println("<<Thread 1 종료>>");
    }
}

class Sleep_2 extends Thread {
    @Override
    public void run() {
        for (int i=0; i<300; i++) {
            System.out.print("|");
        }
        System.out.println("<<Thread 2 종료>>");
    }
}

public class ThreadSleepTest {
    public static void main(String[] args) {
        Thread t1 = new Sleep_1();
        Thread t2 = new Sleep_2();

        t1.start();
        t2.start();

        try {
            // t1.sleep(2000); 이렇게는 사용하지 않는다.
            // t1을 지정해서 sleep 시킬 수 없다.
            Thread.sleep(2000); // main thread가 자게 된다.
            // sleep은 static method이고 현재 Thread를 sleep 시키는 method이다.
            // t1을 재우려면 t1의 run에 sleep이 있어야 한다.
        } catch (Exception e) { }

        System.out.println("<< main thread 종료 >>");
    }
}
7.2 interrupt(), interrupted(), isInterrupted()
- 진행 중인 Thread를 작업이 다 끝나기 전에(run method의 수행이 끝나기 전에) 실행을 중지 시켜야 할 때도 있다.
- 예제에는 이 작업을 stop() method로 해결했다. 하지만 이제는 이렇게 못한다.
- 따라서 interrupt()라는 method를 대신 제공해서 이 작업을 수행할 수 있도록 해준다.
- 그런데 한 가지 주의해야 할 점이 있다.
- interrupt()는 Thread에게 작업을 중지하라고 요청하는 것이며, stop()처럼 강제로 중지 시키지 않는다.
- interrupt() method는 Thread가 내부적으로 가지고 있는 interrupted state를 변경하는 역할을 수행한다.
- interrupted(), isInterrupted() 이 2개의 method는 Thread가 내부적으로 가지고 있는 interrupted state 값을 알아오는 것이다.
- 만약, 해당 Thread가
interrupt()가 호출되었으면 true가 리턴 되며, 그렇지 않으면 false가 리턴 된다. - 한 가지 조심할 점은
interrupted()이 method는 static으로 지정되어 있다.- 현재 수행 중인 Thread의 interrupted state를 알려준다.
- 그 상태를 알려준 다음에 무조건 값을 false로 변경한다.
- 반면,
isInterrupted()는 아주 심플하다.- instance method이다.
- 해당 Thread의 interrupted state를 알려주고 아무 일도 하지 않는다.
- 즉, 값을 변경하지 않는다.
- sleep()에 의해서 해당 Thread가 일시 정지 되어 있을 때 해당 Thread에 interrupt()를 호출해서 Interrupt Exception 발생하게 하고 해당 Thread를 Runnable 상태로 변경해준다.
package test;

import javax.swing.*;

class MyThread_3 extends Thread {
    @Override
    public void run() {
        int i = 10;

        // isInterrupted() -> interrupt면 true, 아니면 false 반환
        while (i != 0 && !isInterrupted()) { // interrupt도 아니고 i가 10이면
            System.out.println(i--);
            for (long k=0; k<25000000000L; k++); // 시간 지연
        }
        System.out.println("카운트가 종료되었습니다.");
    }
}

public class ThreadInterruptTest {
    public static void main(String[] args) {
        Thread t = new MyThread_3();
        t.start();

        // 약간의 시간 지연을 위해 Swing을 이용한다.
        // swing에서 값을 입력하면 바로 while 문이 끝난다.
        String input = JOptionPane.showInputDialog("값을 입력하세요!");
        System.out.println("입력된 값은 " + input + " 입니다.");

        t.interrupt(); // isInterrupted() 메소드에 의해 while 문을 탈출한다.
    }
}- 위 코드는 잘 동작하긴 하지만, 사용하면 안 되는 코드가 들어있다.
- sleep을 이용해서 해결하여 코드를 다시 써보자.
- 한 가지 기억해야 하는 것은 sleep() 도중에 interrupt()가 호출되면 InterruptedException이 발생한다.
- 즉, catch문이 수행된다.
- 이 다음에 내부적으로 해당 Thread의 interrupted state가 false로 자동 초기화된다.
- 그래서 다시 interrupt()를 설정해야 한다.
package test;
import javax.swing.*;
class MyThread_3 extends Thread {
@Override
public void run() {
int i = 10;
// isInterrupted() -> interrupt면 true, 아니면 false 반환
while (i != 0 && !isInterrupted()) { // interrupt도 아니고 i가 10이면
System.out.println(i--);
try {
Thread.sleep(4000); // 4초 자고 깨서 다시 while문 반복
// sleep에서 깨면서 내부적으로 interrupt가 false가 된다.
} catch (Exception e) { // Exception 발생하면 바로 while문으로 가며 interrupt가 발생하면서 while문이 끝난다.
interrupt();
}
}
System.out.println("카운트가 종료되었습니다.");
}
}
public class ThreadInterruptTest {
public static void main(String[] args) {
Thread t = new MyThread_3();
t.start();
// 약간의 시간 지연을 위해 Swing을 이용한다.
// swing에서 값을 입력하면 바로 while 문이 끝난다.
// 즉, swing에서 값을 입력하면 interrupt가 발생한다.
String input = JOptionPane.showInputDialog("값을 입력하세요!");
System.out.println("입력된 값은 " + input + " 입니다.");
t.interrupt(); // isInterrupted() 메소드에 의해 while 문을 탈출한다.
}
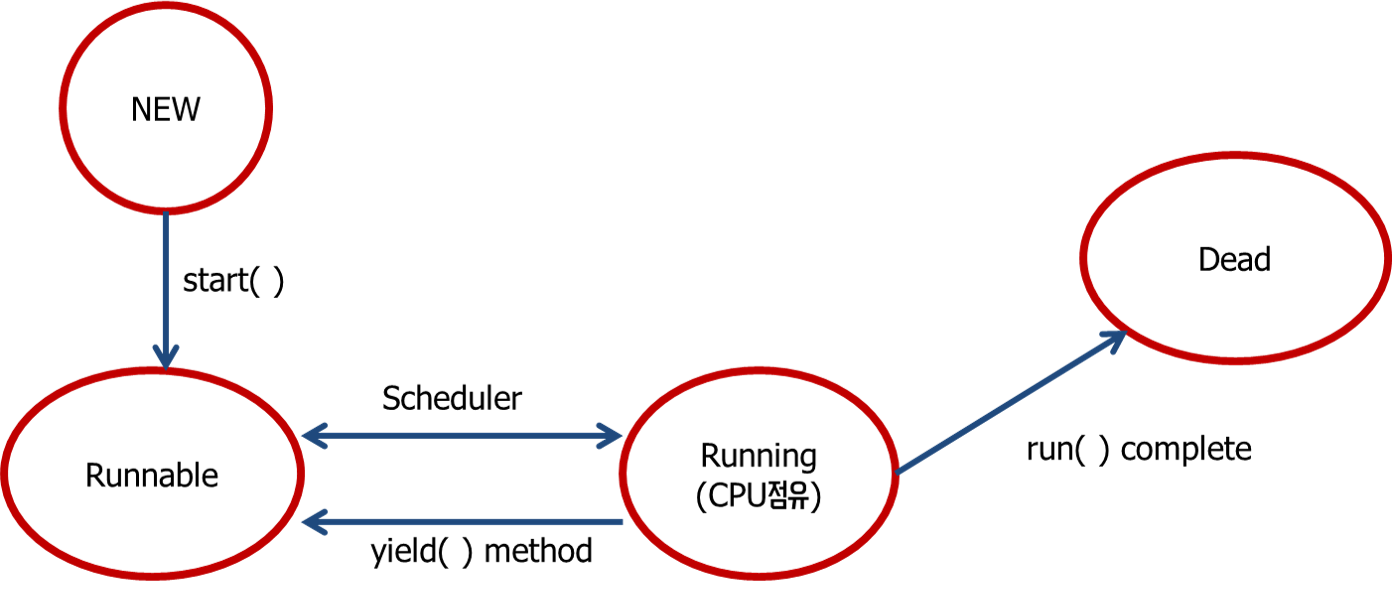
}7.3 yield()
- yield() method는 Thread 자신에게 주어진 실행 시간을 다음 차례의 Thread에게 양보하는 method이다.
- 프로그램의 응답 시간을 줄이기 위해 사용한다.
- 일반적으로 응답성을 높이는 목적으로 사용된다.
- 만약, yield()가 호출되면 자신은 Runnable 상태로 다시 들어가게 된다.
- deprecated 된 suspend(), resume(), stop()을 한번 이용해 보자.
package test;

class MyRunnable_4 implements Runnable {
    @Override
    public void run() {
        while (true) {
            System.out.println(Thread.currentThread().getName()); // 현재 Thread
            try {
                Thread.sleep(1000);
            } catch (Exception e) {

            }
        }
    }
}

public class ThreadYieldTest {
    public static void main(String[] args) {
        // Runnable 객체
        MyRunnable_4 r = new MyRunnable_4();

        Thread t1 = new Thread(r, "*"); // Thread 이름 지정
        Thread t2 = new Thread(r, "**"); // Thread 이름 지정
        Thread t3 = new Thread(r, "***"); // Thread 이름 지정

        t1.start();
        t2.start();
        t3.start();

        try {
            Thread.sleep(2000); // main thread가 sleep
            t1.suspend(); // t1을 일시 중지
            Thread.sleep(2000); // main thread가 sleep
            t2.suspend(); // t2을 일시 중지
            Thread.sleep(3000); // main thread가 sleep
            t1.resume();
            Thread.sleep(3000); // main thread가 sleep
            t1.stop();
            t2.stop();
            Thread.sleep(2000); // main thread가 sleep
            t3.stop();
        } catch (Exception e) {

        }
    }
}- 위의 코드를 변수와 로직을 이용해서 똑같이 구현해 보자.
package test;

class MyRunnable_4 implements Runnable {

    // 인스턴스 variable이므로 Thread가 이것을 공유할 수 없다.
    // 객체를 만들어서 각각 Thread와 맵핑한다.
    volatile boolean suspended = false;
    volatile boolean stoped = false;

    private Thread t;

    public void setThread(Thread t) {
        this.t = t;
    }

    @Override
    public void run() {

        while (!stoped) {
            if (!suspended) {
                System.out.println(Thread.currentThread().getName());
                try {
                    Thread.sleep(1000);
                } catch (Exception e) {

                }
            } else {
                Thread.yield();
            }
        }
    }

    public void suspend() {
        suspended = true;
        // thread에 대해서 interrupt 걸면 된다.
        // thread에 대한 reference가 있어야 한다.
        t.interrupt();
    }

    public void resume() {
        suspended = false;
    }

    public void stop() {
        stoped = true;
    }
}

public class ThreadYieldTest {
    public static void main(String[] args) {
        // Runnable 객체
        MyRunnable_4 r1 = new MyRunnable_4();
        MyRunnable_4 r2 = new MyRunnable_4();
        MyRunnable_4 r3 = new MyRunnable_4();

        Thread t1 = new Thread(r1, "*"); // Thread 이름 지정
        Thread t2 = new Thread(r2, "**"); // Thread 이름 지정
        Thread t3 = new Thread(r3, "***"); // Thread 이름 지정

        r1.setThread(t1);
        r2.setThread(t2);
        r3.setThread(t3);

        t1.start();
        t2.start();
        t3.start();

        try {
            Thread.sleep(2000); // main thread가 sleep
            r1.suspend(); // t1을 일시 중지
            Thread.sleep(2000); // main thread가 sleep
            r2.suspend(); // t2을 일시 중지
            Thread.sleep(3000); // main thread가 sleep
            r1.resume();
            Thread.sleep(3000); // main thread가 sleep
            r1.stop();
            r2.stop();
            Thread.sleep(2000); // main thread가 sleep
            r3.stop();
        } catch (Exception e) {

        }
    }
}
7.4 join()
- Thread가 자신이 하던 작업을 잠시 멈추고 다른 Thread를 지정된 시간 혹은 해당 Thread가 일을 다 마칠 때까지 Thread의 실행 시간을 확보하는 method
- join()도 sleep()처럼 interrupt()에 의해서 대기 상태에서 벗어날 수 있다. try-cath 구문을 이용해야 한다.
- 기억해야 하는 점 중 하나는 sleep()은 static method이다. joint은 특정 Thread를 지칭해야 하기 때문에 static이 아니다.
package test;

class MyThread_8 extends Thread {
    @Override
    public void run() {
        for(int i=0; i<100; i++) {
            System.out.println("-");
        }
    }
}

class MyThread_9 extends Thread {
    @Override
    public void run() {
        for(int i=0; i<100; i++) {
            System.out.println("|");
        }
    }
}

public class ThreadJoinTest {
    public static void main(String[] args) {
        MyThread_8 t1 = new MyThread_8();
        MyThread_9 t2 = new MyThread_9();

        t1.start();
        t2.start();

        try {
            t1.join(); // t1을 참여시키고, main thread를 일시 정지 시키고(대기), t1이 끝나면 main이 다시 실행
            t2.join();
        } catch (Exception e) {

        } // t1, t2 중 누가 어떻게 먼저 끝날지는 모르지만 적어도 main이 가장 늦게 끝날 것이다.
    }
}
안녕하세요 :)