1일차: Pages Router vs App Router + useState 배치 업데이트 완전 분석
🎯 학습 목표
- Next.js의 두 라우팅 시스템 차이점 완전 이해
- React useState의 배치 업데이트 메커니즘 마스터
- 실무에서 어떤 라우터를 선택해야 하는지 판단 능력 습득
📚 Part 1: Pages Router vs App Router 심화 분석
1.1 Pages Router (Legacy, ~Next.js 12)
파일 구조:
pages/
├── index.js          // '/' 경로
├── about.js          // '/about' 경로
├── blog/
│   ├── index.js      // '/blog' 경로
│   └── [slug].js     // '/blog/동적경로' 경로
├── _app.js           // 전역 App 컴포넌트
├── _document.js      // HTML 구조 커스터마이징
└── api/
    └── hello.js      // API 라우트
특징:
- 단순하고 직관적 - 파일 = 페이지
- getServerSideProps, getStaticProps 사용
- 클라이언트 사이드 렌더링 기본
- 전역 레이아웃은 _app.js에서만 관리
// pages/blog/[slug].js
export default function BlogPost({ post }) {
  return (
    <article>
      <h1>{post.title}</h1>
      <p>{post.content}</p>
    </article>
  )
}

export async function getServerSideProps({ params }) {
  const post = await fetchPost(params.slug)
  return {
    props: { post }
  }
}
1.2 App Router (Next.js 13+, 권장)
파일 구조:
app/
├── layout.js         // 루트 레이아웃
├── page.js           // '/' 경로
├── loading.js        // 로딩 UI
├── error.js          // 에러 UI
├── not-found.js      // 404 페이지
├── about/
│   └── page.js       // '/about' 경로
├── blog/
│   ├── layout.js     // 블로그 섹션 레이아웃
│   ├── page.js       // '/blog' 경로
│   └── [slug]/
│       ├── page.js   // '/blog/동적경로' 경로
│       └── loading.js // 해당 페이지 로딩 UI
└── api/
    └── hello/
        └── route.js  // API 라우트
혁신적인 특징:
1) 서버 컴포넌트가 기본
// app/blog/page.js - 서버 컴포넌트 (기본)
async function BlogPage() {
  // 서버에서 직접 데이터 페칭
  const posts = await fetch('https://api.example.com/posts')

  return (
    <div>
      {posts.map(post => (
        <article key={post.id}>
          <h2>{post.title}</h2>
        </article>
      ))}
    </div>
  )
}

export default BlogPage
2) 중첩 레이아웃 시스템
// app/layout.js (루트 레이아웃)
export default function RootLayout({ children }) {
  return (
    <html lang="ko">
      <body>
        <nav>전역 네비게이션</nav>
        {children}
        <footer>전역 푸터</footer>
      </body>
    </html>
  )
}

// app/blog/layout.js (블로그 섹션 레이아웃)
export default function BlogLayout({ children }) {
  return (
    <div className="blog-container">
      <aside>블로그 사이드바</aside>
      <main>{children}</main>
    </div>
  )
}
3) 스트리밍과 Suspense
// app/dashboard/page.js
import { Suspense } from 'react'

async function SlowComponent() {
  await new Promise(resolve => setTimeout(resolve, 3000))
  return <div>느린 컴포넌트 로드 완료!</div>
}

export default function Dashboard() {
  return (
    <div>
      <h1>대시보드</h1>
      <Suspense fallback={<div>로딩 중...</div>}>
        <SlowComponent />
      </Suspense>
    </div>
  )
}
1.3 실무 선택 가이드
| 상황 | 권장 라우터 | 이유 |
|---|---|---|
| 새 프로젝트 | App Router | 최신 기술, 더 나은 성능, React 18 기능 활용 |
| 기존 프로젝트 마이그레이션 | 단계적 접근 | 점진적으로 App Router로 이전 |
| 단순한 정적 사이트 | Pages Router | 러닝 커브 낮음, 충분한 기능 |
| 복잡한 대화형 앱 | App Router | 서버 컴포넌트, 스트리밍 등 고급 기능 |
📚 Part 2: useState 배치 업데이트 완전 분석
📚 배치(Batch)가 뭘까요?배치 = 묶음, 일괄 처리쉬운 예시:
배치 아님: 편지 1장씩 개별 배송 📮📮📮
배치: 편지 3장을 한 번에 묶어서 배송 📦
React에서 배치 업데이트:
배치 아님: setState 3번 → 렌더링 3번 😵
배치: setState 3번 → 렌더링 1번 😊
2.1 배치 업데이트란?
React 18 이전에는 이벤트 핸들러 내에서만 상태 업데이트를 배치 처리했습니다.(setTimeout, Promise 안에서는 한번에 처리가 안됌.)
React 18부터는 모든 상황에서 자동 배치 처리됩니다.
2.2 React 17 vs React 18 동작 차이
function Counter() {
  const [count, setCount] = useState(0)
  const [flag, setFlag] = useState(false)

  console.log('렌더링 발생:', count, flag)

  // React 17: 이벤트 핸들러에서만 배치 처리
  const handleClick = () => {
    setCount(c => c + 1)  // 배치 처리 ✅
    setFlag(f => !f)      // 배치 처리 ✅
    // 한 번만 리렌더링
  }

  // React 17: setTimeout에서는 배치 처리 안됨
  const handleTimeout = () => {
    setTimeout(() => {
      setCount(c => c + 1)  // 리렌더링 1회
      setFlag(f => !f)      // 리렌더링 2회 (총 2번 렌더링)
    }, 1000)
  }

  // React 18: 모든 곳에서 배치 처리!
  const handleTimeoutV18 = () => {
    setTimeout(() => {
      setCount(c => c + 1)  // 배치 처리 ✅
      setFlag(f => !f)      // 배치 처리 ✅
      // 한 번만 리렌더링
    }, 1000)
  }

  return (
    <div>
      <p>Count: {count}</p>
      <p>Flag: {flag.toString()}</p>
      <button onClick={handleClick}>동기 업데이트</button>
      <button onClick={handleTimeout}>비동기 업데이트 (17)</button>
      <button onClick={handleTimeoutV18}>비동기 업데이트 (18)</button>
    </div>
  )
}
2.3 실무에서 중요한 배치 업데이트 패턴
1) 폼 상태 관리
function UserForm() {
  const [formData, setFormData] = useState({
    name: '',
    email: '',
    age: ''
  })
  const [errors, setErrors] = useState({})
  const [isSubmitting, setIsSubmitting] = useState(false)

  const handleSubmit = async (e) => {
    e.preventDefault()

    // 이 모든 상태 업데이트가 배치 처리됨 ✅
    setErrors({})           // 에러 초기화
    setIsSubmitting(true)   // 로딩 상태

    try {
      await submitForm(formData)
      // 성공 처리도 배치됨
      setFormData({ name: '', email: '', age: '' })  // 폼 초기화
      setIsSubmitting(false)  // 로딩 완료
    } catch (error) {
      // 에러 처리도 배치됨
      setErrors({ general: '제출 중 오류가 발생했습니다' })
      setIsSubmitting(false)
    }
  }

  return (
    <form onSubmit={handleSubmit}>
      {/* 폼 내용 */}
    </form>
  )
}
2) 데이터 페칭과 상태 관리
function ProductList() {
  const [products, setProducts] = useState([])
  const [loading, setLoading] = useState(false)
  const [error, setError] = useState(null)
  const [page, setPage] = useState(1)

  const fetchProducts = async () => {
    // React 18: 모든 상태 업데이트가 배치됨
    setLoading(true)
    setError(null)

    try {
      const response = await api.getProducts(page)
      // 이것들도 배치됨
      setProducts(response.data)
      setLoading(false)
    } catch (err) {
      // 에러 상태도 배치됨
      setError(err.message)
      setLoading(false)
    }
  }

  return (
    <div>
      {loading && <div>로딩 중...</div>}
      {error && <div>에러: {error}</div>}
      {products.map(product => (
        <div key={product.id}>{product.name}</div>
      ))}
    </div>
  )
}
2.4 배치를 무시하고 즉시 업데이트하려면?
import { flushSync } from 'react-dom'

function UrgentUpdate() {
  const [count, setCount] = useState(0)
  const [message, setMessage] = useState('')

  const handleUrgentUpdate = () => {
    flushSync(() => {
      setCount(c => c + 1)  // 즉시 리렌더링
    })

    // 이 시점에서 이미 count가 업데이트된 상태
    console.log('업데이트된 count 사용 가능')

    setMessage('업데이트 완료')  // 별도 배치로 처리
  }

  return (
    <button onClick={handleUrgentUpdate}>
      긴급 업데이트 (flushSync)
    </button>
  )
}
🎯 실무 적용 과제: 현재 프로젝트 라우터 분석
체크리스트
1. 현재 프로젝트 라우터 확인:
- Pages Router 사용 중인지 확인
- App Router 사용 중인지 확인
- 혼재 사용하고 있는지 확인
2. 라우터 분석 보고서 작성:
## 프로젝트 라우터 분석 보고서

### 현재 상태
- 사용 중인 라우터: [Pages/App/혼재]
- Next.js 버전: [버전]
- 주요 페이지 수: [개수]

### 장단점 분석
- 현재 라우터의 장점: [분석]
- 현재 라우터의 한계: [분석]

### 개선 방안
- App Router 마이그레이션 필요성: [Y/N]
- 우선순위 페이지: [목록]
- 예상 작업 기간: [기간]
3. useState 배치 업데이트 실험:
- 기존 컴포넌트에서 여러 상태 업데이트 패턴 찾기
- 콘솔 로그로 렌더링 횟수 확인하기
- 성능 개선 가능한 부분 식별하기
내일 준비사항
- App Router 프로젝트 초기 설정
- 동적 라우팅 실습 환경 준비
- React DevTools Profiler 활용법 학습
💡 핵심 포인트:
1. App Router는 미래, 새 프로젝트라면 무조건 App Router
2. 서버 컴포넌트로 성능과 SEO 크게 개선 가능
3. 배치 업데이트는 React 18에서 더욱 강력해짐
4. 실무에서는 점진적 마이그레이션 전략이 중요
이해가 안 되는 부분이 있거나 더 자세한 설명이 필요한 부분이 있다면 언제든 질문해주세요! 🚀
배운점
🎯 특정 페이지에서 최상단 레이아웃 제외하기
🚀 Next.js App Router에서 루트 레이아웃 건너뛰는 방법들
방법 1: Route Groups 사용하기 (가장 깔끔한 방법)
app/
├── layout.js                    // 기본 루트 레이아웃
├── page.js                      // 홈페이지 (루트 레이아웃 적용)
├── dashboard/
│   ├── layout.js               // 대시보드 레이아웃 (루트 레이아웃 적용)
│   └── page.js
└── (standalone)/                // 🔥 Route Group - 독립된 레이아웃
    ├── layout.js               // 완전히 새로운 루트 레이아웃!
    ├── admin/
    │   ├── layout.js           // 관리자 전용 레이아웃
    │   └── page.js             // 루트 레이아웃 없이 관리자 레이아웃만!
    └── login/
        └── page.js             // 완전 독립된 로그인 페이지
Suspense 주의사항과 팁
jsx// ❌ 잘못된 사용
function BadExample() {
  return (
    <Suspense fallback={<div>로딩...</div>}>
      {/* 여러 컴포넌트가 각각 다른 데이터를 로딩 */}
      <UserProfile />     {/* 1초 */}
      <UserPosts />       {/* 3초 */}
      <UserFollowers />   {/* 2초 */}
    </Suspense>
  )
  // 결과: 가장 느린 것(3초)까지 모두 기다림
}

// ✅ 올바른 사용
function GoodExample() {
  return (
    <div>
      {/* 각각 독립적으로 로딩 */}
      <Suspense fallback={<ProfileSkeleton />}>
        <UserProfile />
      </Suspense>

      <Suspense fallback={<PostsSkeleton />}>
        <UserPosts />
      </Suspense>

      <Suspense fallback={<FollowersSkeleton />}>
        <UserFollowers />
      </Suspense>
    </div>
  )
  // 결과: 각각 준비되는 대로 표시
}
자주하는 useState 실수
  // 실수 2: 불필요한 의존성
  useEffect(() => {
    if (user) {
      fetchUserPosts(user.id).then(setPosts)
    }
  }, [user, setPosts])  // ❌ setPosts는 항상 동일한 함수

  // 실수 3: 객체를 의존성으로 사용
  const searchParams = { query: 'react', limit: 10 }
  useEffect(() => {
    searchPosts(searchParams).then(setPosts)
  }, [searchParams])  // ❌ 매 렌더링마다 새 객체 생성

// 수정
  useEffect(() => {
    if (user) {
      fetchUserPosts(user.id).then(setPosts)
    }
  }, [user])  // setPosts 제외

  // ✅ 객체는 useMemo로 안정화
  const searchParams = useMemo(() => ({
    query: 'react',
    limit: 10
  }), [])

  useEffect(() => {
    searchPosts(searchParams).then(setPosts)
  }, [searchParams])
✅ 객체는 useMemo로 안정화
const searchParams = useMemo(() => ({
query: 'react',
limit: 10
}), [])
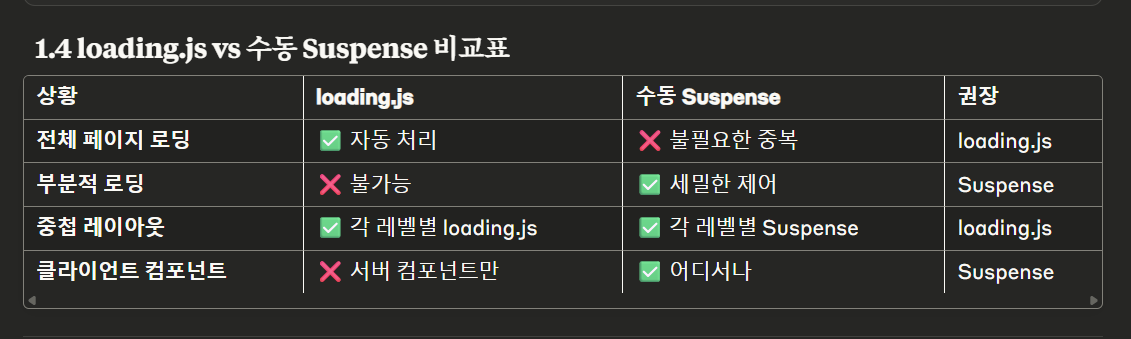
- loading.js는 자동으로 Suspense fallback - 별도로 Suspense 감쌀 필요 없음
- 부분적 로딩이 필요할 때만 수동 Suspense 사용
- useCallback은 성능 최적화가 필요할 때만 사용
- 과도한 최적화는 금물 - 필요할 때만!
언제 useCallback을 쓸까? (실무 가이드)
✅ 써야 하는 경우:
// 1. React.memo된 자식에게 props로 전달할 때
const MemoizedChild = React.memo(({ onClick }) => { ... })
const onClick = useCallback(() => { ... }, [])

// 2. useEffect 의존성 배열에 함수가 들어갈 때
useEffect(() => {
  expensiveFunction()
}, [expensiveFunction])

// 3. 커스텀 훅에서 함수를 반환할 때
function useAPI() {
  const fetchData = useCallback(async () => { ... }, [])
  return { fetchData }
}

// 4. 복잡하고 비싼 계산이 포함된 함수
const complexCalculation = useCallback(() => {
  // 수백 줄의 복잡한 로직
}, [dependency])
❌ 쓰지 않아도 되는 경우:
// 1. 단순한 이벤트 핸들러
const handleClick = () => setCount(count + 1)  // useCallback 불필요

// 2. 자식 컴포넌트가 React.memo가 아닐 때
<RegularChild onClick={() => doSomething()} />  // 괜찮음

// 3. 의존성이 항상 바뀌는 함수
const fn = useCallback(() => {
  doSomething(alwaysChanging)
}, [alwaysChanging])  // 의미없음, 매번 재생성됨
Next.js React.Memo를 사용할까?
🤔 Next.js에서 React.memo 사용 실태
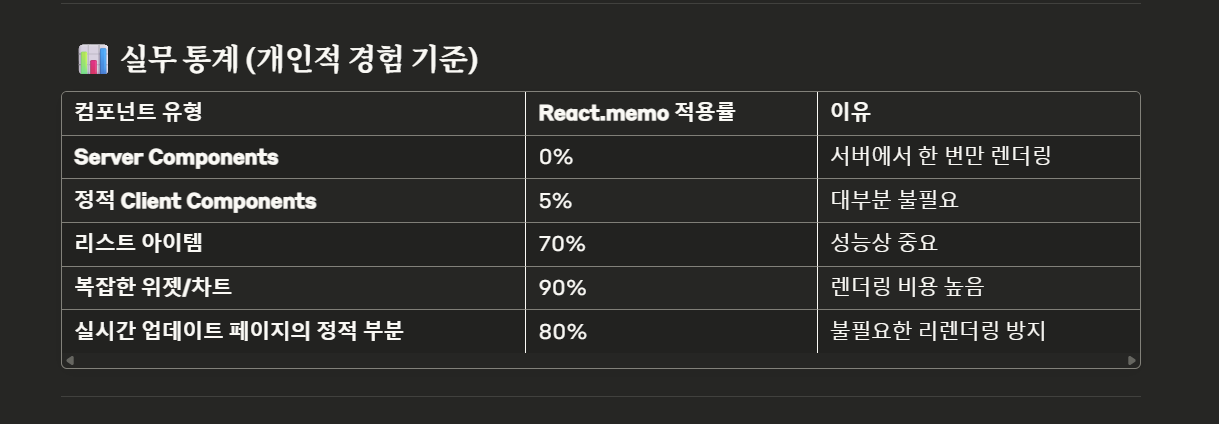
📊 실무 현실: React.memo 사용 빈도
Next.js에서 React.memo 사용 현황
답: 생각보다 많이 안 씁니다!
그 이유들:
1️⃣ Server Components가 기본
jsx// Next.js 13+ App Router - 서버 컴포넌트 (기본)
async function BlogPage() {
  const posts = await fetchPosts()  // 서버에서 실행

  return (
    <div>
      {posts.map(post => (
        <PostCard key={post.id} post={post} />  // 서버에서 렌더링
      ))}
    </div>
  )
}

// React.memo가 필요 없음!
// 서버에서 한 번 렌더링되고 HTML로 전송되기 때문
2️⃣ Static Generation (SSG/ISR)
jsx// 빌드 타임 또는 요청 시 한 번만 렌더링
export async function generateStaticParams() {
return [{ slug: 'post-1' }, { slug: 'post-2' }]
}

async function BlogPost({ params }) {
const post = await getPost(params.slug)

return (
  <article>
    <h1>{post.title}</h1>
    <PostContent content={post.content} />  // memo 불필요
  </article>
)
}
🎯 Next.js에서 React.memo가 필요한 실제 상황들
1️⃣ Client Components에서 복잡한 상호작용
jsx'use client'
import { useState, memo, useCallback } from 'react'

export default function ProductPage() {
  const [selectedOptions, setSelectedOptions] = useState({})
  const [quantity, setQuantity] = useState(1)
  const [reviewFilter, setReviewFilter] = useState('all')

  // 이 함수들이 바뀔 때마다 모든 자식이 리렌더링될 수 있음
  const handleOptionChange = useCallback((option, value) => {
    setSelectedOptions(prev => ({ ...prev, [option]: value }))
  }, [])

  return (
    <div className="product-page">
      <ProductImages />  {/* 정적이라 memo 불필요 */}

      <ProductOptions
        options={selectedOptions}
        onChange={handleOptionChange}  // memo 필요할 수 있음
      />

      <ProductReviews
        filter={reviewFilter}
        onFilterChange={setReviewFilter}  // memo 고려
      />

      {/* 매우 복잡한 컴포넌트라면 memo 적용 */}
      <ExpensiveProductCalculator
        options={selectedOptions}
        quantity={quantity}
      />
    </div>
  )
}
// ✅ 복잡한 계산이 있는 컴포넌트는 memo 적용
const ExpensiveProductCalculator = memo(function Calculator({ options, quantity }) {
  // 수백 줄의 복잡한 가격 계산 로직...
  const totalPrice = useMemo(() => {
    // 매우 복잡한 계산
    return calculateComplexPrice(options, quantity)
  }, [options, quantity])

  return <div>총 가격: {totalPrice}</div>
})
2️⃣ 무한 스크롤, 대용량 리스트
jsx'use client'
import { memo } from 'react'

// ✅ 리스트 아이템은 memo 적용하는 것이 좋음
const ProductCard = memo(function ProductCard({ product, onAddToCart }) {
  return (
    <div <className="product-card">
      <img src={product.image} alt={product.name} />
      <h3>{product.name}</h3>
      <p>{product.price}</p>
      <button onClick={() => onAddToCart(product)}>
        장바구니 추가
      </button>
    </div>
  )
})

export default function ProductList() {
  const [products, setProducts] = useState([])
  const [cart, setCart] = useState([])

  const handleAddToCart = useCallback((product) => {
    setCart(prev => [...prev, product])
  }, [])

  return (
    <div className="grid grid-cols-3 gap-4">
      {products.map(product => (
        <ProductCard  // memo 덕분에 cart 변경시 다른 카드들은 리렌더링 안됨
          key={product.id}
          product={product}
          onAddToCart={handleAddToCart}
        />
      ))}
    </div>
  )
}
3️⃣ 실시간 데이터가 있는 대시보드
jsx'use client'
import { useState, useEffect, memo } from 'react'

// ✅ 실시간으로 업데이트되지 않는 위젯은 memo 적용
const UserInfoWidget = memo(function UserInfoWidget({ user }) {
  return (
    <div className="widget">
      <h3>{user.name}</h3>
      <p>{user.email}</p>
    </div>
  )
})

const StaticChartWidget = memo(function StaticChartWidget({ data }) {
  return (
    <div className="chart-widget">
      {/* 복잡한 차트 렌더링 */}
      <ComplexChart data={data} />
    </div>
  )
})

export default function Dashboard() {
  const [user] = useState({ name: '김개발', email: 'kim@dev.com' })
  const [chartData] = useState(expensiveChartData)
  const [realTimeData, setRealTimeData] = useState(0)

  // 1초마다 실시간 데이터 업데이트
  useEffect(() => {
    const interval = setInterval(() => {
      setRealTimeData(prev => prev + Math.random())
    }, 1000)
    return () => clearInterval(interval)
  }, [])

  return (
    <div className="dashboard">
      {/* memo 덕분에 realTimeData가 바뀌어도 리렌더링 안됨 */}
      <UserInfoWidget user={user} />
      <StaticChartWidget data={chartData} />

      {/* 실시간 데이터 (memo 불필요) */}
      <div>실시간 값: {realTimeData}</div>
    </div>
  )
}

📈 실무에서의 React.memo 사용 가이드라인
✅ React.memo를 써야 하는 경우

대용량 리스트의 아이템 컴포넌트

jsx   const ListItem = memo(({ item, onAction }) => { ... })

복잡한 계산이나 렌더링을 하는 컴포넌트

jsx   const ComplexChart = memo(({ data }) => { /* 복잡한 차트 로직 */ })

자주 바뀌는 상태를 가진 부모의 자식들
jsx // 실시간 타이머가 있는 페이지에서
const StaticSidebar = memo(() => { ... })
Third-party 라이브러리 래퍼
jsx const ExpensiveMapComponent = memo(({ markers }) => {
return
})
❌ React.memo가 불필요한 경우

1. Next.js Server Components (기본적으로 서버에서 한 번만 렌더링)
2. 작고 간단한 컴포넌트
3. props가 자주 바뀌는 컴포넌트
4. 최적화 측정 없이 추측으로 적용
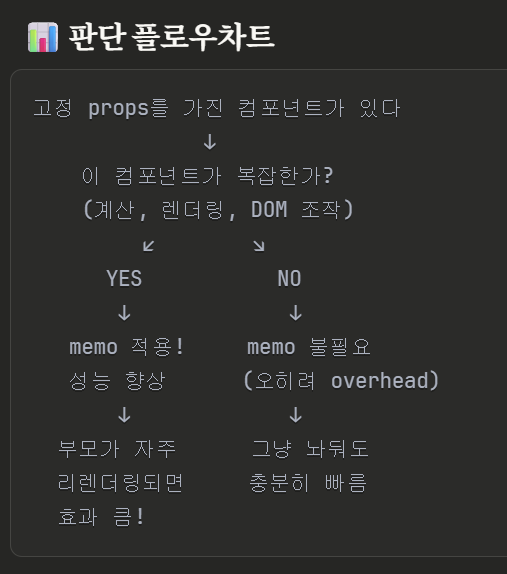
💡 핵심 요점
고정 값 ≠ memo 불필요
- React의 기본 동작: 부모 리렌더링 → 모든 자식 리렌더링
- props가 고정이어도 부모가 바뀌면 자식도 매번 실행됨
- memo의 역할: props 비교해서 동일하면 렌더링 스킵
- 비용 vs 효과: 복잡한 컴포넌트일수록 memo 효과 큼
실무 기준
- 간단한 컴포넌트: memo 생략 (성능 차이 미미)
- 복잡한 컴포넌트: memo 적용 (성능 향상 큼)
- 리스트 아이템: 거의 항상 memo 적용
- 자주 바뀌는 props 포함: memo 고려 불필요
Next.js 특수 상황
- Server Components: memo 불필요 (서버에서 한 번만 렌더링)
- Client Components: memo 고려 (브라우저에서 인터랙티브)
결론: 고정 값이어도 컴포넌트가 복잡하고 부모가 자주 리렌더링된다면 memo를 쓰는 것이 좋습니다! 🎯