🔎 내비게이션 그래프 디자인
내비게이션 그래프는 앱의 모든 목적지와 사용자가 한 목적지에서 다른 목적지로 이동하는 데 사용할 수 있는 논리적 연결 또는 액션을 포함하는 리소스 파일.
내비게이션 컴포넌트는 앱의 내비게이션을 관리하기 위해 내비게이션 그래프 사용.
📖 Top-level navigation graph
앱의 최상위 내비게이션 그래프는 앱을 시작할 때 사용자에게 보이는 출발 목적지로 시작해야하며, 사용자가 앱을 이동하면서 볼 수 있는 목적지를 포함해야 함.
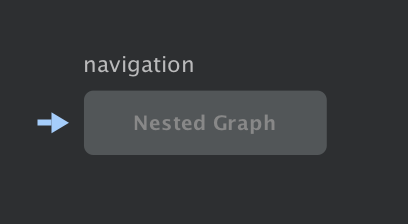
📖 중첩 그래프
로그인 플로우, 위자드, 또는 앱 내의 다른 하위 플로우는 일반적으로 중첩 내비게이션 그래프로 가장 잘 나타낼 수 있음.
👉 앱의 주요 UI 흐름을 더 이해하기 쉽고 관리하기 쉬워짐.
중첩된 그래프는 재사용 가능하며 목적지를 캡슐화하여 그래프 외부의 대상은 중첩 그래프 내의 대상에 직접 액세스할 수 없음.
중첩된 그래프 자체로 navigate() 해야하며 그래프의 나머지 부분에 영향을 주지 않고 내부 로직을 변경할 수 있음.
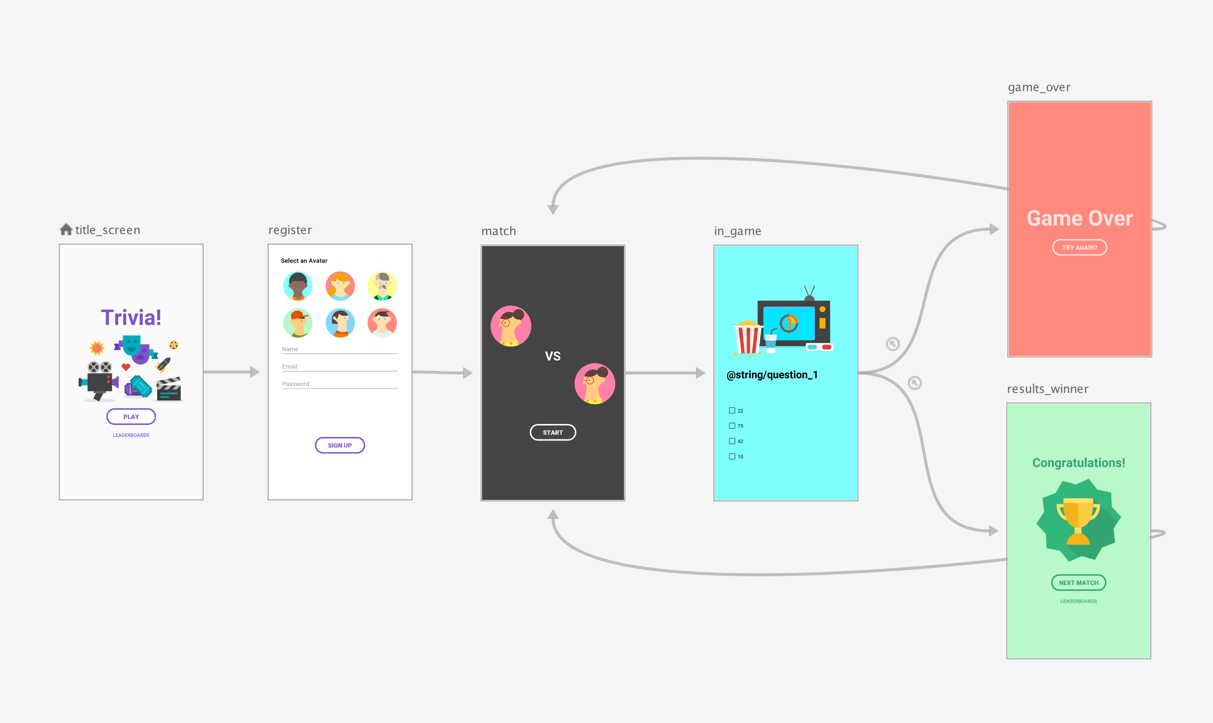
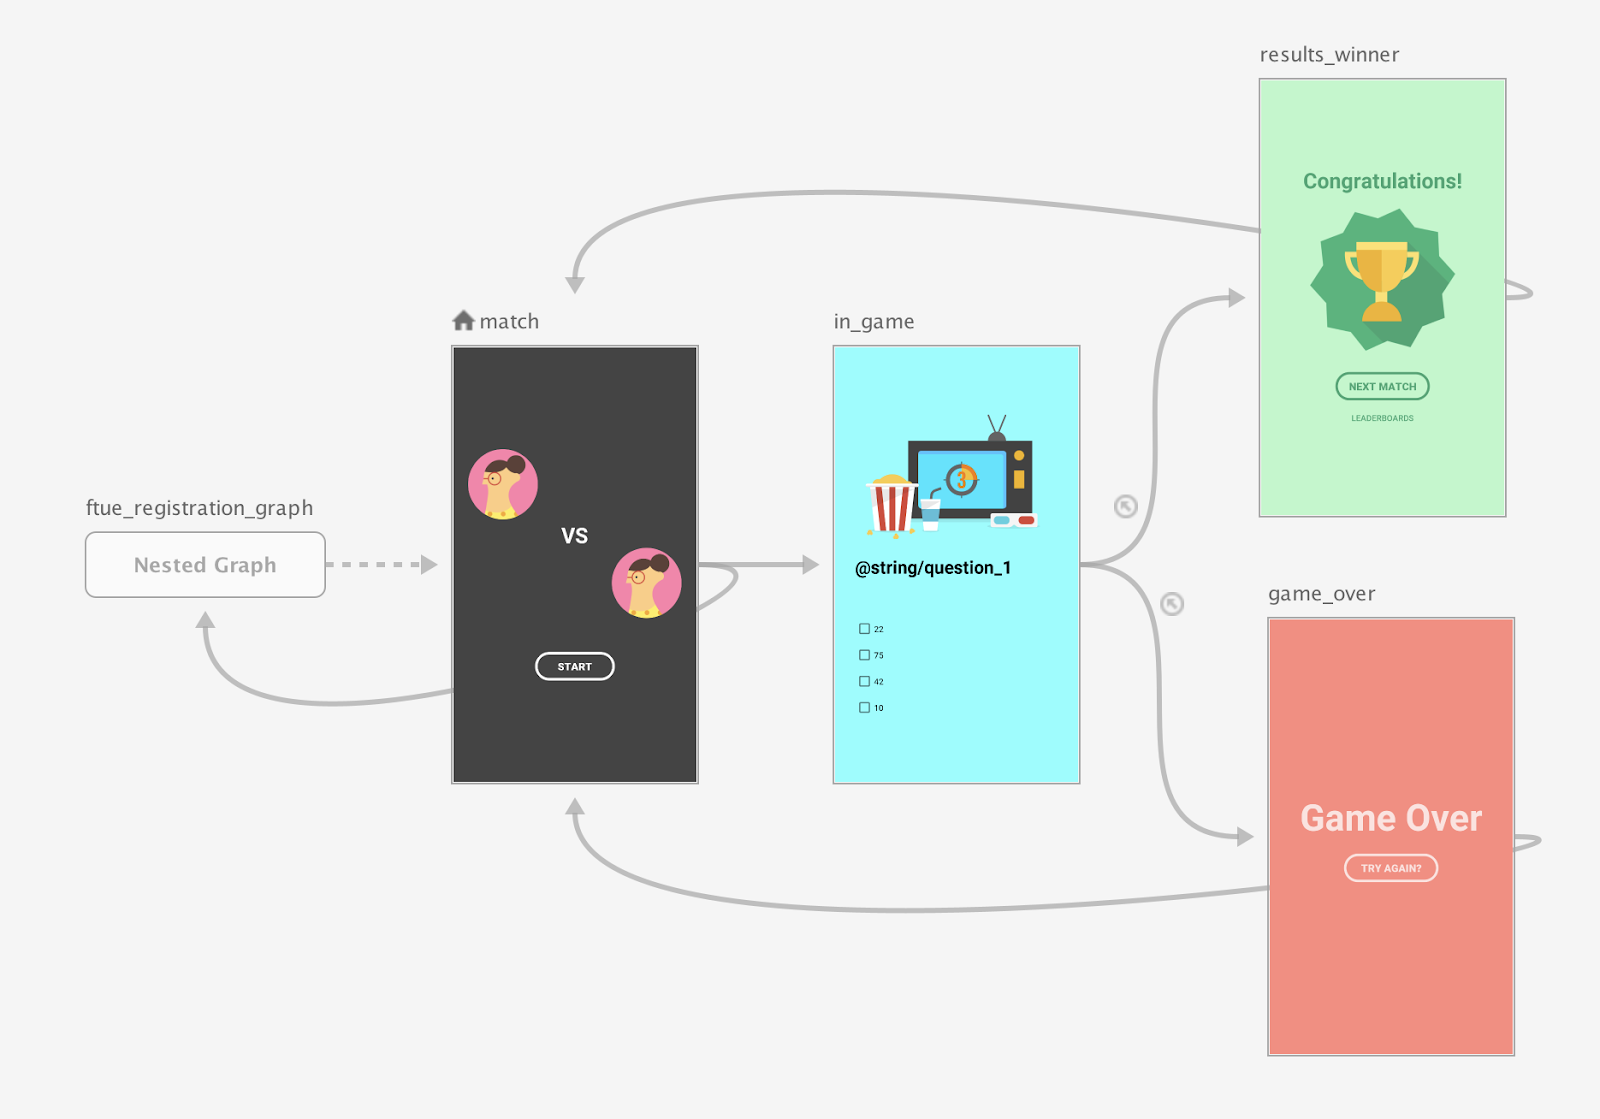
아래 그림에서, 사용자가 앱을 최초로 실행할 때 title_screen 및 register 화면을 볼 수 있도록하고 사용자 정보가 저장된 후 앱을 다시 시작하면 match 화면으로 바로 이동해야함.
최상위 내비게이션 시작 목적지를 match 화면으로 설정하고, title 및 register 화면을 중첩된 그래프로 이동하는 것이 좋음.
match 화면이 시작될 때 등록된 사용자가 있는지 확인할 수 있음. 사용자가 등록되지 않았다면 사용자를 등록 화면으로 이동시킬 수 있음.
그래프 구조를 모듈화하는 또 다른 방법은 부모 내비게이션 그래프에서 <include> 요소를 사용하여 다른 그래프를 포함하는 것
이를 통해 포함된 그래프를 완전히 별도의 모듈이나 프로젝트로 정의할 수 있으며, 재사용성을 극대화할 수 있음.
📖 Global actions
앱에서 여러 경로를 통해 도달할 수 있는 모든 목적지는 해당 목적지로 이동하는데 사용할 수 있는 글로벌 액션이 정의되어야 함.
위쪽 그림에 나온 예제에서는 이기거나 게임 오버 목적지에 동일한 액션이 정의되어 있음. (다시 매칭 화면으로 이동.) 이러한 공통 액션을 하나의 글로벌 액션으로 추출하고 이를 양쪽 목적지에서 참조해야 함.
<?xml version="1.0" encoding="utf-8"?>
<navigation xmlns:android="http://schemas.android.com/apk/res/android"
   xmlns:app="http://schemas.android.com/apk/res-auto"
   android:id="@+id/in_game_nav_graph"
   app:startDestination="@id/in_game">

   <!-- Action back to destination which launched into this in_game_nav_graph-->
   <action android:id="@+id/action_pop_out_of_game"
                       app:popUpTo="@id/in_game_nav_graph"
                       app:popUpToInclusive="true" />

   <fragment
       android:id="@+id/in_game"
       android:name="com.example.android.gamemodule.InGame"
       android:label="Game">
       <action
           android:id="@+id/action_in_game_to_resultsWinner"
           app:destination="@id/results_winner" />
       <action
           android:id="@+id/action_in_game_to_gameOver"
           app:destination="@id/game_over" />
   </fragment>

   <fragment
       android:id="@+id/results_winner"
       android:name="com.example.android.gamemodule.ResultsWinner" />

   <fragment
       android:id="@+id/game_over"
       android:name="com.example.android.gamemodule.GameOver"
       android:label="fragment_game_over"
       tools:layout="@layout/fragment_game_over" />

</navigation>
🔎 destination 생성
내비게이션 에디터에서 이미 존재하는 목적지 타입을 내비게이션 그래프에 추가하려면 New Destination을 클릭 후 드롭다운에서 해당 목적지 클릭.
📖 다이얼로그 프래그먼트로부터 목적지 생성
기존의 DialogFragment가 있을 경우 <dialog> element를 사용하여 다이얼로그를 내비게이션 그래프에 추가할 수 있음.
<?xml version="1.0" encoding="utf-8"?>
<navigation xmlns:android="http://schemas.android.com/apk/res/android"
            xmlns:app="http://schemas.android.com/apk/res-auto"
            android:id="@+id/nav_graph">

...


<dialog
    android:id="@+id/my_dialog_fragment"
    android:name="androidx.navigation.myapp.MyDialogFragment">
    <argument android:name="myarg" android:defaultValue="@null" />
        <action
            android:id="@+id/myaction"
            app:destination="@+id/another_destination"/>
</dialog>

...

</navigation>
📖 Create a new activity destination
액티비티 목적지를 생성하는 방법은 프래그먼트 목적지를 생성하는 것과 유사하지만 액티비티 목적지의 특성은 다름.
사용자가 다른 Activity로 이동하면 현재 내비게이션 그래프는 더 이상 범위 내에 있지 않습니다. 이는 액티비티 목적지를 내비게이션 그래프 내의 끝점으로 간주해야 함을 의미함.
액티비티 목적지를 추가하려면 액티비티의 전체 클래스 이름과 함께 지정.
<?xml version="1.0" encoding="utf-8"?>
<navigation xmlns:android="http://schemas.android.com/apk/res/android"
    xmlns:app="http://schemas.android.com/apk/res-auto"
    android:id="@+id/navigation_graph"
    app:startDestination="@id/simpleFragment">

    <activity
        android:id="@+id/sampleActivityDestination"
        android:name="com.example.android.navigation.activity.DestinationActivity"
        android:label="@string/sampleActivityTitle" />
</navigation>
위의 xml은 다음 호출과 같음.
startActivity(Intent(context, DestinationActivity::class.java))액티비티 클래스에 컴파일 타임 종속성이 없거나 암시적 인텐트를 통한 간접성을 선호할 수 있으므로 xml에 액티비티를 추가하는 것이 적절하지 않을 수 있음.
<?xml version="1.0" encoding="utf-8"?>
<manifest xmlns:android="http://schemas.android.com/apk/res/android"
    package="com.example.android.navigation.activity">
    <application>
        <activity android:name=".DestinationActivity">
            <intent-filter>
                <action android:name="android.intent.action.VIEW" />
                <data
                    android:host="example.com"
                    android:scheme="https" />
                <category android:name="android.intent.category.BROWSABLE" />
                <category android:name="android.intent.category.DEFAULT" />
            </intent-filter>
        </activity>
    </application>
</manifest>
만약 위와 같은 매니페스트가 있다면
해당 Activity 목적지는 매니페스트 항목과 일치하는 action 및 data 속성으로 구성되어야 함.
<?xml version="1.0" encoding="utf-8"?>
<navigation xmlns:android="http://schemas.android.com/apk/res/android"
    xmlns:app="http://schemas.android.com/apk/res-auto"
    android:id="@+id/navigation_graph"
    app:startDestination="@id/simpleFragment">
    <activity
        android:id="@+id/localDestinationActivity"
        android:label="@string/localActivityTitle"
        app:action="android.intent.action.VIEW"
        app:data="https://example.com"
        app:targetPackage="${applicationId}" />
</navigation>
targetPackage를 현재 applicationId로 지정하면 범위가 현재 애플리케이션으로 제한됨.
다른 특정 앱을 목적지로 사용하고자 한다면 applicationId에 목적지 앱 패키지명을 입력.
<?xml version="1.0" encoding="utf-8"?>`
<navigation xmlns:android="http://schemas.android.com/apk/res/android"
    xmlns:app="http://schemas.android.com/apk/res-auto"
    android:id="@+id/navigation_graph"
    app:startDestination="@id/simpleFragment">
    <activity
        android:id="@+id/localDestinationActivity"
        android:label="@string/localActivityTitle"
        app:action="android.intent.action.VIEW"
        app:data="https://example.com"
        app:targetPackage="com.example.android.another.app" />
</navigation>
❗ 주의: 지정된 앱이 기기에 설치되어있지 않거나, 목적지 앱에 매칭되는 intent-filter가 있는 액티비티가 매니페스트에 정의되어있지 않으면 ActivityNotFoundException이 발생.
Dynamic arguments
추가 정보가 URL의 일부로 전송되는 동적 URL을 지원해야할 경우 (예를 들어 사용자 ID를 https://example.com?userId=<actual user ID>와 같은 형식의 URL로 보냄.) data 속성 대신 dataPattern 사용.
<?xml version="1.0" encoding="utf-8"?>
<navigation xmlns:android="http://schemas.android.com/apk/res/android"
    xmlns:app="http://schemas.android.com/apk/res-auto"
    android:id="@+id/navigation_graph"
    app:startDestination="@id/simpleFragment">
    <activity
        android:id="@+id/localDestinationActivity"
        android:label="@string/localActivityTitle"
        app:action="android.intent.action.VIEW"
        app:dataPattern="https://example.com?userId={userId}"
        app:targetPackage="com.example.android.another.app">
        <argument
            android:name="userId"
            app:argType="string" />
    </activity>
</navigation>
또한 Safe Args 혹은 Bundle을 사용하여 userId 값 지정가능.
navController.navigate(
    R.id.localDestinationActivity,
    bundleOf("userId" to "someUser") //userId 대신 someUser로 대체한 후 https://example.com?userId=someUser 생성.
)
❗ 주의: 내비게이션이 요청한 인수가 누락될 경우 예외 발생.
📖 Placeholder destinations
플레이스홀더는 목적지의 시각적 표현 역할을 함.
아직 구현되지 않은 목적지를 나타내기 위해 플레이스홀더를 사용할 수 있음.
내비게이션 에디터 내에서 플레이스홀더를 다른 목적지와 동일하게 사용 가능.
⭐ 참고: 앱을 실행하기 전 플레이스홀더의 클래스 속성을 기존 목적지로 변경해야 함. 플레이스홀더는 컴파일 오류를 발생시키지 않으며 플레이스홀더 목적지로 이동을 시도할 경우 런타임 예외가 발생함.
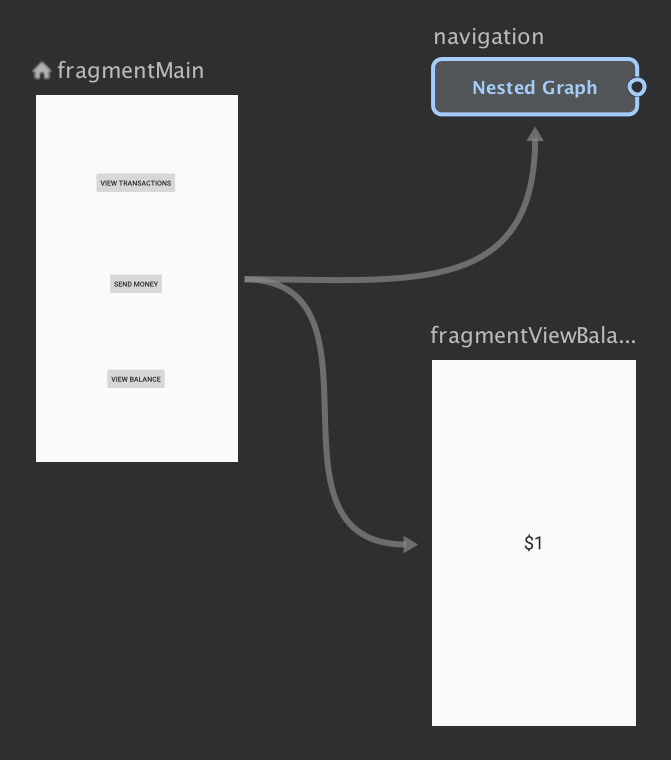
🔎 중첩 내비게이션 그래프
목적지는 root graph라 불리는 상위 내비게이션 그래프 내에서 중첩된 그래프로 그룹화될 수 있음.
중첩된 그래프는 앱의 UI 섹션을 구성하고 재사용에 유용함.
중첩된 그래프는 목적지를 캡슐화함. 루트 그래프와 마찬가지로 중첩된 그래프는 시작 목적지로 식별된 목적지가 있어야 함.
중첩 그래프 외부의 목적지는 중첩된 그래프에 대한 접근을 시작 목적지를 통해서만 할 수 있음.
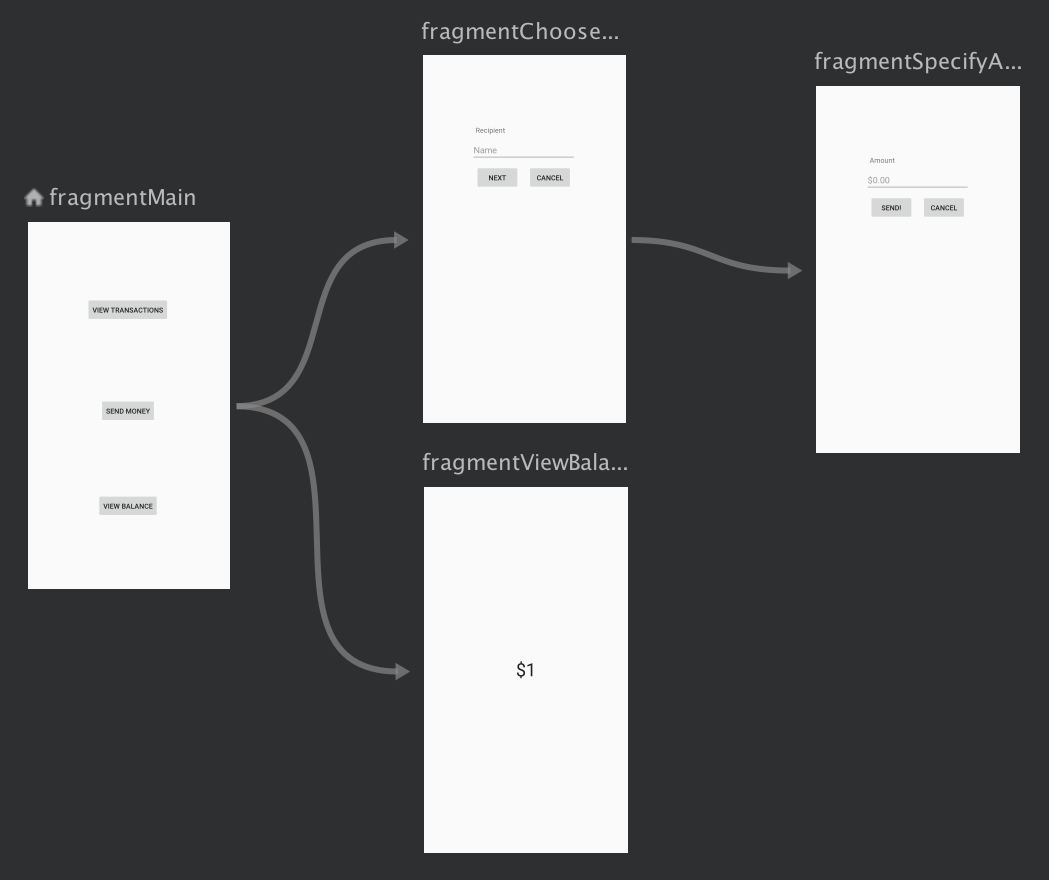 그림1. 간단한 송금 앱 내비게이션 그래프. 상단플로우는 송금, 하단 플로우는 잔액확인.
- 중첩된 그래프로 그룹화하기
-
내비게이션 에디터에서 Shift 키를 누른 상태로 중첩 그래프에 포함하려는 목적지 클릭.
-
우클릭하여 컨텍스트 메뉴를 열고 Nested Graph > New Graph를 선택.
-
중첩 그래프를 클릭하면 다음 속성이 표시됨.
- Type: Nested Graph를 포함하는 Type.
- ID: 중첩된 그래프에 대한 시스템 할당 ID. 이 ID는 코드에서 중첩된 그래프를 참조하는데 활용됨.
-
중첩된 그래프를 더블 클릭하여 목적지를 표시함.
-
XML 뷰로 전환하려면 Text 탭 클릭.
<?xml version="1.0" encoding="utf-8"?>
<navigation xmlns:app="http://schemas.android.com/apk/res-auto"
    xmlns:tools="http://schemas.android.com/tools"
    xmlns:android="http://schemas.android.com/apk/res/android"
    app:startDestination="@id/mainFragment">
    <fragment
        android:id="@+id/mainFragment"
        android:name="com.example.cashdog.cashdog.MainFragment"
        android:label="fragment_main"
        tools:layout="@layout/fragment_main" >
        <action
            android:id="@+id/action_mainFragment_to_sendMoneyGraph"
            app:destination="@id/sendMoneyGraph" />
        <action
            android:id="@+id/action_mainFragment_to_viewBalanceFragment"
            app:destination="@id/viewBalanceFragment" />
    </fragment>
    <fragment
        android:id="@+id/viewBalanceFragment"
        android:name="com.example.cashdog.cashdog.ViewBalanceFragment"
        android:label="fragment_view_balance"
        tools:layout="@layout/fragment_view_balance" />
    <navigation android:id="@+id/sendMoneyGraph" app:startDestination="@id/chooseRecipient">
        <fragment
            android:id="@+id/chooseRecipient"
            android:name="com.example.cashdog.cashdog.ChooseRecipient"
            android:label="fragment_choose_recipient"
            tools:layout="@layout/fragment_choose_recipient">
            <action
                android:id="@+id/action_chooseRecipient_to_chooseAmountFragment"
                app:destination="@id/chooseAmountFragment" />
        </fragment>
        <fragment
            android:id="@+id/chooseAmountFragment"
            android:name="com.example.cashdog.cashdog.ChooseAmountFragment"
            android:label="fragment_choose_amount"
            tools:layout="@layout/fragment_choose_amount" />
    </navigation>
</navigation>- 코드에서 루트 그래프와 중첩된 그래프를 연결하는 액션의 리소스 ID를 전달.
view.findNavController().navigate(R.id.action_mainFragment_to_sendMoneyGraph)📖 <include> 를 사용하여 다른 내비게이션 그래프 참조
내비게이션 그래프 내에서는 include를 사용하여 다른 그래프를 참조할 수 있음.
이것은 중첩된 그래프를 사용하는 것과 기능적으로 동일하지만 include를 사용하면 다른 프로젝트 모듈이나 라이브러리 프로젝트에서 그래프를 사용할 수 있음.
<!-- (root) nav_graph.xml -->
<?xml version="1.0" encoding="utf-8"?>
<navigation xmlns:android="http://schemas.android.com/apk/res/android"
    xmlns:app="http://schemas.android.com/apk/res-auto"
    xmlns:tools="http://schemas.android.com/tools"
    android:id="@+id/nav_graph"
    app:startDestination="@id/fragment">

    <include app:graph="@navigation/included_graph" />

    <fragment
        android:id="@+id/fragment"
        android:name="com.example.myapplication.BlankFragment"
        android:label="Fragment in Root Graph"
        tools:layout="@layout/fragment_blank">
        <action
            android:id="@+id/action_fragment_to_second_graph"
            app:destination="@id/second_graph" />
    </fragment>

    ...
</navigation>
<!-- included_graph.xml -->
<?xml version="1.0" encoding="utf-8"?>
<navigation xmlns:android="http://schemas.android.com/apk/res/android"
xmlns:app="http://schemas.android.com/apk/res-auto"
xmlns:tools="http://schemas.android.com/tools"
android:id="@+id/second_graph"
app:startDestination="@id/includedStart">
<fragment
android:id="@+id/includedStart"
android:name="com.example.myapplication.IncludedStart"
android:label="fragment_included_start"
tools:layout="@layout/fragment_included_start" />
</navigation>🔎 목적지에 대한 딥 링크 만들기
Android에서 딥 링크는 앱 내에서 특정 목적지로 직접 이동하는 링크.
내비게이션 컴포넌트를 사용하면 명시적 딥 링크와 암시적 딥 링크 두 가지 유형의 딥 링크를 만들 수 있음.
📖 명시적 딥링크 만들기
명시적 딥링크는 PendingIntent를 사용하여 사용자를 앱 내의 특정 위치로 이동시키는 딥링크의 단일 인스턴스.
예) 알림이나 앱 위젯의 일부
사용자가 명시적 딥링크를 통해 앱을 열면 작업 백스택이 지워지고 딥링크 목적지로 대체됨.
NavDeepLinkBuilder 클래스를 사용하여 PendingIntent를 구성할 수 있음.
제공된 컨텍스트가 Activity가 아닌 경우 기본적으로 PackageManager.getLaunchIntentForPackage()를 통해 사용가능한 시작할 액티비티를 지정.
val pendingIntent = NavDeepLinkBuilder(context)
    .setGraph(R.navigation.nav_graph)
    .setDestination(R.id.android)
    .setArguments(args)
    .createPendingIntent()
기본적으로 NavDeepLinkBuilder는 앱 매니페스트에서 선언된 기본 시작 Activity로 명시적 딥 링크를 시작함.
NavHost가 다른 액티비티에 있는 경우 딥링크 빌더를 만들때 해당 요소 이름을 지정해야 함.
val pendingIntent = NavDeepLinkBuilder(context)
    .setGraph(R.navigation.nav_graph)
    .setDestination(R.id.android)
    .setArguments(args)
    .setComponentName(DestinationActivity::class.java) // 이름 지정
    .createPendingIntent()
ComponentName가 있다면 직접 빌더에 전달할 수 있음.
val componentName = ...

val pendingIntent = NavDeepLinkBuilder(context)
    .setGraph(R.navigation.nav_graph)
    .setDestination(R.id.android)
    .setArguments(args)
    .setComponentName(componentName)
    .createPendingIntent()
기존 NavController가 있다면 NavController.createDeepLink()을 사용하여 딥 링크를 만들 수도 있음.
❗주의: 이 API는 앱 내의 모든 화면에 딥 링크를 허용하며 해당 화면이 암시적 딥링크를 지원하지 않더라도 사용가능. 해당 화면에 딥 링크를 통해 도달할때 로그인이 필요한 화면이면
조건부로 사용자를 해당화면으로 리디렉션하도록 구성해야함.
📖 암시적 딥링크 만들기
암시적 딥링크는 앱의 특정 대상을 가리키는 URI.
딥 링크는 URI, 인텐트 액션 및 MIME 타입으로 일치시킬 수 있음.
하나의 딥 링크에 대해 여러 타입을 지정할 수 있지만 URI가 먼저 우선되며 그 다음 액션 및 MIME 타입이 따름.
<fragment android:id="@+id/a"
          android:name="com.example.myapplication.FragmentA"
          tools:layout="@layout/a">
        <deepLink app:uri="www.example.com"
                app:action="android.intent.action.MY_ACTION"
                app:mimeType="type/subtype"/>
</fragment>
암시적 딥링크를 활성화하려면 앱의 매니페스트 xml 파일에도 추가해야 함.
기존 내비게이션 그래프를 가리키는 액티비티에 <nav-graph> 요소를 추가해줌.
  <?xml version="1.0" encoding="utf-8"?>
<manifest xmlns:android="http://schemas.android.com/apk/res/android"
    package="com.example.myapplication">

    <application ... >

        <activity name=".MainActivity" ...>
            ...

            <nav-graph android:value="@navigation/nav_graph" />

            ...

        </activity>
    </application>
</manifest>
프로젝트를 빌드할 때 내비게이션 컴포넌트는 내비게이션 그래프의 모든 딥링크와 일치하도록 <nav-graph> 요소를 생성된 <intent-filter> 요소로 대체함.
암시적 딥 링크를 트리거할 때 백 스택의 상태는 Intent.FLAG_ACTIVITY_NEW_TASK 플래그를 사용하여 암시적 인텐트가 시작되었는지 여부에 따라 달라짐.
-
플래그가 설정되면 작업 백 스택이 지워지고 딥링크 대상으로 대체됨. 명시적 딥링킹과 마찬가지로 그래프를 중첩할 때 각 중첩 수준의 시작 대상, 즉 계층 구조의 각
<navigation>요소의 시작 대상도 스택에 추가됨. 즉, 사용자가 딥 링크 대상에서 뒤로 버튼을 누르면 마치 진입점에서 앱에 들어간 것처럼 내비게이션 스택을 다시 탐색하게 됨. -
플래그가 설정되지 않은 경우 암시적 딥링크가 트리거된 이전 앱의 작업 스택에 남아 있음. 이 경우 뒤로 버튼을 누르면 이전 앱으로 돌아가고 위로 버튼을 누르면 앱이 시작됨.
🔎 Global actions
글로벌 액션을 사용하여 여러 대상에서 사용할 수 있는 공통 작업을 생성할 수 있음.
예를 들어서 서로 다른 대상에 있는 버튼을 사용하여 동일한 기본 앱 화면으로 이동할 수 있음.
내비게이션 에디터에서 작은 화살표로 표시됨.
글로벌 액션을 사용하려면 아래와 같이 사용.
viewTransactionButton.setOnClickListener { view ->
    view.findNavController().navigate(R.id.action_global_mainFragment)
}