
인증 (Authentication) VS 인가 (Authorization)
-
인증(Authentication)
인증이란 식별 가능한 정보 (이름 , 이메일)를 이용하여 서비스에 등록 유저의 신원 입증하는 과정입니다. -
인가(Authorization)
인가란 인증이 완료된 사용자가 접근하려는 자원에 대한 권한이 있는지 확인하는 절차입니다.
Spring Security ?
Spring Security 란 Spring 에서 제공해주는 인증(Authentication) 과 인가(Authorization) 에 대한 처리를 위임하는 별도의 프레임워크입니다.
특징
-
세션 기반의 인증을 제공합니다.
-
스프링 시큐리티는 필터기반으로 작동합니다.
인증 처리 과정
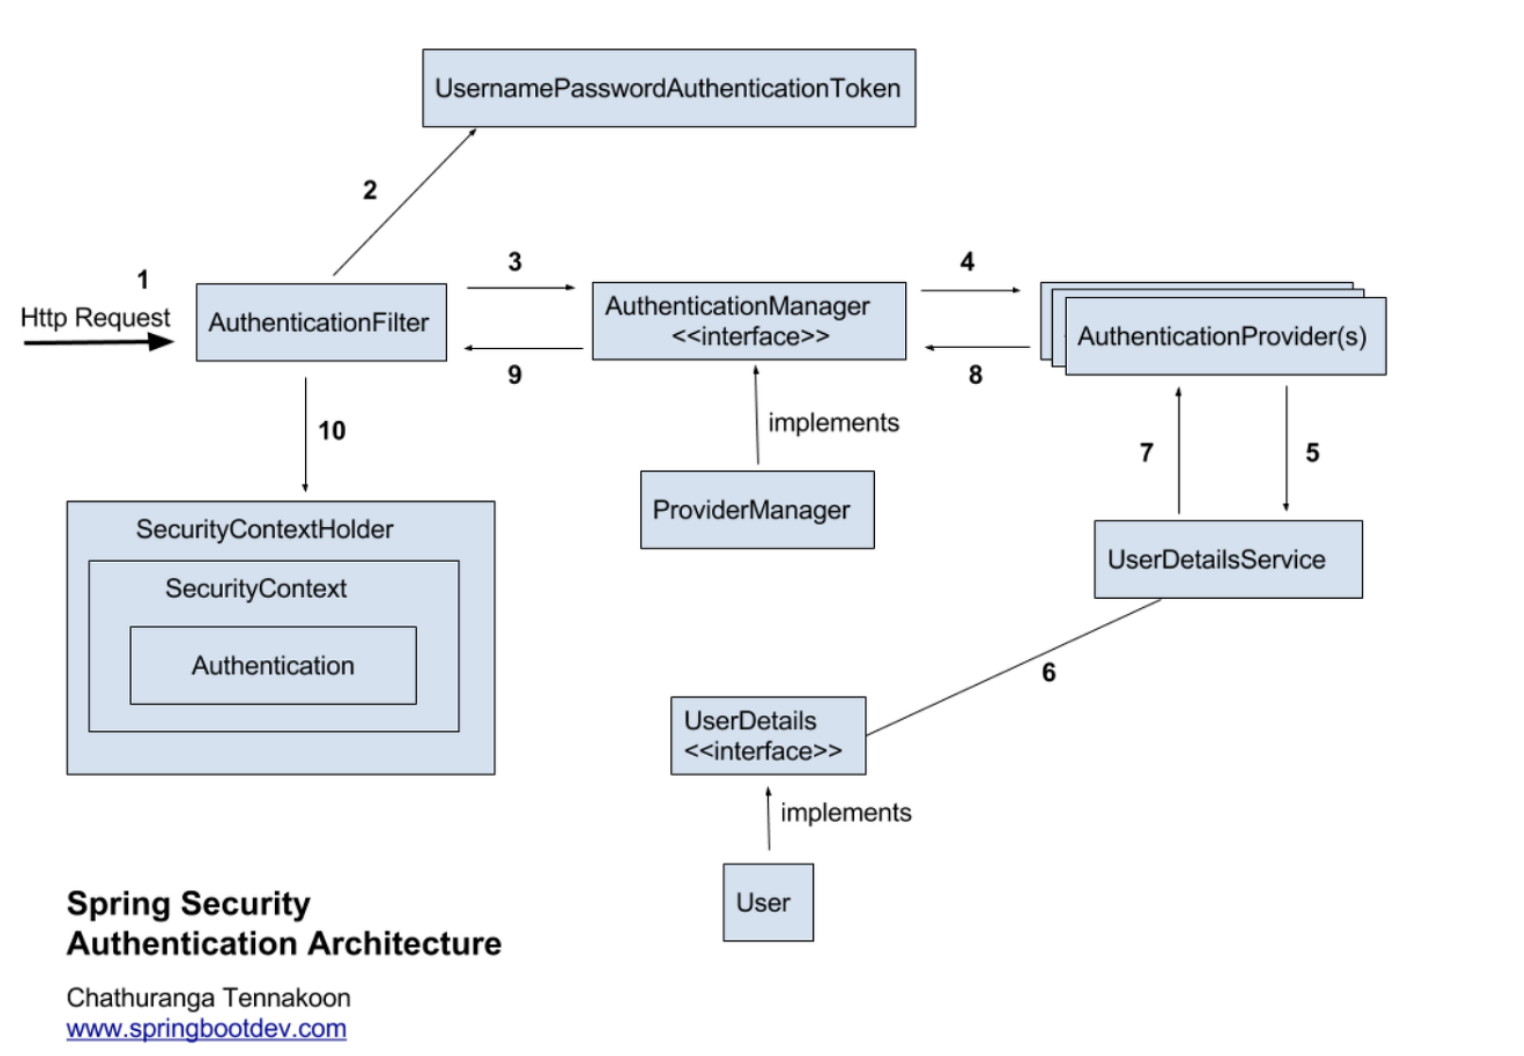
1. Http Request 수신
- 사용자가 로그인 정보와 함께 인증 요청을 합니다.
2. 유저 자격을 기반으로 인증토큰 생성
- AuthenticationFilter가 요청을 가로채고, 가로챈 정보를 통해 UsernamePasswordAuthenticationToken의 인증용 객체를 생성합니다.
3. FIlter를 통해 AuthenticationToken을 AuthenticationManager로 위임
- AuthenticationManager의 구현체인 ProviderManager에게 생성한 UsernamePasswordToken 객체를 전달합니다.
4. AuthenticationProvider의 목록으로 인증을 시도
- AutenticationManger는 등록된 AuthenticationProvider들을 조회하며 인증을 요구합니다.
5. UserDetailsService의 요구
- 실제 데이터베이스에서 사용자 인증정보를 가져오는 UserDetailsService에 사용자 정보를 넘겨줍니다.
6. UserDetails를 이용해 User객체에 대한 정보 탐색
- 넘겨받은 사용자 정보를 통해 데이터베이스에서 찾아낸 사용자 정보인 UserDetails 객체를 만듭니다.
7. User 객체의 정보들을 UserDetails가 UserDetailsService(LoginService)로 전달
- AuthenticaitonProvider들은 UserDetails를 넘겨받고 사용자 정보를 비교합니다.
8. 인증 객체 or AuthenticationException
- 인증이 완료가되면 권한 등의 사용자 정보를 담은 Authentication 객체를 반환합니다.
9. 인증 끝
- 다시 최초의 AuthenticationFilter에 Authentication 객체가 반환합니다.
10. SecurityContext에 인증 객체를 설정
- Authentication 객체를 Security Context에 저장합니다.
Spring Boot에 Spring Security 적용
1. Version
Spring Boot : 3.0.2
2. 의존성 추가
// Spring Security
implementation 'org.springframework.boot:spring-boot-starter-security'
implementation 'org.thymeleaf.extras:thymeleaf-extras-springsecurity6'
testImplementation 'org.springframework.security:spring-security-test'
3. Domain 생성
UserDetails를 상속 받는 User 클래스를 생성합니다.
@Table(name = "users")
@NoArgsConstructor(access = AccessLevel.PROTECTED)
@Getter
@Entity
public class User implements UserDetails {

    @Id
    @GeneratedValue(strategy = GenerationType.IDENTITY)
    @Column(name = "id", updatable = false)
    private Long id;

    @Column(name = "email", nullable = false, unique = true)
    private String email;

    @Column(name = "password", nullable = false)
    private String password;

    @Builder
    public User(String email, String password, String auth) {
        this.email = email;
        this.password = password;
    }


    @Override
    public Collection<? extends GrantedAuthority> getAuthorities() {
        return List.of(new SimpleGrantedAuthority("user"));
    }

    @Override
    public String getUsername() {
        return email;
    }

    @Override
    public String getPassword() {
        return password;
    }

    @Override
    public boolean isAccountNonExpired() {
        return true;
    }

    @Override
    public boolean isAccountNonLocked() {
        return true;
    }

    @Override
    public boolean isCredentialsNonExpired() {
        return true;
    }

    @Override
    public boolean isEnabled() {
        return true;
    }
}
4. Repository 생성
이메일을 통해 사용자의 정보를 가져오기 위해 메서드를 생성합니다.
public interface UserRepository extends JpaRepository<User, Long> {
    Optional<User> findByEmail(String email);
}
5. Service 생성
UserDetailsService 인터페이스를 구현하고, loadUserByUsername() 메서드를 오버라이딩해서 사용자 정보를 가져오는 로직을 작성합니다.
@RequiredArgsConstructor
@Service
public class UserDetailService implements UserDetailsService {

    private final UserRepository userRepository;

    @Override
    public UserDetails loadUserByUsername(String email) throws UsernameNotFoundException {
        return userRepository.findByEmail(email)
                .orElseThrow(() -> new IllegalArgumentException(email));
    }
}
6. WebSecurityConfig 설정
Spring Security를 사용하여 웹 애플리케이션의 보안을 구성하는 데 필요한 설정합니다.
@RequiredArgsConstructor
@Configuration
public class WebSecurityConfig {

    private final UserDetailService userService;

    @Bean
    public WebSecurityCustomizer configure() {
        return (web) -> web.ignoring()
                .requestMatchers(toH2Console())
                .requestMatchers("/static/**");
    }

    @Bean
    public SecurityFilterChain filterChain(HttpSecurity http) throws Exception {
        return http
                .authorizeRequests()
                .requestMatchers("/login", "/signup", "/user").permitAll()
                .anyRequest().authenticated()
                .and()
                .formLogin()
                .loginPage("/login")
                .defaultSuccessUrl("/articles")
                .and()
                .logout()
                .logoutSuccessUrl("/login")
                .invalidateHttpSession(true)
                .and()
                .csrf().disable()
                .build();
    }

    @Bean
    public AuthenticationManager authenticationManager(HttpSecurity http, BCryptPasswordEncoder bCryptPasswordEncoder, UserDetailService userDetailService) throws Exception {
        return http.getSharedObject(AuthenticationManagerBuilder.class)
                .userDetailsService(userService)
                .passwordEncoder(bCryptPasswordEncoder)
                .and()
                .build();
    }

    @Bean
    public BCryptPasswordEncoder bCryptPasswordEncoder() {
        return new BCryptPasswordEncoder();
    }
}-
configure 메서드
Spring Security에서 무시해야 하는 요청을 설정합니다. 이 코드에서는 H2 데이터베이스 콘솔과 정적 리소스(/static/**)에 대한 요청을 무시하고 인증을 거치지 않도록 구성합니다.
-
filterChain 메서드
실제 보안 필터 체인을 정의합니다. /login, /signup, /user와 같은 경로에 대한 요청은 인증 없이 허용되고, 다른 모든 요청은 인증이 필요합니다. 또한 폼 로그인(form login) 및 로그아웃 처리를 구성하고, CSRF(Cross-Site Request Forgery) 보호를 비활성화합니다.
-
authenticationManager 메서드
AuthenticationManager를 빈으로 등록합니다. 이 매니저는 사용자 인증을 처리하고, UserDetailService를 사용하여 사용자 정보를 가져오며, BCryptPasswordEncoder를 사용하여 비밀번호를 확인합니다.
-
bCryptPasswordEncoder 메서드
BCryptPasswordEncoder를 빈으로 등록하여 암호 해싱을 수행합니다.
회원가입, 로그인, 로그아웃 구현
1. DTO 생성
회원가입을 위한 DTO를 생성합니다.
@Getter
@Setter
public class AddUserRequest {

    private String email;
    private String password;
}
2. Service 생성
새로운 사용자를 등록하고 비밀번호를 해싱하여 보안을 강화하는 데 사용됩니다.
@RequiredArgsConstructor
@Service
public class UserService {

    private final UserRepository userRepository;
    private final BCryptPasswordEncoder bCryptPasswordEncoder;

    public Long save(AddUserRequest addUserRequest) {
        return userRepository.save(User.builder()
                .email(addUserRequest.getEmail())
                .password(bCryptPasswordEncoder.encode(addUserRequest.getPassword()))
                .build()).getId();
    }

}
3. Controller 생성
사용자 등록 및 로그아웃과 관련된 기능을 처리합니다.
@RequiredArgsConstructor
@Controller
public class UserApiController {

    private final UserService userService;

    @PostMapping("/user")
    public String signup(AddUserRequest addUserRequest) {
        userService.save(addUserRequest);
        return "redirect:/login";
    }

    @GetMapping("/logout")
    public String logout(HttpServletRequest request, HttpServletResponse response) {
        new SecurityContextLogoutHandler().logout(request, response, SecurityContextHolder.getContext().getAuthentication());
        return "redirect:/login";
    }
}
4. ViewController 생성
@Controller
public class UserViewController {

    @GetMapping("/login")
    public String login() {
        return "login";
    }

    @GetMapping("/signup")
    public String signup() {
        return "signup";
    }
}
5. login page 생성
<!DOCTYPE html>
<html xmlns:th="http://www.thymeleaf.org">
<head>
  <meta charset="UTF-8">
  <title>로그인</title>
  <link rel="stylesheet" href="https://cdn.jsdelivr.net/npm/bootstrap@4.6.1/dist/css/bootstrap.min.css">

  <style>
    .gradient-custom {
      background: linear-gradient(to right, rgba(106, 17, 203, 1), rgba(37, 117, 252, 1))
    }
  </style>
</head>
<body class="gradient-custom">
<section class="d-flex vh-100">
  <div class="container-fluid row justify-content-center align-content-center">
    <div class="card bg-dark" style="border-radius: 1rem;">
      <div class="card-body p-5 text-center">
        <h2 class="text-white">LOGIN</h2>
        <p class="text-white-50 mt-2 mb-5">서비스를 사용하려면 로그인을 해주세요!</p>

        <div class = "mb-2">
          <form action="/login" method="POST">
            <input type="hidden" th:name="${_csrf?.parameterName}" th:value="${_csrf?.token}" />
            <div class="mb-3">
              <label class="form-label text-white">Email address</label>
              <input type="email" class="form-control" name="username">
            </div>
            <div class="mb-3">
              <label class="form-label text-white">Password</label>
              <input type="password" class="form-control" name="password">
            </div>
            <button type="submit" class="btn btn-primary">Submit</button>
          </form>

          <button type="button" class="btn btn-secondary mt-3" onclick="location.href='/signup'">회원가입</button>
        </div>
      </div>
    </div>
  </div>
</section>
</body>
</html>
6. signup page 생성
<!DOCTYPE html>
<html xmlns:th="http://www.thymeleaf.org">
<head>
  <meta charset="UTF-8">
  <title>회원 가입</title>
  <link rel="stylesheet" href="https://cdn.jsdelivr.net/npm/bootstrap@4.6.1/dist/css/bootstrap.min.css">

  <style>
    .gradient-custom {
      background: linear-gradient(to right, rgba(254, 238, 229, 1), rgba(229, 193, 197, 1))
    }
  </style>
</head>
<body class="gradient-custom">
<section class="d-flex vh-100">
  <div class="container-fluid row justify-content-center align-content-center">
    <div class="card bg-dark" style="border-radius: 1rem;">
      <div class="card-body p-5 text-center">
        <h2 class="text-white">SIGN UP</h2>
        <p class="text-white-50 mt-2 mb-5">서비스 사용을 위한 회원 가입</p>

        <div class = "mb-2">
          <form th:action="@{/user}" method="POST">
            <!-- 토큰을 추가하여 CSRF 공격 방지 -->
            <input type="hidden" th:name="${_csrf?.parameterName}" th:value="${_csrf?.token}" />
            <div class="mb-3">
              <label class="form-label text-white">Email address</label>
              <input type="email" class="form-control" name="email">
            </div>
            <div class="mb-3">
              <label class="form-label text-white">Password</label>
              <input type="password" class="form-control" name="password">
            </div>

            <button type="submit" class="btn btn-primary">Submit</button>
          </form>
        </div>
      </div>
    </div>
  </div>
</section>
</body>
</html>
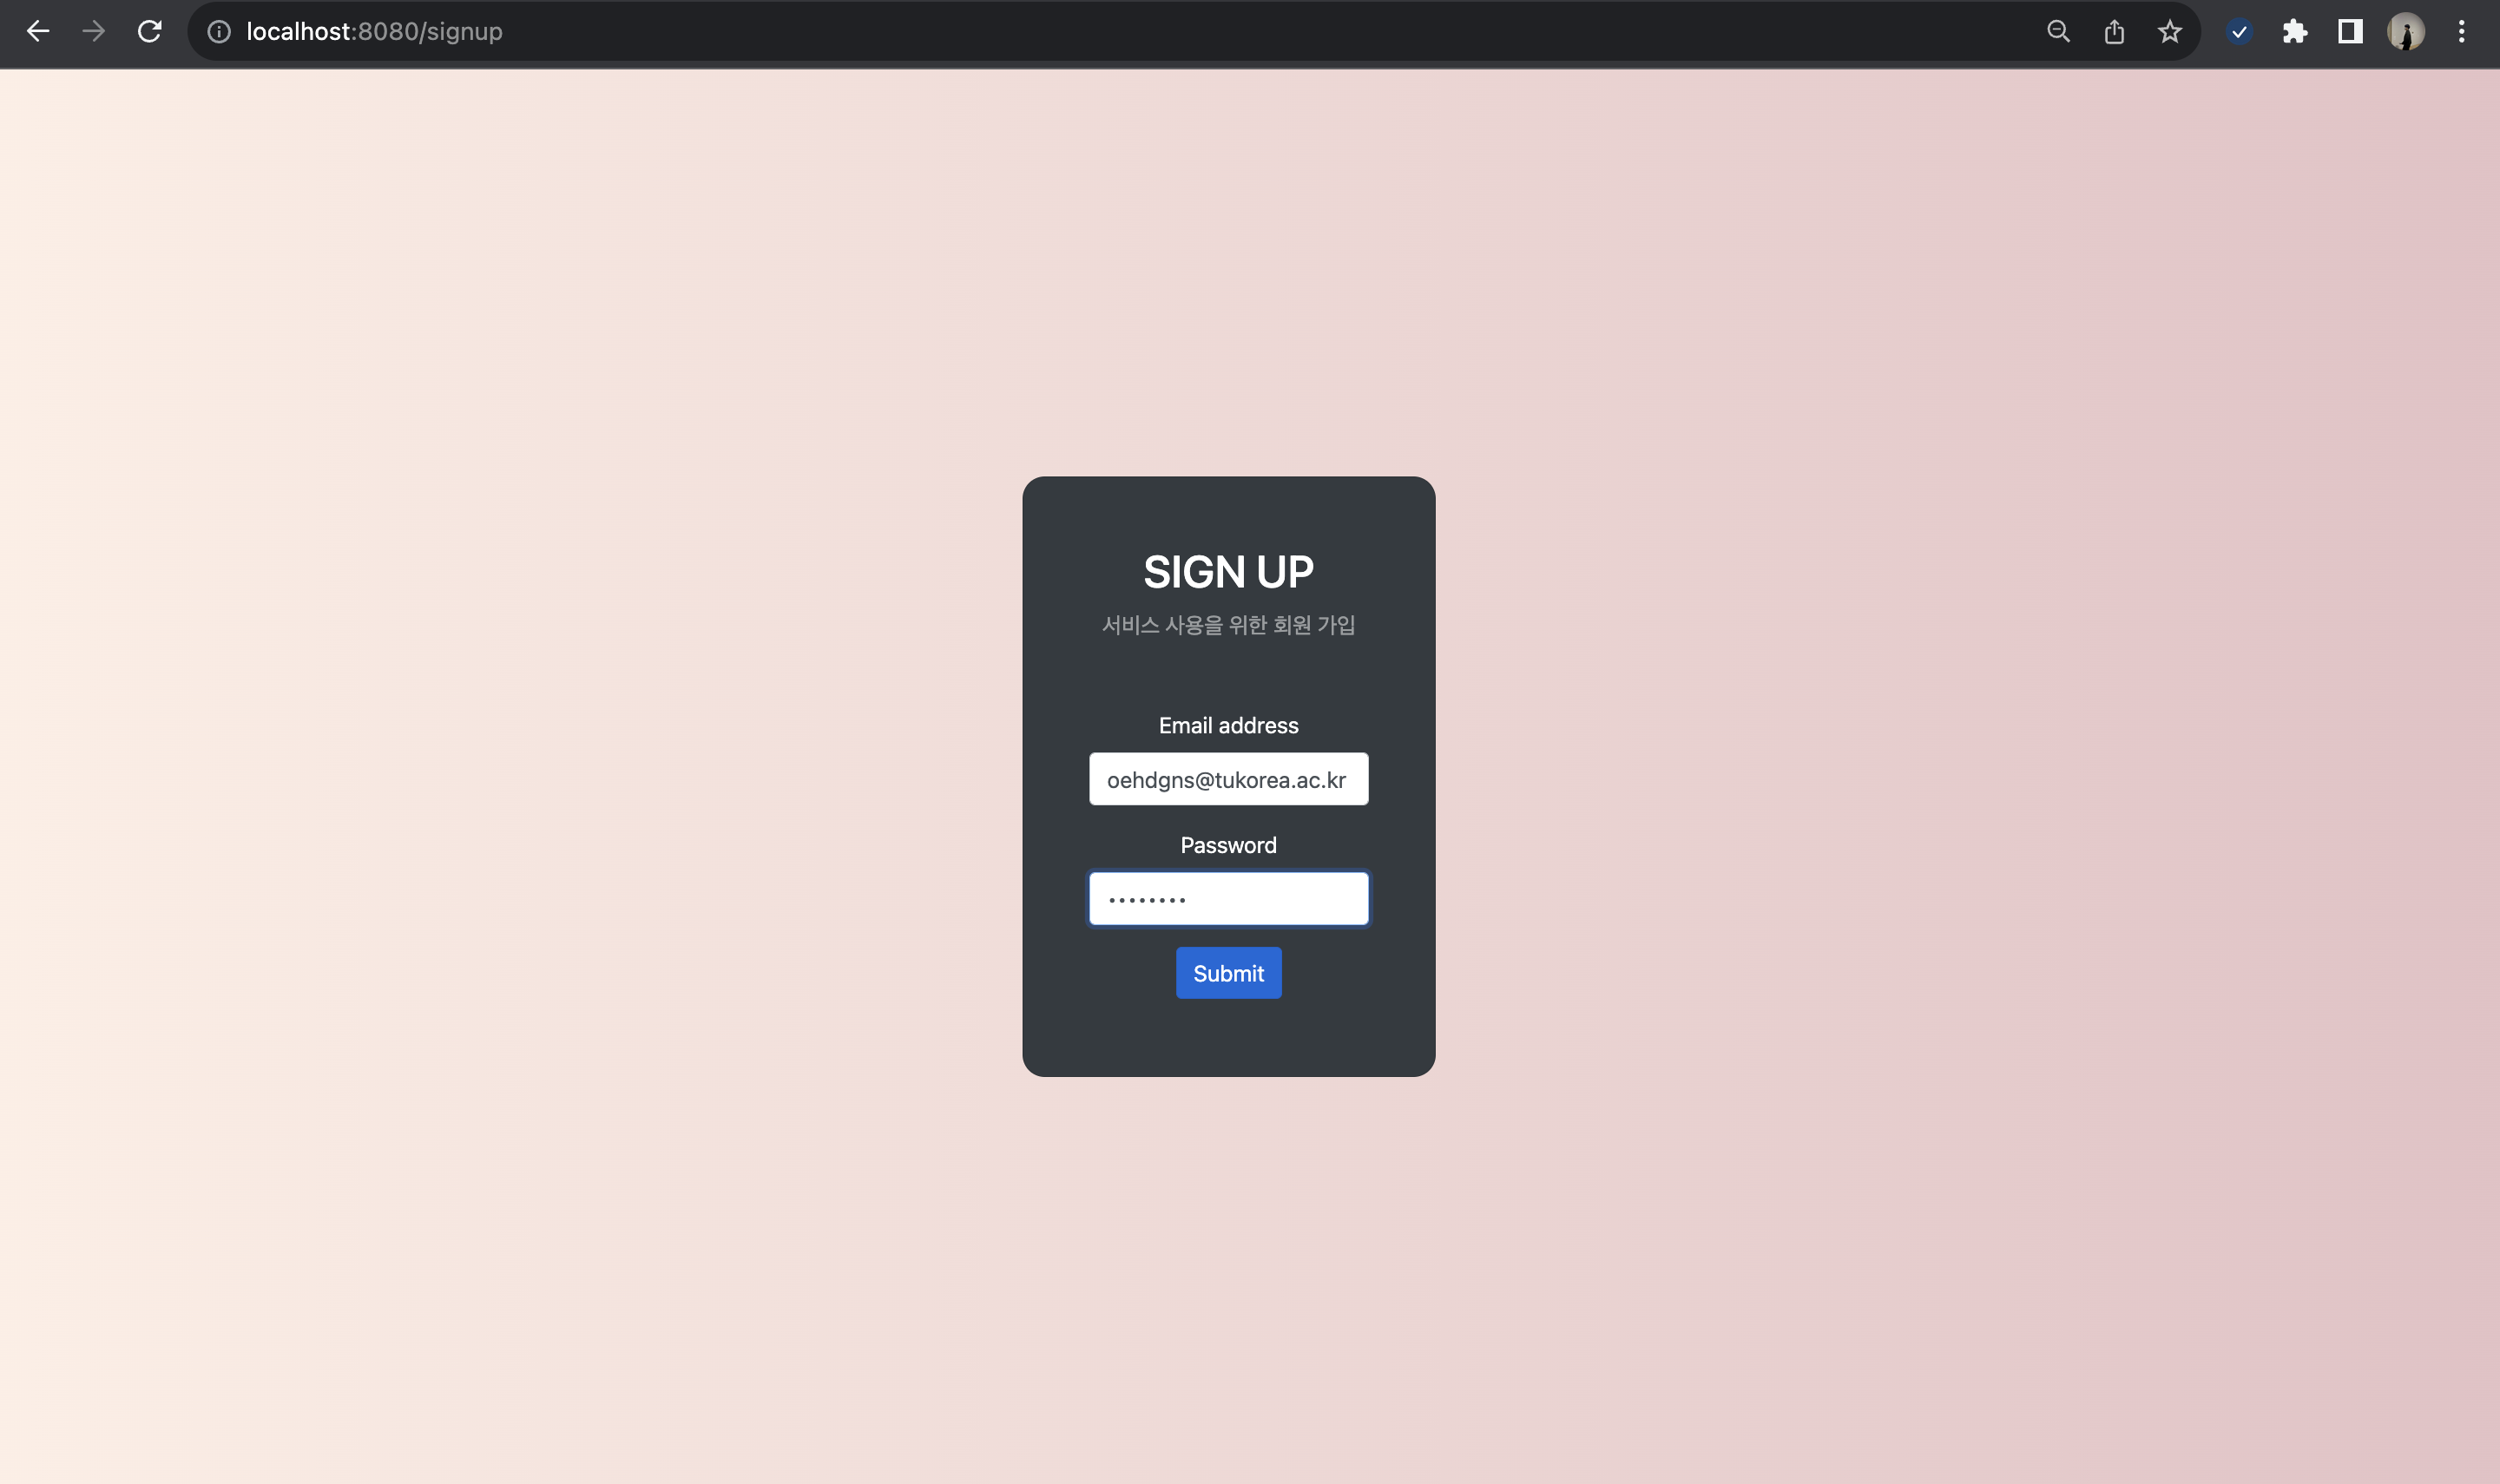
결과
회원가입 페이지
다음과 같이 회원가입을 진행합니다.
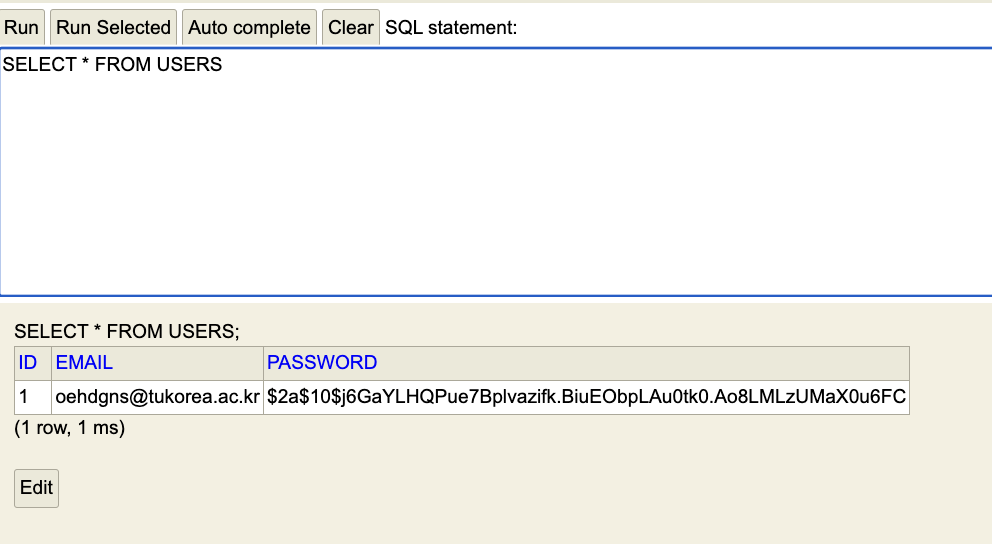
H2 Database
데이터베이스를 확인하면 패스워드가 암호화돼서 데이터베이스에 저장된 모습을 확인 할 수 있습니다.
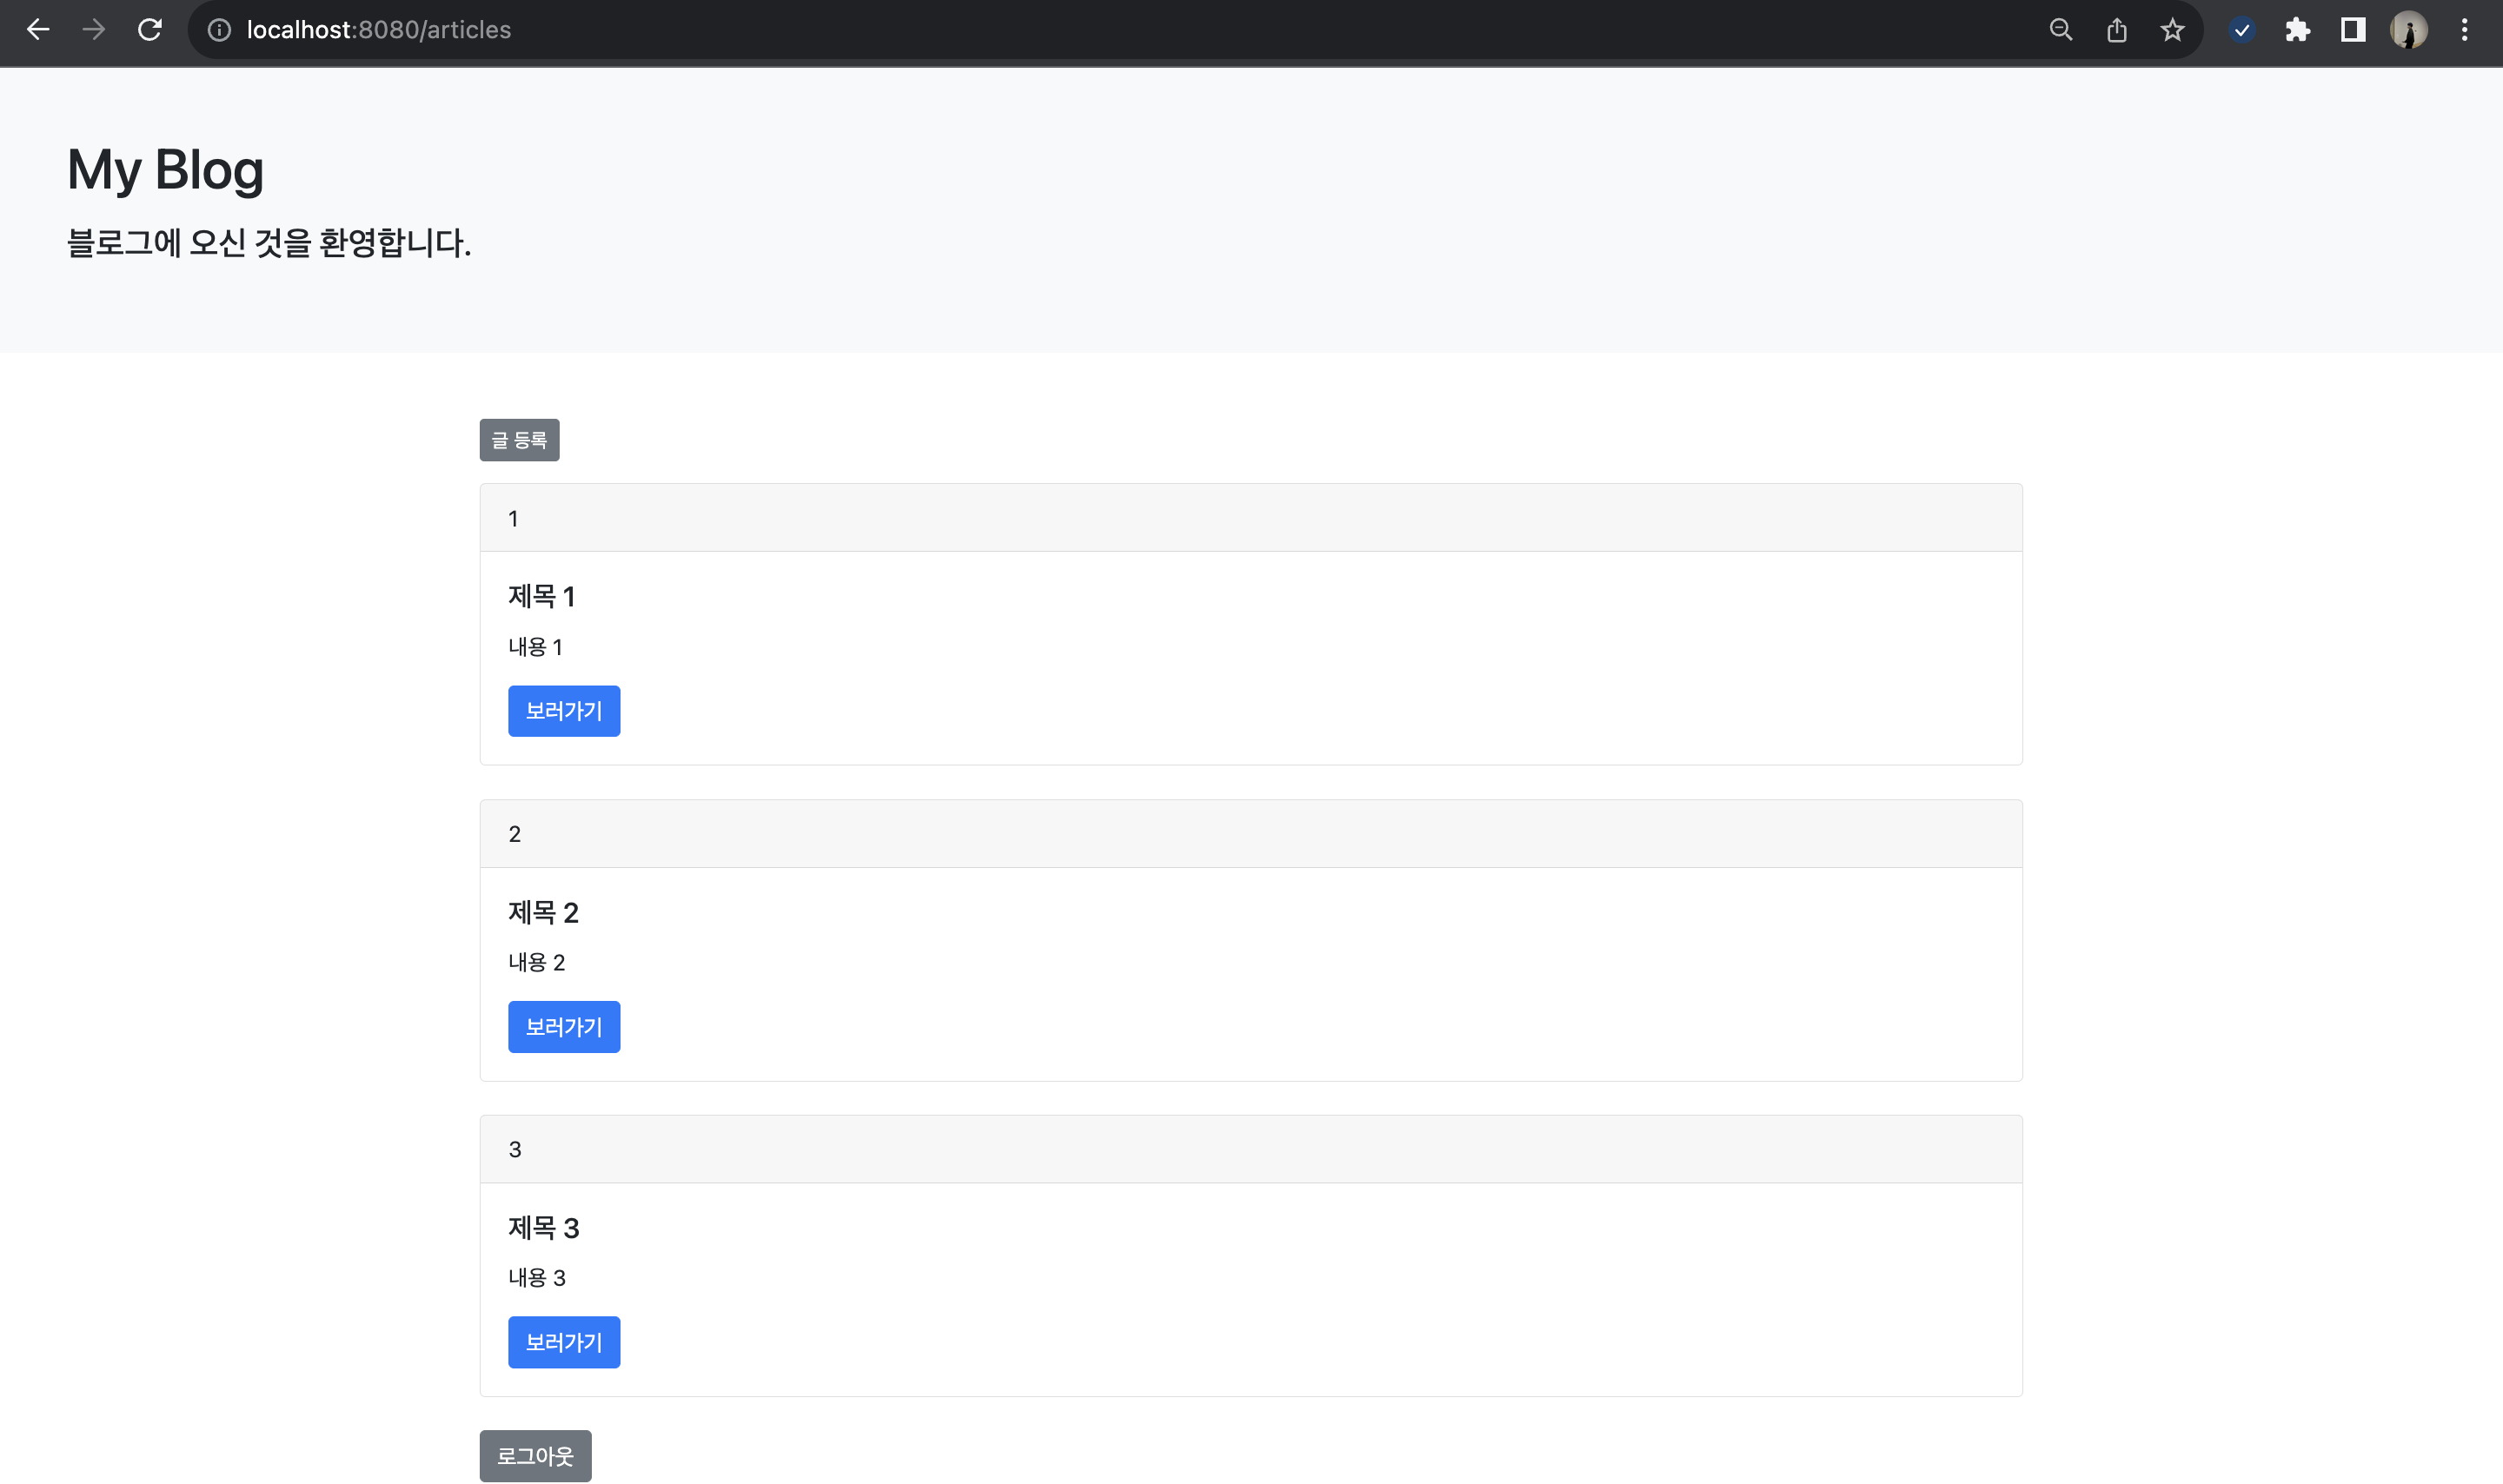
메인 페이지
로그인이 성공적으로 이루어지면 메인 페이지에 접근이 가능합니다.
예제 코드 github 주소
💡 https://github.com/jjeongdong/Springboot3_JPA_OAuth2_JWT_AWS