[OpenLayers] OpenLayers 시작하기! (3) - Layer, Zoom, Center, Coordinates, Scale
[OpenLayers] OpenLayers 시작하기!
 우리가 흔히 사용하는 지도 웹을 보면, 여러 가지 아이콘들로 지도를 컨드롤 할 수 있다.
따라서, 우리도 지난번 생성한 Map 객체를 컨트롤하여 아래와 같은 기능들을 구현해 보겠다.
1. Layer 추가/삭제 - 기본, 위성, 하이브리드
2. Zoom in/out
3. View reset
4. Coordinates 표시
5. Map Scale 표시
또한, 컨트롤 방법을 알아보며 사용될 map객체는 지난번 생성하여 Context API로 생성한 전역 상태의 객체이므로 아래와 같이 불러오면 된다.
import { useContext, useState } from 'react';
import MapContext from 'context/maps/mapContext';

const { mapObj } = useContext(MapContext);
const { map } = mapObj;
이번 포스팅은 React+Next 프로젝트에 적용하는 방법은 생략하였다.
OpenLayers 메서드 중심으로 알아볼 거임, 아무튼 그럴 거임. 🎃
이제 여러 가지 컨트롤 방법을 알아보자~!!
🗺️ Layer 추가/삭제 - 기본, 위성, 하이브리드
- Layer 추가 메서드
map.addLayer()- Layer 삭제 메서드
map.removeLayer()- 위성 지도 Layer 추가/삭제
const satelliteMap = new TileLayer({
  name: 'Satellite',
  visible: true,
  source: new XYZ({
    url: `http://api.vworld.kr/req/wmts/1.0.0/${process.env.VWORLD_API_KEY}/Satellite/{z}/{y}/{x}.jpeg`
  })
});

const handleSatelliteMapButton = () => {
  map.addLayer(satelliteMap);
  // or
  map.removeLayer(satelliteMap)
}- 하이브리드 지도 Layer 추가/삭제
const hybridMap = new TileLayer({
  name: 'Hybrid',
  visible: true,
  source: new XYZ({
    url: `http://api.vworld.kr/req/wmts/1.0.0/${process.env.VWORLD_API_KEY}/Hybrid/{z}/{y}/{x}.png`
  })
});

const handleHybridButtonClick = () => {
  map.addLayer(hybridMap);
  // or
  map.removeLayer(hybridMap);
};
여러 지도(Base, Satellite, Hybrid)에 맞는 형식은 Vworld 공식 문서에서 확인할 수 있다.
Vworld 공식 문서 - WMTS
🗺️ Zoom in/out
- Zoom 컨트롤 메서드
map.getView().setView()- Zoom in/out without Animation
const handleZoomInClick = () => {
  const zoom = map.getView().getZoom() + 1;
  map.getView().setView(zoom);
};

const handleZoomOutClick = () => {
  const zoom = map.getView().getZoom() - 1;
  map.getView().setView(zoom);
};- Zoom in/out with Animation
const handleZoomInClick = () => {
  const zoom = map.getView().getZoom() + 1;
  map.getView().animate({
    zoom,
    duration: 500
  });
};

const handleZoomOutClick = () => {
  const zoom = map.getView().getZoom() - 1;
  map.getView().animate({
    zoom,
    duration: 500
  });
};
컨트롤에는 animation을 적용/미적용 할 수 있는데,
본 포스팅에서는 default 값으로 적용하였다. 조금 더 자연스럽게 변화하기 때문이다.
아래 컨트롤할 부분들도 동일하니 참고하면 좋겠다.
🗺️ View reset
- View reset 메서드
map.getView().setCenter()- View reset without Animation
const center = fromLonLat([126.30574134206182, 33.35570244202401]);

const handleHomeClick = () => {
  map.getView().setCenter(center);
};- View reset with Animation
const center = fromLonLat([126.30574134206182, 33.35570244202401]);

const handleHomeClick = () => {
  map.getView().animate({
    center,
    duration: 1500
  });
};
🗺️ Coordinates 표시
지도에서 마우스 위치 값에 따른 경/위도를 표시해 주는 방법이다.
기존에 생성한 Map 객체에 값을 추가해 주어야 하며, Map 객체를 생성할 때처럼 Element도 추가해 주어야 한다.
// ./map/map.js
import { MousePosition } from 'ol/control';
import { createStringXY } from 'ol/coordinate';

const Map = ({ children }) => {
  // ...

  useEffect(() => {
    // 마우스 위치에 따른 좌표값 생성
    let mousePositionCtrl = new MousePosition({
      coordinateFormat: createStringXY(4), // / 4: 좌표 소숫점 이하 자리수
      projection: 'EPSG:4326', // 좌표계 변환
      className: 'mouse-position', // style 적용할 className 설정
      target: 'mouse-position', //  element id 값
      undefinedHTML: 'lon, lat' // 마우스 위치 값 없을 때 초기 값
    });

    // Map 객체 controls에 추가
    const map = new OlMap({
      controls: defaultControls({ zoom: false, rotate: false }).extend([mousePositionCtrl]),
     // ...
    });

    // ...
  }, []);

  // ...
};

export default Map;

// ./pages/index.js
import Head from 'next/head';
import { useContext, useState } from 'react';
import MapContext from 'context/maps/mapContext';


export default function Home() {
  const { mapObj } = useContext(MapContext);
  const { map } = mapObj;

  return (
    <div>
      <Head>
        <title>OpenLayers Practice</title>
      </Head>
      <div id='map'></div>
      <div id='mouse-position'></div>
    </div>
  );
}
OpenLayers 공식 문서 - MousePosition
🗺️ Map Scale 표시
import { ScaleLine } from 'ol/control';

const Map = ({ children }) => {
  // ...

  useEffect(() => {
    // Map 객체 생성 후 Scale 추가
    const map = new OlMap({
     // ...
    });
	map.addControl(new ScaleLine());
    // ...
  }, []);

  // ...
};

export default Map;
Scale를 추가하는 방법은 아주 간단하다. OpenLayers에서 제공해 주는 메서드를 사용하여 객체를 생성한 후 추가해 주면 된다.
하지만, css가 매우 이상하게 적용된다. 필자는 scale element의 className을 찾아서 새로 설정해 주었다.
.ol-scale-line에 css를 적용할 수 있다.
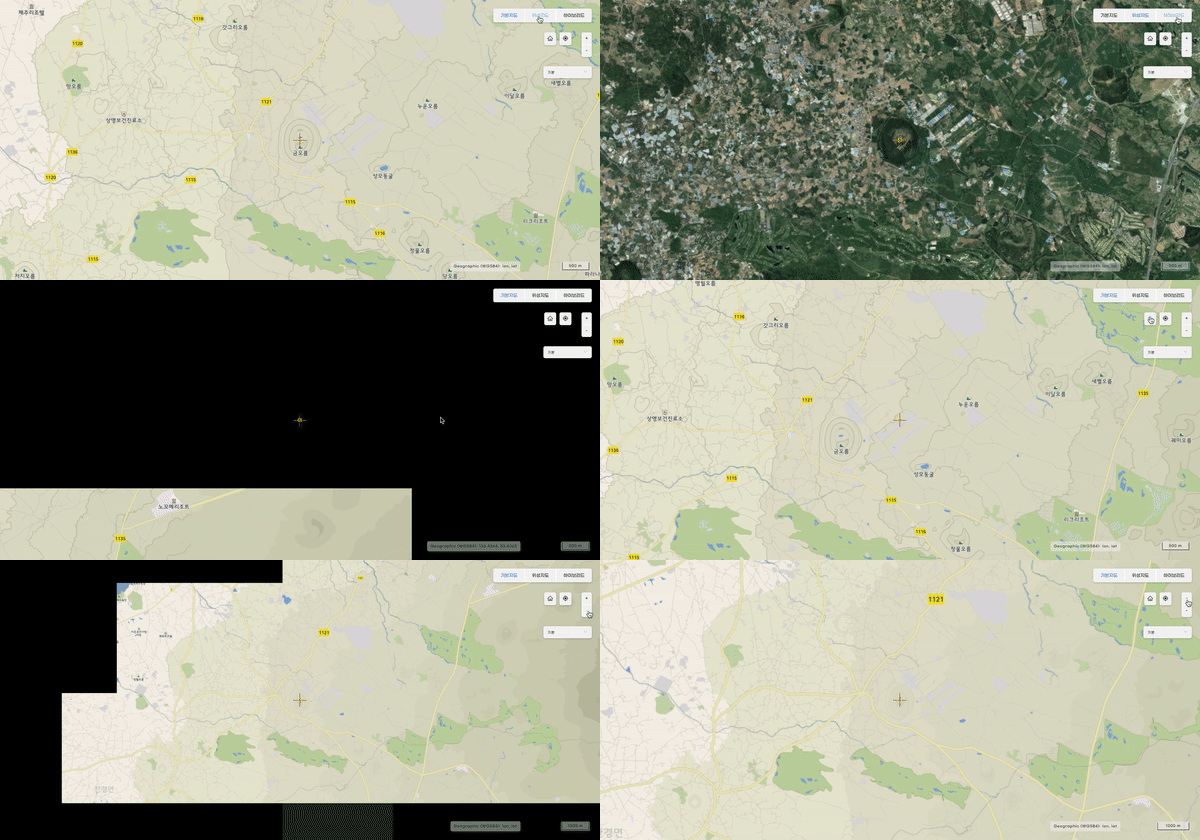
🗺️ Demo

OpenLayers와 조금은 친해진 것 같다 ^__^;

안녕하세요. 글 잘보고 갑니다. 혹시 point나 polygon 그리는 글도 올려주세요. 감사합니다. ^^;