[주요기술]
- Font 적용
- DatePicker
- 날짜 다루기
- 테마 적용
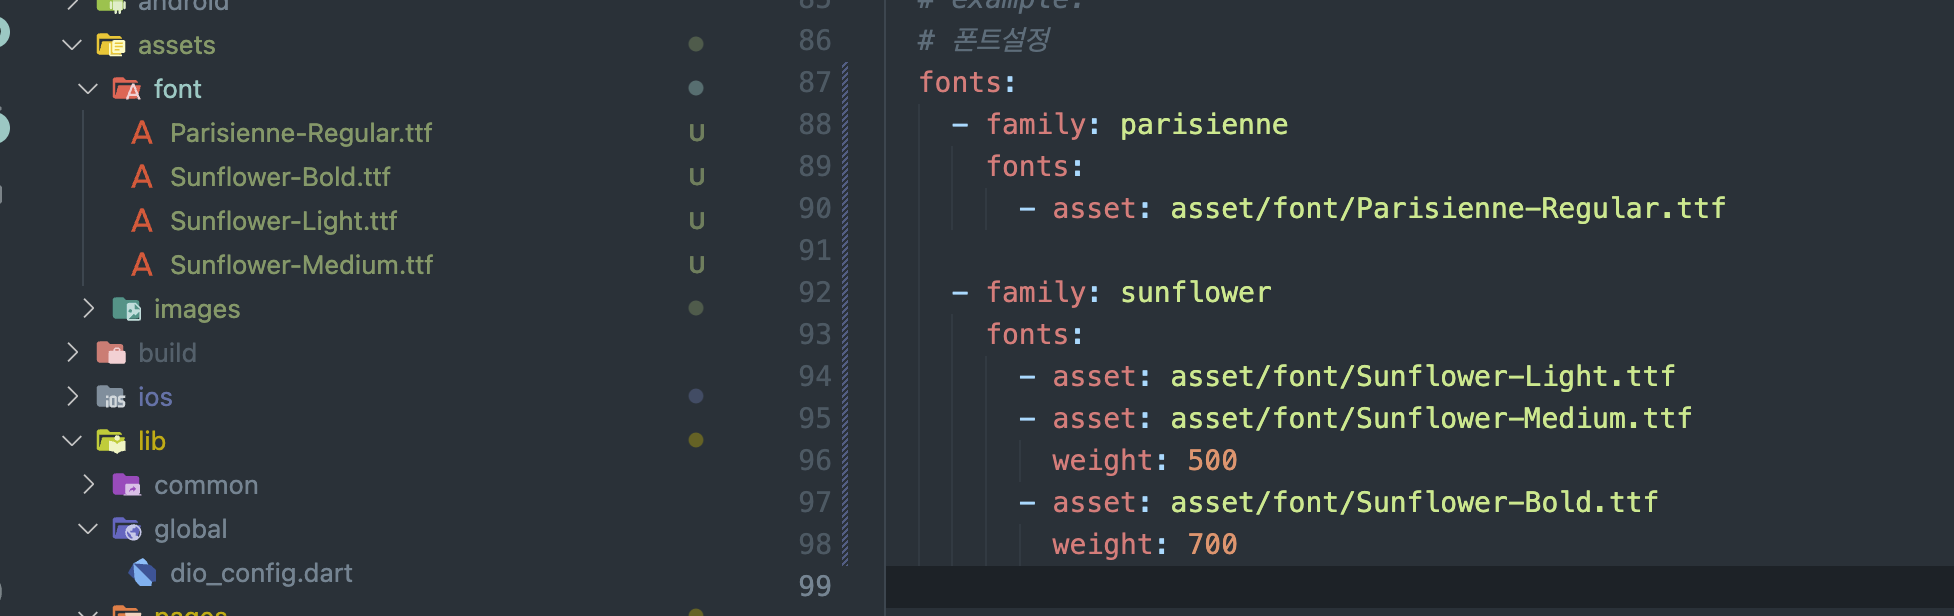
font 설정
- 구글 웹폰트 사용
- pubspec.yaml 파일에서 선언
위젯따로 빼기(가독성)
Column해당되는 부분(따로 뺄 부분) 선택 후 위젯으로 따로 빼줌(Command + .-> 위젯이름 입력(앞에_붙이는게 좋음))
UI 전체코드
import 'package:flutter/cupertino.dart';
import 'package:flutter/material.dart';
import 'package:flutter/rendering.dart';
import 'package:flutter/widgets.dart';

class UniScreen extends StatefulWidget {
  const UniScreen({super.key});

  @override
  State<UniScreen> createState() => _UniScreenState();
}

class _UniScreenState extends State<UniScreen> {
  @override
  Widget build(BuildContext context) {
    return Scaffold(
      backgroundColor: Colors.pink[100],
      body: SafeArea(
        bottom: false,
        child: SizedBox(
          width: MediaQuery.of(context).size.width,
          child: const Column(
            children: [
              _TopPart(),
              _BottomPart(),
            ],
          ),
        ),
      ),
    );
  }
}

class _TopPart extends StatelessWidget {
  const _TopPart({
    super.key,
  });

  @override
  Widget build(BuildContext context) {
    return Expanded(
      child: Column(
        mainAxisAlignment: MainAxisAlignment.spaceEvenly,
        children: [
          const Text(
            'U&I',
            style: TextStyle(
              color: Colors.white,
              fontFamily: 'parisienne',
              fontSize: 80,
            ),
          ),
          const Column(
            children: [
              Text(
                '우리 처음 만난 날',
                style: TextStyle(
                  color: Colors.white,
                  fontFamily: 'sunflower',
                  fontSize: 30,
                ),
              ),
              Text(
                '2024.04.07',
                style: TextStyle(
                  color: Colors.white,
                  fontFamily: 'sunflower',
                  fontSize: 20,
                ),
              ),
            ],
          ),
          IconButton(
            onPressed: () {},
            icon: const Icon(Icons.favorite),
            iconSize: 60,
            color: Colors.red,
          ),
          const Text(
            'D+1',
            style: TextStyle(
                color: Colors.white,
                fontFamily: 'sunflower',
                fontSize: 50,
                fontWeight: FontWeight.w700),
          ),
        ],
      ),
    );
  }
}

class _BottomPart extends StatelessWidget {
  const _BottomPart({
    super.key,
  });

  @override
  Widget build(BuildContext context) {
    return Expanded(
      child: Image.asset(
        'assets/images/biki.png',
        fit: BoxFit.cover,
      ),
    );
  }
}
DatePicker
- 버튼을 눌렀을 때 dialog패키지에서
showCupertinoDialog함수 불러옴 -> 자동으로 cupertino.dart가 import됨(cupertino.dart : IOS스타일 구현 )
showCupertinoDialog함수는 화면을 덮는 즉, 또 하나의 화면을 만들 수 있게 해줌
- 그 화면 안에 들어갈 위젯을 build 값에 넣어주면된다.
-
barrierDismissible: true: showCupertinoDialog 영역 외에 눌렀을 때 닫게 해줌 -
CupertinoDatePickerMode: DatePicke의 일자, 시간 등 어떤 모드로 할 지 정함 -
onDateTimeChanged() {}: 날짜나 시간이 바꼈을때 어떻게 할지 처리해주는 함수, 첫번째인자DateTime dateDateTime인지 어떻게 알지? DateTime이라는 날짜가 들어올거라는걸 알 수 있는 방법이 있음
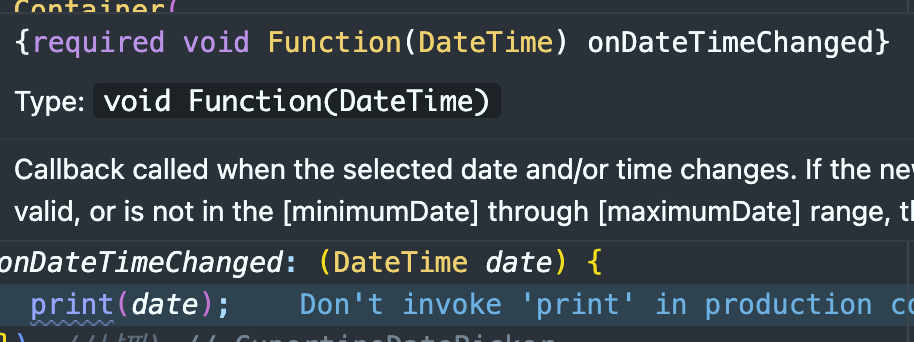
(모르겠으면 함수에 마우스 Hover하거나Command + 클릭해서 들어가서 보면됨)
IconButton(
            onPressed: () {
              showCupertinoDialog(
                context: context,
                barrierDismissible:
                    true, //showCupertinoDialog 영역 외에 눌렀을 때 닫게 해줌
                builder: (BuildContext context) {
                  return Align(
                    alignment: Alignment
                        .bottomCenter, //특정 위젯이 어디에 정렬을 해야되는지 모르면 height값줘도 최대한에 사이즈를 먹음
                    child: Container(
                      color: Colors.white,
                      height: 300,
                      child: CupertinoDatePicker(
                          mode: CupertinoDatePickerMode
                              .date, //CupertinoDatePickerMode에서 일시, 시간 등 고름
                          onDateTimeChanged: (DateTime date) {
                            print(date);
                          }), //날짜)
                    ),
                  );
                },
              );
            },
DateTime 상태관리
-
초기값 설정
DateTime selectedDate = DateTime.now(); -
날짜 업뎃 : 선택한 날짜
selectedDate에 할당
 onDateTimeChanged: (DateTime date) {
                            setState(() {
                              selectedDate = date;
                            });
}),- Text 변수처리해서 가져옴 업뎃되는
selectedDate값 가져옴
Text(
                '${selectedDate.year}.${selectedDate.month}.${selectedDate.day}',
                style: const TextStyle(
                  color: Colors.white,
                  fontFamily: 'sunflower',
                  fontSize: 20,
                ),
),- D-day설정 : 선택한 날짜와 오늘의 날짜를 비교
difference().inDays+1: 차이를 구하고 날짜로 표현(오늘부터 1일이니까 + 1해줌)
- 미래 선택 방지
maximumDate: 최대날짜 정함initialDateTime: CupertinoDatePicker가 실행됐을 떄 초기날짜 세팅CupertinoDatePicker를 실행하는 그 순간으로 DateTime.now로 지정되기 때문에 에러를 방지하기 위해 initialDateTime를 selectedDate로 설정
maximumDate: DateTime(
                            now.year,
                            now.month,
                            now.day,
                          ),
_TopPar 전체 코드
class _TopPartState extends State<_TopPart> {
  DateTime selectedDate = DateTime(
    DateTime.now().year,
    DateTime.now().month,
    DateTime.now().day,
  ); //기본값은 현재 날짜로 지정

  @override
  Widget build(BuildContext context) {
    final now = DateTime.now();

    return Expanded(
      child: Column(
        mainAxisAlignment: MainAxisAlignment.spaceEvenly,
        children: [
          const Text(
            'U&I',
            style: TextStyle(
              color: Colors.white,
              fontFamily: 'parisienne',
              fontSize: 80,
            ),
          ),
          Column(
            children: [
              const Text(
                '우리 처음 만난 날',
                style: TextStyle(
                  color: Colors.white,
                  fontFamily: 'sunflower',
                  fontSize: 30,
                ),
              ),
              Text(
                '${selectedDate.year}.${selectedDate.month}.${selectedDate.day}',
                style: const TextStyle(
                  color: Colors.white,
                  fontFamily: 'sunflower',
                  fontSize: 20,
                ),
              ),
            ],
          ),
          IconButton(
            onPressed: () {
              showCupertinoDialog(
                context: context,
                barrierDismissible:
                    true, //showCupertinoDialog 영역 외에 눌렀을 때 닫게 해줌
                builder: (BuildContext context) {
                  return Align(
                    alignment: Alignment
                        .bottomCenter, //특정 위젯이 어디에 정렬을 해야되는지 모르면 height값줘도 최대한에 사이즈를 먹음
                    child: Container(
                      color: Colors.white,
                      height: 300,
                      child: CupertinoDatePicker(
                          mode: CupertinoDatePickerMode
                              .date, //CupertinoDatePickerMode에서 일시, 시간 등 고름
                          initialDateTime: selectedDate,
                          maximumDate: DateTime(
                            now.year,
                            now.month,
                            now.day,
                          ),
                          onDateTimeChanged: (DateTime date) {
                            setState(() {
                              selectedDate = date;
                            });
                          }), //날짜)
                    ),
                  );
                },
              );
            },
            icon: const Icon(Icons.favorite),
            iconSize: 60,
            color: Colors.red,
          ),
          Text(
            'D+${DateTime(
                  now.year,
                  now.month,
                  now.day,
                ).difference(selectedDate).inDays + 1}',
            style: const TextStyle(
                color: Colors.white,
                fontFamily: 'sunflower',
                fontSize: 50,
                fontWeight: FontWeight.w700),
          ),
        ],
      ),
    );
  }
}
상태관리 하나로 관리
- 상태는 최상위 위젯에서 하나로 관리하는게 코드 관리에 유리함(안그러면 점점 코드를 이해하기 어려워짐)
-
_TopPart를 다시stateless로 변경 -
selectedDate를 최상위 위젯으로 옮김 -> 여기까지하면_TopPart는selectedDate없다고 난리남
3. _TopPart컨스트럭터 생성하고 selectedDate를 파라미터로 받아와서 변수에 저장해줌
-
onPressed도 상위로 가져옴 -
가독성을 위해
onHeartPressed함수 생성
상태를 하나로 관리한 전체코드
import 'package:flutter/cupertino.dart';
import 'package:flutter/material.dart';

class UniScreen extends StatefulWidget {
  const UniScreen({super.key});

  @override
  State<UniScreen> createState() => _UniScreenState();
}

class _UniScreenState extends State<UniScreen> {
  DateTime selectedDate = DateTime(
    DateTime.now().year,
    DateTime.now().month,
    DateTime.now().day,
  ); //기본값은 현재 날짜로 지정

  @override
  Widget build(BuildContext context) {
    return Scaffold(
      backgroundColor: Colors.pink[100],
      body: SafeArea(
        bottom: false,
        child: SizedBox(
          width: MediaQuery.of(context).size.width,
          child: Column(
            children: [
              _TopPart(selectedDate: selectedDate, onPressed: onHeartPressed),
              const _BottomPart(),
            ],
          ),
        ),
      ),
    );
  }

  void onHeartPressed() {
    final now = DateTime.now();

    showCupertinoDialog(
      context: context,
      barrierDismissible: true, //showCupertinoDialog 영역 외에 눌렀을 때 닫게 해줌
      builder: (BuildContext context) {
        return Align(
          alignment: Alignment
              .bottomCenter, //특정 위젯이 어디에 정렬을 해야되는지 모르면 height값줘도 최대한에 사이즈를 먹음
          child: Container(
            color: Colors.white,
            height: 300,
            child: CupertinoDatePicker(
              mode: CupertinoDatePickerMode
                  .date, //CupertinoDatePickerMode에서 일시, 시간 등 고름
              initialDateTime: selectedDate,
              maximumDate: DateTime(
                now.year,
                now.month,
                now.day,
              ),
              onDateTimeChanged: (DateTime date) {
                setState(() {
                  selectedDate = date;
                });
              },
            ), //날짜)
          ),
        );
      },
    );
  }
}

class _TopPart extends StatelessWidget {
  final DateTime selectedDate;
  final VoidCallback onPressed;

  const _TopPart({
    required this.selectedDate,
    required this.onPressed,
    Key? key,
  }) : super(key: key);

  @override
  Widget build(BuildContext context) {
    final now = DateTime.now();

    return Expanded(
      child: Column(
        mainAxisAlignment: MainAxisAlignment.spaceEvenly,
        children: [
          const Text(
            'U&I',
            style: TextStyle(
              color: Colors.white,
              fontFamily: 'parisienne',
              fontSize: 80,
            ),
          ),
          Column(
            children: [
              const Text(
                '우리 처음 만난 날',
                style: TextStyle(
                  color: Colors.white,
                  fontFamily: 'sunflower',
                  fontSize: 30,
                ),
              ),
              Text(
                '${selectedDate.year}.${selectedDate.month}.${selectedDate.day}',
                style: const TextStyle(
                  color: Colors.white,
                  fontFamily: 'sunflower',
                  fontSize: 20,
                ),
              ),
            ],
          ),
          IconButton(
            onPressed: onPressed,
            icon: const Icon(Icons.favorite),
            iconSize: 60,
            color: Colors.red,
          ),
          Text(
            'D+${DateTime(
                  now.year,
                  now.month,
                  now.day,
                ).difference(selectedDate).inDays + 1}',
            style: const TextStyle(
                color: Colors.white,
                fontFamily: 'sunflower',
                fontSize: 50,
                fontWeight: FontWeight.w700),
          ),
        ],
      ),
    );
  }
}

class _BottomPart extends StatelessWidget {
  const _BottomPart({
    super.key,
  });

  @override
  Widget build(BuildContext context) {
    return Expanded(
      child: Image.asset(
        'assets/images/biki.png',
        fit: BoxFit.cover,
      ),
    );
  }
}

개발짜🏃♀️