시작하기 전에
JDK 동적 프록시와 CGLIB 프록시의 차이
동적 프록시 소개
이전 포스팅, [김영한 스프링 review] 스프링 핵심 원리 - 고급편 (4)에서 프록시 개념을 통해 코드를 리팩토링 해봤다.
이전 포스팅에서는 적용해야 하는 클래스마다 프록시 클래스를 만들어줘야 했다.
가령, 적용해야 하는 클래스가 100개면 100개의 프록시 클래스를 만들어야 했는데 이는 너무 불편하고 자원의 소모가 크다.
사실 프록시가 동작하는 과정은 모두 동일하다.
원본 클래스 또는 인터페이스를 상속받고 실제 로직 앞뒤로 부가기능을 넣는 것.
이를 공통화한게 동적 프록시이다.
JDK 동적 프록시 (인터페이스 기반)
소개
JDK 동적 프록시는 인터페이스를 기반으로 프록시를 생성해준다.
따라서 인터페이스가 필수적이다.
예제코드에서는 아래와 같이 Interface와 구현체를 사용한다.
AInerface, AImpl
public interface AInterface {
    String call();
}

@Slf4j
public class AImpl implements AInterface {
    @Override
    public String call() {
        log.info("A 호출");
        return "a";
    }
}
BInterface, BImpl
public interface BInterface {
    String call();
}

@Slf4j
public class BImpl implements BInterface {
    @Override
    public String call() {
        log.info("B 호출");
        return "b";
    }
}`
예제 코드
JDK 동적프록시를 사용하기 위해서는, JDK가 제공하는 InvocationHandler를 상속받으면 된다.
public interface InvocationHandler {

	// Object proxy : 프록시 자신
	// Method method : 호출한 메서드
	// Object[] args : 메서드를 호출할 때 전달한 인수
    public Object invoke(Object proxy, Method method, Object[] args) throws Throwable;
}
메소드 수행에 소요된 시간을 찍는 TimeInvocationHandler
@Slf4j
public class TimeInvocationHandler implements InvocationHandler {
    private final Object target;

    public TimeInvocationHandler(Object target) {
        this.target = target;
    }

    @Override
    public Object invoke(Object proxy, Method method, Object[] args) throws Throwable {
        log.info("TimeProxy 실행");
        long startTime = System.currentTimeMillis();
        Object result = method.invoke(target, args);
        long endTime = System.currentTimeMillis();
        long resultTime = endTime - startTime;
        log.info("TimeProxy 종료 resultTime={}", resultTime);
        return result;
    }
}
테스트 코드
프록시 객체를 생성하기 위해서는,
Proxy.newProxyInstance(ClassLoader, Class<?>[], InvocationHandler)
메소드를 호출하면 된다.
@Slf4j
public class JdkDynamicProxyTest {
    @Test
    void dynamicA() {
        AInterface target = new AImpl();
        TimeInvocationHandler handler = new TimeInvocationHandler(target);
        AInterface proxy = (AInterface)Proxy.newProxyInstance(AInterface.class.getClassLoader(), new Class[] {AInterface.class}, handler);
        proxy.call();
        log.info("targetClass={}", target.getClass());
        log.info("proxyClass={}", proxy.getClass());
    }

    @Test
    void dynamicB() {
        BInterface target = new BImpl();
        TimeInvocationHandler handler = new TimeInvocationHandler(target);
        BInterface proxy = (BInterface)Proxy.newProxyInstance(BInterface.class.getClassLoader(), new Class[] {BInterface.class}, handler);
        proxy.call();
        log.info("targetClass={}", target.getClass());
        log.info("proxyClass={}", proxy.getClass());
    }
}
dynamicA() 테스트 코드 실행결과
TimeInvocationHandler - TimeProxy 실행
AImpl - A 호출
TimeInvocationHandler - TimeProxy 종료 resultTime=0
JdkDynamicProxyTest - targetClass=class hello.proxy.jdkdynamic.code.AImpl
JdkDynamicProxyTest - proxyClass=class com.sun.proxy.$Proxy1
프록시가 정상적으로 생성되고 실행된 것을 알 수 있다.
참고로, proxyClass인 com.sun.proxy.$Proxy1 은 JDK가 만들어준 동적 프록시이다.
이 프록시 클래스는 TimeInvocationHandler의 invoke() 를 실행한다.
클래스 의존관계
JDK 동적프록시 적용 전 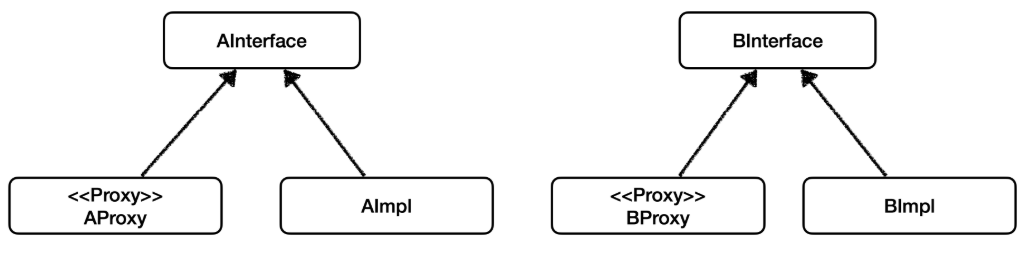
JDK 동적프록시 적용 후 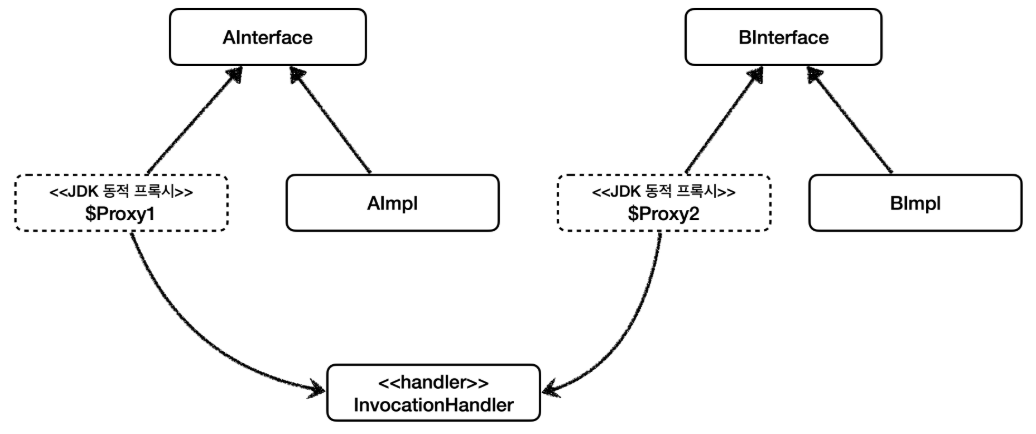
JDK 동적 프록시 - 적용1
이전에 개발했던 LogTrace에 JDK 동적 프록시를 적용해보자.
LogTraceBasicHandler
public class LogTraceBasicHandler implements InvocationHandler {

    private final Object target;
    private final LogTrace logTrace;

    public LogTraceBasicHandler(Object target, LogTrace logTrace) {
        this.target = target;
        this.logTrace = logTrace;
    }

    @Override
    public Object invoke(Object proxy, Method method, Object[] args) throws Throwable {
        TraceStatus status = null;
        try {
            String message = method.getDeclaringClass().getSimpleName() + "." + method.getName() + "()";
            status = logTrace.begin(message);
            //로직 호출
            Object result = method.invoke(target, args);
            logTrace.end(status);
            return result;
        } catch (Exception e) {
            logTrace.exception(status, e);
            throw e;
        }
    }
}
DynamicProxyBasicConfig
JDK 동적 프록시는 인터페이스를 사용해야 한다.!
이전에는 Controller, Service, Repository에 각각 프록시를 만들어줬지만
이제는 JDK 동적 프록시가 알아서 프록시 객체를 생성해주기 때문에,
위에서 만든 LogTraceBasicHandler를 재활용할 수 있다.
@Configuration
public class DynamicProxyBasicConfig {
    @Bean
    public OrderControllerInterface orderControllerInterface(LogTrace logTrace) {
        OrderControllerInterface orderController = new OrderControllerImpl(orderServiceInterface(logTrace));
        OrderControllerInterface proxy = (OrderControllerInterface)Proxy.newProxyInstance(OrderControllerInterface.class.getClassLoader(), new Class[]{OrderControllerInterface.class}, new LogTraceBasicHandler(orderController, logTrace));
        return proxy;
    }

    @Bean
    public OrderServiceInterface orderServiceInterface(LogTrace logTrace) {
        OrderServiceInterface orderService = new OrderServiceImpl(orderRepositoryInterface(logTrace));
        OrderServiceInterface proxy = (OrderServiceInterface)Proxy.newProxyInstance(OrderServiceInterface.class.getClassLoader(), new Class[]{OrderServiceInterface.class}, new LogTraceBasicHandler(orderService, logTrace));
        return proxy;
    }

    @Bean
    public OrderRepositoryInterface orderRepositoryInterface(LogTrace logTrace) {
        OrderRepositoryInterface orderRepository = new OrderRepositoryImpl();
        OrderRepositoryInterface proxy = (OrderRepositoryV1)Proxy.newProxyInstance(OrderRepositoryV1.class.getClassLoader(), new Class[]{OrderRepositoryV1.class}, new LogTraceBasicHandler(orderRepository, logTrace));
        return proxy;
    }
}
JDK 동적 프록시 - 적용2
여기까지 적용하고나면, /no-log API를 호출하더라도 로그가 찍히는걸 확인할 수 있다.
프록시 객체에 특정 조건을 만족할 때만 동작하도록 개선해보자.
LogTraceFilterHandler
public class LogTraceFilterHandler implements InvocationHandler {

    private final Object target;
    private final LogTrace logTrace;
    private final String[] patterns;

    public LogTraceFilterHandler(Object target, LogTrace logTrace, String... patterns) {
        this.target = target;
        this.logTrace = logTrace;
        this.patterns = patterns;
    }

    @Override
    public Object invoke(Object proxy, Method method, Object[] args) throws Throwable {
        //메서드 이름 필터
        String methodName = method.getName();
        if (!PatternMatchUtils.simpleMatch(patterns, methodName)) {
            return method.invoke(target, args);
        }
        TraceStatus status = null;
        try {
            String message = method.getDeclaringClass().getSimpleName() + "." + method.getName() + "()";
            status = logTrace.begin(message);
            //로직 호출
            Object result = method.invoke(target, args);
            logTrace.end(status);
            return result;
        } catch (Exception e) {
            logTrace.exception(status, e);
            throw e;
        }
    }
}
스프링에서 제공하는 PatternMatchUtils.simpleMatch()를 사용하면 문자열에 패턴매치 여부를 간단하게 확인할 수 있다. 패턴은 아래와 같다.
xxx : xxx가 정확히 일치하면 매치
*xxx : xxx로 끝나면 매치
xxx* : xxx로 시작하면 매치
*xxx* : xxx가 포함되면 매치
DynamicProxyFilterConfig
@Configuration
public class DynamicProxyFilterConfig {

    private static final String[] PATTERNS = {"request*", "order*", "save*"};

    @Bean
    public OrderControllerInterface orderControllerInterface(LogTrace logTrace) {
        OrderControllerInterface orderController = new OrderControllerImpl(orderServiceInterface(logTrace));
        OrderControllerInterface proxy = (OrderControllerInterface)Proxy.newProxyInstance(OrderControllerInterface.class.getClassLoader(), new Class[]{OrderControllerInterface.class}, new LogTraceFilterHandler(orderController, logTrace, PATTERNS));
        return proxy;
    }

    @Bean
    public OrderServiceInterface orderServiceInterface(LogTrace logTrace) {
        OrderServiceInterface orderService = new OrderServiceImpl(orderRepositoryInterface(logTrace));
        OrderServiceInterface proxy = (OrderServiceInterface)Proxy.newProxyInstance(OrderServiceInterface.class.getClassLoader(), new Class[]{OrderServiceInterface.class}, new LogTraceFilterHandler(orderService, logTrace, PATTERNS));
        return proxy;
    }

    @Bean
    public OrderRepositoryInterface orderRepositoryInterface(LogTrace logTrace) {
        OrderRepositoryInterface orderRepository = new OrderRepositoryImpl();
        OrderRepositoryInterface proxy = (OrderRepositoryInterface)Proxy.newProxyInstance(OrderRepositoryInterface.class.getClassLoader(), new Class[]{OrderRepositoryInterface.class}, new LogTraceFilterHandler(orderRepository, logTrace, PATTERNS));
        return proxy;
    }
}
CGLIB (Code Generator Library) 프록시
소개
- CGLIB는 바이트코드를 조작해서 동적으로 클래스를 생성하는 기술을 제공하는 라이브러리이다.
- CGLIB를 사용하면 인터페이스가 없어도 구체 클래스만 가지고 동적 프록시를 만들어낼 수 있다.
- 일반적으로는 CGLIB를 직접 구현하진 않는다. (프록시 팩토리로 간단하게 생성할 수 있기 때문에)
예제 코드
ConcreteService
@Slf4j
public class ConcreteService {
    public void call() {
        log.info("ConcreteService 호출");
    }
}
TimeMethodInterceptor
CGLIB 프록시는 MethodInterceptor를 통해 CGLIB 프록시의 실행 로직을 정의한다.
public interface MethodInterceptor extends Callback {
Object intercept(Object, Method, Object[], MethodProxy) throws Throwable;
}Object : CGLIB가 적용된 객체
Method : 호출된 메서드
Object[] : 메서드를 호출하면서 전달된 인수
MethodProxy : 메서드 호출에 사용
@Slf4j
public class TimeMethodInterceptor implements MethodInterceptor {

    private final Object target;

    public TimeMethodInterceptor(Object target) {
        this.target = target;
    }

    @Override
    public Object intercept(Object obj, Method method, Object[] args, MethodProxy proxy) throws Throwable {
        log.info("TimeProxy 실행");
        long startTime = System.currentTimeMillis();
        Object result = proxy.invoke(target, args);
        long endTime = System.currentTimeMillis();
        long resultTime = endTime - startTime;
        log.info("TimeProxy 종료 resultTime={}", resultTime);
        return result;
    }
}
테스트 코드
@Slf4j
public class CglibTest {

    @Test
    void cglib() {
        ConcreteService target = new ConcreteService();
        Enhancer enhancer = new Enhancer();
		// 어떤 구체클래스를 상속받는지
        enhancer.setSuperclass(ConcreteService.class);
		// 실행할 로직이 있는 MethodInterceptor
        enhancer.setCallback(new TimeMethodInterceptor(target));
		// 프록시 객체를 생성한다.
        ConcreteService proxy = (ConcreteService)enhancer.create();
        log.info("targetClass={}", target.getClass());
        log.info("proxyClass={}", proxy.getClass());
        proxy.call();
    }
}
JDK 동적 프록시는 Proxy클래스를 통해 프록시를 생성하는것 처럼,
CGLIB 프록시는 Enhancer를 통해 프록시를 생성한다.
CglibTest - targetClass=class hello.proxy.common.service.ConcreteService
CglibTest - proxyClass=class hello.proxy.common.service.ConcreteService$
$EnhancerByCGLIB$$25d6b0e3
TimeMethodInterceptor - TimeProxy 실행
ConcreteService - ConcreteService 호출
TimeMethodInterceptor - TimeProxy 종료 resultTime=9
프록시 팩토리
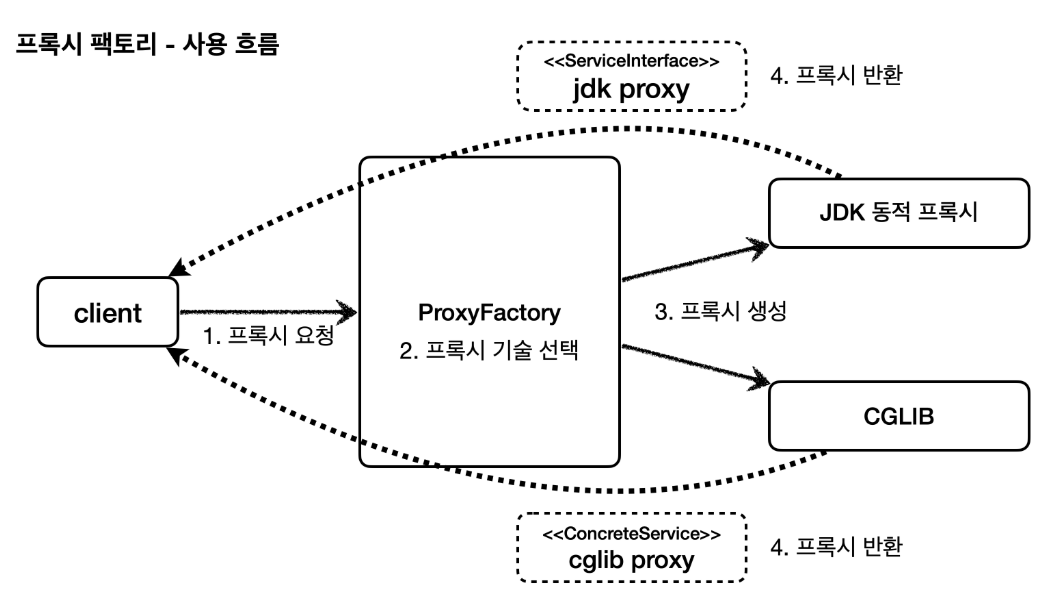
소개
위에서 알아본 JDK 동적프록시와 CGLIB 프록시는, 사용할 수 있는 전제조건 (클래스, 인터페이스 여부?)이 다르다. 따라서, 개발자는 각 상황에 맞는 프록시를 개별적으로 적용해줘야 하는 불편함이 있다.
또한, 로직을 적용하기 위해 JDK 동적 프록시에서는 InvocationHandler를, CGLIB 에서는 MethodInterceptor를 사용한다. 목적이나 동작 방식을 보면 둘이 비슷한데, 이를 중복으로 만들어서 관리하는 것도 불편하다.
프록시 팩토리를 통해 이러한 불편한 점을 해소할 수 있다.
프록시 팩토리는 input으로 들어온 객체에 따라 알아서 JDK 동적 프록시 또는 CGLIB 프록시로 만들어준다.
Advice와 Pointcut
JDK 동적 프록시에서는 로직을 실행하기 위해 InvocationHandler를
CGLIB 프록시에서는 MethodInterceptor 를 사용한다.
아무리 ProxyFactory가 알아서 로직을 만들어준다지만, 실행할 로직을 어떻게 정의해야할까?
스프링에서는 이를 위해 Advice라는 개념을 도입했다.
개발자는 ProxyFactory를 사용할 때 InvocationHandler나 MethodInterceprtor를 만들지 않고
Advice를 통해 로직을 정의하고 넘기면, ProxyFactory는 프록시를 만들면서 InvocationHandler나 MethodInterceptor가 Advice를 실행하게 함으로써 공통화시킨다.
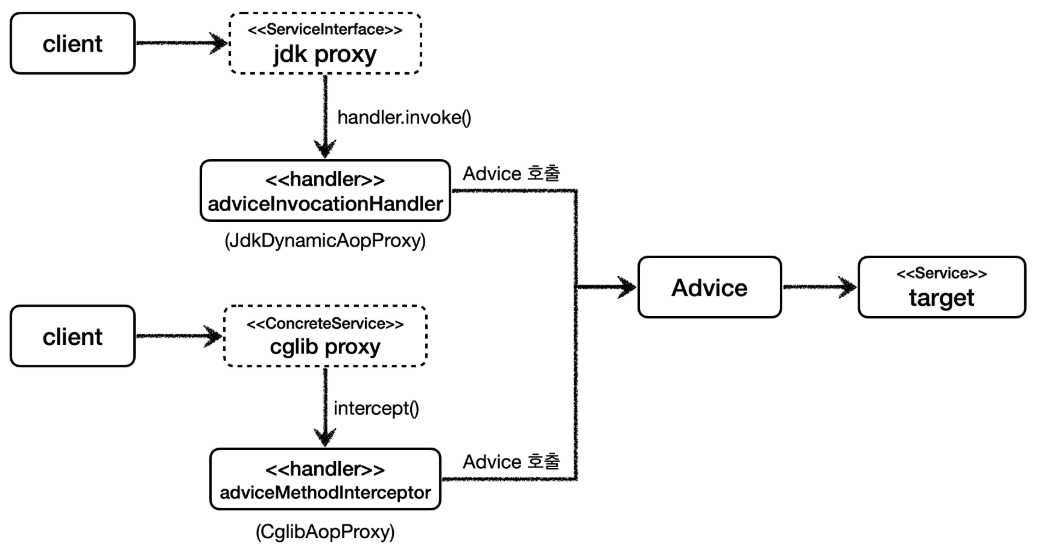
Advice를 만드는 방법은 여러가지가 있지만, 대표적인 방법은 MethodInterceptor를 사용하는 것이다.
참고로, Advice에서 사용하는 MethodInterceptor은 CGLIB에서 사용하는 클래스와 이름이 같지만, 패키지와 method syntax가 다르므로 주의하자.
package org.aopalliance.intercept;

public interface MethodInterceptor extends Interceptor {
    Object invoke(MethodInvocation invocation) throws Throwable;
}
참고로, CGLIB에서는 org.springframework.cglib.proxy 패키지를 사용한다.
위에 JDK 동적 프록시에서, PatternMatchUtils를 통해 특정 조건에서만 로직이 수행되게 필터를 걸었다.
이러한 필터를 JDK 동적 프록시와 CGLIB 에 동일하게 적용하기 위한 것이 Pointcut이다.
자세한 개념과 사용방법은 아래에서 다시 다룬다.
프록시 팩토리 - 예제 코드1
TimeAdvice
// 패키지명에 주의!!
import org.aopalliance.intercept.MethodInterceptor;
import org.aopalliance.intercept.MethodInvocation;

@Slf4j
public class TimeAdvice implements MethodInterceptor {

    @Override
    public Object invoke(MethodInvocation invocation) throws Throwable {
        log.info("TimeProxy 실행");
        long startTime = System.currentTimeMillis();
		// 로직을 수행한다.
        Object result = invocation.proceed();
        long endTime = System.currentTimeMillis();
        long resultTime = endTime - startTime;
        log.info("TimeProxy 종료 resultTime={}ms", resultTime);
        return result;
    }
}
기존에 JDK 동적프록시나 CGLIB 프록시에서는 호출할 실제 구현클래스를 target으로 넘겼는데 Advice에서는 그러한 Target이 없다.
그 이유는 프록시 팩토리로 프록시를 생성하는 단계에서 이미 target 정보를 파라미터로 전달받기 때문이다.
테스트 코드 1
public interface ServiceInterface {
    void save();
    void find();
}

@Slf4j
public class ServiceImpl implements ServiceInterface {
    @Override
    public void save() {
        log.info("save 호출");
    }

    @Override
    public void find() {
        log.info("find 호출");
    }
}
@Slf4j
public class ProxyFactoryTest {
@Test
@DisplayName("인터페이스가 있으면 JDK 동적 프록시 사용")
void interfaceProxy() {
ServiceInterface target = new ServiceImpl();
// 프록시팩토리를 생성할 때 타겟을 같이 넘긴다.
ProxyFactory proxyFactory = new ProxyFactory(target);
// Advice (로직)을 추가한다.
proxyFactory.addAdvice(new TimeAdvice());
ServiceInterface proxy = (ServiceInterface)proxyFactory.getProxy();
log.info("targetClass={}", target.getClass());
log.info("proxyClass={}", proxy.getClass());
proxy.save();
// 프록시 팩토리를 통해서 프록시가 생성되면 JDK 동적 프록시나, CGLIB 모두 참이다.
assertThat(AopUtils.isAopProxy(proxy)).isTrue();
// 프록시 팩토리를 통해서 프록시가 생성되고, JDK 동적 프록시인 경우 참
assertThat(AopUtils.isJdkDynamicProxy(proxy)).isTrue();
// 프록시 팩토리를 통해서 프록시가 생성되고, CGLIB 동적 프록시인 경우 참
assertThat(AopUtils.isCglibProxy(proxy)).isFalse();
}
}ProxyFactoryTest - targetClass=class hello.proxy.common.service.ServiceImpl
ProxyFactoryTest - proxyClass=class com.sun.proxy.$Proxy13
TimeAdvice - TimeProxy 실행
ServiceImpl - save 호출
TimeAdvice - TimeProxy 종료 resultTime=1ms테스트 코드 2
@Test
@DisplayName("구체 클래스만 있으면 CGLIB 사용")
void concreteProxy() {
    ConcreteService target = new ConcreteService();
    ProxyFactory proxyFactory = new ProxyFactory(target);
    proxyFactory.addAdvice(new TimeAdvice());
    ConcreteService proxy = (ConcreteService)proxyFactory.getProxy();
    log.info("targetClass={}", target.getClass());
    log.info("proxyClass={}", proxy.getClass());
    proxy.call();
    assertThat(AopUtils.isAopProxy(proxy)).isTrue();
    assertThat(AopUtils.isJdkDynamicProxy(proxy)).isFalse();
    assertThat(AopUtils.isCglibProxy(proxy)).isTrue();
}
ProxyFactoryTest - targetClass=class hello.proxy.common.service.ConcreteService
ProxyFactoryTest - proxyClass=class hello.proxy.common.service.ConcreteService$
$EnhancerBySpringCGLIB$$103821ba
TimeAdvice - TimeProxy 실행
ConcreteService - ConcreteService 호출
TimeAdvice - TimeProxy 종료 resultTime=1ms테스트 코드 3
인터페이스 -> JDK 동적 프록시
구체 클래스 -> CGLIB 프록시
를 사용하지만, setProxyTargetClass 옵션을 통해 인터페이스가 있어도 CGLIB 을 사용할 수 있다.
@Test
@DisplayName("ProxyTargetClass 옵션을 사용하면 인터페이스가 있어도 CGLIB를 사용하고, 클래스 기반 프록시 사용")
void proxyTargetClass() {
    ServiceInterface target = new ServiceImpl();
    ProxyFactory proxyFactory = new ProxyFactory(target);
    proxyFactory.setProxyTargetClass(true); //중요
    proxyFactory.addAdvice(new TimeAdvice());
    ServiceInterface proxy = (ServiceInterface)proxyFactory.getProxy();
    log.info("targetClass={}", target.getClass());
    log.info("proxyClass={}", proxy.getClass());
    proxy.save();
    assertThat(AopUtils.isAopProxy(proxy)).isTrue();
    assertThat(AopUtils.isJdkDynamicProxy(proxy)).isFalse();
    assertThat(AopUtils.isCglibProxy(proxy)).isTrue();
}
ProxyFactoryTest - targetClass=class hello.proxy.common.service.ServiceImpl
ProxyFactoryTest - proxyClass=class hello.proxy.common.service.ServiceImpl$
$EnhancerBySpringCGLIB$$2bbf51ab
TimeAdvice - TimeProxy 실행
ServiceImpl - save 호출
TimeAdvice - TimeProxy 종료 resultTime=1ms참고로, 스프링 부트는 AOP를 적용할 때 기본적으로 proxyTargetClass=true 로 설정해서 사용한다.
따라서 인터페이스가 있어도 항상 CGLIB를 사용해서 구체 클래스를 기반으로 프록시를 생성한다.