목차
1. Thymeleaf 란?
2. Thymeleaf 사용하기
3. Thymeleaf 사용 예제
4. Thymeleaf 프로젝트 배포
5. 마무리
1. Thymeleaf 란?
기존 Java기반 Web Project에서는 JSP Template Engine을 사용해서 Front End Page를 구현했다. 그러나 완벽할 줄 알았던 JSP에도 아래와 같은 문제가 있었다.
- JSP는 Frontend Page라고 하기에 너무 Java의존적이다. 또한 페이지 내부에 Java 코드와 HTML 코드가 혼용되어 있기에 시인성이 좋지 못하고 MVC 패턴중 VIEW의 성향과 MODEL의 성향이 혼용됨으로 목적성이 약해진다.
- JSP를 배포하기 위해서는 .war 확장자로 압축해야 하는데 이 .war는 Tomcat과 Apache, 즉 WAS(Web Application Server)를 통해서만 패키지의 내용을 확인할 수 있다. 즉 WAS에 지나치게 의존적이다.
그렇기에 Spring Boot는 의존적인 관계를 최소화하고 VIEW의 목적성을 강화하기 위해 Thymeleaf의 사용을 권장한다.
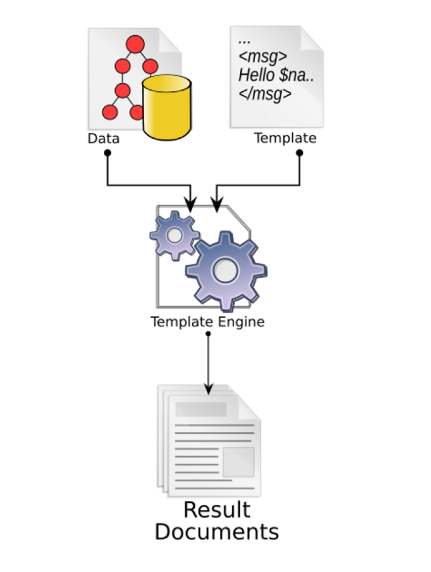
Template Engine 은 무엇인가?
 (출처: https://en.wikipedia.org/wiki/Template_processor)
Template Engine은 템플릿 양식과 특정 데이터 모델에 따른 입력 자료를 결합하여 결과를 출력하는 소프트웨어를 말한다. 즉 Backend(Server)에서 처리한 데이터를 HTML안에 넣어 Frontend(Client)로 전송해 주는 역할을 한다.
그렇다면 JSP를 대체할 수 있는 Template Engine은 무엇이 있는가?
| Template Engine | 특징 |
|---|---|
| Mustache |
|
| Thymeleaf |
|
| FreeMarker |
|
2. Thymeleaf 사용하기
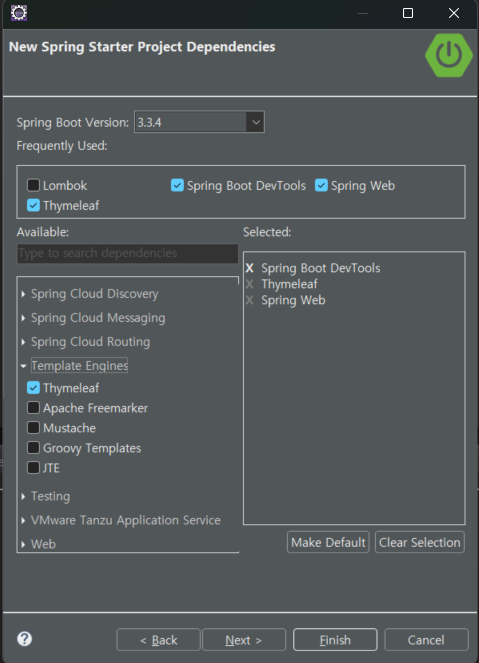
Thymeleaf를 사용하기 위해서는 Maven/Gradle을 통해서 Thymeleaf를 추가해주거나, Spring initializr, Spring Boot에서 제공하는 'Spring Starter Project'를 통해서 Thymeleaf를 추가해주면 된다.
Thymeleaf - Maven
<dependency>
    <groupId>org.thymeleaf</groupId>
    <artifactId>thymeleaf</artifactId>
    <version>3.1.2.RELEASE</version>
</dependency>
Thymeleaf - Gradle
implementation group: 'org.thymeleaf',
name: 'thymeleaf', version: '3.1.2.RELEASE'
Thymeleaf - Spring Starter Project
1) Thymeleaf와 관련된 application.properties 설정
| spring.thymeleaf.cache=true / false | false로 해놓았을 때 타임리프를 수정하고 서버를 재시작할 필요 없이 새로 고침만으로 반영이 된다. 그러나 배포시에는 자주 발생하는 새로고침으로 인한 서버 부하를 피하기 위해 true로 설정하는 것을 권장한다. |
| spring.thymeleaf.prefix=classpath:/templates/ | thymeleaf 파일들의 경로를 설정할 수 있다. 'classpath:/templates/'이 기본값이다. |
| spring.thymeleaf.suffix=.html | thymeleaf 파일의 확장자를 설정해 준다. 기본값은 '.html'이다. |
| spring.thymeleaf.enabled=true / false | thymeleaf 파일을 사용 여부를 설정 할 수 있다. |
| spring.thymeleaf.encoding=UTF-8 | thymeleaf 파일의 인코딩을 설정 할 수 있다. |
2) HTML내에서 Thymeleaf를 사용하기 위한 설정
<html xmlns:th="https://www.thymeleaf.org">
기존 HTML의 기본 구조에서 <html> 태그에 해당 코드를 작성함으로 해당 파일이 Template Engine임을 선언함과 동시에 th:명령어 구조로 Thymeleaf 명령어를 사용할 수 있다.
3) Thymeleaf의 문법과 명령어
| 표현 | 설명 | 예제 |
|---|---|---|
| @{ ... } | URL 링크 표현식 | th:href="@{/css/bootstrap.min.css}" th:href="@{/{itemId}/edit(itemId=${item.id})}" |
| | ... | | literal 대체 | th:text="|Hello ${user.name}!|" (= th:text="'Hello '+${user.name}+'!'" |
| ${ ... } | 변수 | th:text=${user.name} |
| #{ ... } | 메시지. properties 같은 외부 자원에서 코드에 해당하는 문자열 get. |
th:text="#{member.name}" |
| *{ ... } | 선택 변수 |  |
- th:text
- 일반적인 텍스트 형식으로 데이터를 화면에 출력한다.
- ${} 표현식을 사용하여 자바 컨트롤러에서 전달받은 데이터에 접근할 수 있다
- th:if, th:unless
- th:if는 Java의 if 문과 동일하고, th:unless는 if not 의 개념이다.
- th:switch, th:case
- switch case문으로 제어할 태그를 th:block으로 설정하고 그 안에 코드를 작성한다.
- th:block이 아닌 span이나 div같은 태그로도 가능하다.
- th:each
- 컬렉션 객체를 반복처리 한다. 자바의 forEach와 유사한 기능이다.
- th:fragment
- head태그에 해당 속성을 사용해서 fragment의 이름을 지정한다.
- fragment는 다른 HTML에서 include 또는 replace 속성을 사용해서 적용할 수 있다.
- th:block
- head영역을 지정해서 명령을 주는 기능이다. 해당 기능은 동적인 처리가 필요할 때 사용된다.
- th:replace
- JSP의 include 태그와 유사한 속성이다.
- th:fragment을 통해 설정한 이름을 찾아 해당 코드로 치환한다.
- th:href
- a태그의 href 속성과 동일한 기능을 수행한다.
- 웹 애플리케이션을 구분하는 Context Path를 포함한다.
- 파라미터 값도 설정 가능하다.
th:href="@{/thleaf/ex4(param1='안녕', param2='반가워')}"
- th:action
- form 태그 사용시 해당 경로로 요청을 보낼 때 사용한다.
- th:object
- 컬렉션 객체 데이터를 th:object에 설정해둔 객체로 받아들인다.
3. Thymeleaf 사용 예제
1) DTO를 담은 ArrayList를 출력하는 예제
<h2 th:text="'상품 자료들 출력'"></h2>
	<table border="true">
		<tr>
			<th>번호</th>
			<th>아이디</th>
			<th>상품명</th>
			<th>가격</th>
			<th>등록일</th>
		</tr>
      <!--th:each를 사용하여 반복, status를 활용해서 index 지정-->
		  <tr th:each="dto, status:${datas}">
		<!-- <td th:text="${status.index+1}"></td>   이와 같은 방법으로 index가 1부터 시작하게 설정 할 수 있다.-->
			<td th:text="${status.count}"></td> <!-- 그러나 count method를 사용하면 기본적으로 1부터 시작한다. -->
			<td th:text="${dto.id}"></td>
			<td th:text="${dto.name}"></td>
			<td>[[${dto.price}]]</td>
			<td>[[${dto.regdate}]]</td>
		</tr>
	</table>
2) th:fragment와 th:replace를 활용한 레이아웃 예제
Thymeleaf 레이아웃을 설정하기 위해서는 'thymeleaf-layout-dialect' 라이브러리를 추가해야 한다.
implementation 'nz.net.ultraq.thymeleaf:thymeleaf-layout-dialect'기준 페이지
<!DOCTYPE html>
<html xmlns:th="http://www.thymeleaf.org" layout:decorate="~{layouts/mylayout}">
<head>
<meta charset="UTF-8">
<title>레이아웃 파일임을 선언함</title>

</head>
<body>
<h2 th:text="'레이아웃 연습'"></h2>
<!-- 실제 적용내용은 layout:fragment="content"부터 아래까지 이기 때문에 위의 코드는 적용되지 않는다. -->
<div layout:fragment="content">
<h1>본문</h1></br>
<img alt="Dog Image" th:src="@{/images/Funny_Dog_H.png}" title="Dog Image" style="width:200px"/>
sdffsd
</div>
</body>
</html>
레이아웃
<!DOCTYPE html>
<html xmlns:th="http://www.thymeleaf.org">
<head>
<meta charset="UTF-8">
<title>레이아웃 파일</title>
<link rel="stylesheet" th:href="@{/css/mystyle.css}">
<!-- header나 footer는 myleayout에서 th:replace를 통해 실행된다. 그렇기 때문에 속성은 mylayout에서 부여한다면 모든 파일에 적용되게 된다.  -->
</head>
<body>
<h2>레이아웃 연습이라고 외침</h2><br/>
<!-- 헤더 조각으로 대체 -->
<th:block th:replace="~{layouts/header :: header}"></th:block><!-- ~(틸드) 는 찾아라는 의미 -->

<!-- 특정 페이지 내용으로 대체될 동적 컨텐츠 영역. 이 부분은 각 페이지에서 치환된다. -->
<div layout:fragment="content"></div>

<!-- 푸터 조각으로 대체 -->
<th:block th:replace="~{layouts/footer :: badak}"></th:block>
</body>
</html>
이 때에 눈여겨 봐야할 것은 이 코드가 Server side Render 이후 Client side에 도착했을때의 모습이다. header의 정보가운데 title은 기준이 되는 페이지의 정보를 갖고 있지만 body는 layout 페이지의 구조를 갖게된다. (layout:fragment="content"로 선언된 부분은 기준이 되는 페이지의 layout:fragment="content" 이후의 정보를 담게 된다)

4. Thymeleaf 프로젝트 배포
- Thymeleaf 프로젝트는 배포시에 jar로 배포하게 된다. 기존 JSP 프로젝트의 경우에는 .war로 압축되기에 해당 프로젝트를 실행하기 위해서는 WAS가 필요하지만 .jar로 배포된 Thymeleaf의 경우에는 JRE(Java Runtime Environment) 만 있다면 프로젝트를 실행 할 수 있다.
1) 프로젝트 압축
- 프로젝트를 압축하는 방법은 여러가지가 있지만 gradle로 빌드한 프로젝트이기 때문에 gradlew를 사용해서 압축해 보았다.
1. 명령 프롬포트 실행 후 프로젝트 위치로 이동한다.

2. gradlew build 명령어를 실행한다.
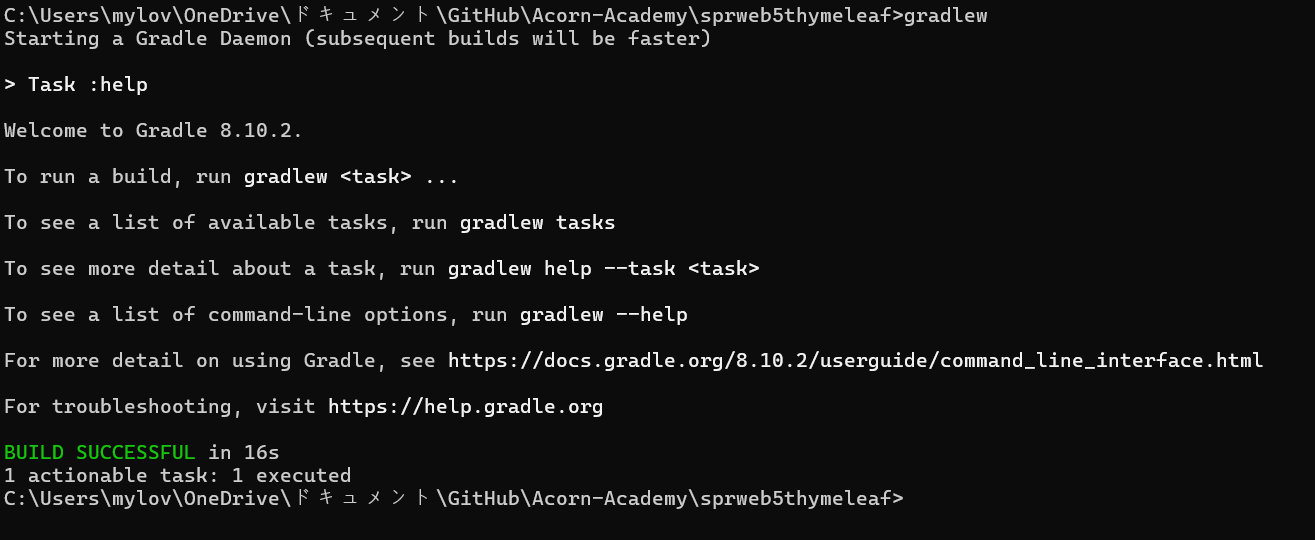
3. 폴더 내 build > libs 폴더를 확인
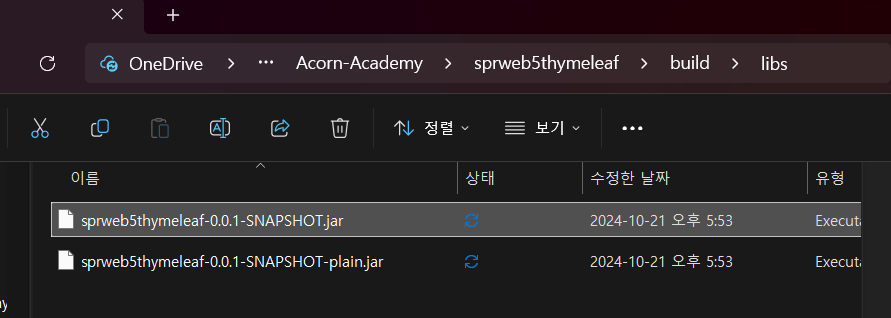
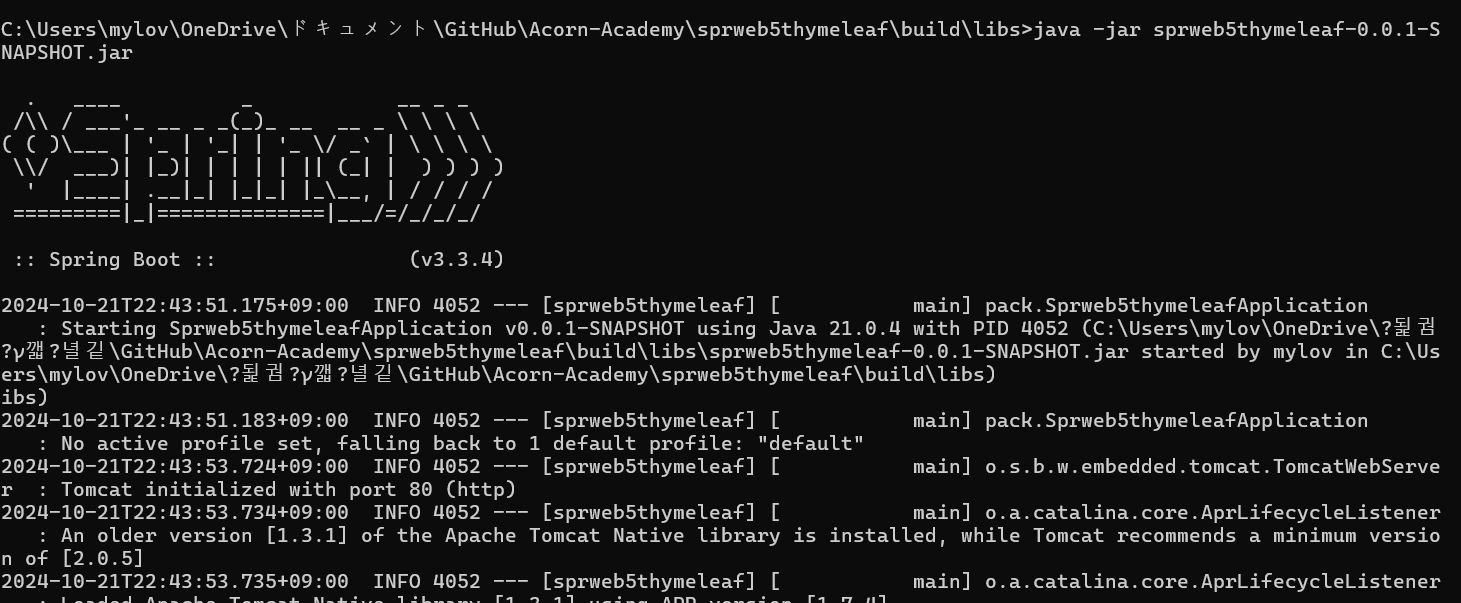
배포시에는 해당 파일을 공유하면 된다! JRE가 있는 환경에서 "명령프롬포트 java -jar 파일명"을 통해 실행하면 Spring Boot에 내장되어있는 tomcat server을 통해 프로젝트가 실행된다.
5. 마무리
- 새로운 Template Engine인 Thymeleaf를 배웠다. 처음에는 걱정했지만 다행히 JSP와 유사한 점이 많아 익히는데 크게 어렵지는 않았다.
- 앞으로 Thymeleaf를 활용할 다양한 코드가 기대된다 :)
