(12) React 어플리케이션의 lifecycle
react 어플리케이션에서 컴포넌트의 생성부터 소멸까지의 과정을 알아봅니다. (이벤트도 발생시켜서 확인해볼겁니다.)
1) 생성자로 초기화 시키고, 숫자 증가,감소함수를 선언하고 bind 시켜줍니다.
2) render() 내부에 이벤트를 연결한 버튼과 컴포넌트를 결합합니다.
3) lifeCycle을 볼 수 있는 함수들을 선언합니다.
(1) componentWillMount() : DOM에 컴포넌트가 링크 되기 전에 실행
(2) componentDidMount() : DOM에 컴포넌트가 링크 된 후에 실행
-------------------------------render()------------------------------------
(3) shouldComponentUpdate(newProps, newState)
: 내부적으로 값이 변경 되면 (state~~~> render()에 반영 되어야함
여기서는 return 값에 따라 그 동작을 취소 혹은 동작 되도록 함
(4) componentWillUpdate() : 업데이트 전에 실행
(5) componentDidUpdate() : 업데이트 후에 실행
(6) componentWillReceiveProps(newProps) : 새로운 props를 받았을 때 실행
적용해봅시다 my-lifecycle -> App.js
import React,{Component, useImperativeHandle} from 'react';

class App extends Component{
  constructor(props){
    super(props)
    this.state = {
        data : 0 //data 라는 속성을 갖습니다.
    }
    console.log('constructor called')
    // 생성자 내부에 이벤트 함수를 연결 ( 자동으로 연결이 안되서 해주는 것)
    this.setNewNumber=this.setNewNumber.bind(this);
    //this.setDownNumber=this.setDownNumber.bind(this);
    // 이렇게 constructor에 bind 시켜도 되고, 이벤트 연결 선언부에서 bind 시켜줘도 됩니다.
  }
  // 증가 => 1,2,,,,,10  < 더 이상 증가X
  setNewNumber(){
    if(this.state.data>10){
      alert('더 이상 증가할 수 없습니다.')
      return // return false 같음
    }else{
      this.setState({data:this.state.data+1})
    }
  }
  //감소
  setDownNumber(){
    if(this.state.data<0){
      alert('더 이상 감소할 수 없습니다.')
      return // return false 같음
    }else{
      this.setState({data:this.state.data-1})
    }
  }

  render(){
      return(
        <div>
          <button onClick={this.setNewNumber}>증가</button>
          <button onClick={this.setDownNumber.bind(this)}>감소</button>
          <Content myNumber={this.state.data} />
        </div>
      )
      // myNumber = {this.state.data} 자식 객체인 Content가 찍느게 아니고 부모로부터 넘겨받는 것
      // onClick = {this.setDownNumber.bind(this)} <- 생성자가 아닌 직접적으로 바인딩
      }
}


class Content extends React.Component{
  //1.화면에 보여주는 부분
  componentWillMount(){
    console.log('before component link DOM(componentWillMount)')
  }
  componentDidMount(){
    console.log('after component link DOM(componentDidMount')
  }
  render(){
    console.log('Content Class render() called')
    // 삼항 연산으로 if문을 대신합니다
    return(<div>
      {this.props.myNumber < 10?
      <h3>{this.props.myNumber}</h3>:
      <h3>더 이상 값을 증가시킬수가 없다.</h3>}
   </div>)
  }

  // 2. 화면에 수정전 or 수정후(업데이트)
  shouldComponentUpdate(newProps,newState){
      /*
        내부적으로 값이 변경(state) -> render() 반영
        원래 변경이 되면 화면에 바로 반영이 되도록 자동적으로 호출() 보통의 경우
     */
     console.log('return false이면 render() 호출이 취소됨')
     return true; // 화면에 변화가 있기떄문에, 다시 render() 해서 뿌리라는 구문입니다.
     //return false; // render() 호출이 안됨
  }
  componentWillUpdate(){
    console.log('before component update(componentWillUpdate)')
  }
  componentDidUpdate(){
    console.log('after component update(componentDidUpdate)')
  }
  componentWillReceiveProps(newProps){
    console.log('receive new props'+newProps)
  }
}
export default App;


출력된 화면들입니다. 버튼 클릭에 다라 -1~10 까지 증감되며, 범위를 넘어가면 메세지를 출력합니다.
그럼 lifeCycle 함수들은 어떻게 움직였을까요

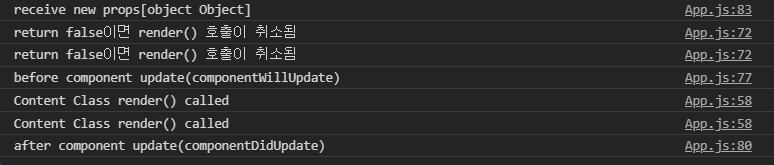
콘솔을 확인해보시면, 왜 두번씩 출력되는진 모르겠지만 이렇게 출력되게 됩니다.

웹프로그래밍 공부를 시작한 패션디자이너 출신 웹린이