spring security + jwt
JWT(Json Web Token)이란?
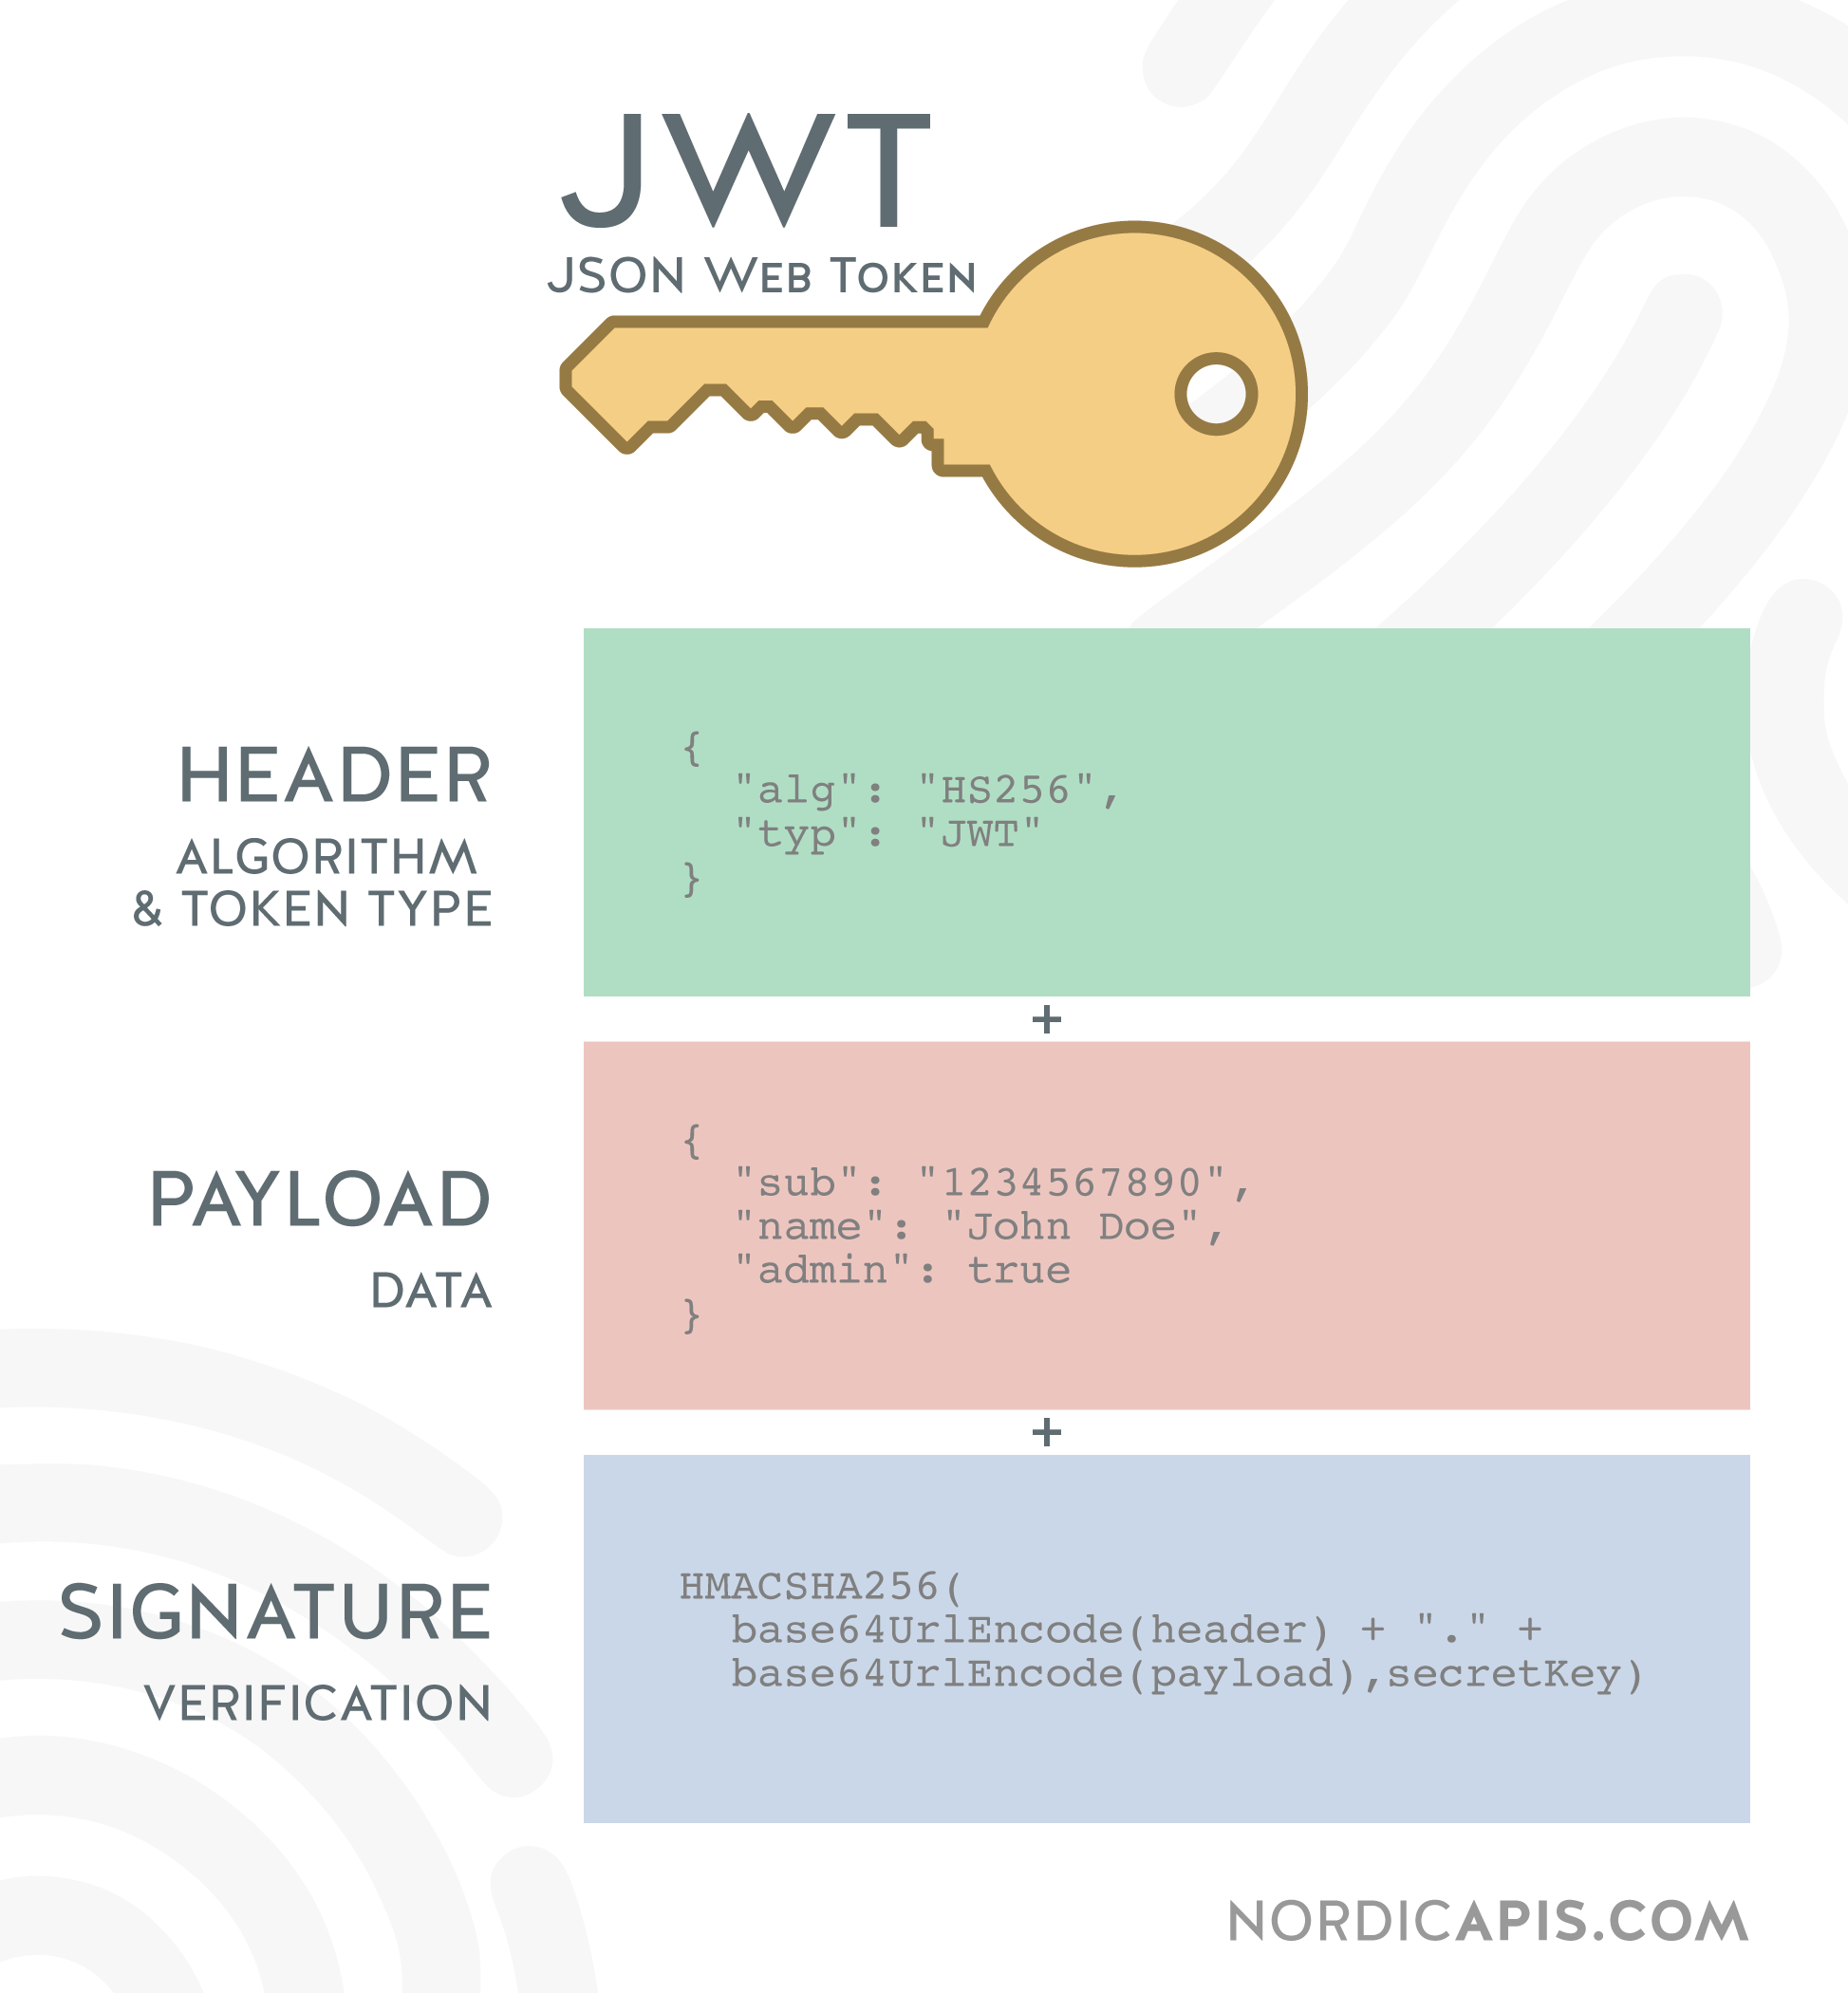
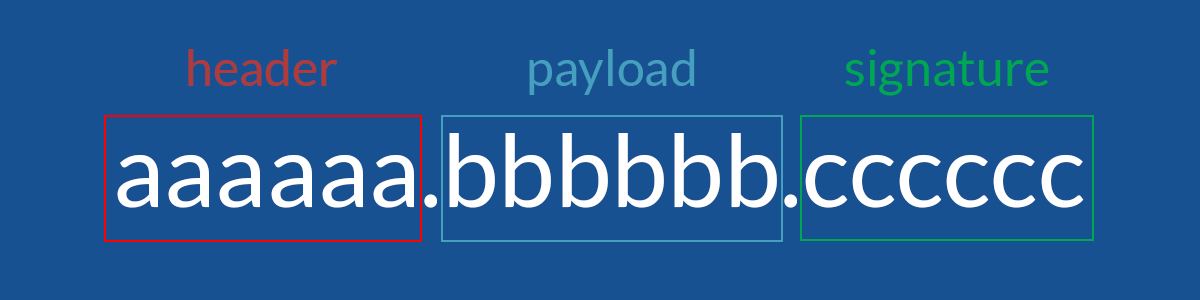
JWT는 header, payload, signature로 구성되어 있으며 header는 signature를 해싱하기 위한 알고리즘 정보가 담겨있고 payload는 실제로 사용될 데이터들이 담겨 있다.
signature는 토큰의 유효성 검증을 위한 문자열로 이 문자열을 통해 이 토큰이 유효한 토큰인지 검증이 가능하다.
JWT는 RFC7519 웹 표준으로 JSON 객체를 이용해 데이터를 주고받을 수 있도록한 웹 토큰이다.
JWT 을 이용한 인증 과정
세션기반 인증 방식은 사용자가 로그인 되어있는지에 관한 정보를 세션이라는 이름으로 서버에 저장한다. 보통은 메모리에 세션의 정보를 저장해두며 이로 인해 너무 많은 유저의 정보가 저장된다면 메모리에 부담이 된다는 단점을 가지고 있다. 이에 반해 JWT를 이용한 인증방식은 토큰이라는 것을 이용하여 유저의 정보를 토큰에 저장해두고 클라이언트에게 전송하며 따로 서버에 저장해두지 않는다. 서버에 저장해두지 않기 때문에 메모리 부담은 적지만 토큰을 탈취당하면 토큰 만으로는 부정한 요청인지 알 방법이 없다. 그래서 토큰의 주기를 짧게 가져가고 다른 토큰 하나 더 생성하여 긴 주기를 가지게 하여 redis에 토큰의 정보를 저장하는 방법을 많이 택한다. 짧게 주기를 가져간 토큰을 Access Token 이라고 하며 만료된 Access Token 을 재발행(reissue)하기도 하고 긴 주기(2주정도)를 가지는 토큰을 Refresh Token 이라고 한다.
- 사용자가 로그인 요청을 한다.
- 스프링 시큐리티의 핵심 로직으로 DB로 이메일과 패스워드를 인증하고 통과하면 Access Token과 Refresh Token을 발급한다.
- 사용자는 일반 데이터 요청을 Access Token과 함께 보낸다.
- 서버는 Access Token을 검증하고 통과하면 데이터 응답을 보낸다.
- 사용자가 만료된 Access Token을 이용해 요청을 보내면 서버는 재발행요청을 한다.
- 서버에서는 RefreshToken을 검증하고 다시 AccessToken과 RefreshToken 값을 사용자에게 넘겨준다.
@Bean
	SecurityFilterChain filterChain(HttpSecurity http) throws Exception {
		return http
				.csrf().disable()
				.sessionManagement().sessionCreationPolicy(SessionCreationPolicy.STATELESS)
				.and()
				.formLogin().disable()
				.httpBasic().disable()
				.apply(new MyCustomDsl()) // 커스텀 필터 등록
				.and()
				.authorizeRequests(authroize -> authroize.antMatchers("/api/v1/user/**")
						.access("hasRole('ROLE_USER') or hasRole('ROLE_MANAGER') or hasRole('ROLE_ADMIN')")
						.antMatchers("/api/v1/manager/**")
						.access("hasRole('ROLE_MANAGER') or hasRole('ROLE_ADMIN')")
						.antMatchers("/api/v1/admin/**")
						.access("hasRole('ROLE_ADMIN')")
						.anyRequest().permitAll())
				.build();
	}

    public class MyCustomDsl extends AbstractHttpConfigurer<MyCustomDsl, HttpSecurity> {
		@Override
		public void configure(HttpSecurity http) throws Exception {
			AuthenticationManager authenticationManager = http.getSharedObject(AuthenticationManager.class);
			http
					.addFilter(corsConfig.corsFilter())
					.addFilter(new JwtAuthenticationFilter(authenticationManager))
					.addFilter(new JwtAuthorizationFilter(authenticationManager, userRepository));
		}
	}
SessionCreationPolicy.STATELESS - 스프링시큐리티가 생성하지도않고 기존것을 사용하지도 않음
JWT를 사용하는 경우 session을 사용하지 않기 때문에 스프링 시큐리티에서 session을 생성하거나 사용하지 않도록 설정한다. 또한 formLogin도 disable해놨기 때문에 기존에 스프링 시큐리티에서 작동하던 필터들을 직접 커스터마이징 하여 인증과 인가처리를 해야한다.
인증
@RequiredArgsConstructor
public class JwtAuthenticationFilter extends UsernamePasswordAuthenticationFilter{

	private final AuthenticationManager authenticationManager;


	@Override
	public Authentication attemptAuthentication(HttpServletRequest request, HttpServletResponse response)
			throws AuthenticationException {

		System.out.println("JwtAuthenticationFilter : 진입");

		// request에 있는 username과 password를 파싱해서 자바 Object로 받기
		ObjectMapper om = new ObjectMapper();
		LoginRequestDto loginRequestDto = null;
		try {
			loginRequestDto = om.readValue(request.getInputStream(), LoginRequestDto.class);
		} catch (Exception e) {
			e.printStackTrace();
		}

		System.out.println("JwtAuthenticationFilter : "+loginRequestDto);

		UsernamePasswordAuthenticationToken authenticationToken =
				new UsernamePasswordAuthenticationToken(
						loginRequestDto.getUsername(),
						loginRequestDto.getPassword());

		System.out.println("JwtAuthenticationFilter : 토큰생성완료");

		Authentication authentication =
				authenticationManager.authenticate(authenticationToken);

		PrincipalDetails principalDetailis = (PrincipalDetails) authentication.getPrincipal();
		System.out.println("Authentication : "+principalDetailis.getUser().getUsername());
		return authentication;
	}

	// JWT Token 생성해서 response에 담아주기
	@Override
	protected void successfulAuthentication(HttpServletRequest request, HttpServletResponse response, FilterChain chain,
			Authentication authResult) throws IOException, ServletException {

		PrincipalDetails principalDetailis = (PrincipalDetails) authResult.getPrincipal();

		String jwtToken = JWT.create()
				.withSubject(principalDetailis.getUsername())
				.withExpiresAt(new Date(System.currentTimeMillis()+JwtProperties.EXPIRATION_TIME))
				.withClaim("id", principalDetailis.getUser().getId())
				.withClaim("username", principalDetailis.getUser().getUsername())
				.sign(Algorithm.HMAC512(JwtProperties.SECRET));

		response.addHeader(JwtProperties.HEADER_STRING, JwtProperties.TOKEN_PREFIX+jwtToken);
	}

}- Authentication 객체 만들어서 리턴 => 의존 : AuthenticationManager
- 로그인 인증 요청시에 실행되는 함수
- 유저네임패스워드 토큰 생성
- authenticate() 함수가 호출 되면 인증 프로바이더가 유저 디테일 서비스의
loadUserByUsername(토큰의 첫번째 파라메터) 를 호출하고 UserDetails를 리턴받아서 토큰의 두번째 파라메터(credential)과 UserDetails(DB값)의 getPassword()함수로 비교해서 동일하면 Authentication 객체를 만들어서 필터체인으로 리턴해준다.
인가
// 인가
public class JwtAuthorizationFilter extends BasicAuthenticationFilter{

	private UserRepository userRepository;

	public JwtAuthorizationFilter(AuthenticationManager authenticationManager, UserRepository userRepository) {
		super(authenticationManager);
		this.userRepository = userRepository;
	}

	@Override
	protected void doFilterInternal(HttpServletRequest request, HttpServletResponse response, FilterChain chain)
			throws IOException, ServletException {
		String header = request.getHeader(JwtProperties.HEADER_STRING);
		if(header == null || !header.startsWith(JwtProperties.TOKEN_PREFIX)) {
			chain.doFilter(request, response);
                        return;
		}
		System.out.println("header : "+header);
		String token = request.getHeader(JwtProperties.HEADER_STRING)
				.replace(JwtProperties.TOKEN_PREFIX, "");

		// 토큰 검증 (이게 인증이기 때문에 AuthenticationManager도 필요 없음)
		// 내가 SecurityContext에 집적접근해서 세션을 만들때 자동으로 UserDetailsService에 있는 loadByUsername이 호출됨.
		String username = JWT.require(Algorithm.HMAC512(JwtProperties.SECRET)).build().verify(token)
				.getClaim("username").asString();

		if(username != null) {
			User user = userRepository.findByUsername(username);

			// 인증은 토큰 검증시 끝. 인증을 하기 위해서가 아닌 스프링 시큐리티가 수행해주는 권한 처리를 위해
			// 아래와 같이 토큰을 만들어서 Authentication 객체를 강제로 만들고 그걸 세션에 저장
			PrincipalDetails principalDetails = new PrincipalDetails(user);
			Authentication authentication =
					new UsernamePasswordAuthenticationToken(
							principalDetails, //나중에 컨트롤러에서 DI해서 쓸 때 사용하기 편함.
							null, // 패스워드는 모르니까 null 처리, 어차피 지금 인증하는게 아니니까
							principalDetails.getAuthorities());

			// 강제로 시큐리티의 세션에 접근하여 값 저장
			SecurityContextHolder.getContext().setAuthentication(authentication);
		}

		chain.doFilter(request, response);
	}

}- 권한이 필요한 요청발생시 실행되는 필터
- 토큰을 검증하여 올바른 토큰인지 확인한다.
- 올바른 토큰이라면 SecurityContextHolder에 저장하기 위한 Authenticaton 객체를 만든다. 이 때 Authentication객체를 만들어 세션을 저장하는 이유는 SpringSecurity의 인가 기능을 활용하기 위함이다.