
Overview
Spring에서 요청 파라미터를 바인딩하는 방법은 다양하다.
필자는 여러 개의 파일과 데이터 그리고 list 형식의 dto 데이터를 받고자 하는 경우가 발생해 @ModelAttribute 어노테이션을 활용했었는데 레퍼런스를 따라쓰기 바빴던 것 같다.
해당 어노테이션이 어떤 역할이고 어떻게 동작하는지를 살펴보면서 알고 사용해보자!
ModelAttribute란?
@ModelAttribute는 클라이언트로부터 일반 HTTP 요청 파라미터나 multipart/form-data 형태의 파라미터를 받아 객체로 사용하고 싶을 때 이용된다.@ModelAttribute는 "가장 적절한" 생성자를 찾아 객체를 생성 및 초기화한다.- 객체 생성 및 초기화 > Data Binding > Validation 순서로 진행된다.
- Data Binding은 getter/setter가 존재하는 변수에 한해서 이루어진다.
공식 문서 살펴보기
Annotation that binds a method parameter or method return value to a named model attribute, exposed to a web view.
- 웹 뷰에 노출된 명명된 모델 속성에 메소드 파라미터 또는 리턴 값을 바인딩(매핑)하는 Annotation
Supported for controller classes with @RequestMapping methods.
@RequestMapping메소드가 붙여진 Controller 클래스에 지원된다.
WARNING: Data binding can lead to security issues by exposing parts of the object graph that are not meant to be accessed or modified by external clients. Therefore the design and use of data binding should be considered carefully with regard to security.
-
Data Binding은 외부 클라이언트가 접근(
get) 또는 수정(set)하면 안되는 객체의 일부분을 노출시킴으로써 보안 이슈를 일으킬 수 있다. 그러므로 Data Binding을 설계하고 사용할 때, 보안과 관련해 신중하게 고려되어야 한다. -
parameter, method 레벨로 두 가지의 방식을 지원하고 있다.
@Target({ElementType.PARAMETER, ElementType.METHOD})
@Retention(RetentionPolicy.RUNTIME)
@Documented
@Reflective
public @interface ModelAttribute {

	@AliasFor("name")
	String value() default "";

	@AliasFor("value")
	String name() default "";

	boolean binding() default true;
}
1. method 레벨
@Controller
@RequestMapping
public class TestController {

    @GetMapping("/test")
	public String printTest(@ModelAttribute("printRequest) PrintReq req,
    					ModelMap model) {
		return req.getMessage();
	}

    @ModelAttribute
    public void setAttributes(Model model) {
        model.addAttribute("message", "hello");
    }
}- 하나 이상의 속성을
Model에 추가하고 싶을 때 method 레벨에서@ModelAttibute를 추가해준다. - Spring MVC는 요청 핸들러 메소드를 호출하기 전에 항상
@ModelAttibute가 붙은 메소드를 먼저 호출한다.- 컨트롤러 메소드 내에서 처리가 시작되기 전에 모델 개체를 만들어야 한다는 것.
2. parameter 레벨
@ModelAttibute는 여러 곳에 있는 단순 데이터 타입을 복합 타입의 객체로 받아오거나 해당 객체를 새로 만들 때 사용할 수 있다.- 여러 곳 = URI path, 요청 파라미터, 세션 등
- 만약 값을 바인딩할 수 없다면
BindException이 발생하여 400 에러를 반환한다.- 바인딩 에러를 핸들링하려면 해당 메소드에
BindingResult파라미터를 추가하면 된다.
@GetMapping("/test") public String printTest(@ModelAttribute PrintReq req, BindingResult bindingResult) { if(bindingResult.hasErrors()) { bindingResult.getAllErrors().forEach(e -> { System.out.println(e.toString()); }); } return req.getMessage(); } - 바인딩 에러를 핸들링하려면 해당 메소드에
사용 방법
PrintController.java
@ModelAttribute는 Controller에서 endpoint 요청 파라미터에 이용된다.
@GetMapping("/test")
public String printTest(@ModelAttribute PrintReq req) {
	return req.getMessage();
}
PrintReq.java
@ModelAttribute를 사용할 때는 객체의 각 필드에 접근해 데이터를 바인딩 할 수 있는 생성자나 setter가 필요하다.- 만약 생성자/setter를 정의하지 않는다면 모델 객체에 바인딩하지 못한다.
@Getter
@Setter // or @AllArgsConstructor
public class PrintReq {
	private String message;
}
PrintControllerTest.java
/test?message=hello형태의 쿼리 스트링이 되어 GET 요청PrintReq{message='hello'}로 데이터가 바이딩된다- Query String 및 Form 형식이 아닌 데이터는 처리할 수 없다.
@Test
void printTest() throws Exception {
    mockMvc.perform(get("/test")
            .param("message", "hello")
            .andExpect(status().isOk())
            .andExpect(content().string("hello"));
}
작동 원리
ModelAttributeMethodProcessor
@ModelAttribute가 붙여진 메소드의 반환값을 처리한다.- 크게
ModelAttributeMethodProcessor#resolveArgument메소드 안에서 진행된다.
👀 ModelAttributeMethodProcessor 클래스를 뜯어보며 동작 원리를 파악해보자.
1. 적절한 생성자 찾기
createAttribute안에서 내부적으로 리플렉션(ReflectionUtils)을 사용하여 적절한 생성자를 찾아서 바인딩할 객체를 생성한다.
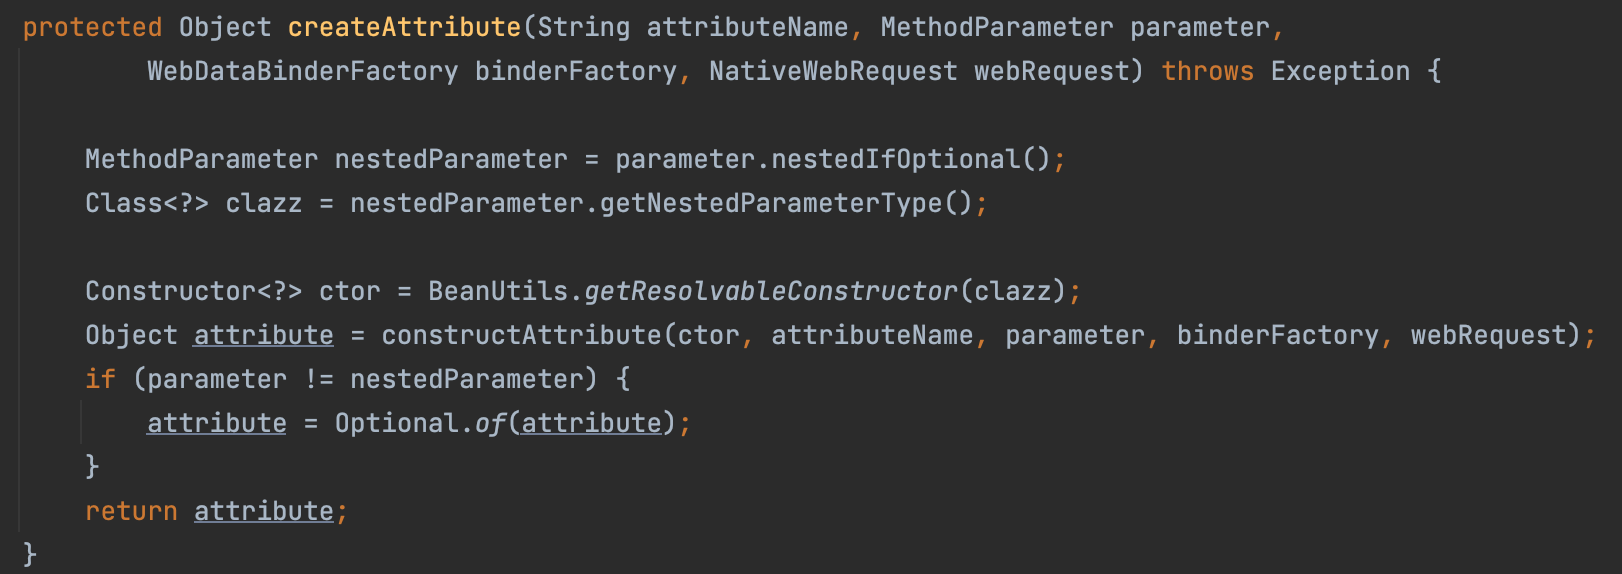
- 이때
BeanUtils.getResolvableConstructor()가 실행되는데 이는 대상이 되는 클래스의 사용 가능한 생성자를 찾는 메소드이다.
적절한 생성자?👀
- public으로 선언된 생성자를 찾는다.
- 없다면, public이 아닌 생성자 중에 매개변수 개수가 제일 적은 생성자를 선택한다. (보통 기본 생성자)
- 찾은 생성자가 고유하다면, 해당 생성자를 선택한다.
- 찾은 생성자가 여러개라면, 매개변수가 제일 적은 생성자를 선택한다.
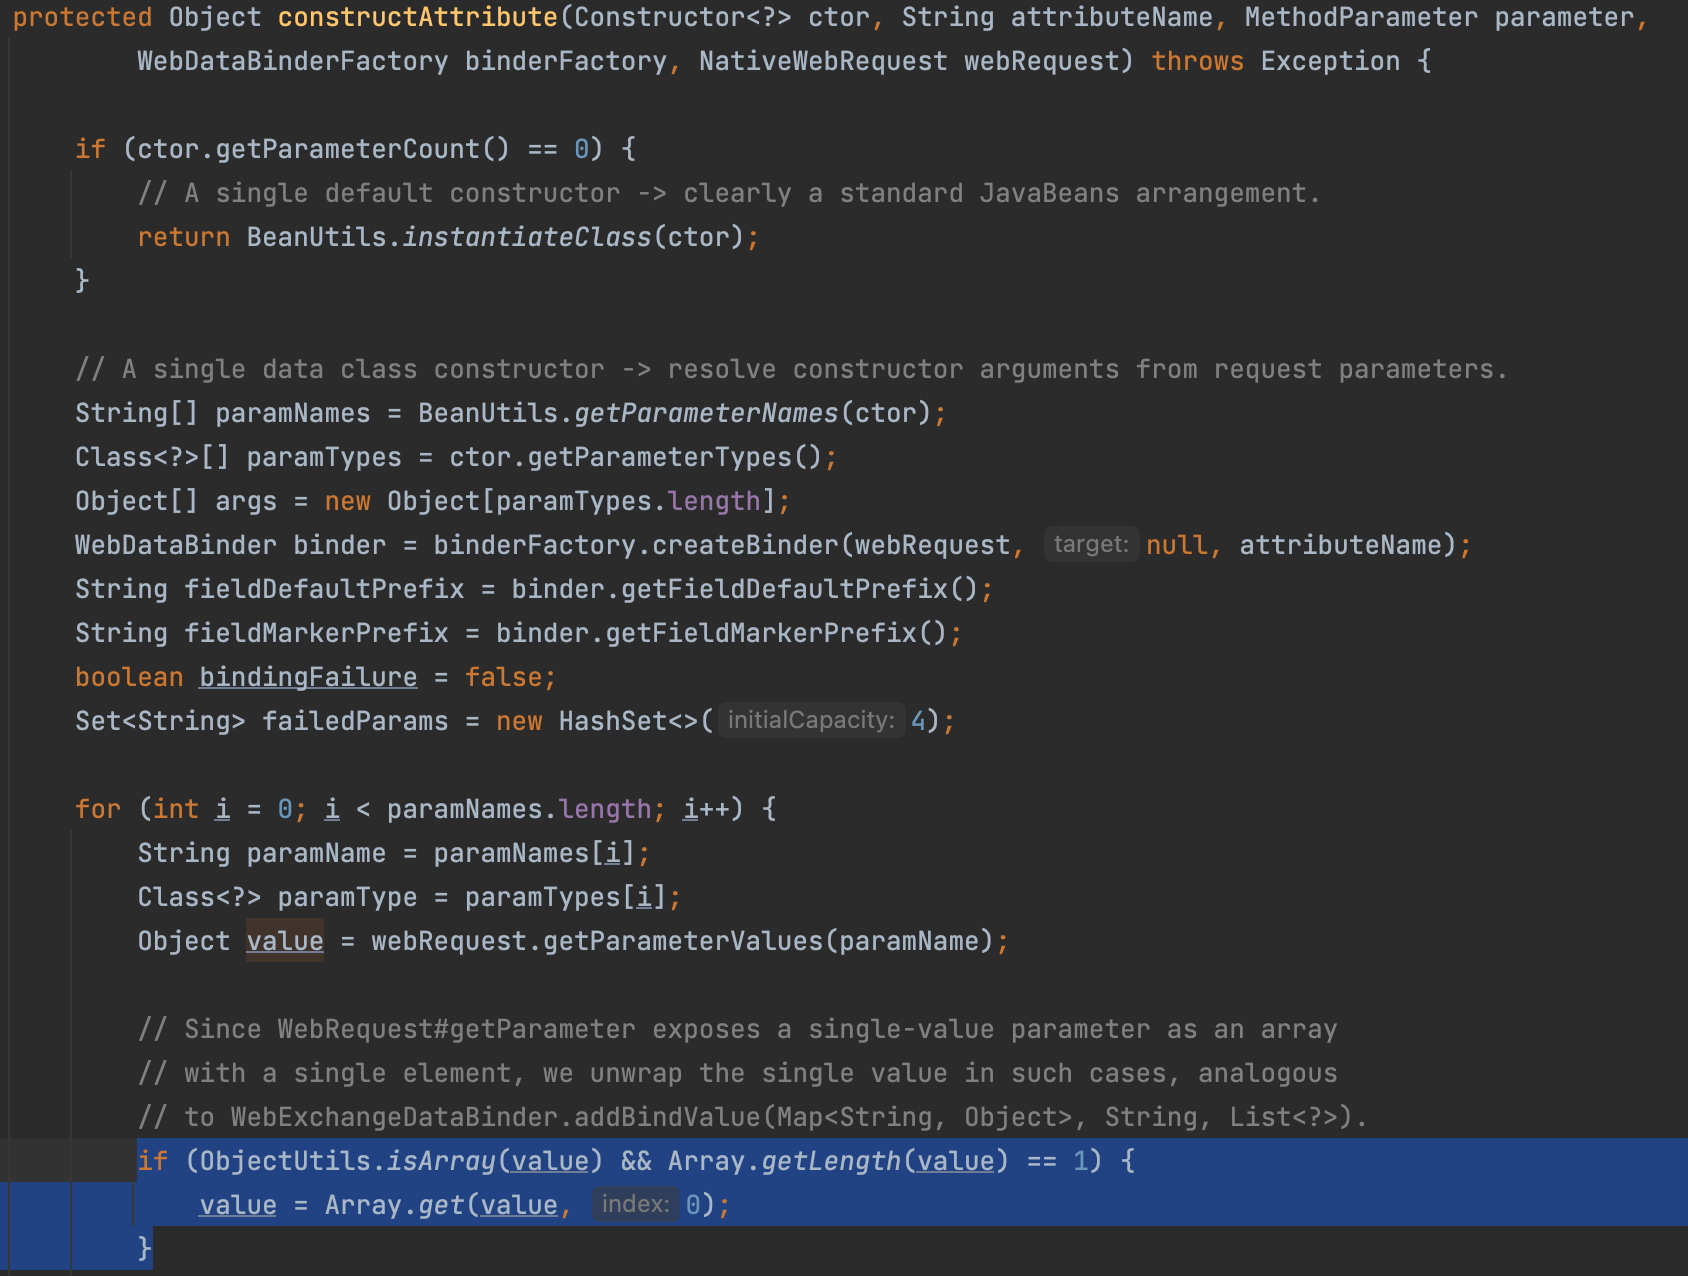
2. 지정된 생성자로 인스턴스 생성하기
constructAttribute안에서 생성자 생성하기- 선택한 생성자를 이용해 인스턴스를 생성할 때 생성자 인수 이름과 요청 파라미터의 이름이 같다면 값을 바인딩한다.
- 생성자 인수의 이름과 클라이언트가 요청한 파라미터의 이름이 같을때만 바인딩한다는 것.
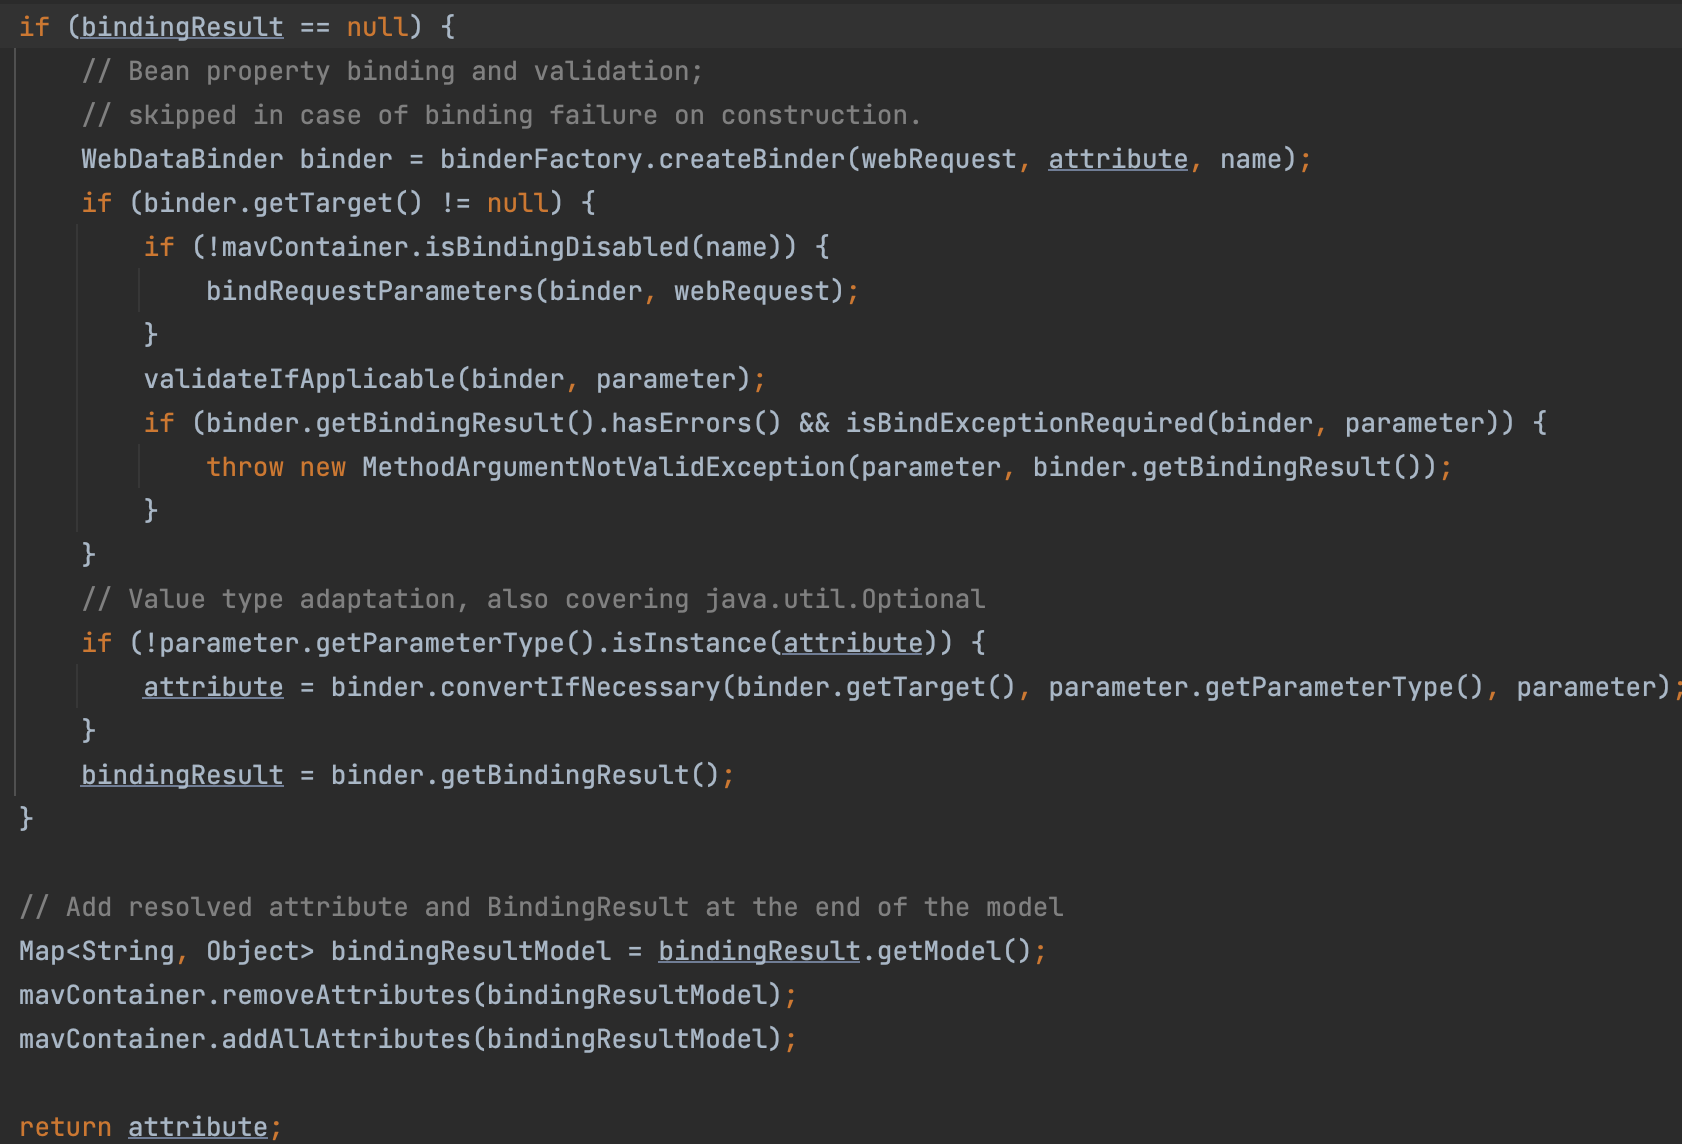
3. 바인딩 하기
resolveArgument메소드에서 파라미터 바인딩을 시도한다.- 요청 파라미터를 기준으로 setter 메소드를 통하여 빈 속성을 바인딩한다.
결론
- 내부적으로 리플렉션(
ReflectionUtils)을 사용하므로 setter만 만들어서 사용해도 되고, 적절한 생성자(매개 변수가 가장 적은 생성자)를 기준으로 매개변수의 이름을 파라미터 이름과 동일하게 하여 사용해도 된다. - 참고로
@ModelAttribute를 생략하여도 Spring MVC는ModelAttributeMethodProcessor를 우선적으로 호출해 생성자를 선택하는 과정을 가진다고 한다.
ref

덕분에 좋은 정보 잘 보고 갑니다.
감사합니다.