.jpg)
복습
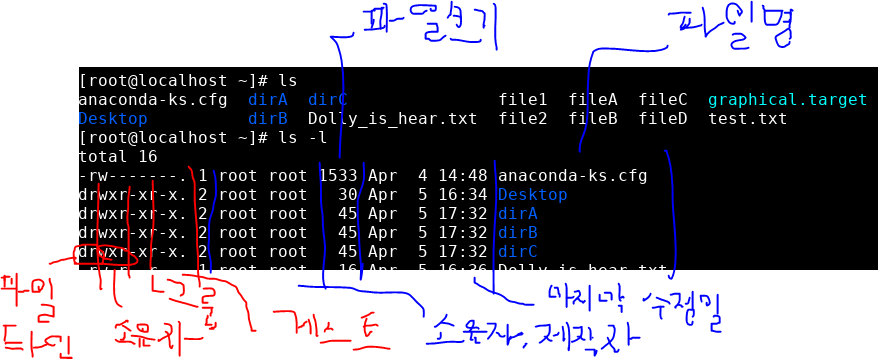
권한
- chmod : 권한 변경
링크
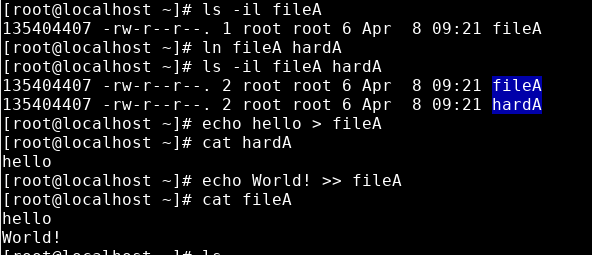
하드링크
- 디스크 공간을 한곳으로 모으고, 그곳을 링크하여 파일처럼 사용하는 것
- fileA와 hardA를 하드링크로 연결한다.
- fileA의 내용을 수정하니, hardA의 내용도 바뀐 것을 볼 수 있다.
>로 데이터를 넣으면 내용 덮어씌우기가 되지만>>로 데이터를 넣으면 내용 이어쓰기가 된다.
- ls로 확인해보면 fileA와 hardA가 파란배경으로 표시된다.

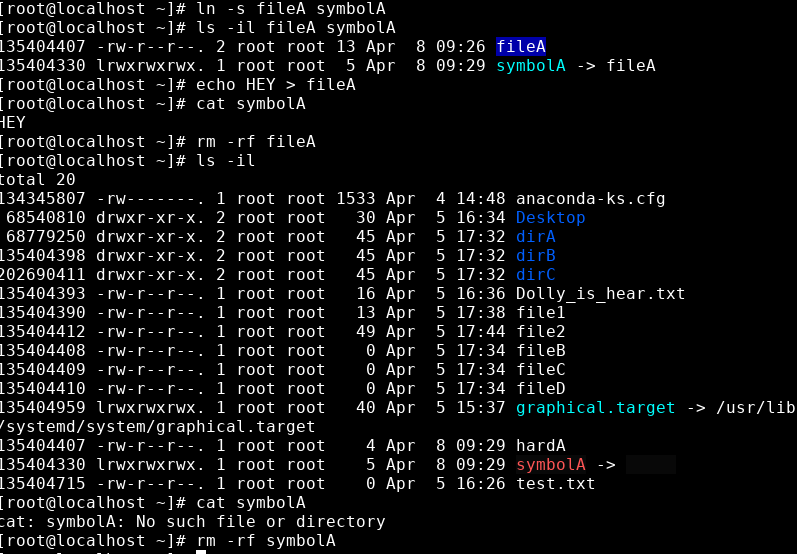
심볼릭 링크
ln -s fileA symbolA:-s옵션으로 심볼릭링크를 만든다.- 심볼릭링크로 바로가기같은 파일을 만든다.
- 하드링크와 달리 그냥 바로가기파일이기 때문에, 원본이 삭제되면 더이상 사용할 수 없다.
파일 내용 검색
grep 명령어
grep 'root' /etc/passwd: /etc/pass에서 'root'가 들어가는 문장을 찾아준다.grep -v 'root' /etc/passwd: 반대로 'root'가 들어가지 않은 문장을 찾는다.
egrep 명령어
- egrep 'N(o|e)+' /etc/passwd : /etc/pass에서 N으로 시작하고 +로 끝나며 o 혹은 e 가 중간에 들어가는 단어를 찾아라.
파일 및 디렉토리 검색
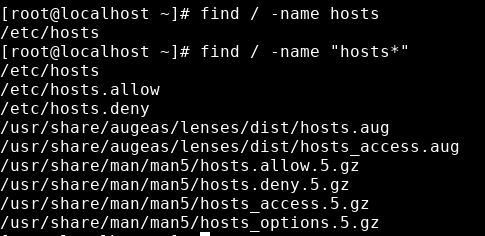
find명령어 : 파일 혹은 디렉토리를 검색해준다.
find / -name hosts: 이름이 hosts인 파일 및 디렉토리 검색find / -name "hosts*": 이름이 hosts이며, 뒤에 다른 문자가 붙은 것도 포함해서 검색
vi 편집기 기초
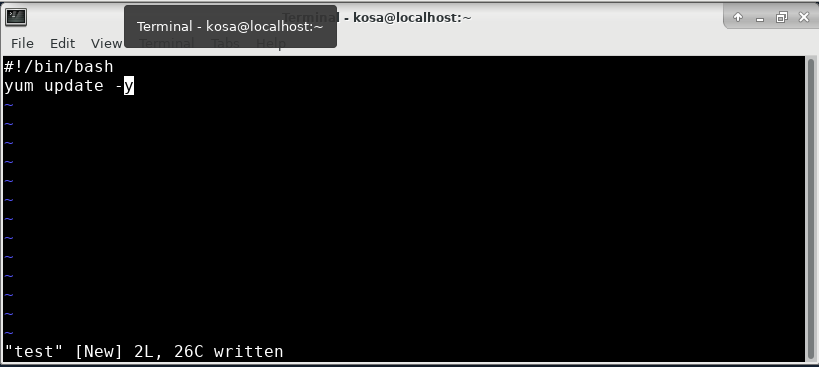
:%s/old/new/g: old인 문자를 new로 바꿔준다.su kosa: kosa 계정으로 바꿔주고 홈폴더로 들어가 준다.vi test: test파일을 생성하고 vi편집기로 들어가준다.
- 이렇게 내용을 편집하고 저장해준다.
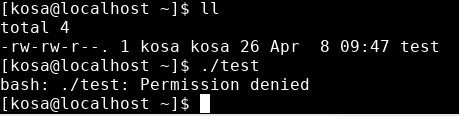
- 내가 소유자인데도 실행이 되지 않는다.
- chmod로 764를 주어, 실행 가능하게 만들어줘야 한다.
- 실행이 되지 않는데, yum명령어 자체가 root명령어라 root로 들어가서 실행시켜 준다.

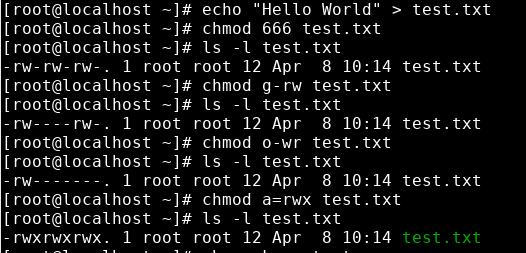
권한 변경
- chmod : 읽기(r, 4), 쓰기(w, 2), 실행(e, 1) 등 권한을 부여한다.
- chown : 소유자를 바꾼다.
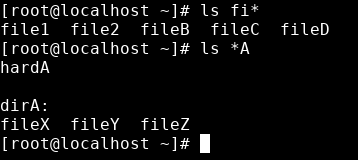
파일이름 대체 문자
ls fi*: fi로 시작하는 이름을 가진 파일 및 디렉토리 lsls *A: A로 끝나는 이름을 가진 파일 및 디렉토리 ls
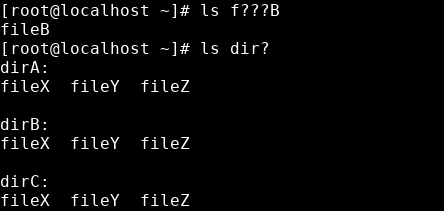
- ls f???A : f로 시작, A로 끝나는 5글자 이름을 가진 파일 및 디렉토리ls
- ls dir? : dir로 시작하고 한글자가 더 붙은 이름을 가진 파일 및 디렌토리 ls
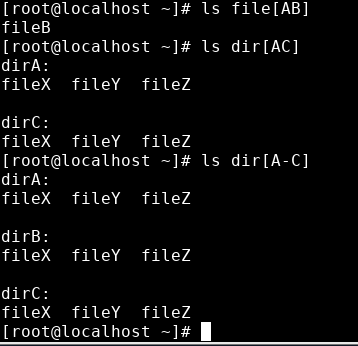
s file[AB]: file이름 뒤에 A혹은B 인 이름을 가진 파일 및 디렉토리 lss dir[AC]: dir 이름 뒤에 A혹은 Cs dir[A-C]: dir 이름 뒤에 A부터 C까지의 이름을 가진 파일 및 디렉토리 ls
인용부호 메타문자
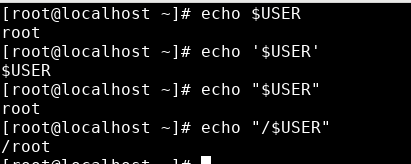
$USER, "$USER": 이 두 인용부호 메타문자는 자동으로 user정보로 나타내준다. 또, 마지막처럼 /문자뒤에 붙혀 사용할 수 잇다.
- env에 저장되어 있다.

date 명령어
- echo 'date'
- echo "The current time is 'date'"
표준 입력 (stdin;0) 재지정
- cat 0< /etc/hosts : cat명령어에 /etc/hosts의 출력을 넣는다.
- cat명령어가 0< 을 생략해서 출력해주고 있었다.

표준 출력 (stroud;1) 재 지정
- 화살표 방향이 중요하다.
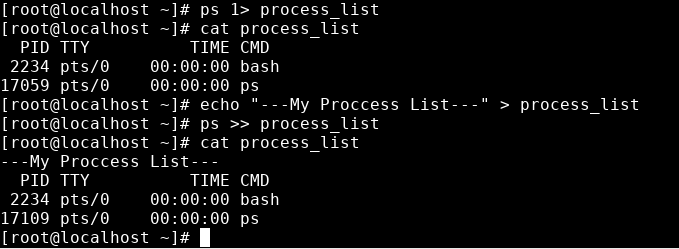
ps: 현재 프로세스 목록ps의 출력을 process_list라는 파일에 넣어주고 출력한다.
표준 에러 (stderr;2) 재지정
- root계정으로
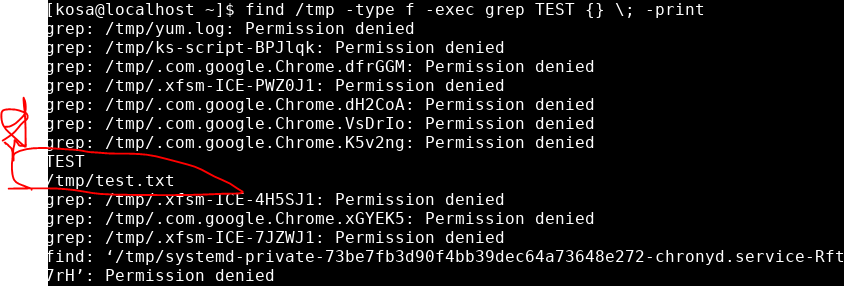
echo "TEST" > /tmp/test.txt를 만들어준다.su kosa해서 kosa계정으로 들어간 다음find /tmp -type f -exec grep TEST {} \; -print: 하면 권한에러가 많이 출력된다
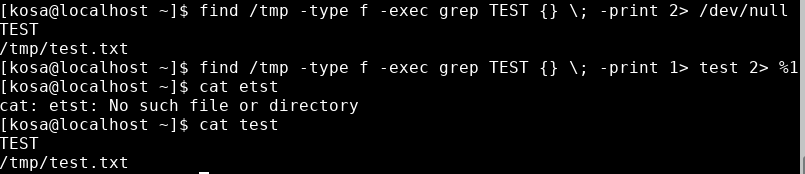
find /tmp -type f -exec grep TEST {} \; -print 2> /dev/null: 하면 에러 메세지 (2>)라면 /dev/null(쓰레기통)으로 넣어준다.find /tmp -type f -exec grep TEST {} \; -print 1> test 2>&1: 출력나오는 것은 test로 넣어주고, 에러메세지는 버린다.
history 명령어
history: 지금까지 사용된 명령어 목록 출력history 5: 가장 최근 명령어 5개 출력history | head -3,history | tail -3: 제일 위(old) 3가지 명령어, 제일 아래(new)명령어 3개 를 출력!1위에서 1번째 명령어 다시실행!10위에서 10번째 명령어 다시 실행
사용자 초기화 파일
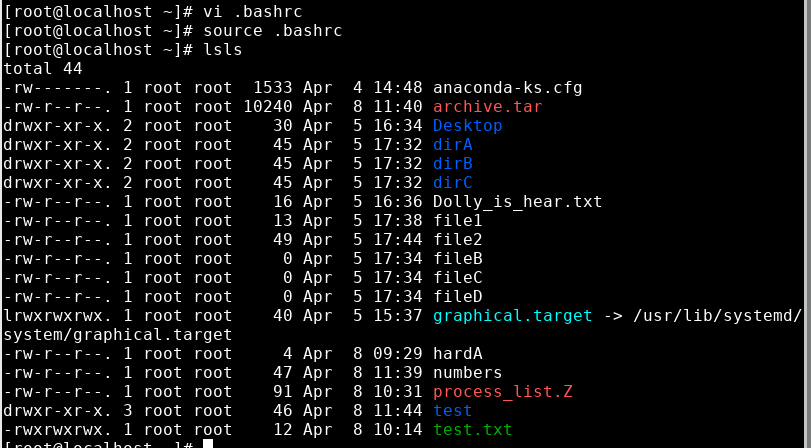
vi .bashrc: .bashrc 파일은 숨겨져 있으며, 별칭?(닉네임?) 이 정의되어있다.MyName=Cocudeny: 여기 내이름=Cocudeny를 정의해준다.source .bashrc: .bashrc를 reboot해준다.echo $MyName: MyName을 출력해본다.
- alias ans='ansible'
- alias k='kubernates' : 이런식으로 긴 이름을 줄여서 사용할 수 있다.
alias ls='ls -l': 이렇게는 안되고,alias lsls='ls -l': 이렇게 다른 말로 저장하면 된다.

프로세스 확인
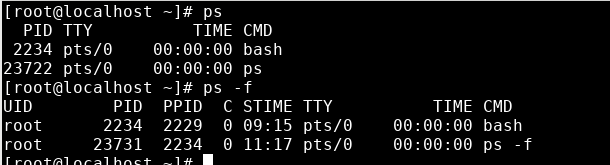
ps: 현재 실행중인 프로세스 목록ps: ps를 조금더 자세하게 보기
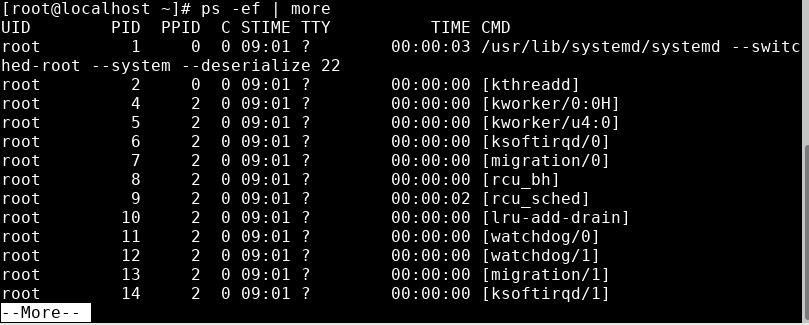
ps -ef | more: 지금 실행중인 프로세스 전부를 보여준다. 또, 너무 많으니 more를 통해 한페이지씩 볼 수 있게 해준다.
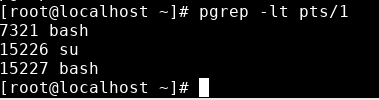
grep -lt pts/1: 현재 터미널을 사용하고 있는 프로세스? 를 보여준다.
kill명령어
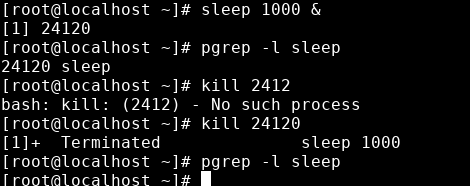
sleep 1000 &: sleep 1000을 백그라운드에서 실행한다.pgrep -l sleep: sleep이라는 이름을 가진 프로세스 검색kill 24120: sleep의 PID인 24120을 kill (종료)pgrep -l sleep: 으로 종료되었는지 확인
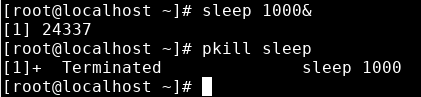
pkill: kill이지만 PID가 아닌 프로세스 이름으로 삭제할 수 있다.
yes > /dev/null &: 하면 무한루프로 yes라는 출력을 쓰레기통에 버리게 된다.&옵션이기 때문에 백그라운드에서 계속 돌아가게 된다.
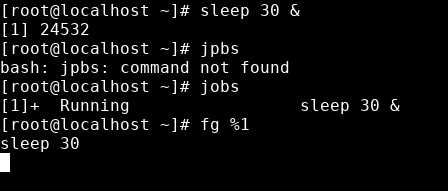
작업관리
sleep 60 &: 백그라운드에서 sleepjobs: 백그라운드에서 실행되는 프로세스 보기fg %1: 백그라운드에서 실행되고 있는 sleep foreground로 끌고오기
이론
아카이브(하나의 파일로 모은다. ) - Archive
tar 명령어
c: 새로운 tar 파일을 생성 (arChive의 c라고 한다.)t: tar 파일 내부 내용 확인x: tar 파일을 해제한다. (eXtract)f: 아카이브 파일 지정v: tar 명령어 수행 과정 출력
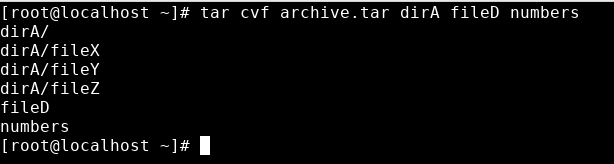
tar 명령어를 이용한 아카이브 생성(jar, war 유사)
tar cvf archive.tar dirA fileD numbers: archive하는 과정이다.c옵션으로 새로운tar파일 생성,v옵션으로 수행 과정 출력,f옵션으로 (dirA, fildD, numbers)이 세 파일을 아카이브 파일로 지정하였다.
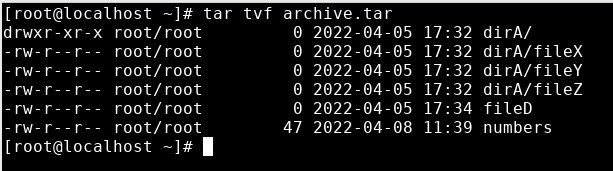
tar tvf archive.tar:t옵션으로 tar내부 내용 확인
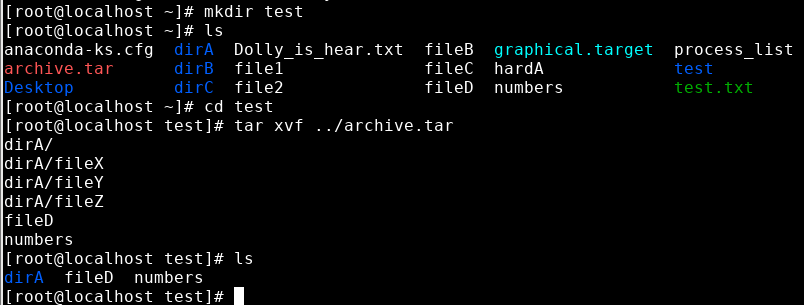
tar xvf ../archive.tar: test 폴더를 만들고, 그 안에 arcive.tar파일을x옵션으로 tar파일을 해제했다.
압축 및 압축 해제
compress 파일 압축 (이건 중요하지 않다. 기억할 필요 없지만 그냥 알아보자)
- compress는 굳이 다운받아야하기 때문에 굳이 쓸 이유가 없다고 할 수 있다.
yum install ncompress -y: ncompress를 다운받는다.compress -v process_list: process_list를 압축시킨다. (먼저 process_list파일이 있는지 확인 해야된다)- ls -l로 확인해본다.

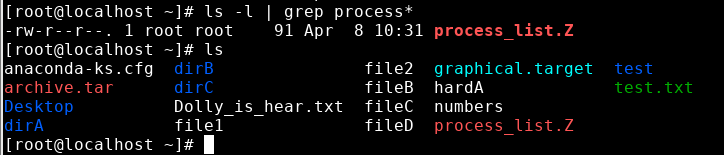
- process_list.Z가 생겼고, 용량은 91이 되었다. 또한, process_list 원본이 사라졌다.
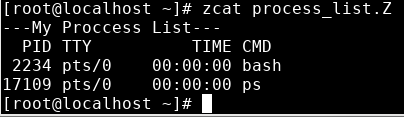
zcat process_list.Z: 압축파일의 내부를 확인한다.
compress -v archive.tar: tar파일도 다시 압축 할 수 있다.
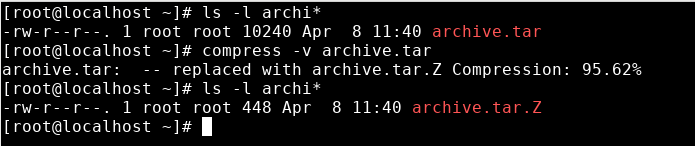
- 용량을 확인하면, 10240에서 448이 되었다.
- 다만, tar에서도 옵션을 주어서 archive와 동시에 압축할 수 있다....
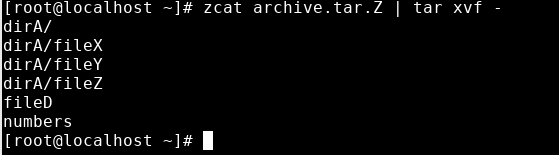
- 또, Z로 압축된 tar파일도 내부를 확인할 수 있지만
zcat archive.tar.Z | tar xvf -: 이렇게 파이프 명령어로 Z파일 보기 | tar파일 보기 해야한다.
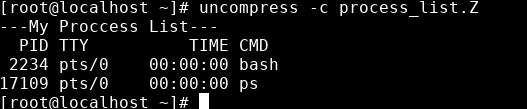
uncompress -c process_list.Z: uncompress가 압축을 푸는 명령어지만, -c옵션으로 zcat처럼 사용되었다.
uncompress 압축 해제
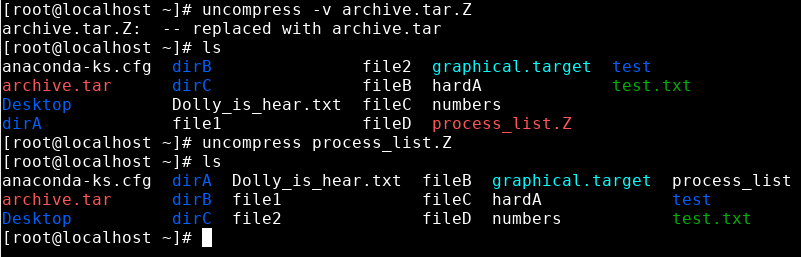
uncompress -v archive.tar.Z: uncompress -v로 압축을 해제한다.uncompress process_list: uncompress 에 -v옵션을 주지 않아도 압축은 풀린다. 다만 과정이 보이지 않는다.
--v: view옵션이었던 것을 볼 수 있다.
gzip 파일 압축 (자주 사용된다.)
- 도커에서 이렇게 압축해서 사용할 수 있다.
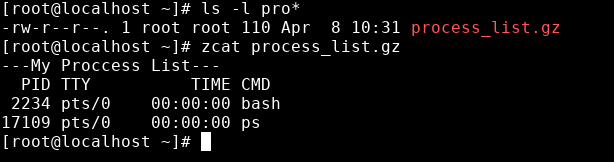
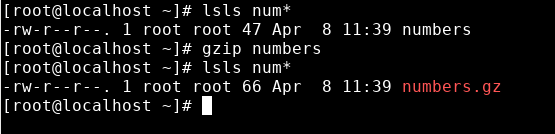
gzip process_list: gz파일로 압축되어있다.zcat process_list.gz: gz파일의 내용을 볼 수 있다
- 재밌게도 용량이 작은 파일을 압축하니 오히려 용량이 늘었다.
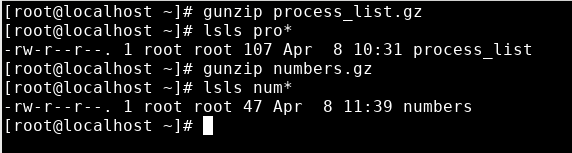
gunzip 압축 해제
gunzip process_list.gz: 압축 해제한다.
아카이브 된 파일 또는 디렉토리 압축 및 해제
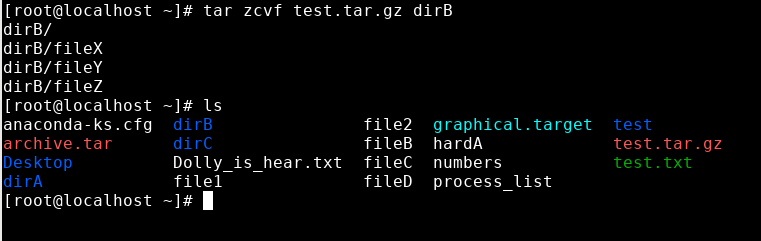
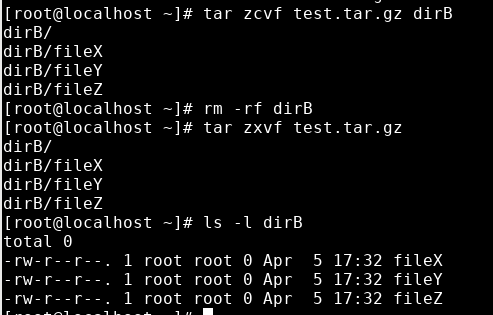
tar zcvf test.tar.gz dirB: dirB를z옵션을 주어서 압축까지 같이해서, test.tar.gz파일로 만든다.
tar zxvf test.tar.gz:z옵션과x옵션으로 압축파일을 해제한다. dirB를 지우고, 압축을 해제하면 다시 dirB가 나올 것이다.
- 만약 tar파일을 압축하고, 해제하게 된다면,
gzip으로 tar파일을 압축하고,gunzip으로 tar.gz -> tar파일로 압축 해제 할 수 있다.
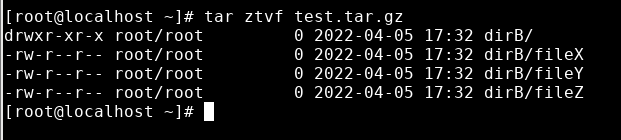
- tar.gz파일의 내부를 보고싶다면
tar ztvt명령어를 쓸 수 있다.
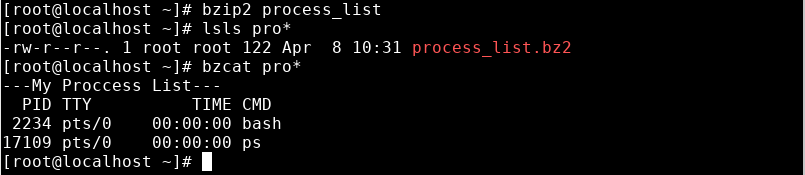
bzip2 파일 압축
zip2 process_list: zip2로 파일을 압축해보자bzcat process_list: gzcat으로 내용을 확인 할 수 있다.
bunzip 압축 해제
bunzip2 process_list.bz2 dirB: bz2파일 압축 해제

아카이브된 파일 또는 디렉토리 압축 및 해제
tar jcvf test.tar.bz2 dirB:

zip 파일 또는 디렉토리 압축 및 해제
yum install -y zip unzip: zip설치zip test.zip dirB/*: dirB와 그 하위폴더/*들을 test.zip으로 압축한다.
오후 강의
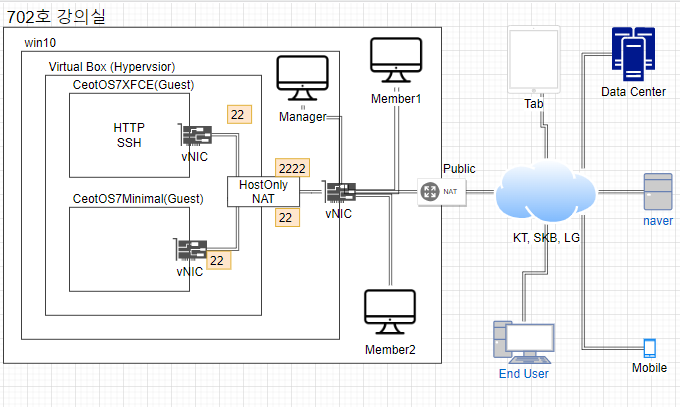
diagram.net
- 다이어그램을 만들어주는 웹 사이트이며, Disk에 바로 자동저장할 수 있다.
- 나중에 AWS 아키텍처 설계 진행시 여기서 사용하면 된다.
- 또, 구버전 AWS 아이콘과, 새버전 AWS 아이콘이 있는데, 새버전 아이콘 쓰는 것이 좋을 것이다.
- HostOnly랜카드나 다른 랜카드도 똑같이 vNIC를 통하기 때문에, NAT를 거쳐야 한다.
리눅스 서버
SSH (Secure Shell; KeyPair 생성 및 활용)
- 키 쌍은 특정 인증 프로토콜에 사용되는 공개 키 및 프라이빗 키 파일을 나타낸다.
- SSH 공개 키 인증은
비동기 암호화 알고리즘을 사용하여"프라이빗" 키와"공개" 키라는 두 가지 키 파일을 생성합니다.프라이빗 키 파일은 암호와 동일하며,모든 상황에서 보호되어야 합니다. 다른 사람이 사용자의 프라이빗 키를 획득하면 사용자가 엑세스할 수 있는 모든 SSH 서버에 사용자의 이름으로 로그인할 수 있습니다.
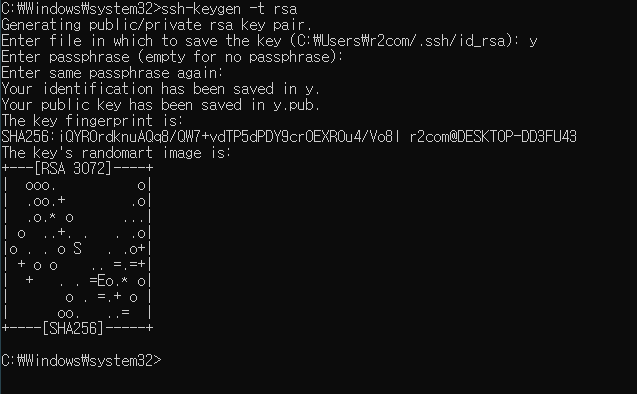
생성
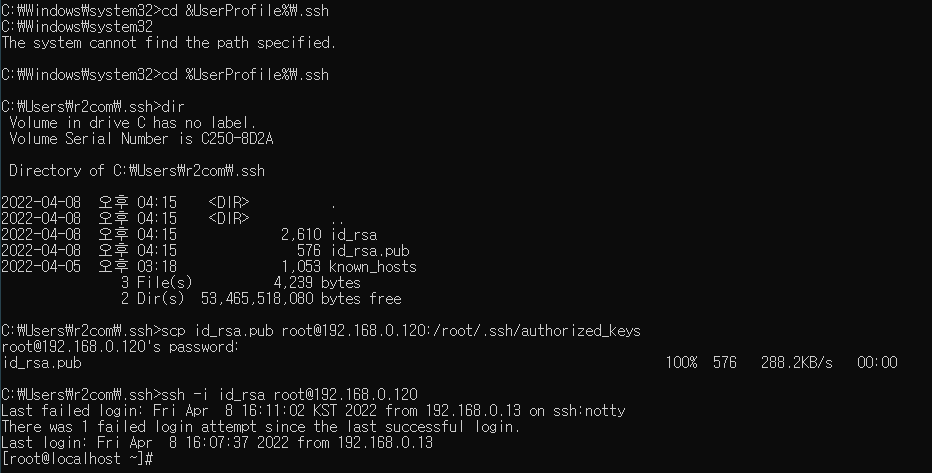
ssh root@[IPaddress]: VM에 접속mkdir /root/.ssh: 혹시 ssh폴더가 없을 수 있으니 생성exit: VM에서 나와 명령프롬프트로 돌아옴ssh-keygen -t rsa: rsa 키 페어 생성cd %UserProfile%\.ssh: 사용자의 ssh폴더에 들어가봄scp id_rsa.pub root@[VM IPadress]:/root/.ssh/authorized_keys:scp는 네트워크를 통한cp명령어이다.
- key를 생성하고 key전달 완료하였다. 따라서, 비밀번호 입력 없이 접속할 수 있는 것을 볼 수 있다.
- 이후 ,
vi /etc/ssh/sshd_config해서PasswordAuthentication no로 바꿔준다.- 또,
system.ctl restart sshd로 리스타트 해준다.
HTTPD(Hyper Text Transfer Protocol Daemon ;웹서버 구축 및 간단 홈페이지 꾸미기)
- Deamon은 백그라운드에서 돌아가는 것을 말한다.
- HTTP는 HTML문서와 같은 리소스들을 가져올 수 있도록 해주는 프로토콜이다.
- HTTP는 웹에서 이루어지는 모든 데이터 교환의 기초이며, 클라이언트-서버 프로토콜이기도 한다.
- 클라이언트-서버 프로토콜이란 (보통 웹브라우저인) 수신자 측에 의해 요청이 초기화되는 프로토콜을 의미한다.
- 하나의 완전한 문서는 텍스트, 레이아웃 설명, 이미지, 비디오, 스크립트 등 불러온 (fetched) 하위 문서들로 재구성 된다.
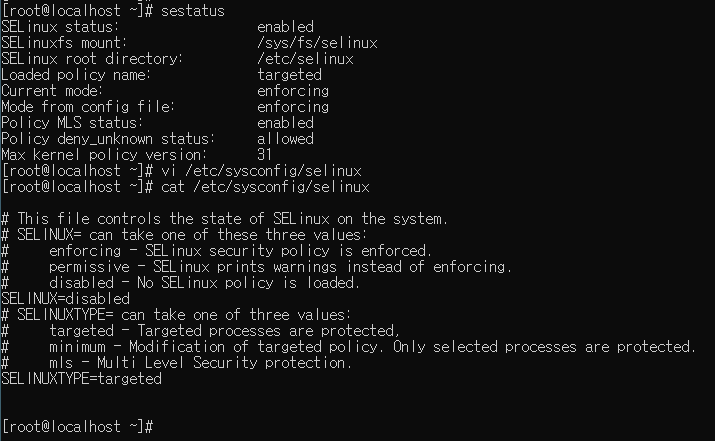
selinux
sestatus:selinux에서 사용하는 status이다.- 너무 강력한 보안이라, 실습에 방해가 될 수 있어 일단 disable할 것이다.
- 서버 실습 중, 누구는 되고 누구는 안되는 상황이 일어날 수 있다.
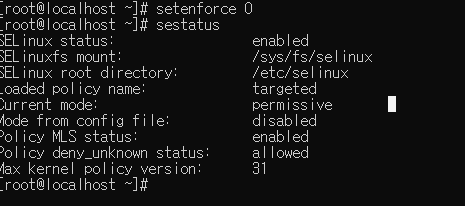
- disable 시켰다.
setenforce 0: enforce를 0으로 set해준다.
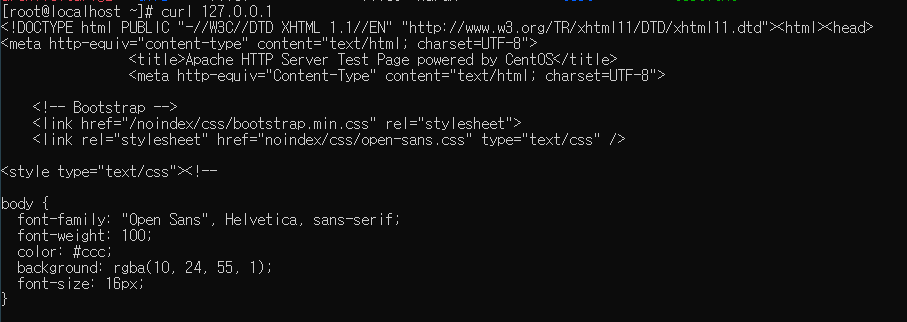
yum install -y httpd: httpd를 설치systemctl start httpd: httpd 시작curl 127.0.0.1: 127.0.0.1 웹주소에 대한 정보를 리턴해준다. (HTML 을 리턴해 주는 것 같아.)
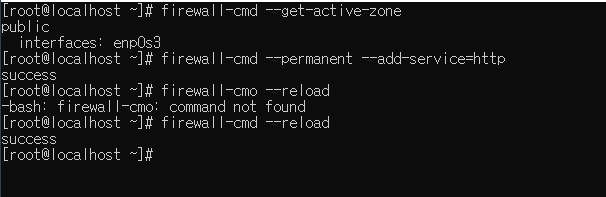
systemctl status firewalld: firewalld에서 d는 deamon을 뜻하며, 백그라운드에서 돌아가는 것을 말한다.
- 이후 방화벽 설정해준다.
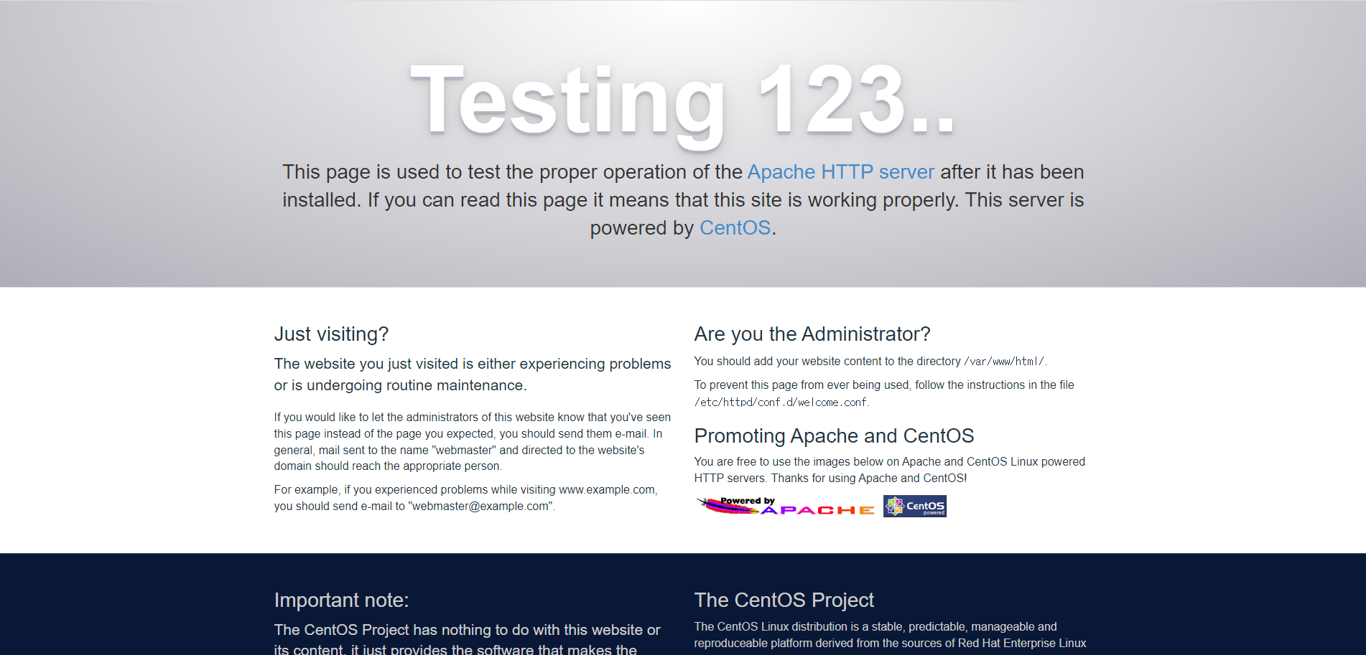
- 이제 VM의 IP주소로 접속하면 아래 웹페이지가 나온다.
- 이 사이트는VM에서 Chrome을 키고, 들어갈 수 있다.
- 위 IP주소는 lo (loop) 주소이며, 자시 자신의 IP주소를 들어갈 떄 사용하는 IP주소이다. 위 lo IP주소로 chrome으로 들어가면 위 사이트에 접속하여 작동확인을 할 수 있다.
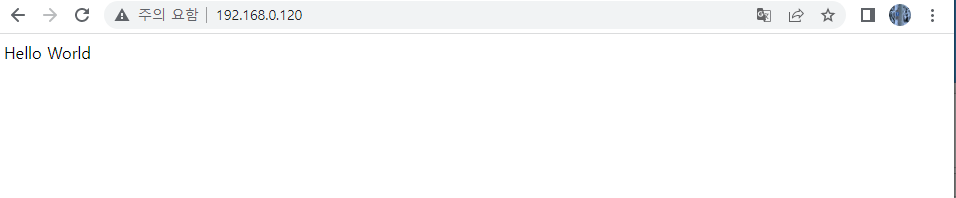
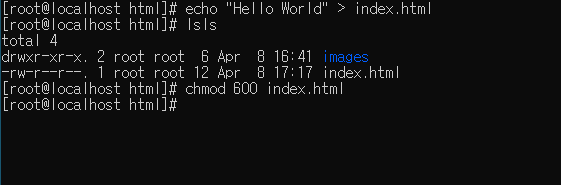
cd /var/www/html: httpd 를 설치하면 생기는 폴더이다.echo "Hello world" > index.html: index.html 을 만들어준다.
- 그 후, 웹페이지를 새로고침하면 Hello world를 출력해 주는 것을 볼 수 있다.
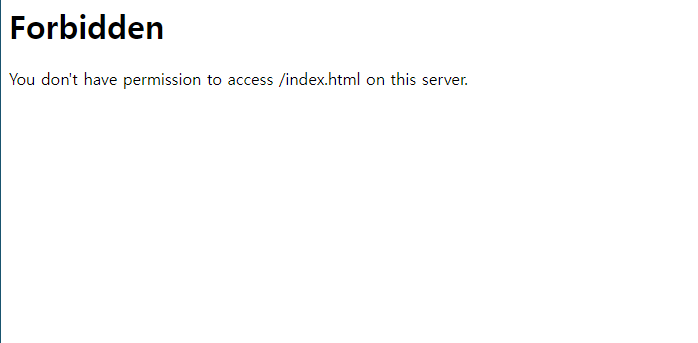
- 또, chmod로 index.html 권한을 조정해주면, 웹에서도 접속 할 수 없게 된다.
- 또, index.html을 수정하여 내용을 넣어준다. (교수님 메모장 실무 기초-서버와 네트워크 참조)
- 그리고 index.html 파일이 있는 위치에
mkdir images를 해주고, 그 안에 이미지를 넣어준다.


Talking Potato