Azure_set
github에서 불러오기
- `git clone https://github.com/hali-linux/azure_set.git
tf파일 살펴보기
vi variables.tf
variable "resource_group_name_prefix" {
  default       = "rg"
  description   = "Prefix of the resource group name that's combined with a random ID so name is unique in your Azure subscription."
}

variable "resource_group_location" {
  default = "koreacentral"
  description   = "Location of the resource group."
}
vi main.tf
provider "azurerm" {
  features {}
}

resource "random_pet" "rg-name" {	# 이름을 랜덤하게 만들어준다.
  prefix    = var.resource_group_name_prefix	# 그러나 랜덤 이름 앞에 prefix로 var.resource_group_name_prefix(rg)를 넣는다.
  												# rg-~~~ 가 된다.
}

resource "azurerm_resource_group" "rg" {		# 리소스 그룹 생성
  name      = random_pet.rg-name.id			# 아까 랜덤생성한 이름
  location  = var.resource_group_location	# 미리 정의한 리전을 넣어준다.
}

# Create virtual network
resource "azurerm_virtual_network" "myterraformnetwork" {
  name                = "myVnet"		# 가상 vnet을 만들고 별칭을 달아준다.
  address_space       = ["10.228.0.0/16"]	# cidr을 설정해준다.
  location            = azurerm_resource_group.rg.location
  resource_group_name = azurerm_resource_group.rg.name
}

# Create subnet
resource "azurerm_subnet" "myterraformsubnet" {	# azurerm_subnet으로 서브넷을 만든다.
  name                 = "mySubnet"
  resource_group_name  = azurerm_resource_group.rg.name
  virtual_network_name = azurerm_virtual_network.myterraformnetwork.name
  address_prefixes     = ["10.233.0.0/24"]
}

# Create public IPs
resource "azurerm_public_ip" "myterraformpublicip" {	# 퍼블릭IP를  생성한다.
  name                = "myPublicIP"
  location            = azurerm_resource_group.rg.location
  resource_group_name = azurerm_resource_group.rg.name
  allocation_method   = "Dynamic"			# 동적으로 IP를 할당받는다.
}

# Create Network Security Group and rule
resource "azurerm_network_security_group" "myterraformnsg" {	# 네트워크 보안그룹을 생성한다.
  name                = "myNetworkSecurityGroup"
  location            = azurerm_resource_group.rg.location	# KoreaCentral이다.
  resource_group_name = azurerm_resource_group.rg.name

  security_rule {						# 보안규칙
    name                       = "SSH"
    priority                   = 1001	# 우선순위 1001
    direction                  = "Inbound"
    access                     = "Allow"
    protocol                   = "Tcp"
    source_port_range          = "*"	# 모든 소스포트에서
    destination_port_range     = "22"	# SSH프로토콜의 포트 번호 22
    source_address_prefix      = "*"	# 소스 주소 prefix, 모든 prefix허용
    destination_address_prefix = "*"	# 목적지 주소도 모든 prefix허용
  }
  security_rule {
    name                       = "HTTP"
    priority                   = 1002
    direction                  = "Inbound"
    access                     = "Allow"
    protocol                   = "Tcp"
    source_port_range          = "*"
    destination_port_range     = "80"
    source_address_prefix      = "*"
    destination_address_prefix = "*"
  }
}

# Create network interface
resource "azurerm_network_interface" "myterraformnic" {
  name                = "myNIC"			# 네트워크 인터페이스(랜카드) 생성 및 별칭을 달아준다.
  location            = azurerm_resource_group.rg.location
  resource_group_name = azurerm_resource_group.rg.name

  ip_configuration {
    name                          = "myNicConfiguration"
    subnet_id                     = azurerm_subnet.myterraformsubnet.id	#서브넷의 ID를 가져온다.
    private_ip_address_allocation = "Dynamic"	# PrivateIP는 동적으로 할당받는다.(DHCP)
    public_ip_address_id          = azurerm_public_ip.myterraformpublicip.id	# PublicIP는 아까 생성한 PublicIP를 받는다.
  }
}

# Connect the security group to the network interface
resource "azurerm_network_interface_security_group_association" "example" {	# 아까 생성했던 보안규칙과 네트워크 인터페이스를 연결해준다.
  network_interface_id      = azurerm_network_interface.myterraformnic.id
  network_security_group_id = azurerm_network_security_group.myterraformnsg.id
}

# Create (and display) an SSH key
resource "tls_private_key" "example_ssh" {	# example_ssh라는 이름으로 키페어를 만들어준다.
  algorithm = "RSA"
  rsa_bits  = 4096
}

# Create virtual machine
resource "azurerm_linux_virtual_machine" "myterraformvm" {	# azurerm_linux_virtual_machine은 VM리소스이다. VM을 만들어준다.
  name                  = "myVM"
  location              = azurerm_resource_group.rg.location
  resource_group_name   = azurerm_resource_group.rg.name	# 리소스 그룹 이름 넣어줌
  network_interface_ids = [azurerm_network_interface.myterraformnic.id]	# 네트워크 인터페이스 연결
  size                  = "Standard_B1s"	# 인스턴스 유형을 Standard_B1s로 한다.

  os_disk {							#볼륨 할당
    name                 = "myOsDisk"
    caching              = "ReadWrite"
    storage_account_type = "Premium_LRS"
  }

  source_image_reference {			# 이미지 설정
    publisher = "Canonical"
    offer     = "UbuntuServer"
    sku       = "18.04-LTS"
    version   = "latest"
  }

  computer_name                   = "myvm"		# VM의 이름은 myvm으로 한다.
  admin_username                  = "azureuser"	# admin유저 아이디를 azureuser로 한다.
  custom_data                     = filebase64("httpd-azure.txt")	# 사용자 데이터를 입력하는데, base64로 변환하여 글자가 깨지지 않게하는 안전장치이다.
  disable_password_authentication = true

  admin_ssh_key {
    username   = "azureuser"
    public_key = tls_private_key.example_ssh.public_key_openssh	# 위에서 생성한 퍼블릭키를 vm에 넣기위해 여기서 선언해준다.
  }
}
vi outputs.tf
output "resource_group_name" {			# 리소스 그룹 이름 출력
  value = azurerm_resource_group.rg.name
}

output "public_ip_address" {			# VM의 PublicIP 출력
  value = azurerm_linux_virtual_machine.myterraformvm.public_ip_address
}

output "tls_private_key" {				# private_key 출력
  value     = tls_private_key.example_ssh.private_key_pem
  sensitive = true
}

# terraform init
# terraform plan
# terraform apply
# terraform output -raw tls_private_key > azure-key.pem
# terraform output public_ip_address
# ssh -i id_rsa azureuser@<public_ip_address>
테라폼 실행해보기
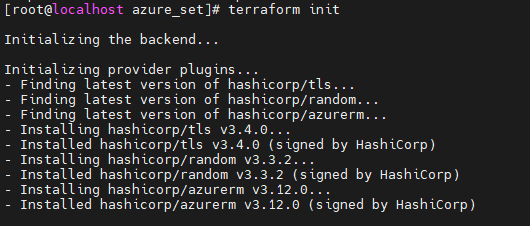
Terraform init
- 코드에 사용된 tls, random, azurerm 내장함수의 최신버전을 찾아준다.
- 또, 이 내장함수들의 최신버전을 설치해준다.
- 에러없이 잘 설정되었다.
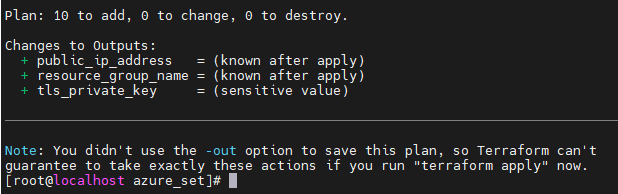
terraform plan
- 에러가 출력되지 않았고, 새로 10가지가 생성될 것이다.
terraform validate
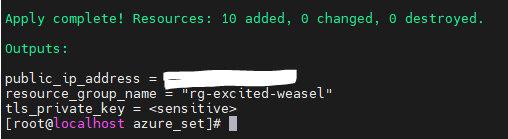
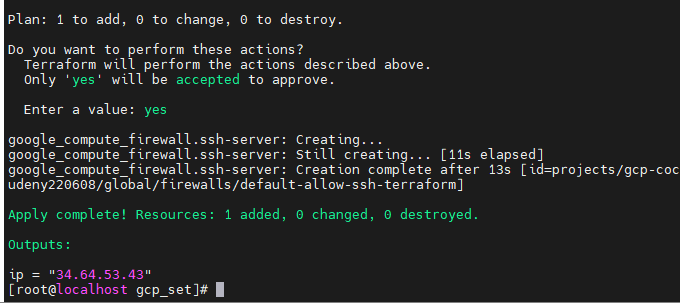
terraform apply
- PublicIP와 리소스그룹 ID, privatekey까지 잘 출력되었다.
결과
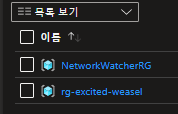
- 리소스 그룹이 잘 생성되었다.
- IP주소로 웹페이지에도 잘 접근할 수 있다.
MobaXterm으로 접속하기
ssh -i id_rsa azureuser@<public_ip_address>
- ssh로 접속해본다.
- 에러가 난다. 아직 키가 없다는 것 같다.
terraform output -raw tls_private_key > azure-key.pem
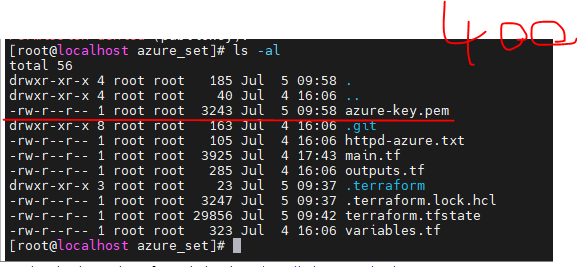
- 아까 output으로 나온 tls_private_key를 azure-key.pem파일을 생성해서 넣어준다.
chmod 400 azure-key.pem으로 권한을 변경해줘야 한다.
- 접속완료!
terraform destroy


GCP CLI
CLI 설치
CLI 설치
mkdir gcp_cli && cd $_: gcp_cli 사용할 폴더를 만들어준다.tee -a /etc/yum.repos.d/google-cloud-sdk.repo << EOM: repository를 만들어서 새로 설치해준다.[google-cloud-cli] name=Google Cloud CLI baseurl=https://packages.cloud.google.com/yum/repos/cloud-sdk-el8-x86_64 enabled=1 gpgcheck=1 repo_gpgcheck=0 gpgkey=https://packages.cloud.google.com/yum/doc/yum-key.gpg https://packages.cloud.google.com/yum/doc/rpm-package-key.gpg EOM
- EOM : End Of Message
- tee 명령어와 EOM으로 repo파일을 생성할 수 있다.
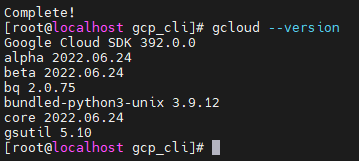
yum install -y google-cloud-cli: google-cloud-cli를 설치한다.
gcloud --version: 버전확인- 잘 설치되었다.
GCP 로그인
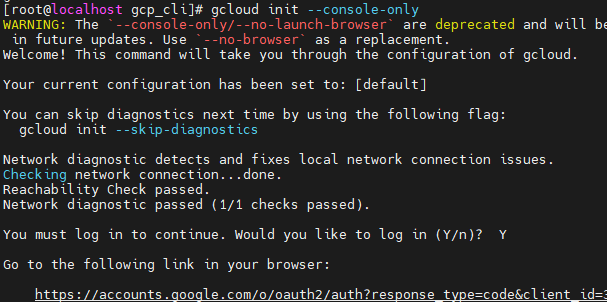
gcloud init --console-only
- 아래 로그인 링크를 준다.
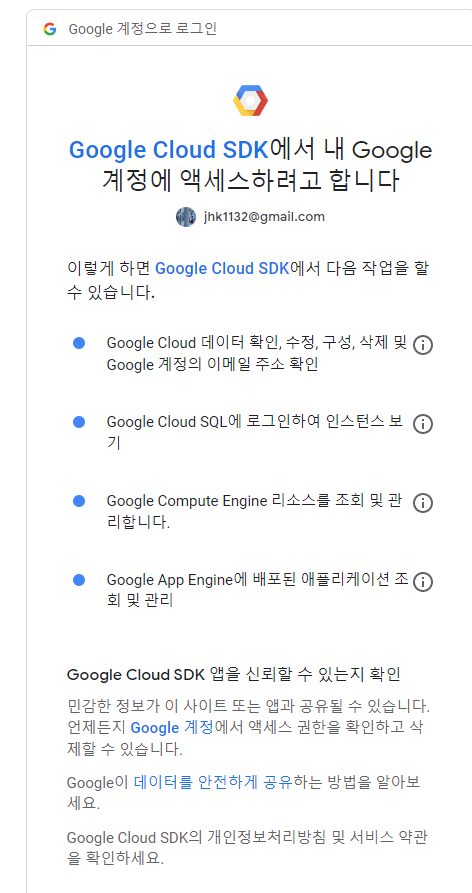
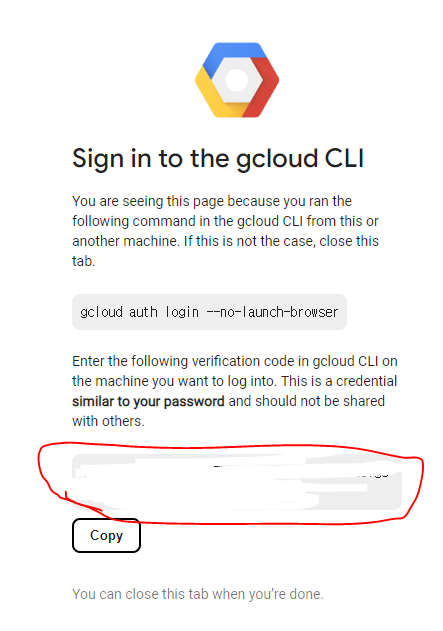
- 로그인을 진행해주고 code를 받아 MobaXterm에 넣어준다.
- 이렇게 나온다.
- copy를 눌러주고 MobaXterm에 들어가서 넣어주면
- 이렇게 나온다. 프로젝트를 선택할 것인지, 아니면 다른 프로젝트에 들어갈 것인지, 새로운 프로젝트를 만들 것인지 정할 수 있다.
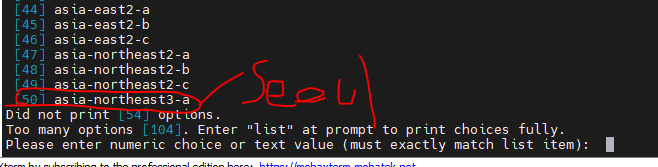
- 리전을 선택해준다. GCP에서 서울리전은 Asia-northeast3-a니까 50을 넣어준다.

GCP-CLI 사용하기
VPC 생성하기
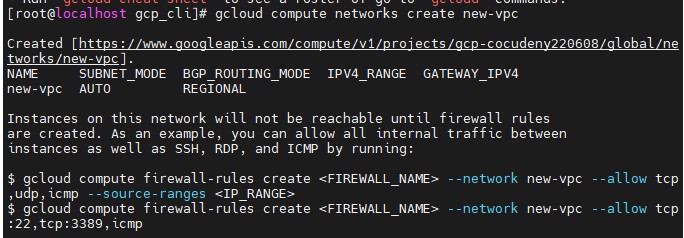
gcloud compute networks create new-vpc: vpc의 이름을 주고 생성한다.- 현재는 new-vpc라는 아무것도 없는 빈 vpc, 거의 이름만 생성된 것이다. 이제 subnet을 추가해간다.
서브넷 생성하기
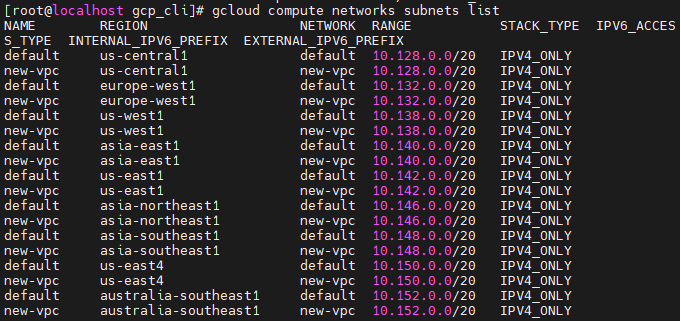
gcloud compute networks subnets create new-subnet --network=new-vpc --range=192.168.0.0/16 --region=asia-northeast3에러...?
- new-vpc이름을 가진 vpc에 new-subnet을 생성한다. 서브넷의 범위는 192.168.0.0/16이고, 리전은 asia-northeast3로 한다.
- ?????
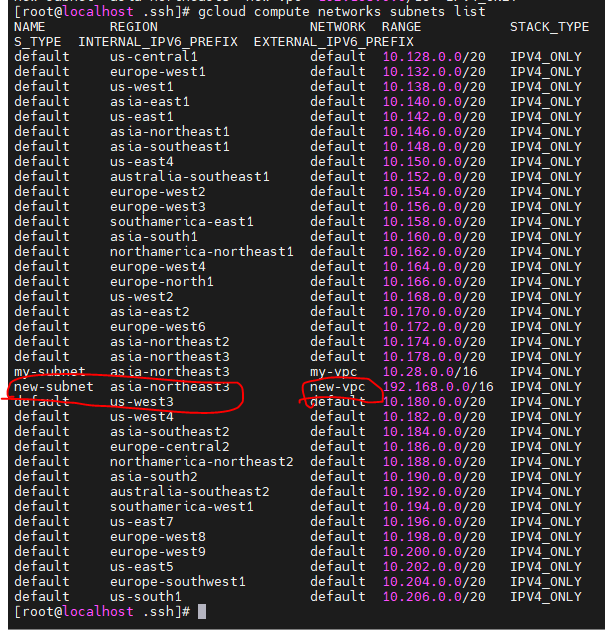
- 전 세계에 new-vpc가 생겼다...? VPC를 생성할때 리전을 안적어줬더니 모든 리전에 new-vpc가 생겼다. ㅎ
- 정리해줘야 한다. 먼저 서브넷을 지워줘야 한다.
gcloud compute networks subnets delete new-subnetgcloud compute networks delete new-vpc: new-vpc도 지워준다.진행상 이전 VPC생성 명령어를 그대로 사용하도록 하겟다.
- gcloud compute networks create new-vpc : VPC생성
- gcloud compute networks subnets create new-subnet --network=new-vpc --range=192.168.0.0/16 --region=asia-northeast3 : 서브넷 생성
방화벽 설정
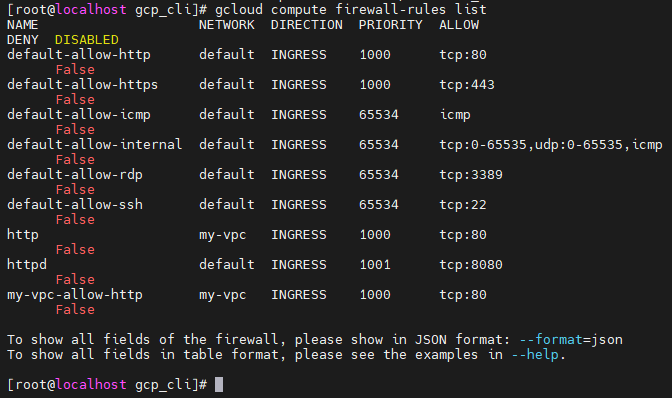
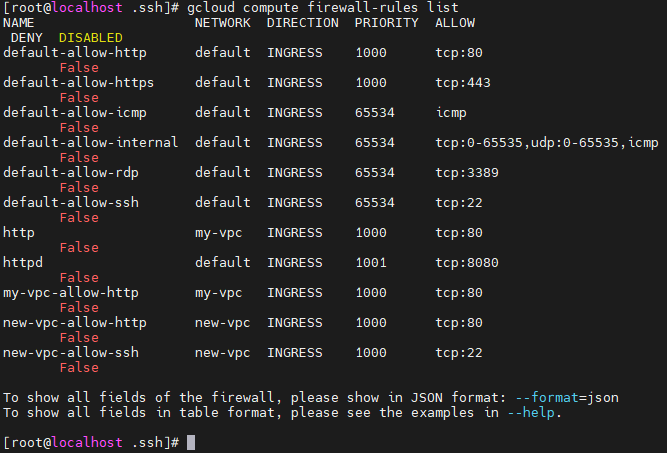
gcloud compute firewall-rules list: 방화벽 규칙 리스트 보기
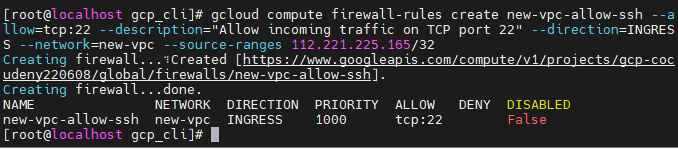
gcloud compute firewall-rules create new-vpc-allow-ssh --allow=tcp:22 --description="Allow incoming traffic on TCP port 22" --direction=INGRESS --network=new-vpc --source-ranges 112.221.225.165/32
- 보안규칙을 생성해준다.
- tcp : 22번포트를 허용한다.
- INGRESS (인바운드)
- new-vpc에 생성한다.
- 0.0.0.0/0에서 들어오는 트래픽을 허용한다.
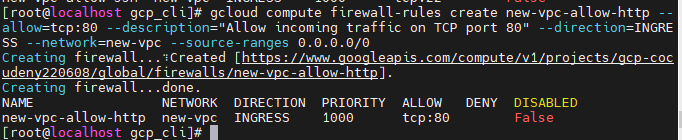
gcloud compute firewall-rules create new-vpc-allow-http --allow=tcp:80 --description="Allow incoming traffic on TCP port 80" --direction=INGRESS --network=new-vpc --source-ranges 0.0.0.0/0
- 똑같이 HTTP 허용해준다.
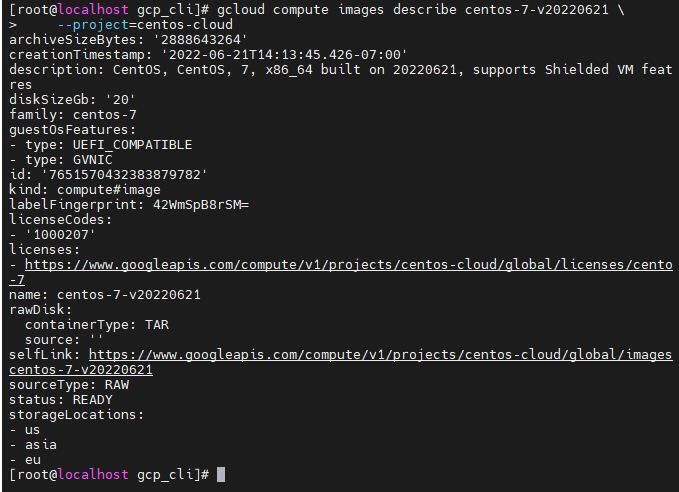
이미지 리스트 보기
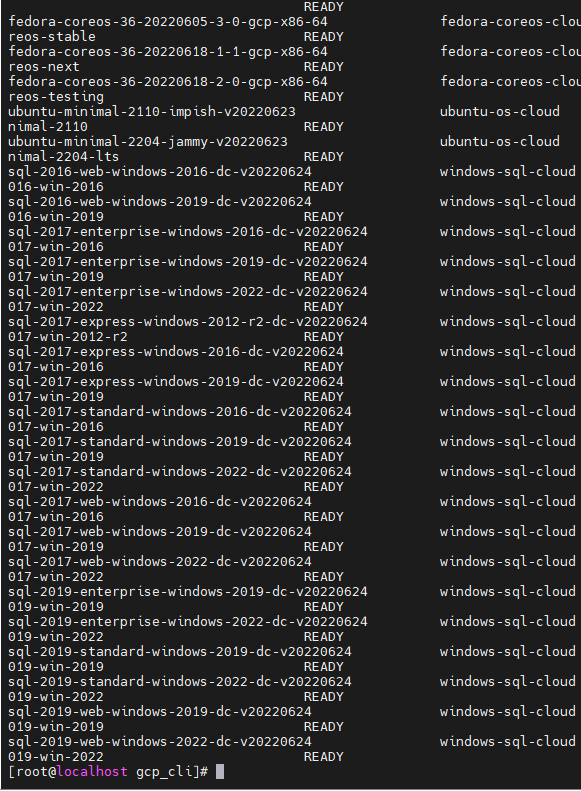
gcloud compute images list: 이미지 리스트가 너무 많다.
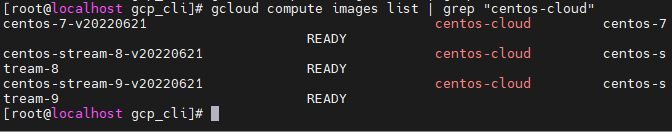
gcloud compute images list | grep "centos-cloud": centos-cloud라는 이름의 이미지만 검색해본다.
- describe명령어를 통해 이미지에 대한 상세내용을 확인한다.
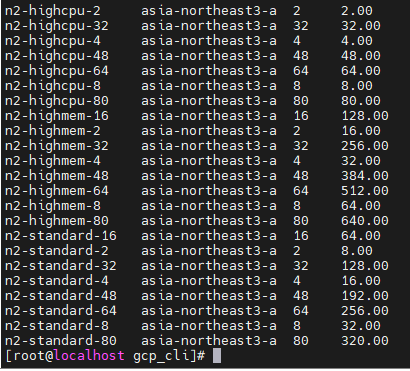
머신 타입 보기
gcloud compute machine-types list --filter="zone:( asia-northeast3-a )"- 서울 리전, a가용영역에서 사용할 수 있는 머신타입, 인스턴스 유형리스트를 찾아본다.
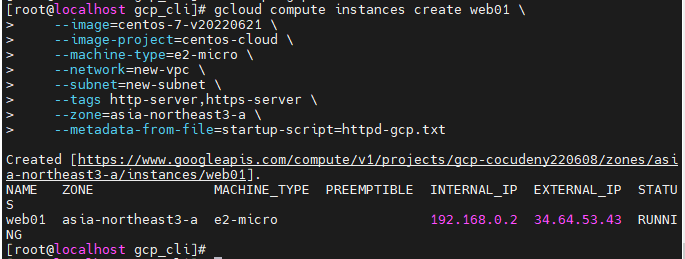
사용자데이터 생성
- vi httpd-gcp.txt
#!/bin/bash
yum install -y httpd
systemctl enable --now httpd
echo "Hello GCP CLI" > /var/www/html/index.html
인스턴스 생성
gcloud compute instances create web01 \	#web01인스턴스를 생성한다.
--image=centos-7-v20220621 \	#이미지는 centos7 최신버전을 사용한다.
--image-project=centos-cloud \	# 이미지의 프로젝트는 centos-cloud로 되어있다.
--machine-type=e2-micro \		# 머신유형은 e2-micro로 한다.
--network=new-vpc \
--subnet=new-subnet \
- 생성되었다.
- 웹 브라우저에서도 잘 접속된다.
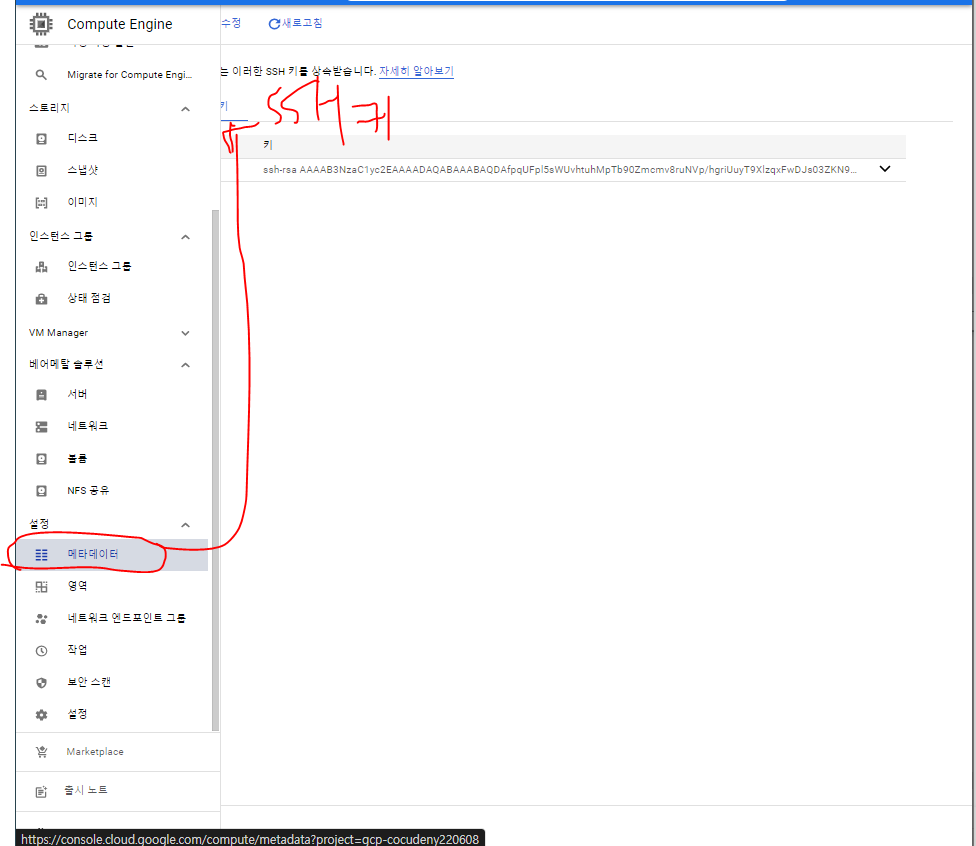
키페어
메타데이터
- 이전에 만들어놓은 키페어가 존재한다.
- 이 메타데이터의 키페어는 전사적으로 다 들어갈수 있는 마스터키와 같다.
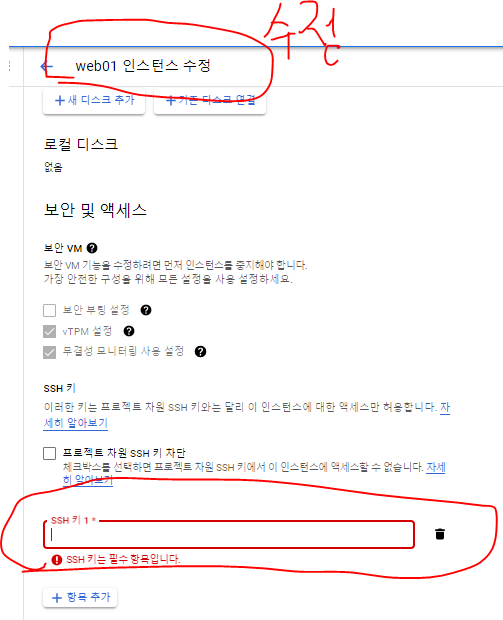
인스턴스 개별 키
- 여기서 수정으로 넣어주는 키는 인스턴스 개별의 키로 사용할 수 있다.
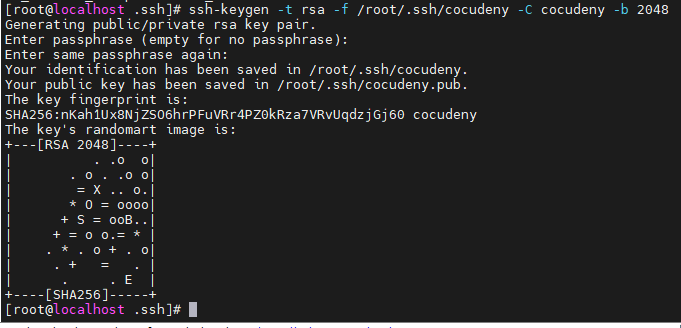
ssh-keygen -t rsa -f /root/.ssh/cocudeny -C cocudeny -b 2048
- SSH 키를 생성한다.
- rsa 타입(-t)으로 /root/.ssh/폴더(-f)에 -C cocudeny이름으로 2048비트수(-b)로 만들어준다.
- 비트수가 높을수록 더 보안이 강하지만, 연산이 느려지는 단점이 있다.
- 키가 생성되었다.
- cocudeny이름으로 키가 생성되었다.
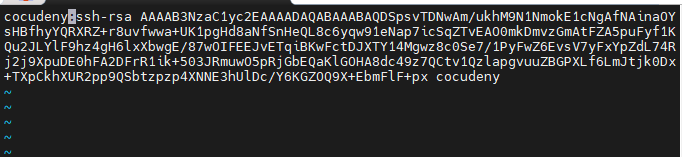
vi cocudeny.pub- 앞에 사용자이름을 넣고
:을 넣어줘야 한다.
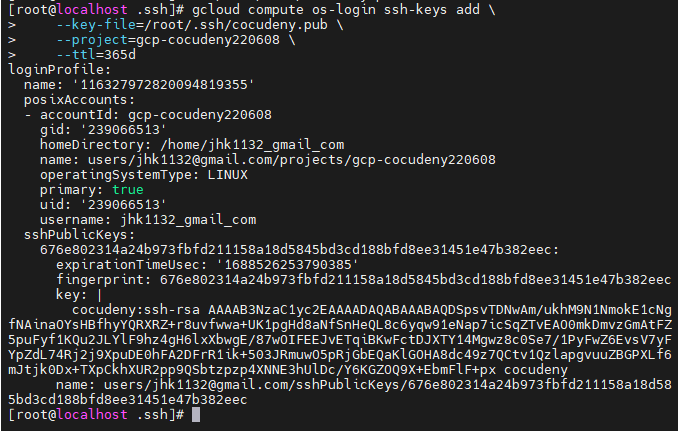
- 생성한 키를 GCP에 추가해준다
gcloud compute os-login ssh-keys add \
    --key-file=/root/.ssh/cocudeny.pub \
    --project=gcp-cocudeny220608 \
    --ttl=365d						# 365 d는 day 즉, 365일을 뜻한다.
gcloud compute instances add-metadata web01 --metadata-from-file ssh-keys=/root/.ssh/cocudeny.pub
- web01 인스턴스에 메타데이터를 추가한다.
- /root/.ssh/cocudeny.pub키를 ssh-keys로 추가한다.
- GCP 콘솔에서 확인하니 잘 나와있다.
- SSH 접속도 잘 된다.


GCP-CLI 정리하기
인스턴스 지우기
gcloud compute instances delete web01- 잘 지워졌다.
방화벽 지우기
- 방화벽 규칙을 지워야 서브넷을 지울 수 있다.
gcloud compute firewall-rules list: 방화벽 리스트 출력
- 여기서 아까 생성한 두가지 규칙을 지워준다.
gcloud compute firewall-rules delete new-vpc-allow-http: HTTP규칙 지워주기gcloud compute firewall-rules delete new-vpc-allow-SSHSSH 규칙도 지워준다.서브넷 지우기
gcloud compute networks subnets delete new-subnetVPC 지우기
gcloud compute networks delete new-vpc

VPC 전세계 만들어지는 에러
gcloud compute networks create new-vpc --subnet-mode=custom: subnet 모드를 커스텀으로 해주니 서울리전에만 생성된다고 한다. 확인해보자gcloud compute networks subnets create new-subnet --network=new-vpc --range=192.168.0.0/16 --region=asia-northeast3
- VPC를 생성했지만 결국 이름만 있는 VPC기 때문에 서브넷을 생성해서 확인해줘야 한다.
- Default리전 외의 방금 생성한 new-subnet하나만 잘 생성되었다.
GCP SET
git에서 가져오기
git clone https://github.com/hali-linux/gcp_set.gitvi provider.tf
provider "google" {					# Cloud Service제공자를 정의한다.
  credentials = file("credentials.json")
  project = "gcp-cocudeny220608"
  region = "asia-northeast3"
  zone = "asia-northeast3-a"
}
vi main.tf
resource "google_compute_subnetwork" "network-with-private-ip-ranges" {	#	서브넷을 먼저 만들고 있다. 그러나 순서는 중요하지 않을 수 있다.
  name          = "new-subnet"		# 서브넷의 이름
  ip_cidr_range = "192.168.0.0/16"
  region        = "asia-northeast3"
  network       = google_compute_network.custom-test.id	# 아래 생성하는 network의 id를 넣어준다.
}

resource "google_compute_network" "custom-test" {
  name                    = "new-vpc"	# network 이름을 new-vpc로 만들어준다.
  auto_create_subnetworks = false		# 여기가 True면 IP범위를 자동으로 넣어준다.
}

resource "google_compute_instance" "default" {	#인스턴스 생성하기
  name         = "vm-from-terraform"	#이름을 VM from terraform 으로 해준다.
  machine_type = "e2-micro"
  zone         = "asia-northeast3-a"

  boot_disk {							# boot_disk, 이미지는 debian-cloud로 만들어준다.
    initialize_params {
      image = "debian-cloud/debian-9"
    }
  }

  network_interface {					# 네트워크 인터페이스설정
    network = "new-vpc"					# VPC는 new-vpc로
    subnetwork = "new-subnet"			# Subnet은 new-subnet으로 설정한다.

    access_config {						# 접근 허용 설정
      // Include this section to give the VM an external ip address
    }
  }

    metadata_startup_script = file("/root/gcp_set/script.txt")

    // Apply the firewall rule to allow external IPs to access this instance
    tags = ["http-server"]			#tags에 http-server를 넣어줄 것이다. 이는 아래에서 정의한다.
    								# 또, 이 태그를 가진 인스턴스는 똑같은 보안그룹에 적용을 받을 것이다.
}

resource "google_compute_firewall" "http-server" {	# 방화벽(보안그룹)으로 http-server를 정의해준다.
  name    = "default-allow-http-terraform"	#
  network = "new-vpc"				# new-vpc를 사용할 것이다.

  allow {							# tcp 80번포트 허용
    protocol = "tcp"
    ports    = ["80"]
  }

  // Allow traffic from everywhere to instances with an http-server tag
  source_ranges = ["0.0.0.0/0"]		# 소스 범위 모든 IP주소
  target_tags   = ["http-server"]
}
서비스 계정 하나 만들기
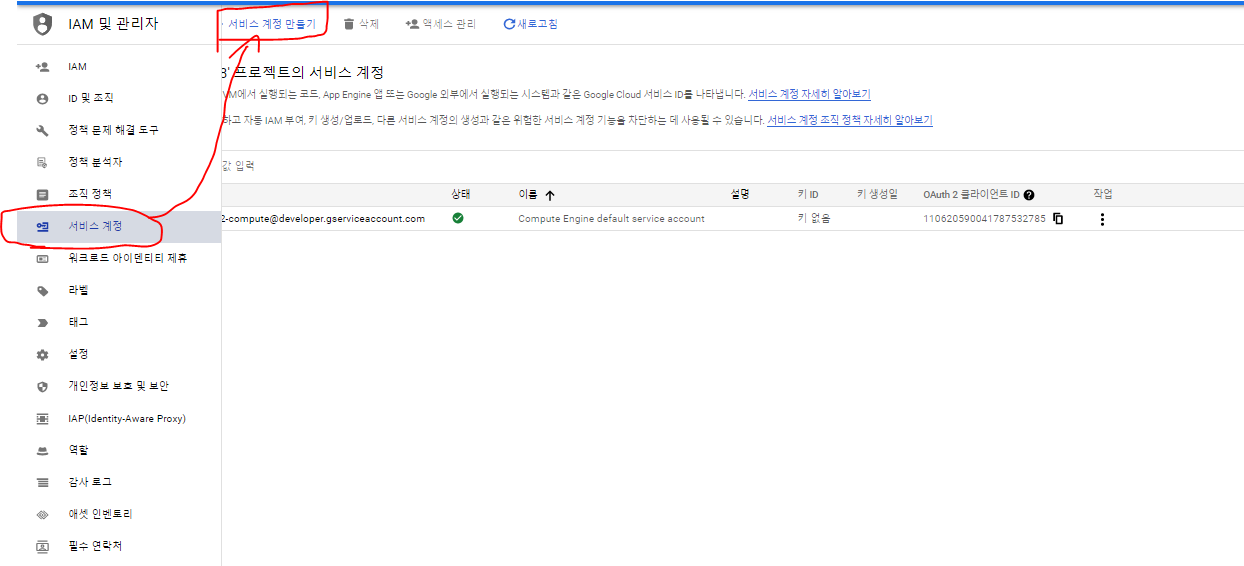
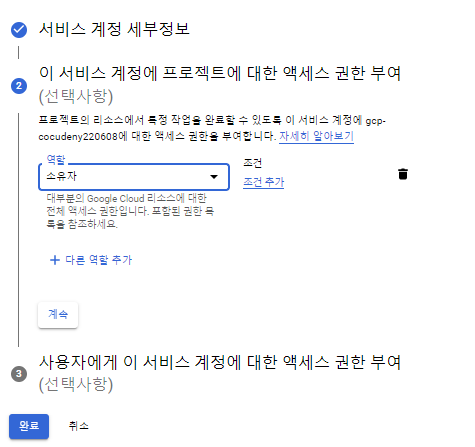
- IAM에서 서비스 계정을 하나 만들어준다.
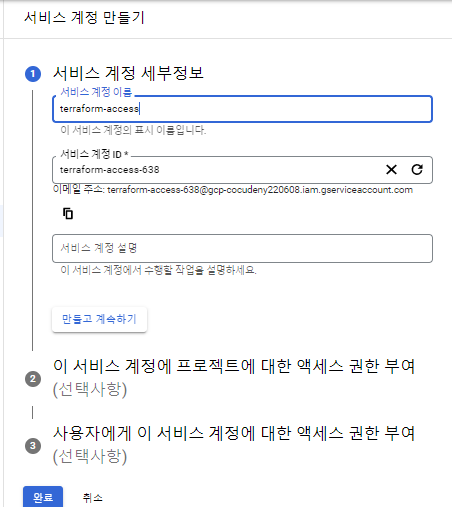
- 먼저 계정을 생성한다.
- 액세스 권한은 소유자로 넣어준다.
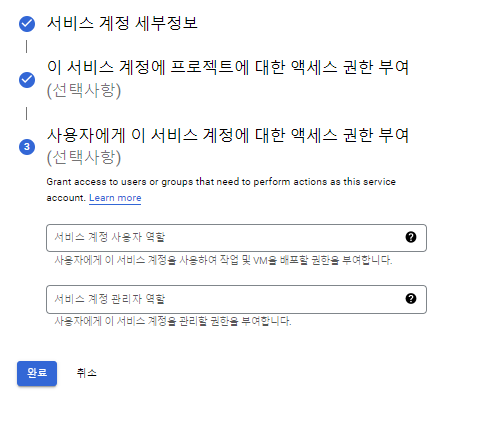
- 사용자에게 이 서비스 계정에 대한 액세스 권한은 기본값으로 넘어간다.
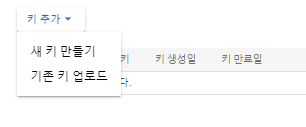
- 계정이 잘 생성되었다. 이제 키 관리로 CLI에서 서비스를 사용할 수 있도록 키를 생성해준다.
- 새 키 만들기 -> JSON으로 만들어 준다.
- JSON 파일이 다운로드 되었다.
- 이름을 credentials.json으로 바꿔준다.
- MobaXterm으로 gcp-set폴더로 옮겨준다.
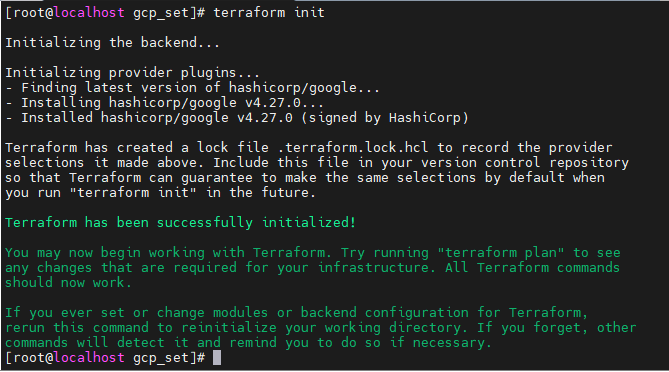
terraform init
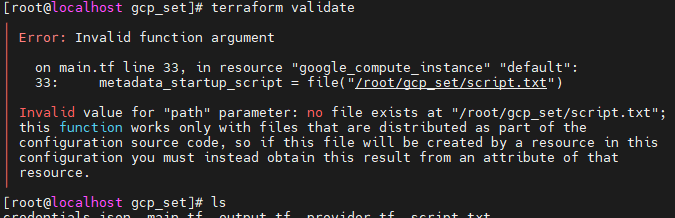
terraform validate
- 경로에 폴더 하나를 빼먹었다. 수정해준다.
- 성공했다.
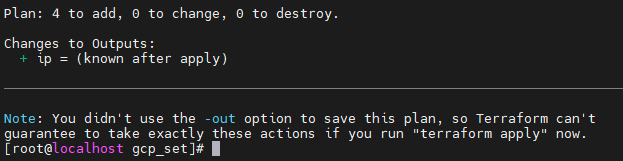
terraform plan
- VPC, Subnet, instance, firewall-rules가 생성될 것이다.
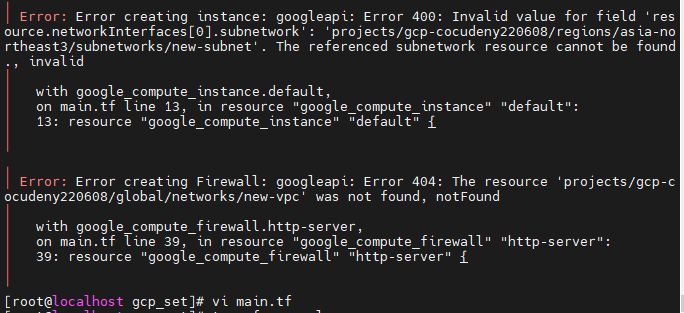
terraform apply
- 에러가 나온다.
- 이 이유는, 코드 내에서 VPC를 만들고 서브넷을 만들어야 하는데, 서브넷이 먼저생성되어 오류가 생겼기 때문이다.
- 그 외에도 계정이름과, 경로에러등 여러 에러가 있었다.
- 수정코드
resource "google_compute_network" "custom-test" {
  name                    = "new-vpc"
  auto_create_subnetworks = false
}

resource "google_compute_subnetwork" "network-with-private-ip-ranges" {
  name          = "new-subnet"
  ip_cidr_range = "192.168.0.0/16"
  region        = "asia-northeast3"
  network       = google_compute_network.custom-test.id
}

resource "google_compute_instance" "default" {
  name         = "vm-from-terraform"
  machine_type = "e2-micro"
  zone         = "asia-northeast3-a"

  boot_disk {
    initialize_params {
      image = "debian-cloud/debian-9"
    }
  }

  network_interface {
    network = "new-vpc"
    subnetwork = "new-subnet"

    access_config {
      // Include this section to give the VM an external ip address
    }
  }
.
    metadata_startup_script = file("/root/gcp_cli/gcp_set/script.txt")

    // Apply the firewall rule to allow external IPs to access this instance
    tags = ["http-server"]
}

resource "google_compute_firewall" "http-server" {
  name    = "default-allow-http-terraform"
  network = "new-vpc"

  allow {
    protocol = "tcp"
    ports    = ["80"]
  }

  // Allow traffic from everywhere to instances with an http-server tag
  source_ranges = ["0.0.0.0/0"]
  target_tags   = ["http-server"]
}
결과 보기
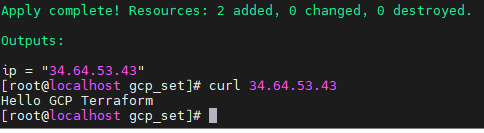
- 성공 메세지와 함께, Public IP주소가 나왔다.
- curl 명령어로 Hello GCP Terraform을 입력해도 잘 나온다.
ssh -i /root/.ssh/cocudeny cocudeny@34.64.150.44
- SSH접속도 잘 되는지 확인해보자
- 안된다. 위로 돌아가면 우리가 SSH접근을 허용하지 않았다.
보안그룹 추가
- 보안그룹을 붙혀주는 부분 (resource "google_compute_firewall")아래에 ssh허용을 추가해준다.
resource "google_compute_firewall" "ssh-server" {
  name    = "default-allow-ssh-terraform"
  network = "new-vpc"

  allow {
    protocol = "tcp"
    ports    = ["22"]
  }

  // Allow traffic from everywhere to instances with an http-server tag
  source_ranges = ["112.221.225.165/32"]
  target_tags   = ["ssh-server"]
}
- 잘 생성 되었다.
- 위에서 조심해야할것은 Protocol에 기존과 같이 ssh로 한다면 에러가 난다. ssh말고 tcp로 입력해줘야 terraform apply에서 에러가 나지 않는다.
보안그룹태그 VM에 추가
- target_tag를 ssh-server로 생성했다. 이것을 VM 인스턴스 생성에 tags 에 넣어줘야 한다. 배열로 선언되어 있는 http-server오른쪽에 복붙해서 넣어준다.
SSH로 접속해보기
ssh -i ./cocudeny cocudeny@34.64.53.43
- 잘 접속됬다.
- 키가 안된다면 로그인할때의 이름이 맞는지 확인한다.
ssh-keygen -t rsa -f /root/.ssh/cocudeny -C cocudeny -b 2048	# 경로 cocudeny이름을 키 생성 , 오른쪽cocudeny가 사용자이름이 된다.
vi /root/.ssh/johnlee.pub
johnlee:ssh-rsa
gcloud compute os-login ssh-keys add \
    --key-file=/root/.ssh/cocudeny.pub \
    --project=gcp-cocudeny220608 \
    --ttl=365d
gcloud compute instances add-metadata vm-from-terraform --metadata-from-file ssh-keys=/root/.ssh/cocudeny.pub
- 위 명령어로 새 키를 만들어서 등록해서 사용하는 방법도 있다.
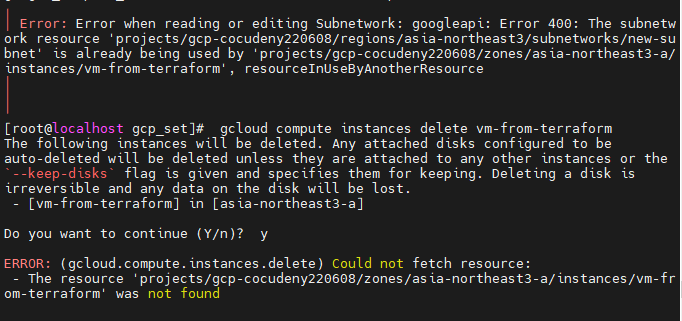
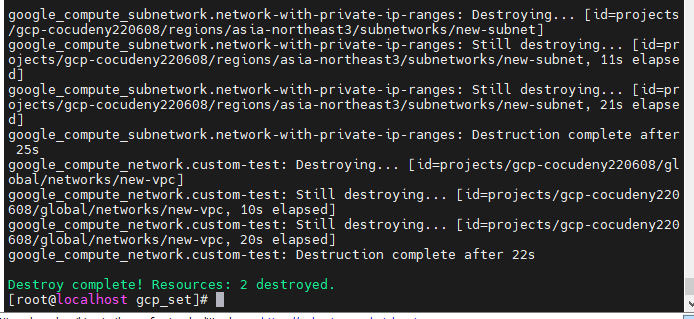
terraform destroy
- 인스턴스가 삭제가 덜됬는데 Subnet이 삭제되는 현상인 것 같다.
- 다시 destroy해주면 해결된다.


Ansible
구성 관리 도구(Configure)
- 셰프, 퍼핏, 앤서블, 솔트스택 등
- 대상 서버에 소프트웨어를 설치하고 관리
- Terraform은 서버생성 즉, 서버가 없는 상태에서 서버를 구성하는 것이 Terraform이라면,
- Ansible은 서버가 존재하는 상태에서 혼자서 거대한 서버를 관리하는 것이다. (예, 100개의 서버에 httpd를 설치하는데 Ansible로 신호를 보내서 받은 서버에 설치하게 만든다.)
- 퍼핏은 OpenStack에서 사용하는 구성관리도구이다.
프로비전 도구
- 이미 존재하는 서버를 관리하느 구성관리(Ansible), 서버 템플릿(Docker), 오케스트레이션(쿠버네티스)와 다르게
- 테라폼, 클라우드포메이션, 오픈스택 히트(heat)와 같은 프로비전 도구는 서버 자체를 생성한다. 생성뿐만 아니라 설정도 하고 있어서, 인프라에 관한 거의 모든 부분을 프로비저닝할 수 있다.
Ansible
- 앤서블이 Script(Playbook)을 따라서 서버들에게 들어가서 작업을 한다.
- 이때, 각 서버에 SSH로 접속하기 때문에 웹서버에는 반드시 SSH통신이 허용되어 있어야 한다.
- 앤서블은 Python으로 모듈을 사용하고, 각 VM들이 가지고 있는 Python을 이용해 스크립트를 설치하게 된다.
- yum 과 같은 모듈들이 python으로 되어있다.
Ansible 실습 환경 설정하기
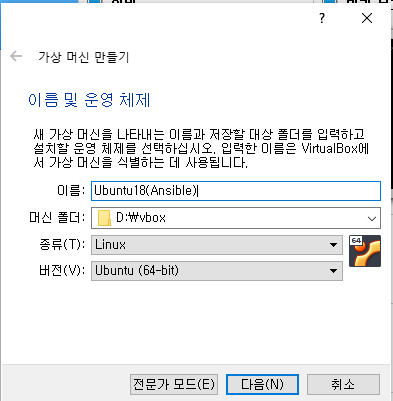
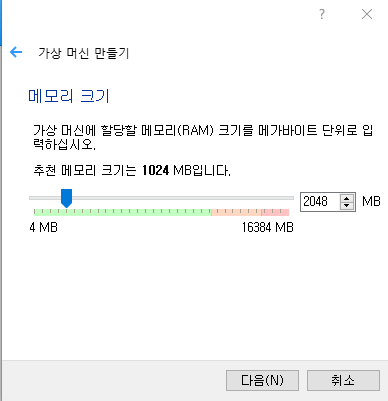
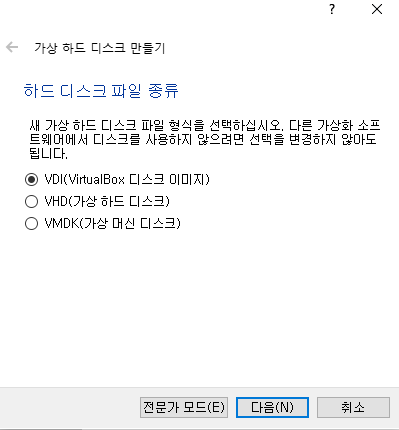
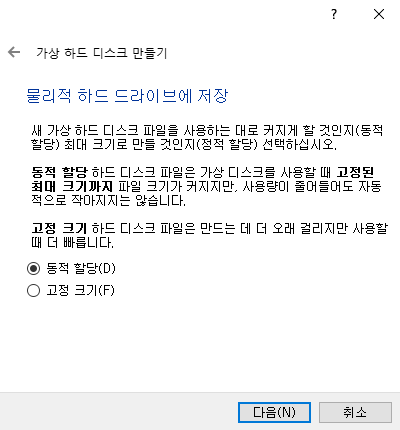
VM생성
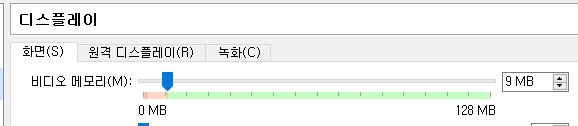
- 128Gb를 준다.
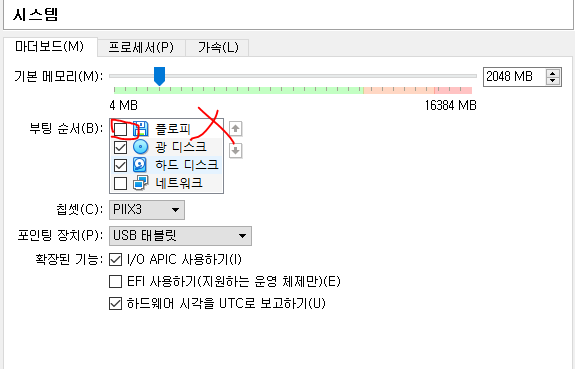
VM 설정
- 오디오 사용안함
- USB사용안함
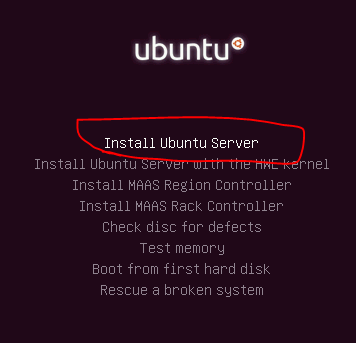
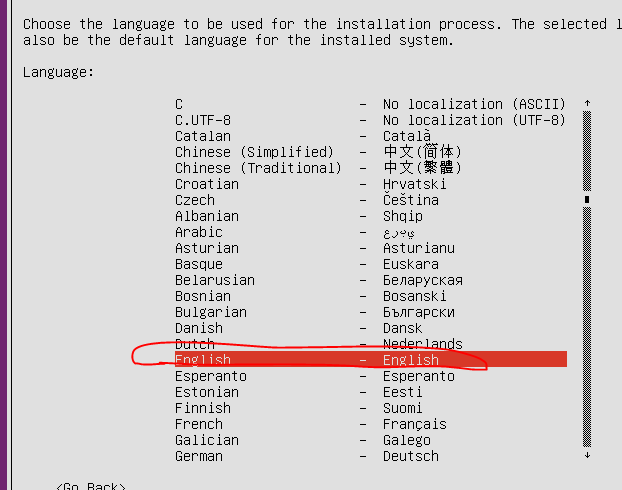
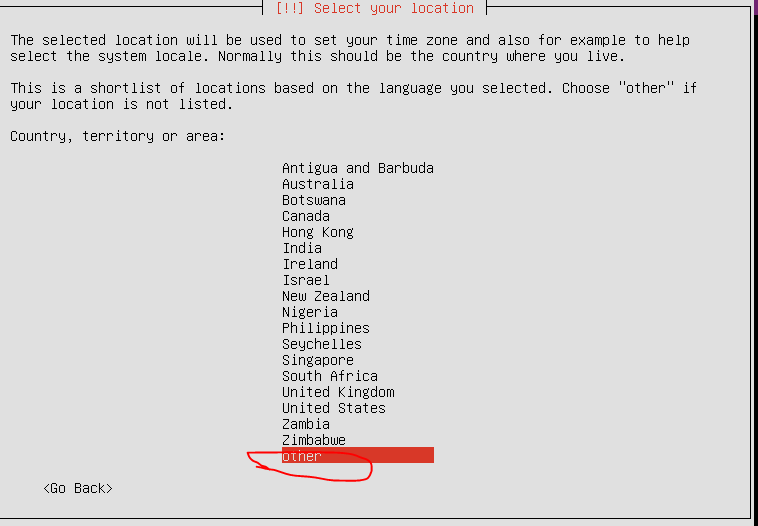
VM 초기설정
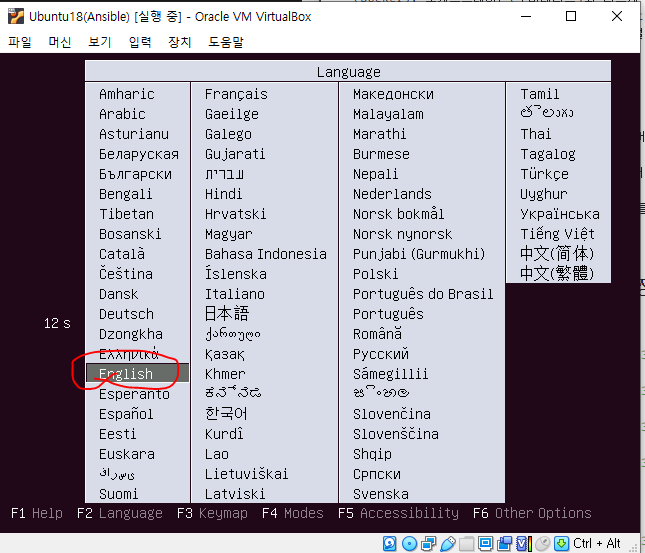
- Other -> Asia -> Korea Republi Of.
- 나머지는 US
- Keyboard Detect -> No, -> Korean
- Hostname = Ubuntu
- 나머지 계정은 자기 임의대로 한다.
- Use all disk
- Partition disk -> Yes
- Proxy설정 -> 그냥 Enter
- No Automatic Update
- OpenSSH Server 스페이스바 -> 엔터
- 만약 실수로 지나갔다면 따로 설치를 진행해야 한다.
sudo apt install openssh-server- Grub -> yes
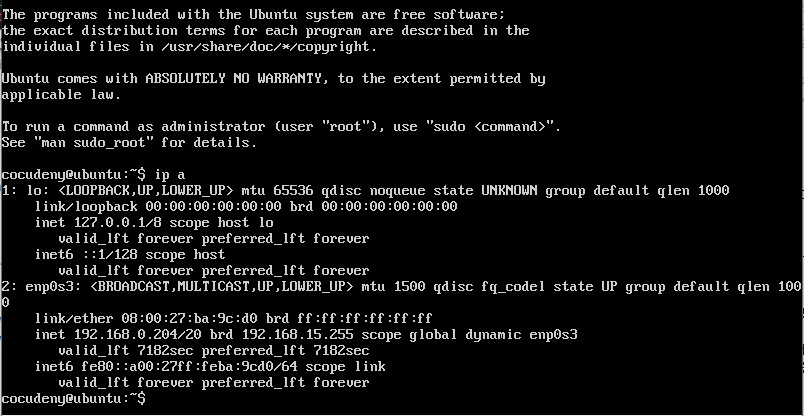
- 잘 생성되었다.
- 또 잘 접속하였다.
Ubuntu root로 들어가기
sudo vi /etc/ssh/sshd_config
- 여기서
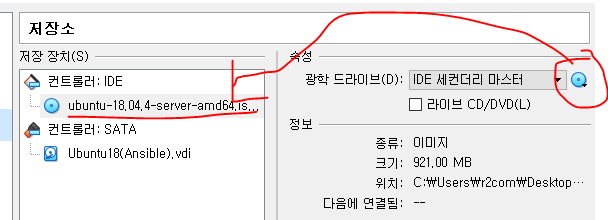
/PermitRootLogin을 검색해본다.VM 가져오기
- Terraform 처음 들어갈때 생성했던 OVA파일 가져와준다.
- CPU : 1
- RAM : 1024MB


Talking Potato