복습
image pull limit Error
- docker login
- kubectl patch -n default serviceaccount/default -p '{"imagePullSecrets":[{"name": "jo1132"}]}'
- 도커 로그인처럼 쿠버네티스도 도커 계정으로 로그인하는 것이다.
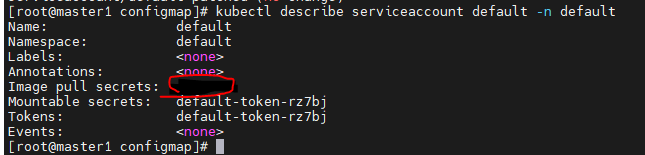
- kubectl describe serviceaccount default -n default
- 쿠버네티스에 내 계정이 잘 들어갔는지 확인
- 여기서 인증이 제대로 안되면 (Not Found)메세지가 추가된다.
metallb
- DHCP와 비슷
Multycontainer
- 하나의 pod에서 여러개의 컨테이너를 한번에 초기화
- depend on을 사용할 수 있고, 혹은 필요한만큼 지연시켜서 순서를 맞춰 컨테이너 생성
- 그러나 보통은 하나의 pod에 하나의 컨테이너를 사용하는 편이다. (마이크로 서비스)
ConfigMap
- 기밀이 아닌 데이터를 저장하는데 사용하는 API오브젝트
- 키 - 값 쌍
오전강의
ConfigMap
vi configmap-dev.yaml
apiVersion: v1
kind: ConfigMap
metadata:
  name: config-dev
  namespace: default
data:
  DB_URL: localhost
  DB_USER: myuser
  DB_PASS: mypass
DEBUG_INFO: debug- kubectl apply -f configmap-dev.yaml
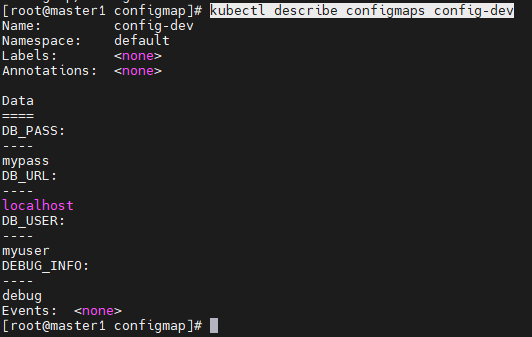
- kubectl describe configmaps config-dev
vi deployment-config01.yaml
apiVersion: apps/v1
kind: Deployment
metadata:
  name: configapp
  labels:
    app: configapp
spec:
  replicas: 1
  selector:
    matchLabels:
      app: configapp
  template:
    metadata:
      labels:
        app: configapp
    spec:
      containers:
      - name: testapp
        image: 192.168.56.101:5000/nginx:latest
        ports:
        - containerPort: 8080
        env:					# 환경변수에 입력을 넣는다.
        - name: DEBUG_LEVEL		# 변수 명
          valueFrom:
            configMapKeyRef:	#
              name: config-dev
              key: DEBUG_INFO
---
apiVersion: v1
kind: Service
metadata:
  labels:
    app: configapp
  name: configapp-svc
  namespace: default
spec:
  type: NodePort
  ports:
  - nodePort: 30800
    port: 8080
    protocol: TCP
    targetPort: 80
  selector:
app: configapp- kubectl exec -it configapp-c9bb7b748-lczsz -- bash

- env
- DEBUG-LEVEL은 deployment-config01에서 정의된 환경변수이다.
- 그 값인 debug는 configmap-deb에서 data에 선언되어있다.
configmap - wordpress
vi configmap-wordpress.yaml
apiVersion: v1
kind: ConfigMap
metadata:
  name: config-wordpress		# 이름: config-wordpress
  namespace: default
data:							# MYSQL에 사전 정의되어있는 변수들에 값을 넣어준다.
								# 중요한 변수들을 미리 Configmap에 작성하고 불러오는 방법을 사용할 것이다.
  MYSQL_ROOT_HOST: '%'
  MYSQL_ROOT_PASSWORD: kosa0401
  MYSQL_DATABASE: wordpress
  MYSQL_USER: wpuser
  MYSQL_PASSWORD: wppass
- kubectl describe configmaps config-wordpress
- configmap타입으로 이름을주고, data로 변수들을 저장한다.
vi mysql-pod-svc.yaml
apiVersion: v1
kind: Pod
metadata:
  name: mysql-pod
  labels:
    app: mysql-pod
spec:
  containers:
  - name: mysql-container
    image: mysql:5.7
    envFrom:				# env값을 한번에 불러오는 것이다.
    - configMapRef:			# configmap에 있는 값을 가져온다.
        name: config-wordpress
    ports:
    - containerPort: 3306
---
apiVersion: v1
kind: Service
metadata:
  name: mysql-svc
spec:					# 내부에서 통신만 되면 된다.
  type: ClusterIP
  selector:
    app: mysql-pod
  ports:
  - protocol: TCP
    port: 3306
    targetPort: 3306
- kubectl apply -f mysql-pod-svc.yaml
- ClusterIP와 함께 잘 서비스 되고있다.
vi wordpress-pod-svc.yaml
apiVersion: v1
kind: Pod
metadata:
  name: wordpress-pod
  labels:
    app: wordpress-pod
spec:
  containers:
  - name: wordpress-container
    image: wordpress
    env:
    - name: WORDPRESS_DB_HOST	# WORDPRESS_DB_HOST = mysql-svc:3306 하는 것처럼 값을 주는 것이다.
      value: mysql-svc:3306
    - name: WORDPRESS_DB_USER	#WORDPRESS_DB_USER 변수에 값을 넣는다.
      valueFrom:			# 그 값을 가져온다.
        configMapKeyRef:	# 컨피그맵에서 가져올 것이다.
          name: config-wordpress	# config-wordpress라는 configmap에서
          key: MYSQL_USER			# MYSQL_USER값을 가져온다.
    - name: WORDPRESS_DB_PASSWORD
      valueFrom:
        configMapKeyRef:
          name: config-wordpress
          key: MYSQL_PASSWORD
    - name: WORDPRESS_DB_NAME
      valueFrom:
        configMapKeyRef:
          name: config-wordpress
          key: MYSQL_DATABASE
    ports:
    - containerPort: 80
---
apiVersion: v1
kind: Service
metadata:
  name: wordpress-svc
spec:
  type: LoadBalancer
  externalIPs:
  - 192.168.2.0
  selector:
    app: wordpress-pod
  ports:
  - protocol: TCP
    port: 80
    targetPort: 80
- kubectl apply -f wordpress-pvc-pod.yaml
vi mysql-deploy-svc.yaml
apiVersion: apps/v1
kind: Deployment
metadata:
  name: mysql-deploy
  labels:
    app: mysql-deploy
spec:
  replicas: 1
  selector:
    matchLabels:
      app: mysql-deploy
  template:
    metadata:
      labels:
        app: mysql-deploy
    spec:
      containers:
      - name: mysql-container
        image: mysql:5.7
        envFrom:
        - configMapRef:
            name: config-wordpress
        ports:
        - containerPort: 3306
---
apiVersion: v1
kind: Service
metadata:
  name: mysql-svc
spec:
  type: ClusterIP
  selector:
    app: mysql-deploy
  ports:
  - protocol: TCP
    port: 3306
    targetPort: 3306
- kubectl apply -f mysql-deploy-svc.yaml
vi wordpress-deploy-svc.yaml
apiVersion: apps/v1
kind: Deployment
metadata:
  name: wordpress-deploy
  labels:
    app: wordpress-deploy
spec:
  replicas: 1
  selector:
    matchLabels:
      app: wordpress-deploy
  template:
    metadata:
      labels:
        app: wordpress-deploy
    spec:
      containers:
      - name: wordpress-container
        image: wordpress
        env:
        - name: WORDPRESS_DB_HOST
          value: mysql-svc:3306
        - name: WORDPRESS_DB_USER
          valueFrom:
            configMapKeyRef:
              name: config-wordpress
              key: MYSQL_USER
        - name: WORDPRESS_DB_PASSWORD
          valueFrom:
            configMapKeyRef:
              name: config-wordpress
              key: MYSQL_PASSWORD
        - name: WORDPRESS_DB_NAME
          valueFrom:
            configMapKeyRef:
              name: config-wordpress
              key: MYSQL_DATABASE
        ports:
        - containerPort: 80
---
apiVersion: v1
kind: Service
metadata:
  name: wordpress-svc
spec:
  type: LoadBalancer
  externalIPs:
  - 192.168.56.101:
  selector:
    app: wordpress-deploy
  ports:
  - protocol: TCP
    port: 80
    targetPort: 80
- kubectl apply -f wordpress-deploy-svc.yaml
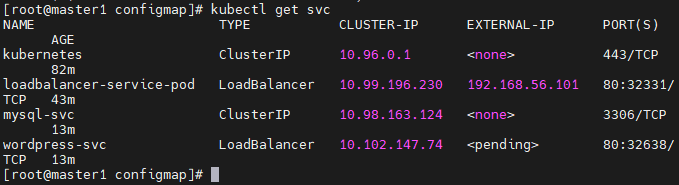
네트워크 에러
- LoadBalancer는 IP를 자동으로 받아야한다.
- 그래서 metallb(DHCP)에서 IP를 받아야하는데, 현재 오류로 인해 metallb를 다 내렸다. 그래서 Pending이 나오고 있다.
- 따라서 새로 External IP 를 부여해야한다.

name space
namespace 관리
- 리소스그룹이라고도 볼 수 있다.
- Azure에서 리소스그룹을 사용할 때, 리소스 그룹안에서 모든 작업을 하고, 이후 작업을 정리할 때, 리소스그룹을 한번에 지우면 되었다.
- 네임스페이스는 쿠버네티스 클러스터를 논리적으로 나눠서 사용하는 것이다.
- 클러스터 하나를 여러개 팀이나 사용자가 공유할 수 있다.
- 네임스페이스를 명시하지 않으면 default 네임스페이스에서 작업하게 된다.
- 따라서 지금까지 우리는 default 네임스페이스에서 작업 한 것이다.
- 또, default 네임스페이스를 우리가 따로 설정할 수 있다.
namespace
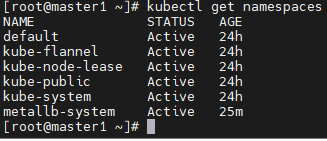
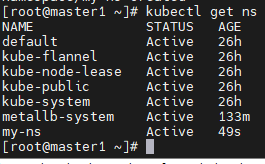
kubectl get namespaces
- 현재 우리가 가지고 있는 namespace들을 보여준다.
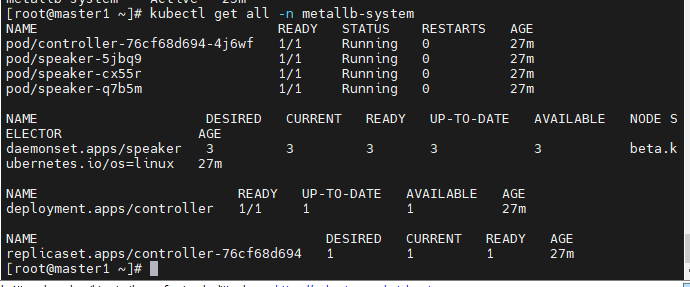
kubectl get all -n metallb-system
- 이전에 metallb로 생성한 네임스페이스의 정보를 볼 수 있다.
kubectl config get-contexts kubernetes-admin@kubernetes
- 오른쪽에 namespace가 없는것은 기본값이 default로 되어있기 때문이다.
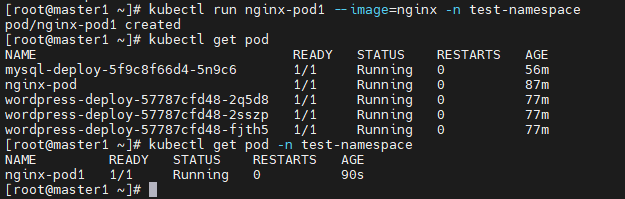
kubectl create namespace test-namespace
- 새로 namespace를 생성했다.
- -n 옵션으로 namespace를 지정하여 pod를 생성하니 그냥 kubectl get pod으로는 나오지 않는다.
- 이렇게 -n을 굳이 쳐줘야 생성한 pod가 나왔다.
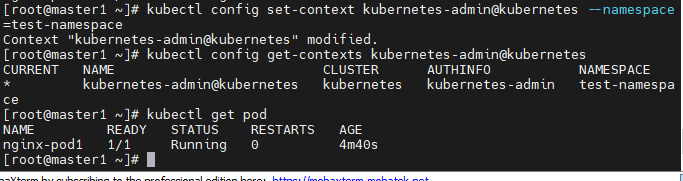
kubectl config set-context kubernetes-admin@kubernetes --namespace=test-namespace
- 기본 namespace를 세팅해준다.
kubectl config get-contexts kubernetes-admin@kubernetes
- 오른쪽 NAMESPACE부분에 test-namespace로 잘 출력된다.
kubectl delete namespaces test-namespace
- 생성한 네임스페이스를 다시 삭제해준다.
- 삭제하고, get all명령어를 입력하니 namespace를 찾을 수 없다는 에러가 출력된다.
kubectl config set-context kubernetes-admin@kubernetes --namespace=default
- 기본 namespace를 다시 default로 바꿔준다.
kubectl create namespace test-namespacekubectl get namespacekubectl config set-context kubernetes-admin@kubernetes --namespace=test-namespacekubectl config set-context kubernetes-- admin@kubernetes --namespace=defaultns
- ns는 namespace의 줄임말이다.
- kubectl create ns my-ns
- my-ns라는 namespace를 만들어준다.
- 잘 생성되었다.


ResourceQuota
- 한 팀에서 리소스를 모두 가져갈 수 없도록, 리소스의 제한을 주는 것이다.
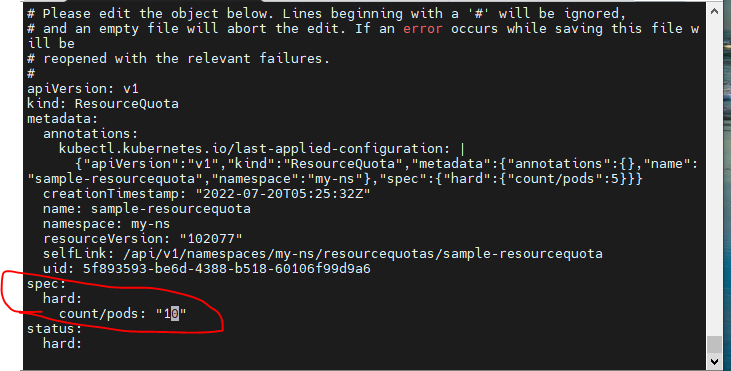
vi sample-resourcequota.yaml
apiVersion: v1
kind: ResourceQuota
metadata:
  name: sample-resourcequota
  namespace: default
spec:
  hard:					# pod을 최대 5개까지만 허용한다.
    count/pods: 5

kubectl describe resourcequotas sample-resourcequota
kubectl run pod new-nginx --image=nginx
vi sample-resourcequota-usable.yaml
apiVersion: v1
kind: ResourceQuota
metadata:
  name: sample-resourcequota-usable
  namespace: default
spec:
  hard:
    requests.memory: 2Gi
    requests.storage: 5Gi
    sample-storageclass.storageclass.storage.k8s.io/requests.storage: 5Gi
    requests.ephemeral-storage: 5Gi
    requests.nvidia.com/gpu: 2
    limits.cpu: 4					# 최대  cpu개수
    limits.ephemeral-storage: 10Gi	# 임시 스토리지, Persistent volume의 반대
    limits.nvidia.com/gpu: 4
- kubectl apply -f sample-resourcequota.yaml
- hard, pod제한이 5개로 제한된것을 볼 수 있다.
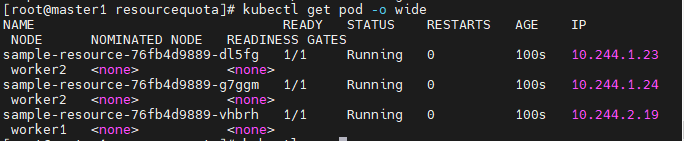
- kubectl run pod new-nginx1 --image=nginx
- kubectl run pod new-nginx2 --image=nginx
- kubectl run pod new-nginx3 --image=nginx
- kubectl run pod new-nginx4 --image=nginx
- kubectl run pod new-nginx5 --image=nginx
- 4개째에서 막혔다. 최대 pod개수 5개중 5개를 사용했기때문에 더이상 생성이 안된다.
vi sample-resourcequota-usable.yaml
apiVersion: v1
kind: ResourceQuota
metadata:
  name: sample-resourcequota-usable
  namespace: my-ns
spec:
  hard:
    requests.memory: 2Gi
    requests.storage: 5Gi
    sample-storageclass.storageclass.storage.k8s.io/requests.storage: 5Gi
    requests.ephemeral-storage: 5Gi
    requests.nvidia.com/gpu: 2
    limits.cpu: 4
    limits.ephemeral-storage: 10Gi
    limits.nvidia.com/gpu: 4
vi sample-resource.yaml
apiVersion: apps/v1
kind: Deployment
metadata:
  name: sample-resource
spec:
  replicas: 3
  selector:
    matchLabels:
      app: sample-app
  template:
    metadata:
      labels:
        app: sample-app
    spec:
      containers:
      - name: nginx-container
        image: nginx:1.16
        resources:
          requests:
            memory: "64Mi"
            cpu: "50m"
          limits:
            memory: "128Mi"
            cpu: "100m"			# 1000m이 1c를 말한다. 즉 1/10의 cpu를 사용한다.
limit늘리는 방법
- edit명령어를 사용해 올려준다.
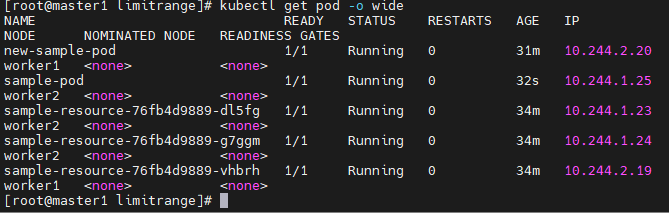
kubectl apply -f sample-pod.yaml
kubectl get pod- pod의 상태가 pending상태이다.
- CPU의 한계에 걸린 것 같다.
- cpu자원을 limit: 1000mi, request: 950mi로 낮춰서 다시 해본다.
kubectl delete pod,deploy --all
- 먼저 기존 pod를 삭제한다.
- vi sample-pod.yaml
apiVersion: v1
kind: Pod
metadata:
  name: sample-pod
spec:
  containers:
  - name: nginx-container
    image: nginx:1.16
    resources:
      requests:
        memory: "64Mi"
        cpu: "100m"				# 요청과 limits모두 낮춤
      limits:
        memory: "128Mi"
        cpu: "1000m"
- requsts와 limits를 이렇게 저렇게 수정했지만, 잘 running되는 조건을 찾기가 매우 힘들었다.
- limits는 하나의 resource quota를 보겠지만, 물론 기본으로 돌아가는 kubelet같은 시스템의 자원점유를 무시할 수 없기 때문인 것 같다.
vi sample-resource.yaml
apiVersion: apps/v1
kind: Deployment
metadata:
  name: sample-resource
spec:
  replicas: 3
  selector:
    matchLabels:
      app: sample-app
  template:
    metadata:
      labels:
        app: sample-app
    spec:
      containers:
      - name: nginx-container
        image: nginx:1.16
        resources:
          requests:
            memory: "64Mi"
            cpu: "50m"
          limits:
            memory: "128Mi"
            cpu: "100m"
- 다행히 리소스의 한도 걱정없이 잘 실행되고 잇다.
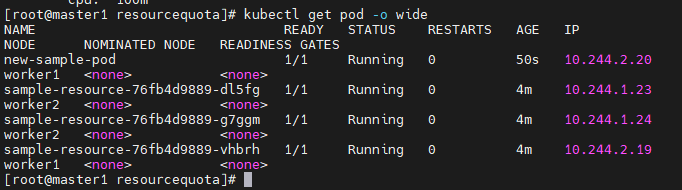
vi new-sample-pod.yaml
apiVersion: v1
kind: Pod
metadata:
  name: new-sample-pod
spec:
  containers:
  - name: nginx-container
    image: nginx:1.16
    resources:
      requests:
        memory: "64Mi"
        cpu: "50m"
      limits:
        memory: "128Mi"
        cpu: "100m"
- worker들 사이의 업무분담을 확인해본다.
- 각 2개의 pod씩 잘 작동하고잇다.


LimitRange
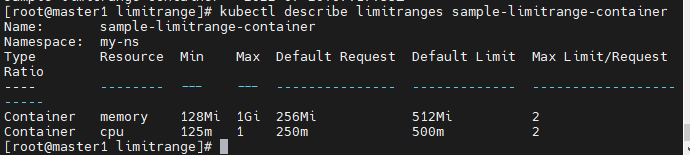
vi sample-limitrange-container.yaml
apiVersion: v1
kind: LimitRange
metadata:
  name: sample-limitrange-container
  namespace: my-ns
spec:
  limits:				# 최대 2개 파드 생성, 1개 더하면 생성안됨
  - type: Container		# 컨테이너에 대해
    default:			# 기본 최대 Limit, 정한 리소스가 부족하면 컨테이너가 생성되지 않는다.
      memory: 512Mi
      cpu: 500m
    defaultRequest:		# 직접 정하지 않은 경우 최소 용량, 최소 확보 용량
      memory: 256Mi
      cpu: 250m
    max:				# 직접 설정할 경우 값
      memory: 1024Mi
      cpu: 1000m
    min:				# 죄소 값
      memory: 128Mi
      cpu: 125m
    maxLimitRequestRatio:	# Request와 Limit의 차이 허용비율 2배, 오버 커밋을 피할 수 있다.
      memory: 2
      cpu: 2
kubectl apply -f sample-limitrange-container.yaml
kubectl describe limitranges sample-limitrange-container
- 메모리 최대: 1G, 최소: 128M 디폴트: 256~512
- CPU 최대: 250m, 최소: 125m 디폴트 250~500m
vi sample-pod-limitrange.yaml
apiVersion: v1
kind: Pod
metadata:
  name: sample-pod-limitrange
spec:
  containers:
  - name: nginx-container
    image: nginx:1.16
kubectl apply -f sample-pod-limitrange.yaml
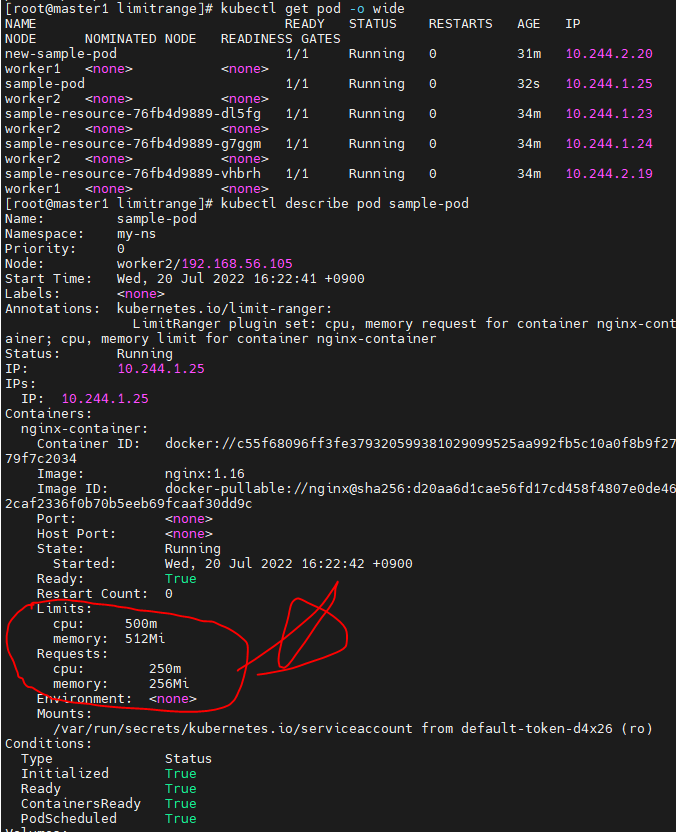
kubectl get pod -o wide
kubectl describe pod sample-pod-limitrange.yaml
- limit정보가 추가되어있다.
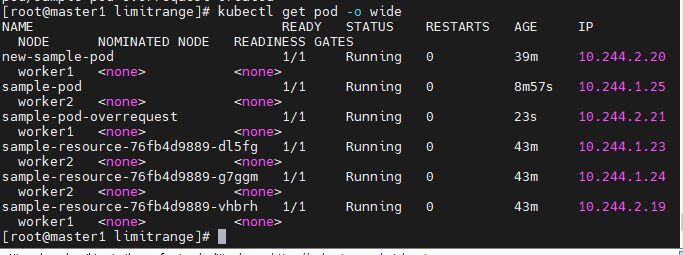
vi sample-pod-overrequest.yaml
apiVersion: v1
kind: Pod
metadata:
  name: sample-pod-overrequest
spec:
  containers:
  - name: nginx-container
    image: nginx:1.16
    resources:			# 아까 정의한  최소용량에 미치지 못하는 resource를 정의해본다.
      requests:			# CPU자원의 request가 정의된 min값을 만족하지 못한다.
        cpu: 100m
      limits:
        cpu: 100m
- minimum cpu usage poer Container 12 125m이라고 에러와함께 경고해주고있다.
- 그렇다면 경고에 맞에 맞춰보도록 하자
vi sample-pod-overrequest.yaml(수정)
apiVersion: v1
kind: Pod
metadata:
  name: sample-pod-overrequest
spec:
  containers:
  - name: nginx-container
    image: nginx:1.16
    resources:			# 아까 정의한  최소용량에 미치지 못하는 resource를 정의해본다.
      requests:			# CPU자원의 request가 정의된 min값을 만족하지 못한다.
        cpu: 125m
      limits:
        cpu: 125m
- 에러가 나오지는 않았다.
- 잘 만들어졌다.
vi sample-pod-overratio.yaml
apiVersion: v1
kind: Pod
metadata:
  name: sample-pod-overratio
spec:
  containers:
  - name: nginx-container
    image: nginx:1.16
    resources:
      requests:
        cpu: 125m
      limits:			# 리미트를 최대값을 넘어가게 설정해본다.
        cpu: 500m
- CPU max limit to request ratio per Container is 2, but provided ratio is 4 라는 에러 메세지가 출력된다.
- 요청 CPU리소스의 한계는 그의 2배여야 하는데 4배의 자원을 주었다는 뜻이다. limits를 250으로 설정하여 다시 시도해본다.
- limits를 250m으로 낮추니 잘 실행하고 있다.


Prometheus
- Prometheus는 CNCF가 호스트하는 오픈소스 소프트웨어 모니터링 도구이다.
- 운영 비용이나, 서버 측 머신 리소스가 필요하다.
- 여러 메트릭을 수집, 그래프화, 모니터링 할 수 있다.
- Grafana와 같이 사용할 것이다
- 아직 준비가 덜되어 이후에 학습할 것이다.
Grafana
- 오픈소스 메트릭 데이터 시각화 도구로, 메트릭 분석 플랫폼을 지향한다.
파드 스케쥴 (자동 배치)
- 노드에 파드를 배치시키는 것 = 스케쥴
- 지금까지 우리가 했던 내용들이다.
먼저 이전 자원 정리
- kubectl delete pod,deploy --all
- pod,deploy들을 지운다.
vi pod-schedule.yaml
apiVersion: v1
kind: Pod
metadata:
  name: pod-schedule-metadata
  labels:
    app: pod-schedule-labels
spec:
  containers:
  - name: pod-schedule-containers
    image: nginx
    ports:
    - containerPort: 80
---
apiVersion: v1
kind: Service
metadata:
  name: pod-schedule-service
spec:
  type: NodePort
  selector:
    app: pod-schedule-labels
  ports:
  - protocol: TCP
    port: 80
    targetPort: 80
ad-hoc으로 만들어본다.
- kubectl run ad-hoc1 --image=nginx
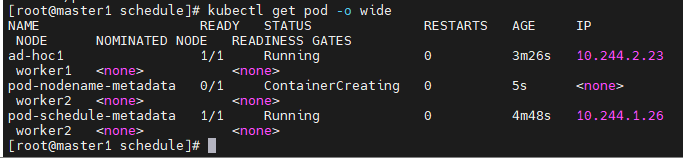
- 현재 2개의 pod을 생성했는데 각각 worker1과 2에 골고루 들어갔다.
vi pod-nodename-service.yaml(수동배치)
apiVersion: v1
kind: Pod
metadata:
  name: pod-nodename-metadata
  labels:
    app: pod-nodename-labels
spec:
  containers:
  - name: pod-nodename-containers
    image: nginx
    ports:
    - containerPort: 80
  nodeName: worker2			# 컨테이너 가장 마지막 단계에서 nodeName을 worker2로 지정한다.
  							# 이렇게하면, 원하는노드에 pod을 추가할 수 있다.
---
apiVersion: v1
kind: Service
metadata:
  name: pod-nodename-service
spec:
  type: NodePort
  selector:
    app: pod-nodename-labels
  ports:
  - protocol: TCP
    port: 80
    targetPort: 80
- pod-nodename-metadata pod가 worker2에서 running중이다.
- 이렇게 노드를 지정할 수 있다.
노드 셀렉터(수동배치)
- 노드에게 label을 주는 것이다.
kubectl label nodes worker1 tier=dev
- tier라는 키와 def라는 값을 주는 것이다.
- 오타가 들어가서 overwrite를 한번 해줬다.
vi pod-nodeselector.yaml
apiVersion: v1
kind: Pod
metadata:
  name: pod-nodeselector-metadata
  labels:
    app: pod-nodeselector-labels
spec:
  containers:
  - name: pod-nodeselector-containers
    image: nginx
ports:
    - containerPort: 80
  nodeSelector:
    tier: dev			# tier를 아까 설정한 dev로 넣는다.
---
apiVersion: v1
kind: Service
metadata:
  name: pod-nodeselector-service
spec:
  type: NodePort
  selector:
    app: pod-nodeselector-labels
  ports:
  - protocol: TCP
    port: 80
    targetPort: 80
kubectl label nodes worker1 tier-
- worker1의 tier를 지우는 방법이다.
- worker의 tier를
-로 넣음으로 tier를 지우는 것이다.
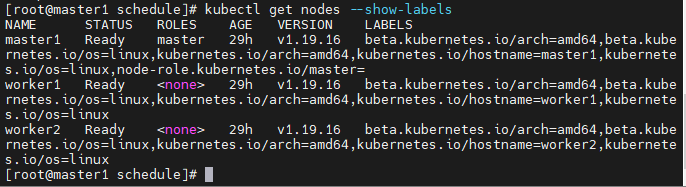
kubectl get nodes --show-labels
- label이 없어졌다.
taint와 toleration
- taint : 더러움
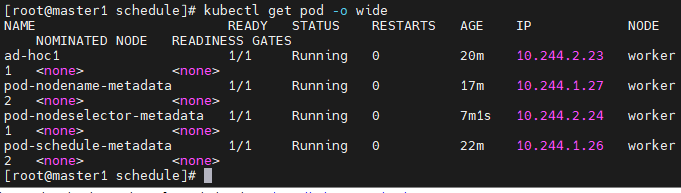
kubectl get pod -o wide
- 현재 worker1과 2가 작업중인데, 만약 수치상으로는 괜찮지만, worker1이 불안정한 상황이라면, taint를 걸어 스케쥴을 부여하지 않는 것이다.
- taint는 수동으로만 container를 부여받고, 자동으로는 받지 않는 것이다.
- 현재 node들의 상황이다.
kubectl taint node worker1 tier=devLNoSchedule
- worker1이 taint되었다고 출력된다.
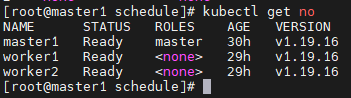
- 현재 kubectl get node에서는 관련 정보가 나오지 않는다.
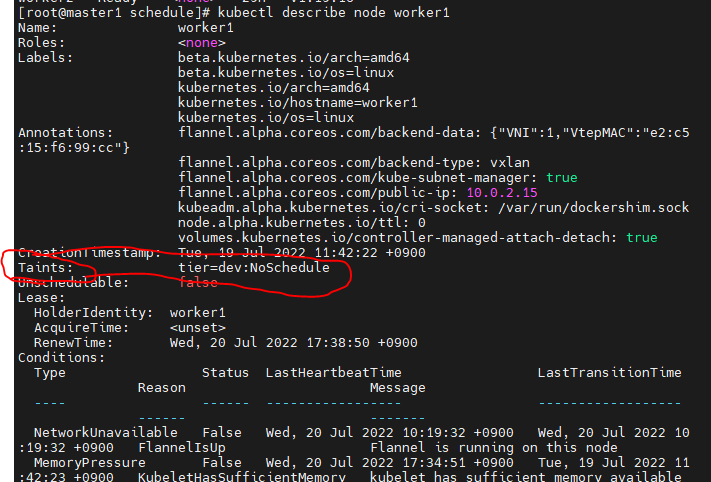
kubectl describe node worker1
- taint로 dev:NoSchedule, 스케쥴을받지 않는다는 것이다.
toleration
- taint된 node에 작업을 주는것이 toleration이다.


Talking Potato