.png)
S3와 CloudFront를 이용한 사진 업로드 구현하기
이번 프로젝트의 다중 사진 업로드 기능을 S3&CloudFront를 이용하여 구현하려고 한다!
S3 버킷은 이미 생성된 상태에서 시작 !
+ CloudFront : 전 세계에 배치된 Edge Location을 이용하여 효율적인 컨텐츠 배포 구조를 제공하는 CDN 서비스. 정적 및 동적 웹 콘텐츠를 사용자에게 더 빨리 배포하도록 지원한다.
- CloudFront를 같이 사용하는 이유?
Edge location에 웹 콘텐츠를 캐싱해두고 제공하므로전송속도,비용절감,서버부하를 줄일 수 있다.
개발 환경
- Window
- JDK 1.8
- Gradle
- Spring boot 2.4.5
- IntelliJ 2021.1.3
- JPA
- spring-cloud-aws 2.2.6
Backend 환경 설정
build.gradle에 dependency 추가
implementation("org.springframework.cloud:spring-cloud-starter-aws:2.2.6.RELEASE")
빌드 후 external libraries에 잘 추가된 것 확인

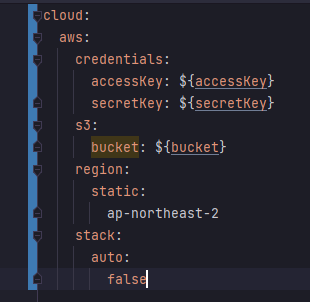
application-aws.yaml파일에 AWS 환경 설정

application.yaml에 application-aws.yaml을 include 시킨다.
spring:
	profiles:
    	include:
        	-aws
환경설정 완료 !
Config 설정
S3Config.java
public class S3Config {


    @Value("${cloud.aws.s3.region}")
    private String region;

    @Value("${cloud.aws.credentials.accessKey}")
    private String accessKey;

    @Value("${cloud.aws.credentials.secretKey}")
    private String secretKey;

    // 외부 의존성을 Bean으로 등록해서 DI를 통해 주입할 수 있도록 함
    @Bean
    public AmazonS3 amazonS3Client() {
        AWSCredentials credentials = new BasicAWSCredentials(accessKey, secretKey);

        return AmazonS3ClientBuilder
                .standard()
                .withCredentials(new AWSStaticCredentialsProvider(credentials))
                .withRegion(region)
                .build();
    }

}
파일 업로드 Service
@Slf4j
@RequiredArgsConstructor
@Service
public class S3Uploader {

    public static final String CLOUD_FRONT_DOMAIN_NAME = ${CLOUD_FRONT_DOMAIN_NAME};

    private final AmazonS3Client amazonS3Client;


    @Value("${cloud.aws.s3.bucket}")
    private String bucket;


    public String upload(MultipartFile multipartFile, String dirName) throws IOException {
        System.out.println(multipartFile);

        File uploadFile = convert(multipartFile)
                .orElseThrow(() -> new IllegalArgumentException("MultipartFile -> File로 전환이 실패했습니다."));

        System.out.println("upload1 "+ uploadFile);

        return upload(uploadFile, dirName);
    }

    private String upload(File uploadFile, String dirName) {

        SimpleDateFormat date = new SimpleDateFormat("yyyymmddHHmmss");
        String orgName = uploadFile.getName();
        if(orgName.length()>30) orgName = orgName.substring(0,30);
        String fileName = dirName + "/" + date.format(new Date()) + "-" + orgName;

        System.out.println("upload2 "+ fileName);
        String uploadImageUrl = putS3(uploadFile, fileName);
        removeNewFile(uploadFile);
        return fileName;
    }

    public void delete(String currentFilePath){
        if ("".equals(currentFilePath) == false && currentFilePath != null) {
            boolean isExistObject = amazonS3Client.doesObjectExist(bucket, currentFilePath);

            if (isExistObject == true) {
                amazonS3Client.deleteObject(bucket, currentFilePath);
            }
        }
    }

    private String putS3(File uploadFile, String fileName) {
        amazonS3Client.putObject(new PutObjectRequest(bucket, fileName, uploadFile).withCannedAcl(CannedAccessControlList.PublicRead));
        return amazonS3Client.getUrl(bucket, fileName).toString();
    }

    private void removeNewFile(File targetFile) {
        targetFile.delete();
    }

    private Optional<File> convert(MultipartFile file) throws IOException {
        File convertFile = new File(file.getOriginalFilename());
        if(convertFile.createNewFile()) {
            try (FileOutputStream fos = new FileOutputStream(convertFile)) {
                fos.write(file.getBytes());
            }
            return Optional.of(convertFile);
        }

        return Optional.empty();
    }
}
Config 설정과 S3를 이용한 파일 업로드 및 삭제 서비스 구현은 완료되었다.
게시판 글 작성 BoardServiceImpl
@Slf4j
@Service("boardService")
public class BoardServiceImpl implements  BoardService{

	@Autowired
    BoardRepository boardRepository;


    @Autowired
    BoardCommentRepository boardCommentRepository;

    @Autowired
    BoardImageRepository boardImageRepository;

    .
    .
    .
    @Autowired
    S3Uploader s3Uploader;

    /*게시물 작성하기 */
    @Override
    public Board registerBoard(BoardRegisterPostReq boardRegisterPostReq) throws IOException {
    	String thumbnailUrl = "";

	//썸네일 저장
        if(boardRegisterPostReq.getFileList()!=null){
            thumbnailUrl = s3Uploader.upload(boardRegisterPostReq.getFileList().get(0), "static");
        }

        Board board = Board.builder()
        	.title(boardRegisterPostReq.getTitle())
                .userId(boardRegisterPostReq.getUserId())
                .thumbnailUrl("https://"+S3Uploader.CLOUD_FRONT_DOMAIN_NAME+"/"+thumbnailUrl)
                .build();

        //게시물 카테고리 저장
        Optional<BoardCategory> boardCategory = boardCategoryRepository.findById(Long.parseLong(boardRegisterPostReq.getBoardType()));
        if(boardCategory.isPresent()){
            board.addBoardCategory(boardCategory.get());
        }
        boardRepository.save(board);

        .
        .
        .

        //게시물 이미지 저장
        for(MultipartFile file : boardRegisterPostReq.getFileList()){
            String saveUrl = s3Uploader.upload(file, "static");
            BoardImage image = BoardImage
                    .builder()
                    .filename(saveUrl)
                    .imgFullPath("https://"+S3Uploader.CLOUD_FRONT_DOMAIN_NAME+"/"+saveUrl)
                    .build();
            image.addBoard(board);
            boardImageRepository.save(image);
        }

                .
        .
        .

    }

}
위와 같이
MultipartFile을 S3Uploader Service를 이용해 S3 버킷 업로드를 구현했다.
수정, 삭제도 마찬가지로 구현하면 된다.

끝난거예요? 더설명없나욤?