Error Boundaries
UI의 일부분에서 에러가 발생했을 때 애플리케이션 전체가 중단되지 않아야 합니다. Error Boundary(에러 경계)는 하위 컴포넌트 트리의 어디에서든 자바스크립트 에러를 기록하며 깨진 컴포넌트 트리 대신 폴백 UI를 보여주는 React 컴포넌트입니다.
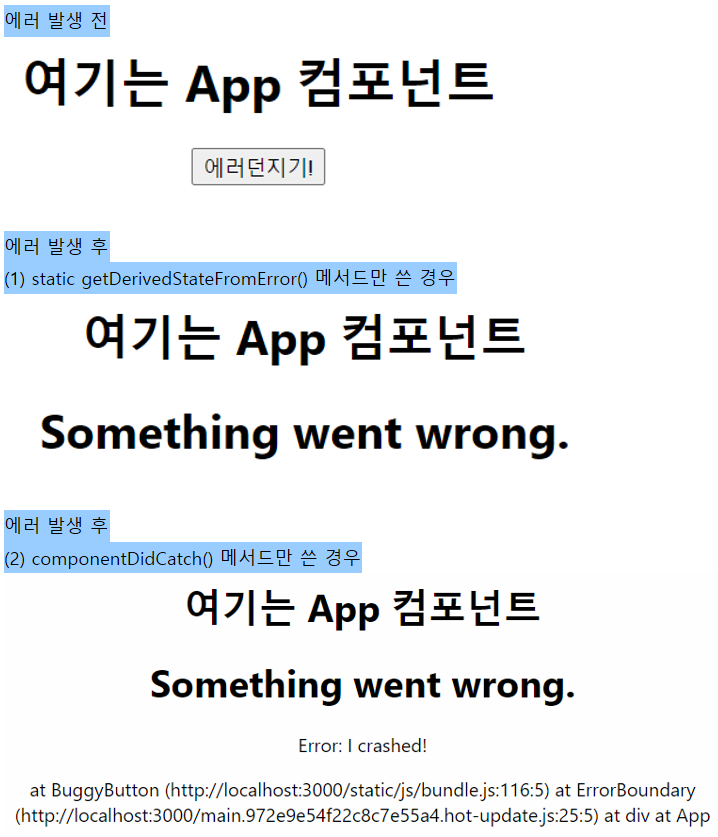
생명주기 메서드인 static getDerivedStateFromError() 와 componentDidCatch() 중 하나라도 정의하면 클래스 컴포넌트 자체가 Error Boundary가 됩니다.
static getDerivedStateFromError(): 에러가 발생한 뒤에 폴백 UI를 렌더링하기 위해 쓰는 메서드componentDidCatch(): 에러 정보를 기억하기 위해 쓰는 메서드
📌 예시
//App.js
function App() {
  return (
    <div className="App">
      <h1>여기는 App 컴포넌트</h1>
      <ErrorBoundary>
        <BuggyButton />
      </ErrorBoundary>
    //ErrorBoundary 컴포넌트는 트리 내에서 하위에 존재하는 컴포넌트인
    //BuggyButton에서 발생하는 에러를 포착합니다.
    </div>
  );
}
//ErrorBoundary.jsx - (1) static getDerivedStateFromError() 메서드만 쓴 경우
export class ErrorBoundary extends React.Component {
constructor(props) {
super(props);
this.state = { hasError: false };
}
static getDerivedStateFromError(error) {
// 다음 렌더링에서 폴백 UI가 보이도록 상태를 업데이트 합니다.
return { hasError: true };
}
render() {
if (this.state.hasError) {
return <h1>Something went wrong.</h1>; //fallback UI
}
return this.props.children;
}
}
//ErrorBoundary.jsx - (2) componentDidCatch() 메서드만 쓴 경우
export class ErrorBoundary extends React.Component {
constructor(props) {
super(props);
this.state = { error: null, errorInfo: null };
}
componentDidCatch(error, errorInfo) {
// 에러 리포팅 서비스에 에러를 기록할 수도 있습니다.
this.setState({
error: error,
errorInfo: errorInfo,
});
}
render() {
if (this.state.error) {
return (
<>
<h1>Something went wrong.</h1>
<p>{this.state.error.toString()}</p>
<p>{this.state.errorInfo.componentStack}</p>
</>
); //fallback UI
}
return this.props.children;
}
}
//BuggyButton.jsx
export class BuggyButton extends React.Component {
  constructor(props) {
    super(props);
    this.state = { clicked: false };
    this.handleClick = this.handleClick.bind(this);
  }

  handleClick() {
    this.setState(({ clicked }) => ({
      clicked: true,
    }));
  }

  render() {
    if (this.state.clicked) {
      throw new Error("I crashed!");
    }
    return <button onClick={this.handleClick}>에러던지기!</button>;
  }
}
✅ try / catch는 명령형 코드에서만 동작합니다. 그러나 React 컴포넌트는 선언적이며 무엇을 렌더링할지 구체화합니다.
✅ 이벤트 핸들러 내부에서는 에러를 포착하지 않습니다. 이벤트 핸들러 내에서 에러를 잡아야 하는 경우에 일반 자바스크립트의 try / catch 구문을 사용하세요.
Forwarding Refs
Ref forwarding은 컴포넌트의 자식 DOM요소에 ref를 자동으로 전달하는 기법입니다. 일부 컴포넌트가 수신한 ref를 받아 조금 더 아래로 전달(즉, “전송”)할 수 있는 옵트인 기능입니다.
📌예시
//Component.jsx
import { createRef } from "react";
import { FancyButton } from "./FancyButton";

export const Component = () => {
  const buttonRef = createRef(); //ref를 생성하고 buttonRef 변수에 할당
  return (
    <>
      <FancyButton ref={buttonRef}>Click me!</FancyButton>
    </> //buttonRef를 JSX 속성으로 지정해서 FancyButton으로 전달
  );
};
// 기본 button DOM 요소를 렌더링하는 FancyButton 컴포넌트
// FancyButton.jsx
import { forwardRef } from "react";
export const FancyButton = forwardRef((props, ref) => {
//ref를 forwardRef 내부의 함수의 두번째 인자로 전달
return <button ref={ref}>{props.children}</button>;
//이 ref를 JSX 속성으로 지정해서 <button ref={ref}>으로 전달
});
//ref가 첨부되면 ref.current는 <button> DOM 노드를 가리키게 됩니다.위 예시에서 FancyButton은 React.forwardRef를 사용하여 전달된 ref를 얻고, 그것을 렌더링 되는 DOM button으로 전달합니다.
이런 방법으로 FancyButton을 사용하는 컴포넌트들은 button DOM 노드에 대한 참조를 가져올 수 있고, 필요한 경우 DOM button을 직접 사용하는 것처럼 접근할 수 있습니다.