이전 게시글에 이어 간단한 예시로 만들어보려고 한다.
Menu, Category, MenuAndCategory 클래스를 만들어서 할 것이다.
Category
public class Category {
    private int categoryCode;
    private String categoryName;

    // 기본 생성자, 매개변수 생성자, getter, setter, toString() 만들기

}
Menu
public class Menu {
    private int menuCode;
    private String menuName;
    private int menuPrice;
    private int categoryCode;
    private String orderableStatus;

    // 기본 생성자, 매개변수 생성자, getter, setter, toString() 만들기

}
MenuAndCategory
public class MenuAndCategory {
    private int menuCode;
    private String menuName;
    private int menuPrice;
    private Category category;
    private String orderableStatus;

    // 기본 생성자, 매개변수 생성자, getter, setter, toString() 만들기

}
JPA 예제는 테스트 코드에서 해볼 것이다.
JDBC API를 이용해 쿼리를 직접 쓰게 되면 생기는 문제들에 대해 먼저 살펴볼 것이기 때문에 테스트 클래스를 만들어보자.
ProblemOfUsingDirectSQLTests
class ProblemOfUsingDirectSQLTests {
    private Connection con;

    @BeforeEach
    void setConnection() throws SQLException {
        String driver = "com.mysql.cj.jdbc.Driver";
        String url = "jdbc:mysql://localhost:3306/menudb";
        String user = "swcamp";
        String password = "swcamp";

        con = DriverManager.getConnection(url, user, password);
        con.setAutoCommit(false);
    }

        @AfterEach
    void closeConnection() throws SQLException {
        con.rollback(); // 직접 Java에 영향을 주지 않기 위해 롤백
        con.close();
    }
}
JDBC API를 이용해 직접 SQL을 다룰 때 발생할 수 있는 문제점
- 데이터 변환, SQL 작성, JDBC API 코드 등을 중복 작성(개발시간 증가, 유지보수 저하)
- SQL에 의존하여 개발
- 패러다임 불일치(상속, 연관관계, 객체 그래프 탐색, 방향성)
- 동일성 보장 문제
일단은 직접 SQL을 작성해서 메뉴를 조회하면서 문제를 확인해보자.
ProblemOfUsingDirectSQLTests에 추가
@DisplayName("직접 SQL을 작성하여 메뉴를 조회할 때 발생하는 문제 확인")
@Test
void testDirectSelectSql() throws SQLException {
// given
String query = "SELECT MENU_CODE, MENU_NAME, MENU_PRICE, CATEGORY_CODE, ORDERABLE_STATUS"
+ " FROM TBL_MENU";
// when
Statement stmt = con.createStatement();
ResultSet rset = stmt.executeQuery(query);
List<Menu> menuList = new ArrayList<>();
while(rset.next()) {
Menu menu = new Menu();
menu.setMenuCode(rset.getInt("MENU_CODE"));
menu.setMenuName(rset.getString("MENU_NAME"));
menu.setMenuPrice(rset.getInt("MENU_PRICE"));
menu.setCategoryCode(rset.getInt("CATEGORY_CODE"));
menu.setOrderableStatus(rset.getString("ORDERABLE_STATUS"));
menuList.add(menu);
}
// then
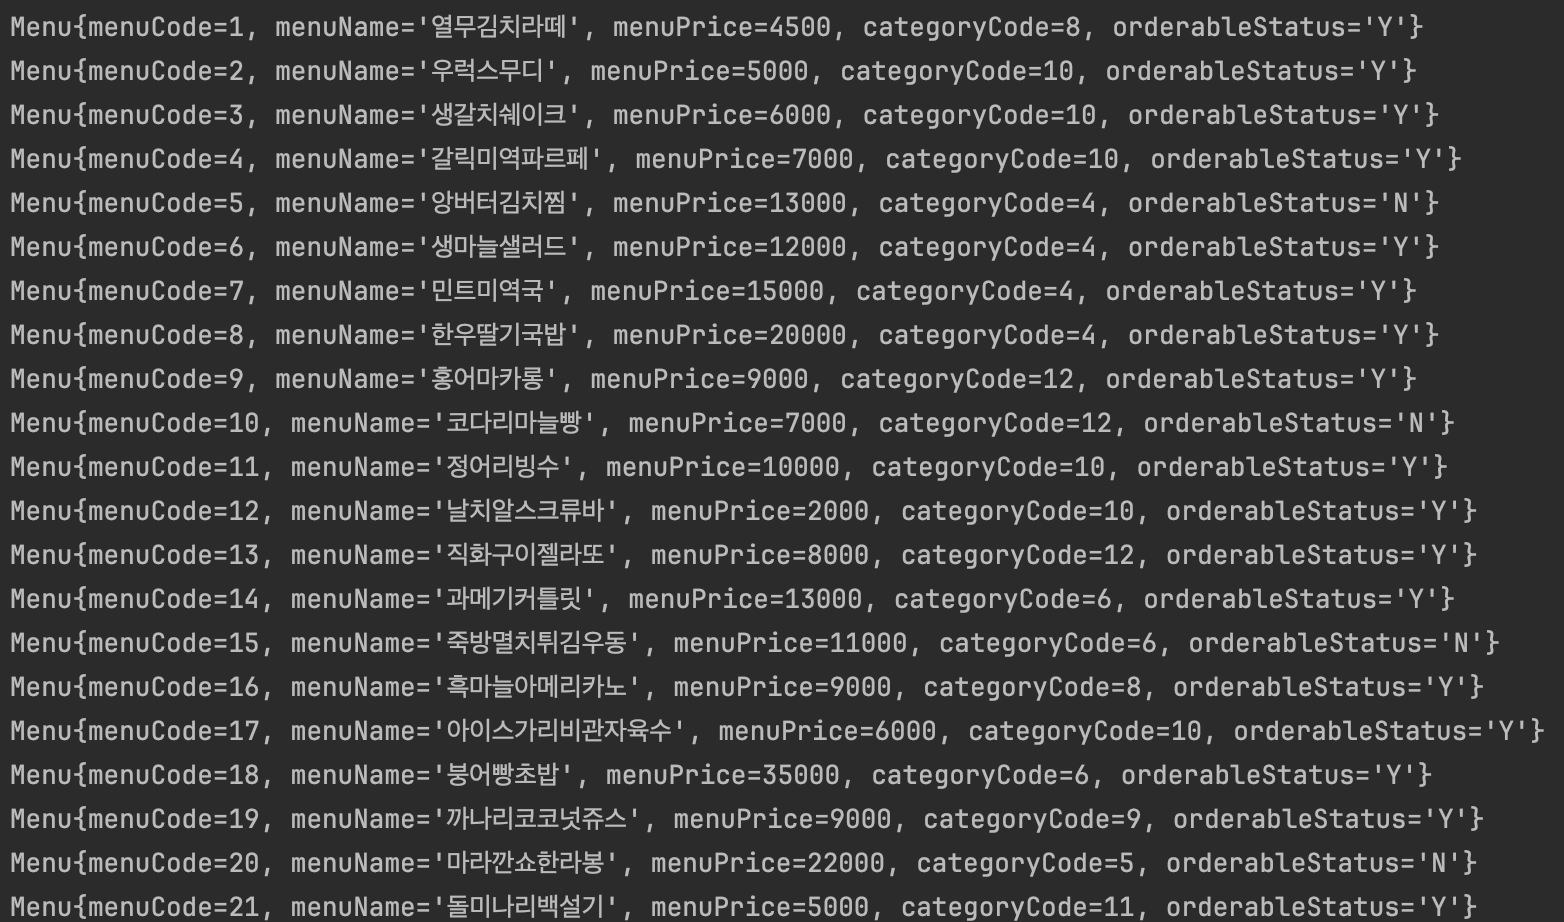
Assertions.assertTrue(!menuList.isEmpty());
menuList.forEach(System.out::println); // 로그 개념으로 출력해보기
}왜 jpa를 쓰는지 알려줄 수 있는 구간이when 부분이다.
Statement, ResultSet을 직접 작성해야 하고 set, get을 이용해서 하는 것부터 굉장히 불편하다.
전체가 아닌 일부일 때도 새로 만들거나 해야 해서 sql부터 새로 짜야 하는 번거로움이 있다.
데이터 변환, SQL 작성, JDBC API 코드 등을 중복 작성(개발시간 증가, 유지보수 저하)
이전에 했던 것과 다른 컴퓨터로 옮기면서 데이터 스크립트를 새로 등록했었고,
잘 되는 것을 볼 수 있었다.
2번째 문제를 한 번 예제로 봐보자.
ProblemOfUsingDirectSQLTests에 추가
    @DisplayName("직접 SQL을 작성하여 신규 메뉴를 추가할 때 발생하는 문제 확인")
    @Test
    void testDirectInsertSQL() throws SQLException {

        // given
        Menu menu = new Menu();
        menu.setMenuName("민트초코짜장면");
        menu.setMenuPrice(12000);
        menu.setCategoryCode(1);
        menu.setOrderableStatus("Y");

        String query = "INSERT INTO TBL_MENU(MENU_NAME, MENU_PRICE, CATEGORY_CODE, "
                + "ORDERABLE_STATUS) VALUES (?, ?, ?, ?)";

        // when
        PreparedStatement pstmt = con.prepareStatement(query);
        pstmt.setString(1, menu.getMenuName());
        pstmt.setInt(2, menu.getMenuPrice());
        pstmt.setInt(3, menu.getCategoryCode());
        pstmt.setString(4, menu.getOrderableStatus());

        int result = pstmt.executeUpdate();

        // then
        Assertions.assertEquals(1, result);
        pstmt.close();
    }
? 을 활용해서 1, 2, 3, 4를 넣으면서 한다는 것을 보면 SQL에 의존해서 넣어서 개발하는 것을 볼 수 있는데 이것도 문제이다.
특정 변수에 담아서 넣는다면 그나마 괜찮지만 저렇게 값을 넣는 과정은 좋지 않다.
SQL에 의존하여 개발
3번째 문제를 한 번 예제로 봐보자.
ProblemOfUsingDirectSQLTests에 추가
@DisplayName("연관된 객체 문제 확인")
@Test
void testAssociationObject() throws SQLException {
// given
String query = "SELECT A.MENU_CODE, A.MENU_NAME, A.MENU_PRICE, B.CATEGORY_CODE, "
+ "B.CATEGORY_NAME, A.ORDERABLE_STATUS "
+ "FROM TBL_MENU A "
+ "JOIN TBL_CATEGORY B ON (A.CATEGORY_CODE = B.CATEGORY_CODE)";
// when
Statement stmt = con.createStatement();
ResultSet rset = stmt.executeQuery(query);
List<MenuAndCategory> menuAndCategories = new ArrayList<>();
while(rset.next()) {
MenuAndCategory menuAndCategory = new MenuAndCategory();
menuAndCategory.setMenuCode(rset.getInt("MENU_CODE"));
menuAndCategory.setMenuName(rset.getString("MENU_NAME"));
menuAndCategory.setMenuPrice(rset.getInt("MENU_PRICE"));
menuAndCategory.setCategory(new Category(rset.getInt("CATEGORY_CODE"),
rset.getString("CATEGORY_NAME")));
menuAndCategory.setOrderableStatus(rset.getString("ORDERABLE_STATUS"));
menuAndCategories.add(menuAndCategory);
}
// then
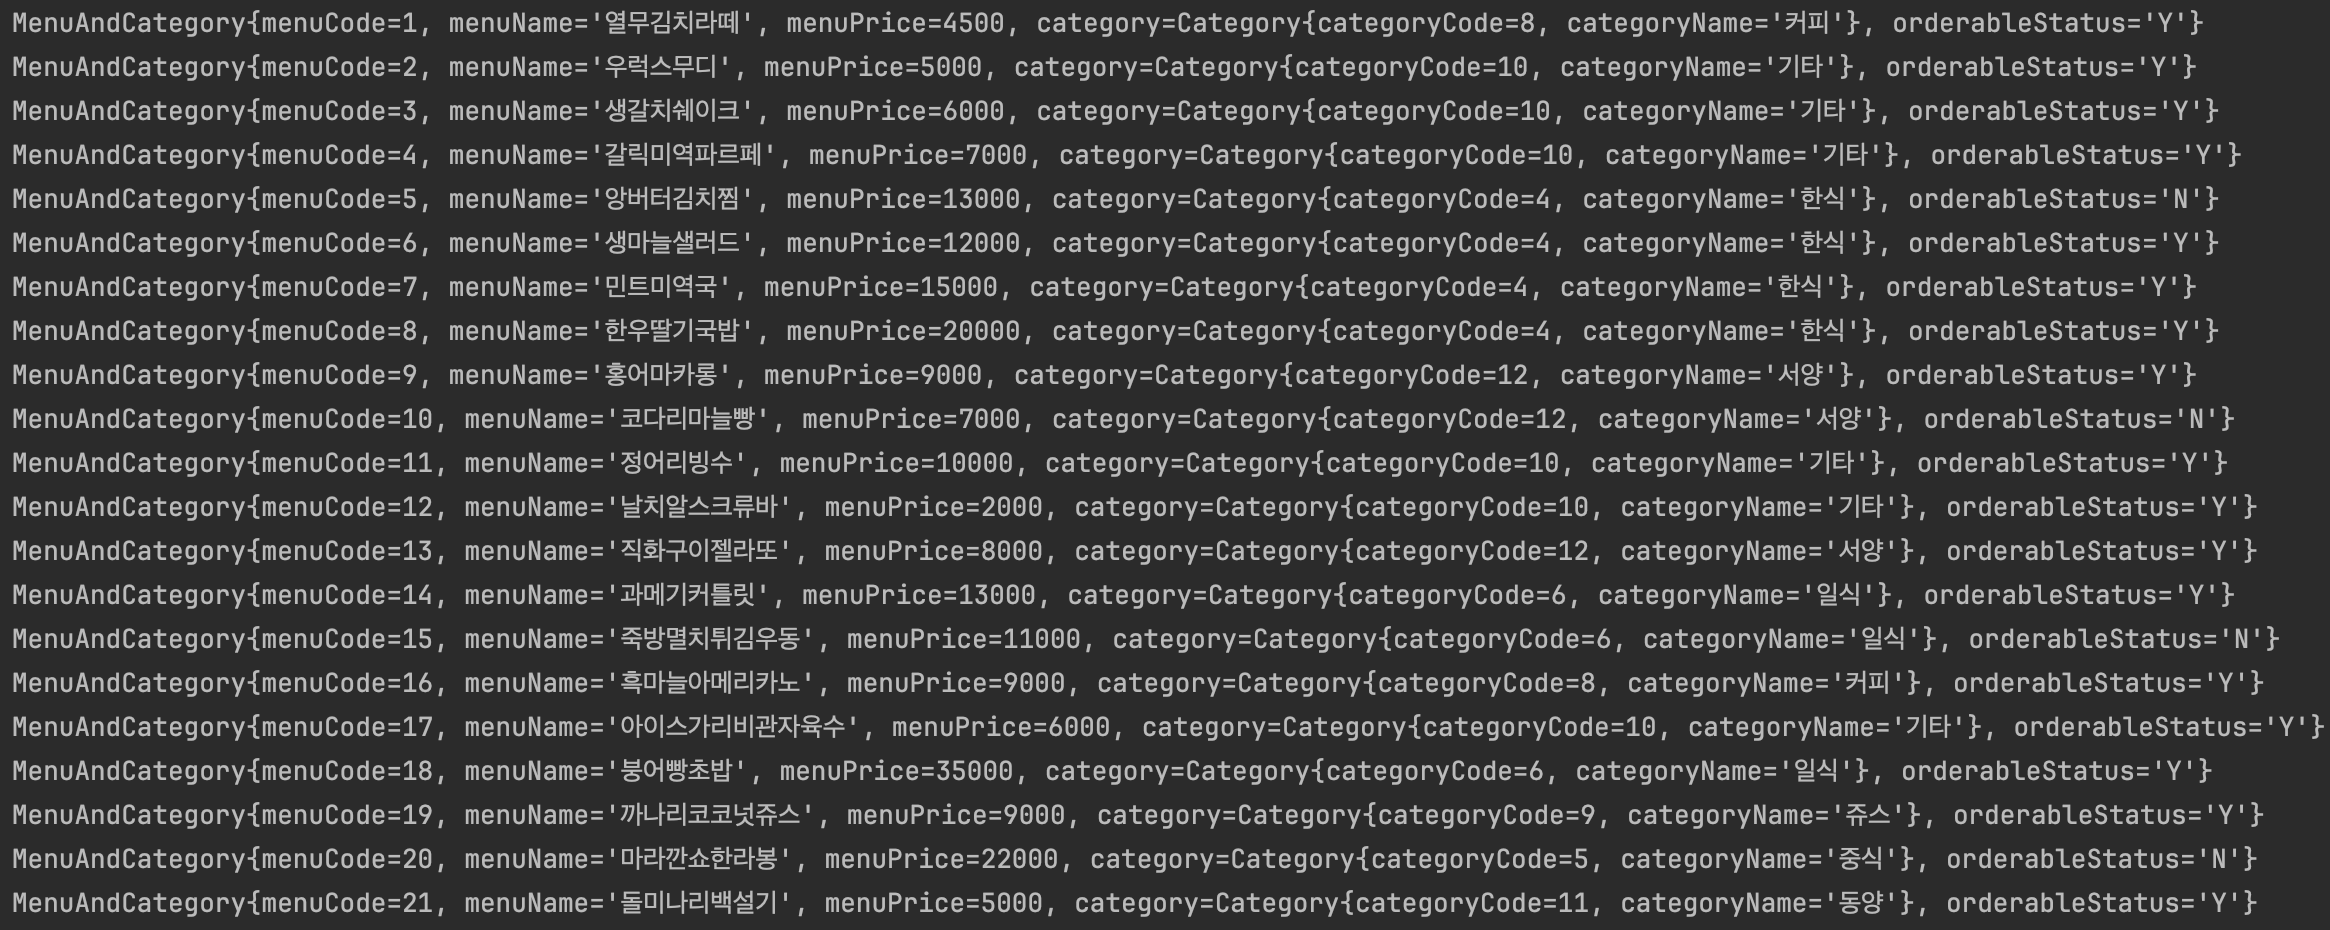
Assertions.assertTrue(!menuAndCategories.isEmpty());
menuAndCategories.forEach(System.out::println);
}패러다임 불일치(상속, 연관관계, 객체 그래프 탐색, 방향성)
위의 문제점들 중 코드에서 다룬건 연관관계이다.
Menu 와 Category가 연관돼있을 때 위와 같이 구현해야 한다.
이후 JPA를 배우는데 @ManyToOne을 통해서 해줄 수 있긴 하지만, 그것도 많이 쓰지 않는 것이 좋다. (여러 문제를 일으킬 수 있기 때문이다.)
상속, 연관관계 등 개념에 대해 보자.
상속 문제
객체 지향 언어의 상속 개념과 유사한 것이 데이터베이스의 서브타입 엔티티이다.(서브 타입을 별도의 테이블로 나누었을 때)
슈퍼타입의 모든 속성을 서브타입이 공유하지 못하여 물리적으로 다른 테이블로 분리가 된 형태이다. (설계에 따라서는 다를 수 있다.)
하지만 객체지향의 상속은 슈퍼타입의 속성을 공유해서 사용하므로 여기에서 패러다임의 불일치가 발생한다.
연관 관계
객체지향에서 말하는 가지고 있는(ASSOCIATION 연관관계 혹은 COLLECTION 연관관계) 경우 데이터베이스 저장 구조와 다른 형태이다.
- 데이터베이스 테이블에 맞춘 객체 모델
public class Menu {
    private int menuCode;
    private String menuName;
    private int menuPrice;
    private int categoryCode;
    private String orderableStatus;
}- 객체 지향 언어에 맞춘 객체 모델
public class Menu {
    private int menuCode;
    private String menuName;
    private int menuPrice;
    private Category category;
    private String orderableStatus;
}
객체 지향 언어에 맞춘 객체 모델은 JPA에서 추구하는 방식이다.
애초에 고민하는 것 자체가 조인을 염두에 둘 것인가를 두고 하는 것이다.
4번째 문제
ProblemOfUsingDirectSQLTests에 추가
    @DisplayName("조회한 두 개의 행을 담은 객체의 동일성 비교 테스트")
    @Test
    void testEquals() throws SQLException {

        // given
        String query = "SELECT MENU_CODE, MENU_NAME FROM TBL_MENU WHERE MENU_CODE = 12";

        // when
        Statement stmt1 = con.createStatement();
        ResultSet rset1 = stmt1.executeQuery(query);

        Menu menu1 = null;

        if(rset1.next()) {
            menu1 = new Menu();
            menu1.setMenuCode(rset1.getInt("MENU_CODE"));
            menu1.setMenuName(rset1.getString("MENU_NAME"));
        }

        Statement stmt2 = con.createStatement();
        ResultSet rset2 = stmt2.executeQuery(query);

        Menu menu2 = null;

        if(rset2.next()) {
            menu2 = new Menu();
            menu2.setMenuCode(rset2.getInt("MENU_CODE"));
            menu2.setMenuName(rset2.getString("MENU_NAME"));
        }

        // then
        Assertions.assertNotEquals(menu1, menu2);
    }
보면 JPA를 사용하지 않고 한다면 계속 객체가 생성되고 낭비가 된다.
JPA를 이용하면 동일 비교가 가능하다.
영속성 컨텍스트에 담겨있는 객체를 계속 entityManager가 가져다주기 때문에 객체도 낭비되지 않는다.
Menu menu1 = entityManager.find(Menu.class, 12);
Menu menu2 = entityManager.find(Menu.class, 12);
System.out.println(menu1 == menu2) // true(동일성이 보장된다. 같은 객체)
JPA 활용
EntityManager 생명주기 활용
Java 환경에서 JDK 17버전으로 프로젝트를 만들고
TEST 패키지 속 resources/META-INF 안에 persistence.xml 을 작성하자.
여러 패키지를 만들고 이름은 같지만 다른 클래스인 Menu도 만들 것이다.
<?xml version="1.0" encoding="UTF-8"?>
<persistence xmlns="http://xmlns.jcp.org/xml/ns/persistence" version="2.2">

    <!-- 설명. 엔티티 매니저 팩토리를 식별하기 위한 이름 설정 -->
    <persistence-unit name="jpatest">

        <!-- 설명. 엔티티는 설정에 따로 추가할 것 -->
        <class>com.jehun.section02.crud.Menu</class>
        <class>com.jehun.section03.persistencecontext.Menu</class>

        <properties>

            <!-- 설명. 데이터베이스 연결 정보 -->
            <property name="jakarta.persistence.jdbc.driver" value="com.mysql.cj.jdbc.Driver"/>
            <property name="jakarta.persistence.jdbc.url" value="jdbc:mysql://localhost:3306/menudb"/>
            <property name="jakarta.persistence.jdbc.user" value="{username}"/>
            <property name="jakarta.persistence.jdbc.password" value="{username}"/>

            <!-- 설명. hibernate 설정(실행되는 sql 구문을 괜찮은 format 형태로 보여주기) -->
            <property name="hibernate.show_sql" value="true"/>
            <property name="hibernate.format_sql" value="true"/>
            <property name="hibernate.dialect" value="org.hibernate.dialect.MariaDB103Dialect"/>
        </properties>
    </persistence-unit>
</persistence>
section01
com.jehun.section01.A_EntityManagerLifeCycleTests
import jakarta.persistence.EntityManager;
import jakarta.persistence.EntityManagerFactory;
import jakarta.persistence.Persistence;
import org.junit.jupiter.api.*;

public class A_EntityManagerLifeCycleTests {
    private static EntityManagerFactory emf;
    private static EntityManager em;

    @BeforeAll
    public static void initFactory() {
        emf = Persistence.createEntityManagerFactory("jpatest");
    }

    @BeforeEach
    public void initManager() {
        em = emf.createEntityManager();
    }

    @Test
    public void 엔티티_매니저_팩토리와_엔티티_매니저_생명주기_확인1() {
        System.out.println("factory의 hashCode1: " + emf.hashCode());
        System.out.println("manager의 hashCode1: " + em.hashCode());
    }

    @Test
    public void 엔티티_매니저_팩토리와_엔티티_매니저_생명주기_확인2() {
        System.out.println("factory의 hashCode2: " + emf.hashCode());
        System.out.println("manager의 hashCode2: " + em.hashCode());
    }

    @AfterEach
    public void closeManager() {
        em.close();
    }

    @AfterAll
    public static void closeFactory() {
        emf.close();
    }
}
생명주기를 알아보면서 개념도 함께 알아보자.
엔티티 매니저와 관련된 개념
엔티티 매니저 팩토리(EntityManagerFactory)란?
- 엔티티 매니저를 생성할 수 있는 기능을 제공하는 팩토리 클래스이다.
- thread-safe하기 때문에 여러 스레드가 동시에 접근해도 안전하므로 서로 다른 스레드 간 공유해서 재사용한다.
- thread-safe한 기능을 요청 스코프마다 생성하기에는 비용(시간, 메모리) 부담이 크므로
- application 스코프와 동일하게 싱글톤으로 생성해서 관리하는 것이 효율적이다.
따라서 데이터베이스를 사용하는 애플리케이션 당 한 개의 EntityManagerFactory를 생성한다.
persistence.xml 속 엔티티 매니저 팩토리를 식별하기 위한 이름 설정
<persistence-unit name="jpatest">엔티티 매니저(EntityManager)란?
- 엔티티 매니저는 엔티티를 저장하는 메모리 상의 데이터베이스를 관리하는 인스턴스이다.
- 엔티티를 저장하고, 수정, 삭제, 조회하는 등의 엔티티와 관련된 모든 일을 한다.
- 엔티티 매니저는 thread-safe하지 않기 때문에 동시성 문제가 발생할 수 있다.
따라서 스레드 간 공유를 하지 않고, web의 경우 일반적으로 request scope와 일치시킨다.
영속성 컨텍스트(PersistenceContext)란?
- 엔티티 매니저를 통해 엔티티를 저장하거나 조회하면 엔티티 매니저는 영속성 컨텍스트에 엔티티를 보관하고 관리한다.
- 영속성 컨텍스트는 엔티티를 key-value 방식으로 저장하는 저장소이다.
- 영속성 컨텍스트는 엔티티 매니저를 생성할 때 같이 하나 만들어진다.
- 그리고 엔티티 매니저를 통해서 영속성 컨텍스트에 접근할 수 있고, 또 관리할 수 있다.
다시 위의 코드와 함께 보자.
    private static EntityManagerFactory emf;
    private static EntityManager em;

    @BeforeAll
    public static void initFactory() {
        emf = Persistence.createEntityManagerFactory("jpatest");
    }

    @BeforeEach
    public void initManager() {
        em = emf.createEntityManager();
    }
시작하기 전 팩토리는 식별해뒀던 jpatest로 만든다.
그 다음 jpa 담당 매니저라고 볼 수 있는 EntityManager를 만든 것이다.
매니저라고는 하지만 실제로는 스트림이기 때문에 테스트 케이스가 끝나면 닫아줘야 한다.
    @AfterEach
    public void closeManager() {
        em.close();
    }

    @AfterAll
    public static void closeFactory() {
        emf.close();
    }
위의 어노테이션이 달린 부분은 하나의 틀이라고 생각하면 된다.
이제 테스트 코드의 메소드이다.
    @Test
    public void 엔티티_매니저_팩토리와_엔티티_매니저_생명주기_확인1() {
        System.out.println("factory의 hashCode1: " + emf.hashCode());
        System.out.println("manager의 hashCode1: " + em.hashCode());
    }

    @Test
    public void 엔티티_매니저_팩토리와_엔티티_매니저_생명주기_확인2() {
        System.out.println("factory의 hashCode2: " + emf.hashCode());
        System.out.println("manager의 hashCode2: " + em.hashCode());
    }

싱글톤한지 확인하기 위해 출력해보았다.
테스트 코드로 CRUD 해보기
A_EntityManagerCRUDTests 라는 이름으로 해볼 것이다.
위의 코드 중 @BeforeEach, @BeforeAll, @AfterEach, @AfterAll
메소드들은 가져오자.
이제 CRUD를 만들어 볼 것이다.
READ
A_EntityManagerCRUDTests
@Test
public void 메뉴코드로_메뉴_조회_테스트() {
// given
int menuCode = 2;
// when
Menu foundMenu = em.find(Menu.class, menuCode);
// then
Assertions.assertNotNull(foundMenu);
Assertions.assertEquals(menuCode, foundMenu.getMenuCode());
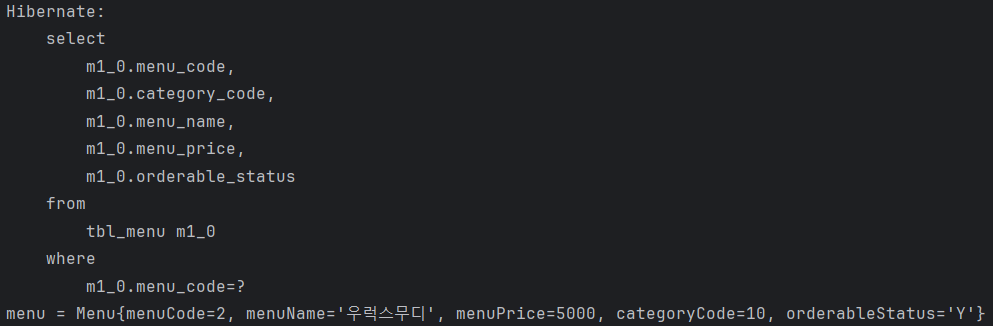
System.out.println("foundMenu = " + foundMenu);
}menuCode에 맞는 Menu.class 타입을 보고 Menu에 담아서 반환된 것이 foundMenu이다.
메뉴 클래스는 아래와 같다.
Menu
@Entity(name="section02_menu")
@Table(name="tbl_menu")

public class Menu {
    @Id
    @Column(name="menu_code")
    @GeneratedValue(strategy=GenerationType.IDENTITY)
    private int menuCode;

    @Column(name="menu_name")
    private String menuName;

    @Column(name="menu_price")
    private int menuPrice;

    @Column(name="category_code")
    private int categoryCode;

    @Column(name="orderable_status")
    private String orderableStatus;

    // 기본 생성자, 매개변수 있는 생성자, getter, setter, toString()
}
테스트 코드 출력 결과

READ는 잘 됐다. 다음은 INSERT를 해보자.
INSERT
A_EntityManagerCRUDTests
    @Test
    public void 새로운_메뉴_추가_테스트() {

        // given
        Menu menu = new Menu();
        menu.setMenuName("꿀발린추어탕");
        menu.setMenuPrice(7000);
        menu.setCategoryCode(4);
        menu.setOrderableStatus("Y");

        // when
        EntityTransaction tx = em.getTransaction();
        tx.begin();

        try {
            em.persist(menu);
            tx.commit();
        } catch(Exception e) {
            tx.rollback();
        }

        // then
        Assertions.assertTrue(em.contains(menu));       // 영속성 컨텍스트에 menu가 존재하는지 확인
    }
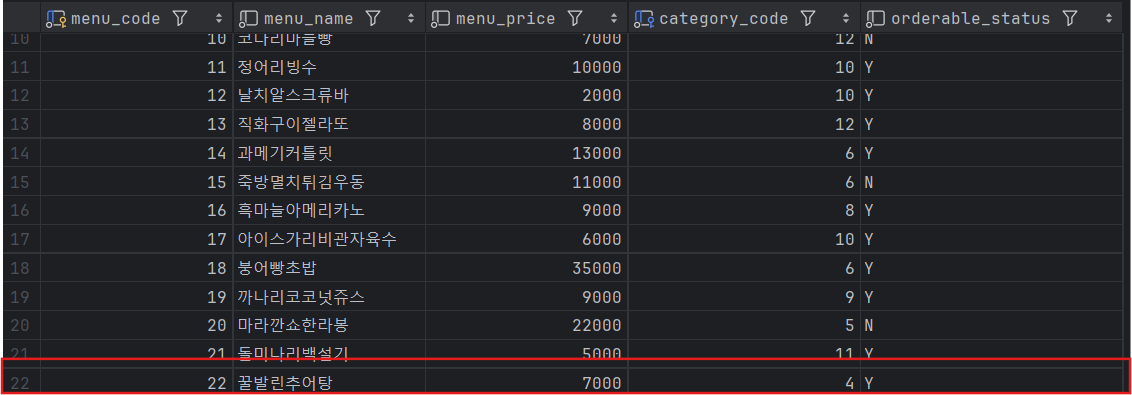
INSERT도 잘 된 것을 알 수 있다.
Update
A_EntityManagerCRUDTests
    @Test
    public void 메뉴_이름_수정_테스트() {

        // given
        Menu menu = em.find(Menu.class, 2);
        System.out.println("menu = " + menu);

        String menuNameToChange = "문어스무디";

        // when
//        EntityTransaction tx = em.getTransaction();
//        tx.begin();

        try {
            menu.setMenuName(menuNameToChange);
//            tx.commit();
        } catch(Exception e) {
//            tx.rollback();
        }

        // then
        Assertions.assertEquals(menuNameToChange, em.find(Menu.class, 2).getMenuName());
    }
위의 코드들 다 지금 전부 새로운 EntityManager를 만들고 사용한다.
그래서 일단 비어있기 때문에 Update 코드에서도 2번 Menu를 가져온다.
즉, 영속 상태의 객체인 것이다. (EntityManager 가 가져다주니까)
EntityManager이 현재 보고 있는 상태인데 변경을 한다면, update문이 쓰기 지연 저장소에 쌓이게 된다.
그리고 그 후에 변화가 없이 commit이 일어난다면 쓰기 지연 저장소에 쌓인 것들을 flush() 하면서 DB에 덮어씌운다.
영속 상태인 객체를 가져와 변경만 한 뒤 DB에 덮어씌우지 않기 위해서 트랜잭션 부분만 주석처리했다.
바꾸긴 했지만 DB 상에는 변화가 없다. (출력문도 쿼리 보내기 전이다.)

Delete
A_EntityManagerCRUDTests
    @Test
    public void 메뉴_삭제하기_테스트() {

        // given
        Menu menuToRemove = em.find(Menu.class, 2);

        // when
        EntityTransaction tx = em.getTransaction();
        tx.begin();

        try {
            em.remove(menuToRemove);
            tx.commit();
        } catch(Exception e) {
            tx.rollback();
        }

        // then
        Menu removeMenu = em.find(Menu.class, 2);
        Assertions.assertEquals(null, removeMenu);
    }
삭제도 잘 될 것이다.