constraintLayout 🐹
constraintLayout을 사용하면 플랫 뷰 계층 구조로 복잡한 레이아웃을 만들 수 있다. constraintLayout은 RelativeLayout과 비슷하지만, RelativeLayout보다 유연합니다.
constraintLayout 활용하기 🐶
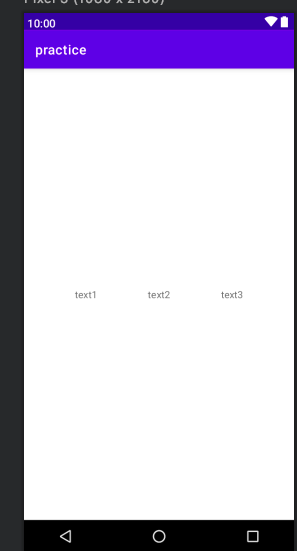
가로뱡향을 자식 뷰 3개 배치
<TextView> 속성에
app:layout_constraintRight_toLeftOf=""
app:layout_constraintTop_toTopOf=""
app:layout_constraintLeft_toLeftOf=""
app:layout_constraintBottom_toBottomOf=""
를 활용하면 가로방향에 자식 뷰 3개를 배치할 수 있다.
<?xml version="1.0" encoding="utf-8"?>
<androidx.constraintlayout.widget.ConstraintLayout
    xmlns:android="http://schemas.android.com/apk/res/android"
    xmlns:app="http://schemas.android.com/apk/res-auto"
    xmlns:tools="http://schemas.android.com/tools"
    android:layout_width="match_parent"
    android:layout_height="match_parent"
    tools:context=".MainActivity">

    <TextView
        android:layout_width="wrap_content"
        android:layout_height="wrap_content"
        android:text="text1"
        android:id="@+id/t1"
        app:layout_constraintRight_toLeftOf="@+id/t2"
        app:layout_constraintTop_toTopOf="parent"
        app:layout_constraintLeft_toLeftOf="parent"
        app:layout_constraintBottom_toBottomOf="parent"
        />

    <TextView
        android:layout_width="wrap_content"
        android:layout_height="wrap_content"
        android:text="text2"
        android:id="@+id/t2"
        app:layout_constraintLeft_toRightOf="@+id/t1"
        app:layout_constraintTop_toTopOf="parent"
        app:layout_constraintRight_toRightOf="@+id/t3"
        app:layout_constraintBottom_toBottomOf="parent"
        />
    <TextView
        android:layout_width="wrap_content"
        android:layout_height="wrap_content"
        android:text="text3"
        android:id="@+id/t3"
        app:layout_constraintLeft_toRightOf="@+id/t2"
        app:layout_constraintBottom_toBottomOf="parent"
        app:layout_constraintTop_toTopOf="parent"
        app:layout_constraintRight_toRightOf="parent"
        />
</androidx.constraintlayout.widget.ConstraintLayout>
자식 위치 쉽게 조정해보기
ConstraintLayout Chain
ConstraintLayout Chain을 사용하면 자식들의 위치를 보다 더 쉽게 조정할 수 있다.
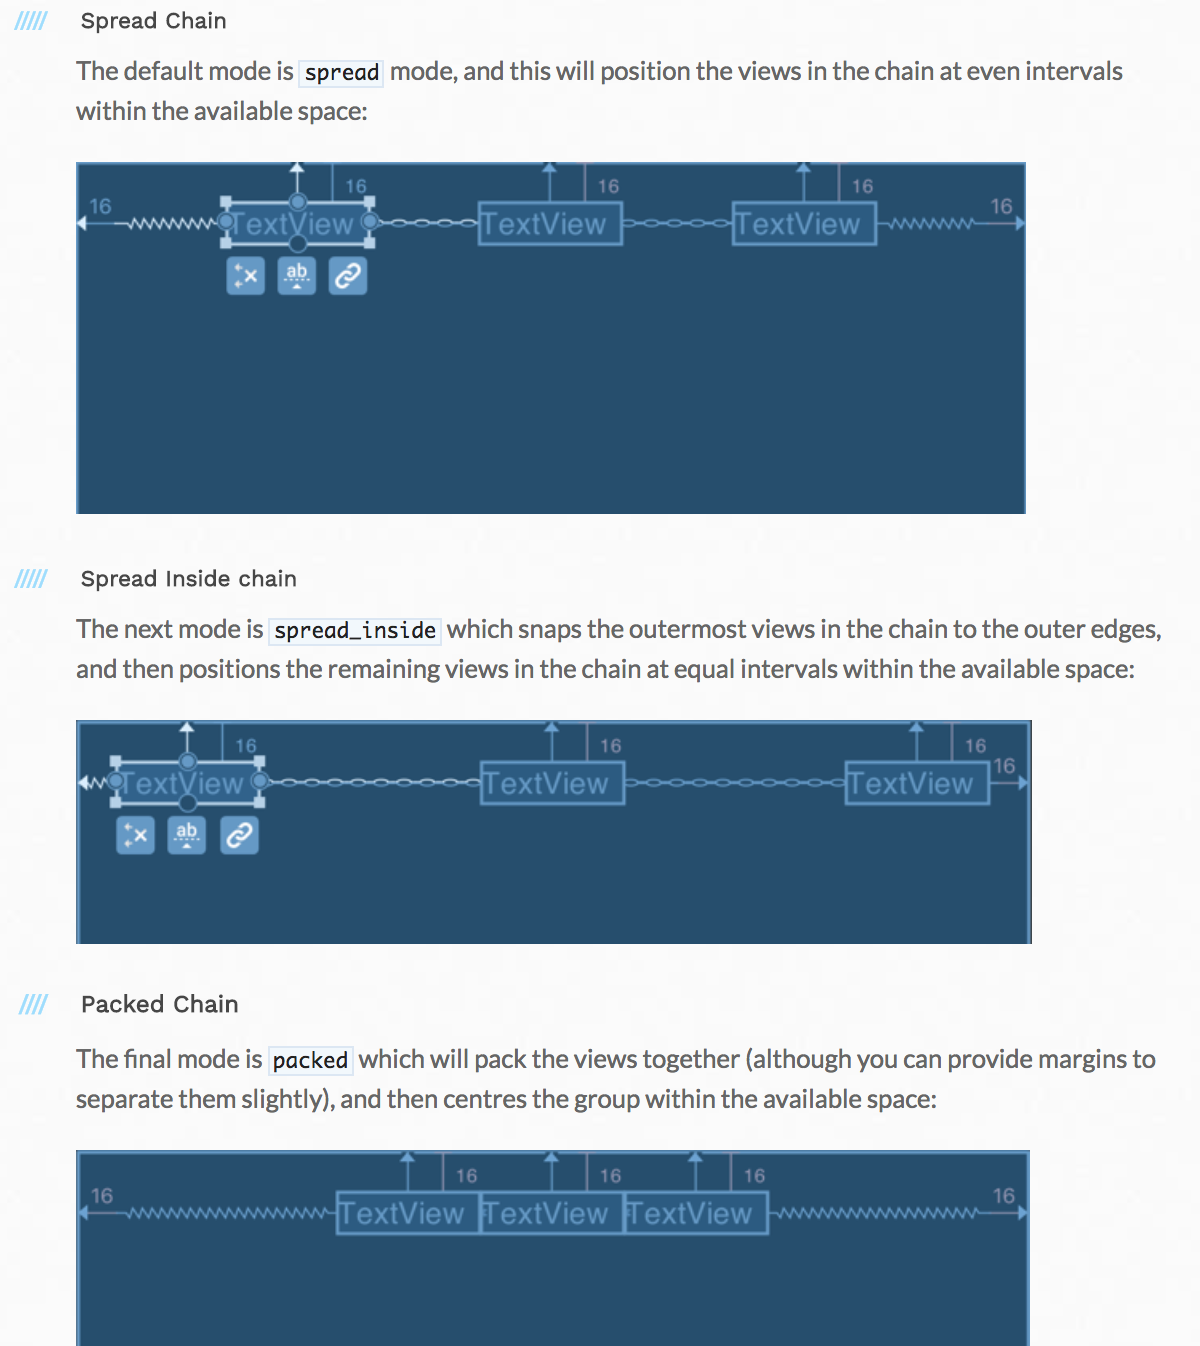
chain의 뜻이 중요하다. 아래 사진을 보면 chain은 동그라미가 서로 연결되어 있다. 동그라미 하나 하나가 뷰라고 생각하면 직관적으로 이해할 수 있다.

chain의 스타일은 spread, packed, spread_inside와 같이 3가지가 있습니다.

출처: 공식문서
weight로 정렬하는 방법
가로로 정렬한다고 할 때 layout_width는 0dp로 주고
android:layout_width=“0dp”
app:layout_constraintHorizontal_weight="1"
baseline constraint
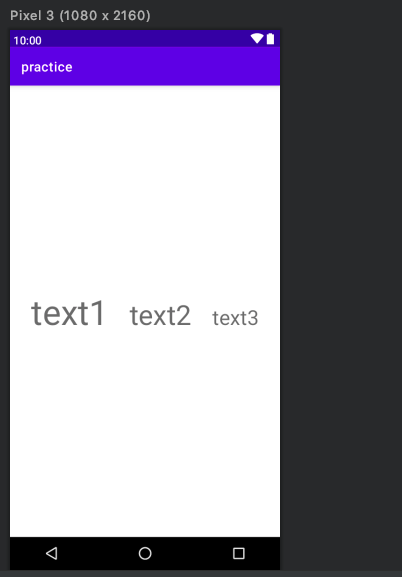
baseline은 textview가 있을때 사용되는 가상의 선이다.
    <?xml version="1.0" encoding="utf-8"?>
<androidx.constraintlayout.widget.ConstraintLayout
    xmlns:android="http://schemas.android.com/apk/res/android"
    xmlns:app="http://schemas.android.com/apk/res-auto"
    xmlns:tools="http://schemas.android.com/tools"
    android:layout_width="match_parent"
    android:layout_height="match_parent"
    tools:context=".MainActivity">

    <TextView
        android:layout_width="wrap_content"
        android:layout_height="wrap_content"
        android:text="text1"
        android:id="@+id/t1"
        app:layout_constraintRight_toLeftOf="@+id/t2"
        app:layout_constraintTop_toTopOf="parent"
        app:layout_constraintLeft_toLeftOf="parent"
        app:layout_constraintBottom_toBottomOf="parent"
        android:textSize="50sp"
        />

    <TextView
        android:layout_width="wrap_content"
        android:layout_height="wrap_content"
        android:text="text2"
        android:id="@+id/t2"
        app:layout_constraintLeft_toRightOf="@+id/t1"
        app:layout_constraintTop_toTopOf="parent"
        app:layout_constraintRight_toRightOf="@+id/t3"
        app:layout_constraintBottom_toBottomOf="parent"
        android:textSize="40sp"
        app:layout_constraintBaseline_toBaselineOf="@id/t1"

        />
    <TextView
        android:layout_width="wrap_content"
        android:layout_height="wrap_content"
        android:text="text3"
        android:id="@+id/t3"
        app:layout_constraintLeft_toRightOf="@+id/t2"
        app:layout_constraintBottom_toBottomOf="parent"
        app:layout_constraintTop_toTopOf="parent"
        app:layout_constraintRight_toRightOf="parent"
        android:textSize="30sp"
        app:layout_constraintBaseline_toBaselineOf="@id/t1"
        />

</androidx.constraintlayout.widget.ConstraintLayout>
app:layout_constraintBaseline_toBaselineOf="@id/t1"을 사용하면 id가 t1인 뷰를 기준으로 baseline을 정하기 때문에 정렬을 맞출 수 있다.


