AutoEncoder의 블로그 설명글들은 대부분 AutoEncoder의 구조에 대해서만 설명한다. 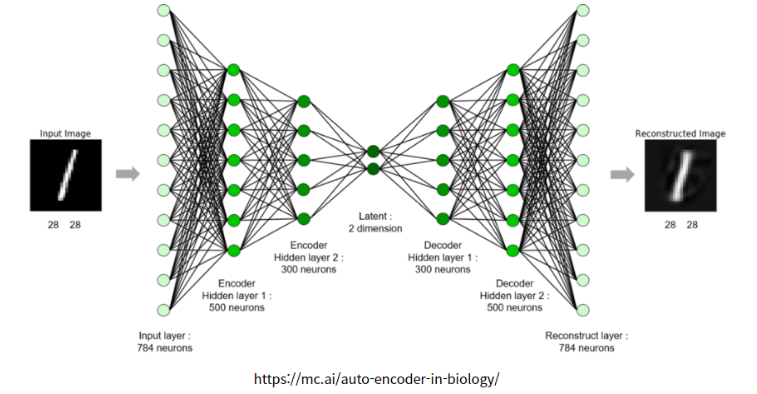
Auto Encoder는 보통 이와 같은 구조를 같고 있다.
- 입력 x가 들어가고 Convolution Layer을 통과한다. (Encoder)
- Bottle Neck 구조로 Latent (Z)에 압축된 정보들을 저장한다.
- 압축된 정보를 풀면서 정보를 복구한다. (Decoder)
내가 알고 싶은 부분은 이 latent dimension 혹은 latent vector 부분이었다. 일단 코드로 작성해보자
Data는 fashion_mnist로 확인을 하였고 tensorflow, pytorch 두 코드 둘다 작성하도록 하겠다.
#### keras로 작성한 AutoEncoder

from keras.layers import Dense, Input, Conv2D, Conv2DTranspose, GlobalAveragePooling2D, Reshape
from keras.models import Model

inputs = Input(shape = (28, 28, 3))
x = Conv2D(32, 3, 2, activation='relu', padding='same')(inputs)
x = Conv2D(64, 3, 2, activation='relu', padding='same')(x)
x = GlobalAveragePooling2D()(x)
latent = Dense(10)(x)

x = Dense(7*7*64)(latent)
x = Reshape(target_shape = (7, 7, 64))(x)
x = Conv2DTranspose(64, 3, 2, activation='relu', padding='same')(x)
x = Conv2DTranspose(32, 3, 2, activation='relu', padding='same')(x)
x = Conv2DTranspose(3, 3 ,activation='sigmoid', padding='same')(x)
model1 = Model(inputs, x)
#### Pytorch로 작성한 Auto Encoder

import torch
import torch.nn as nn
import torchvision.transforms as transforms
from torchvision.datasets import MNIST
from torch.utils.data import DataLoader


class ConvAutoencoder(nn.Module):
    def __init__(self):
        super(ConvAutoencoder, self).__init__()
        # 인코더 정의
        self.encoder = nn.Sequential(
            nn.Conv2d(1, 16, 3, stride=2, padding=1),  # input: 28x28x1, output: 14x14x16
            nn.ReLU(),
            nn.Conv2d(16, 32, 3, stride=2, padding=1),  # output: 7x7x32
            nn.ReLU(),
            nn.Conv2d(32, 64, 7),  # output: 1x1x64
            nn.ReLU()
        )
        self.fc1 = nn.Linear(64, 10)  # 잠재 벡터로 변환

        # 디코더 정의
        self.fc2 = nn.Linear(10, 64)  # 잠재 벡터에서 복원
        self.decoder = nn.Sequential(
            nn.ConvTranspose2d(64, 32, 7),  # output: 7x7x32
            nn.ReLU(),
            nn.ConvTranspose2d(32, 16, 3, stride=2, padding=1, output_padding=1),  # output: 14x14x16
            nn.ReLU(),
            nn.ConvTranspose2d(16, 1, 3, stride=2, padding=1, output_padding=1),  # output: 28x28x1
            nn.Tanh()
        )

    def forward(self, x):
        x = self.encoder(x)
        x = x.view(x.size(0), -1)  # Flatten the output for the fully connected layer
        x = self.fc1(x)
        x = self.fc2(x)
        x = x.view(-1, 64, 1, 1)  # Reshape back for the decoder
        x = self.decoder(x)
        return x

# 모델 인스턴스 생성
autoencoder = ConvAutoencoder()
내가 알고 싶은 부분은 앞서 말했듯이 코드에 대한 리뷰가 아니라 latent 부분에 대한 호기심(?)이다. keras, pytorch 모두 중간에 fully connected layer가 들어가 있다. 이럴 경우 과연 어떻게 작동을 할까에 대한 궁금증이다.
일반적으로 fully connected layer는 추상적인 특징(고차원)에 대해 매우 탁월한 성능을 보인다. 하지만 공간 정보를 잃어버린다. AutoEncoder는 공간정보에 대해서도 민감하기 때문에 이 공간정보를 얼마나 살리는 것도 중요한 부분이다.
그럼 살펴보자!!!
Reshape
# keras
x = Reshape(target_shape = (7, 7, 64))(x)

#pytorch
x = x.view(x.size(0), -1)
keras의 Reshape와 Pytorch의 view를 살펴봐야 한다.
fully connected layer를 통과시킨 이후에는 공간정보를 갖고 있던 tensor 즉 어떤 dimension 공간 정보를 섞어버리는 결과를 초래한다. 따라서 공간정보를 잃고 하나의 vector 형태로 존재한다. 이를 공간정보를 갖는 상태로 복구시키려면 Reshape와 view를 사용해야 한다.
Reshape와 view의 작동 원리는 비슷하다.
이들의 작동 원리는 다음과 같다.
-
텐서의 형태를 변경할 때 원본 데이터의 배열 순서를 유지한다. 즉, 데이터는 메모리 내에서의 원래 순서대로 재배치되어 새로운 차원 형태로 나타난다.
-
예를들어, 1차원 벡터를 2차원 행렬로 변환할 때, 벡터의 첫번째 요소가 행렬의 첫번째 행의 첫 번째 열에 위치하게 된다는 것.
[1, 2, 3, 4, 5, 6] # 1차원 벡터

[[1, 2, 3],
 [4, 5, 6]]        # 2차원 행렬
즉, fully connected layer에 들어가서 1차원 벡터로 펼쳐져 있더라도 Reshape와 view를 사용하면 이전의 배열 순서를 유지하며 새로운 차원의 형태로 나타낼 수 있게 되는 것이다.
그렇다면 fully connected layer가 없는 경우에는 어떤 결과가 나올까?
#### keras

inputs = Input(shape = (28, 28, 3))
x = Conv2D(32, 3, 2, activation='relu', padding='same')(inputs)
x = Conv2D(64, 3, 2, activation='relu', padding='same')(x)
# x = GlobalAveragePooling2D()(x)
# latent = Dense(10)(x)

# x = Dense(7*7*64)(latent)
# x = Reshape(target_shape = (7, 7, 64))(x)
x = Conv2DTranspose(64, 3, 2, activation='relu', padding='same')(x)
x = Conv2DTranspose(32, 3, 2, activation='relu', padding='same')(x)
x = Conv2DTranspose(3, 3 ,activation='sigmoid', padding='same')(x)
model2 = Model(inputs, x)
#### pytorch로 짠 코드


class ConvAutoencoder(nn.Module):
    def __init__(self):
        super(ConvAutoencoder, self).__init__()
        # 인코더 정의
        self.encoder = nn.Sequential(
            nn.Conv2d(1, 16, 3, stride=2, padding=1),  # input: 28x28x1, output: 14x14x16
            nn.ReLU(),
            nn.Conv2d(16, 32, 3, stride=2, padding=1),  # output: 7x7x32
            nn.ReLU(),
            nn.Conv2d(32, 64, 7)  # output: 1x1x64
        )
        # 디코더 정의
        self.decoder = nn.Sequential(
            nn.ConvTranspose2d(64, 32, 7),  # output: 7x7x32
            nn.ReLU(),
            nn.ConvTranspose2d(32, 16, 3, stride=2, padding=1, output_padding=1),  # output: 14x14x16
            nn.ReLU(),
            nn.ConvTranspose2d(16, 1, 3, stride=2, padding=1, output_padding=1),  # output: 28x28x1
            nn.Tanh()
        )

    def forward(self, x):
        x = self.encoder(x)
        x = self.decoder(x)
        return x
그럼 fully connected layer를 넣은 결과와 넣지 않은 결과를 확인해보자.
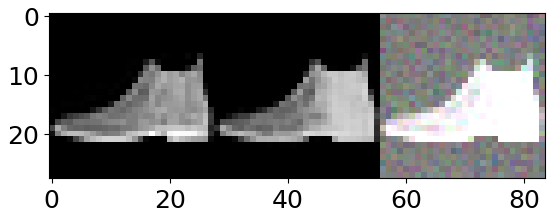
1. fully connected layer를 넣었을 때의 결과

- 왼쪽 사진 (원본)
- 중간 사진 (복원 이미지)
- 오른쪽 사진 (노이즈 학습 이미지)
2. fully connected layer를 넣지 않았을 때의 결과
- 왼쪽 사진 (원본)
- 중간 사진 (복원 이미지)
- 오른쪽 사진 (노이즈 학습 이미지)
이 두 가지 결과를 비교하면 왜 중간에 fully connected layer를 사용하지 않는지 확연히 알 수 있게 된다.Reshape을 통해 복원을 아무리 한다고 해도 제대로 공간에 대한 손실이 있을테고 아무리 깊게 학습한다고 해도 제약이 생길 테니깐...
그러나 Reshape이나 view를 통해서 fully connected layer도 어느정도 복구가 된다는 관점에 대해선 매우 놀라운 실험 결과라고 생각한다.