PFLD Preprocess에 대해 샅샅히 파헤쳐 보려고 한다. 구현에 대해서 수학적인 지식이 필요하긴 하다. 하지만 모든 것을 알순 없듯이 배워가면 그만이다. 어려운 부분은 같이 공부하며 앞으로 나아가면 된다. 시작해보자.
PFLD는 WFLW face landmark dataset을 사용했으며 directory 구조는 다음과 같다.
WFLW images
- 0--Parade
- 1--Handshaking
- 2--Demonstration
- 3--Riot
- ...
WFLW annotations
- list_98pt_rect_attr_train_test
- list_98pt_rect_attr_test.txt- list_98pt_rect_attr_train.txt
- README
- utils
- list_98pt_test
- list_98pt_test- list_98pt_test_blur
- list_98pt_test_expression
- list_98pt_test_illumination
- list_98pt_test_largepose
- ...
위와 같은 구조로 되어 있고, 학습에 사용할 annotation은 이미지와 list_98pt_rect_attr_test.txt, list_98pt_rect_attr_train.txt 이 두개의 텍스트 파일이다.
list_98pt_rect_attr_test.txt의 파일을 열어보면 아래와 같은 형식으로 landmark 데이터가 저장되어 있는 것을 볼 수 있다.
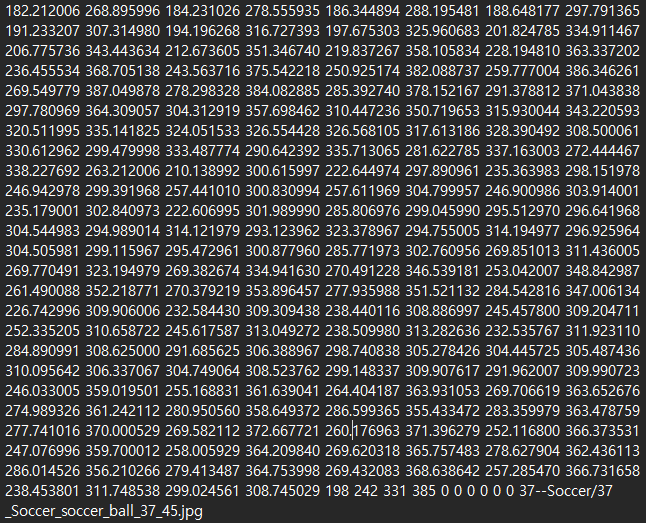
총 207개의 데이터들이 한 묶음식 저장되어 있는 것을 볼 수 있는데, 이들의 데이터 형식은
(x, y), (box_x1, box_y1, box_x2, box_y2), (pose, expression, illumination, make_up, occlusion, blur), img_name 으로 구성되어 있는 것을 볼 수 있다.
- 98개의 (x, y) 좌표쌍 : 196개
- face bounding box coordinate : 4개
- attributions : 6개
- image_name : 1개
--> 총 207개이고 이를 인덱싱으로 나타내면 annotations[:206]으로 표현할 수 있다.
또한, 98개의 (x, y) 좌표쌍은 WFLW face landmark와 mapping되는데,
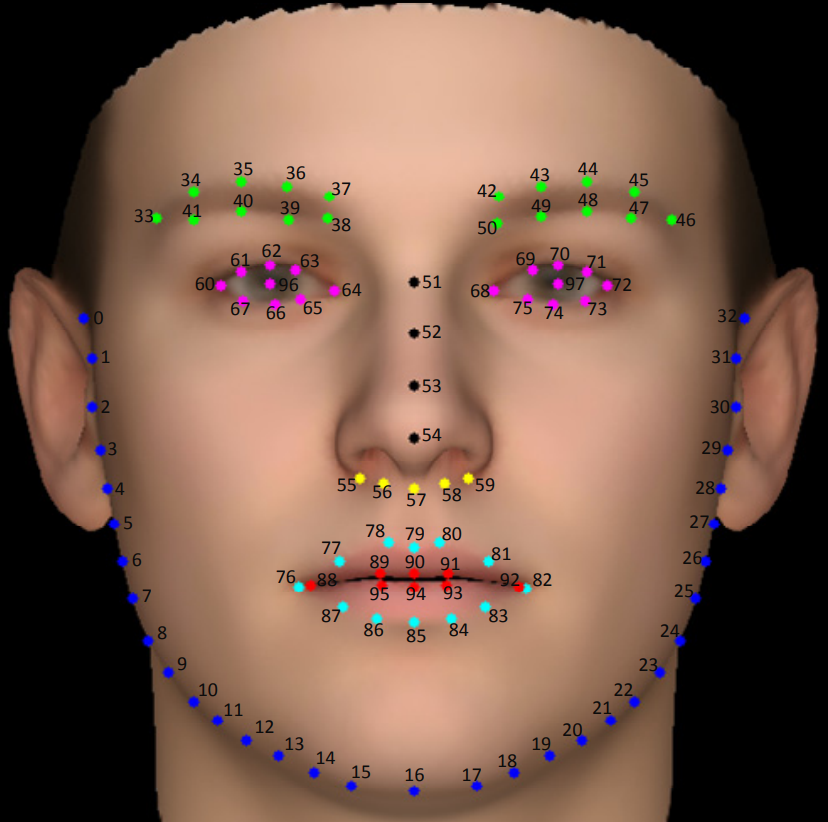
98개의 (x, y)좌표쌍의 첫번째 쌍은 이미지의 0번과 mapping된다. 즉, 해당 0번의 위치가 annotations의 첫번째 (x, y)라는 것이다. 두번째 (x, y)쌍은 이미지의 1번과 mapping되고 해당 1번 위치를 나타낸다.
if __name__ == '__main__':
    root_dir = os.path.dirname(os.path.realpath(__file__))
    images_dir = 'D:/DeepLearning/WFLW/WFLW_images'
    Mirror_file = "Mirror98.txt"

    landmark_dir = ['./WFLW_annotations/list_98pt_rect_attr_train_test/list_98pt_rect_attr_test.txt',
                    './WFLW_annotations/list_98pt_rect_attr_train_test/list_98pt_rect_attr_train.txt']

    outdir = ['test_data', 'train_data']

    for landmark_dir, outdir in zip(landmark_dir, outdir):
        outdir = os.path.join(root_dir, outdir)
        # print(landmark_dir)
        if os.path.exists(outdir):
            shutil.rmtree(outdir)
        os.mkdir(outdir)

        if 'list_98pt_rect_attr_test.txt' in landmark_dir:
            is_train = False
        else:
            is_train = True

        imgs = get_dataset_list(images_dir, outdir, landmark_dir, is_train)


    print('end')
따라서 다음과 같은 코드를 사용하여 저장할 디렉토리를 만드는데, 해당 디렉토리가 이미 존재할 경우에 shutil.rmtree()를 사용하면 디렉토리(outdir)와 그 내부의 모든 파일 및 서브 디렉토리를 재귀적으로 삭제하는 함수이다. 복구가 불가능하기 때문에, 주의가 필요하다.
main문을 실행하면 get_dataset_list()가 실행되고 get_dataset_list()는 ImageDate클래스를 사용하게 되는데, 우선은 ImageDate 클래스를 확실히 이해하고 넘어가려고 한다.
class ImageDate():
    def __init__(self, line, imgdir, image_size=112):
        self.img_size = image_size
        line = line.strip().split()
        assert (len(line) == 207)
        self.list = line
        self.line = line
        self.landmark = np.asarray(list(map(float, line[:196])), dtype=np.float32).reshape(-1, 2)
        self.bbox = np.asarray(list(map(int, line[196:200])), dtype=np.int32)
        flag = list(map(int, line[200:206]))
        flag = list(map(bool, flag))
        self.pose = flag[0]
        self.expression = flag[1]
        self.illumination = flag[2]
        self.make_up = flag[3]
        self.occlusion = flag[4]
        self.blur = flag[5]
        self.img_path = os.path.join(imgdir, line[206])
        self.img = None

        self.imgs = []
        self.landmarks = []
        self.boxes = []

    def load_data(self, is_train, repeat, mirror=None):
        if mirror is not None:
            with open(mirror, 'r') as f:
                lines = f.readlines()
                assert(len(lines) == 1)
                mirror_idx = lines[0].strip().split(',')
                mirror_idx = list(map(int, mirror_idx))
        xminymin = np.min(self.landmark, axis=0).astype(np.int32)  # self.landmark shape : (98, 2)
        xmaxymax = np.max(self.landmark, axis=0).astype(np.int32)  # 오른쪽 모서리
        wh = xmaxymax - xminymin  # width, height

        center = ((xminymin + xmaxymax) / 2).astype(np.int32) # (x, y)
        img = cv2.imread(self.img_path)
        boxsize = int(np.max(wh) * 1.2) # 얼굴이 짤리는 것을 방지용
        xy = center - boxsize // 2
        x1, y1 = xy
        x2, y2 = xy + boxsize
        height, width, _ = img.shape

        dx = max(0, -x1)
        dy = max(0, -y1)
        x1 = max(0, x1)
        y1 = max(0, y1)

        edx = max(0, x2 - width)
        edy = max(0, y2 - height)
        x2 = min(width, x2)
        y2 = min(height, y2)

        imgT = img[y1:y2, x1:x2]
        if (dx > 0 or dy > 0 or edx > 0 or edy > 0):
            imgT = cv2.copyMakeBorder(imgT, dy, edy, dx, edx, cv2.BORDER_CONSTANT, 0)
        if imgT.shape[0] == 0 or imgT.shape[1] == 0:
            imgTT = cv2.cvtColor(img, cv2.COLOR_GRAY2BGR)
            for x, y, in (self.landmark + 0.5).astype(np.int32):
                cv2.circle(imgTT, (x, y), 1, (0, 0, 255))
            cv2.imshow('0', imgTT)
            if cv2.waitKey(0) == 27:
                exit()

        imgT = cv2.resize(imgT, (self.img_size, self.img_size))
        landmark = (self.landmark - xy) / boxsize # 일종의 normalize네
        # (98, 2) 모양을 1.2배 늘린 커스텀 박스의 최상단 x,y 좌표에 -를 하는거임.
        # 이미지나 landmark 모두 custom 박스내에서만 학습을 할테니 그외는 학습에 이용되지 않음.
        #
        self.imgs.append(imgT)
        self.landmarks.append(landmark)

        if is_train:
            while len(self.imgs) < repeat:
                angle = np.random.randint(-30, 30)

                cx, cy = center
                # boxsize : (x, y)
                cx = cx + int(np.random.randint(-boxsize * 0.1, boxsize*0.1)) # -10% +10% 사이의 값을 랜덤하게 선택
                                                                              # 데이터 증강을 위해서임 랜덤 오프셋을 주는것
                cy = cy + int(np.random.randint(-boxsize * 0.1, boxsize * 0.1))
                M, landmark = rotate(angle, (cx, cy), self.landmark)

                imgT = cv2.warpAffine(img, M, (int(img.shape[1] * 1.1), int(img.shape[0] * 1.1)))

                wh = np.ptp(landmark, axis=0).astype(np.int32) + 1
                size = np.random.randint(int(np.min(wh)), np.ceil(np.max(wh) * 1.25))
                xy = np.asarray((cx - size // 2, cy - size // 2), dtype=np.int32)
                landmark = (landmark - xy) / size

                if (landmark < 0).any() or (landmark > 1).any():
                    continue

                x1, y2 = xy
                x2, y2 = xy + size
                height, width, _ = imgT.shape

                dx = max(0, -x1)
                xy = max(0, -y1)
                x1 = max(0, x1)
                y1 = max(0, y1)

                edx = max(0, x2 - width)
                edy = max(0, y2 - height)
                x2 = min(width, x2)
                y2 = min(height, y2)

                imgT = imgT[y1:y2, x1, x2]
                if (dx > 0 or dy > 0 or edx > 0 or edy > 0):
                    imgT = cv2.copyMakeBorder(imgT, dy, edy, dx, edx, cv2.BORDER_CONSTANT, 0)

                imgT = cv2.resize(imgT, (self.image_size, self.image_size))

                if mirror is not None and np.random.choice((True, False)):
                    landmark[:, 0] = 1 - landmark[:0]
                    landmark = landmark[mirror_idx]
                    imgT = cv2.flip(imgT, 1)

                self.imgs.append(imgT)
                self.landmarks.append(landmark)

    def save_data(self, path, prefix):
        attributes = [self.pose, self.expression, self.illumination, self.make_up, self.occlusion, self.blur]
        attributes = np.asarray(attributes, dtype=np.int32)
        attributes_str = ''.join(list(map(str, attributes)))
        labels = []

        TRACKED_POINTS = [33, 38, 50, 46, 60, 64, 68, 72, 55, 59, 76, 82, 85, 16]
        for i, (img, landmark) in enumerate(zip(self.imgs, self.landmarks)):
            assert landmark.shape == (98, 2)
            save_path = os.path.join(path, prefix + '+' + str(i) + '.png')
            assert not os.path.exists(save_path), save_path
            cv2.imwrite(save_path, img)

            euler_angles_landmark = []
            for index in TRACKED_POINTS:
                euler_angles_landmark.append(landmark[index])
            euler_angles_landmark = np.asarray(euler_angles_landmark).reshape((-1, 28))
            pitch, yaw, roll = calculate_pitch_yaw_roll(euler_angles_landmark[0])
            euler_angles = np.asarray((pitch, yaw, roll), dtype=np.float32)
            euler_angles_str = ' '.join(list(map(str, euler_angles)))
            landmark_str = ' '.join(list(map(str, landmark.reshape(-1).tolist())))

            label = '{} {} {} {}\n'.format(save_path, landmark_str, attributes_str, euler_angles_str)

            labels.append(label)

        return label
앞에서 설명한 WFLW dataset은 (x,y)형태를 가지며 이를 학습에 사용하기 위해선 처리를 해줘야한다.
line = line.strip().split()
self.landmark = np.asarray(list(map(float, line[:196])), dtype=float32).reshape(-1, 2)
해당 코드가 실행되면
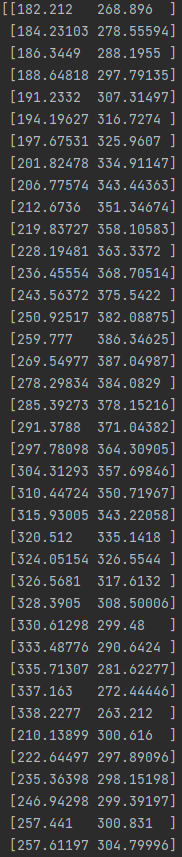
이처럼 학습에 사용할 수 있도록 (x,y) 쌍이 나타나 있는 것을 쉽게 확인할 수 있다.
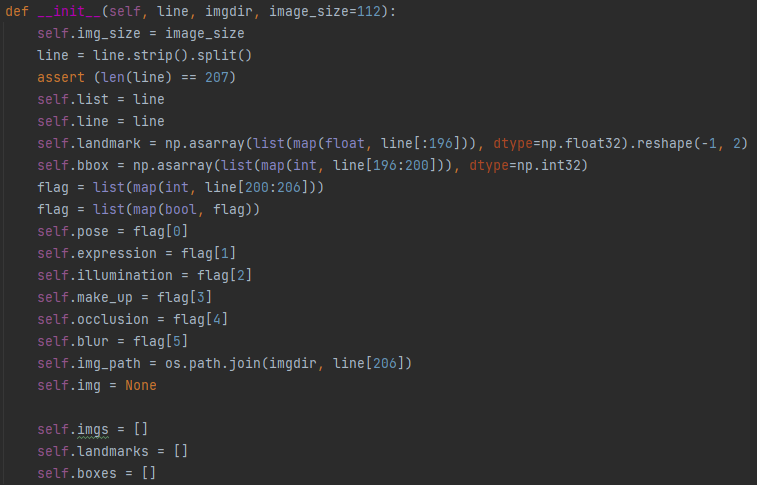
bbox도 4개의 좌표값을 가지므로 변수를 만들어 저장하고 있으며, 각 attribute도 추후에 사용되므로 flag로 사용되는 것을 볼 수 있다.
def load_data(self, is_train, repeat, mirror=None):이 함수에서 중요한 매개변수는 is_train 함수인데, 이는 처음 main문을 다시 살펴볼 필요가 있다.
if 'list_98pt_rect_attr_test.txt' in landmark_dir:
      is_train = False
else:
      is_train = True
이 is_train이라는 변수는 image Augmentation에 사용되기 위함이다. Image Augmentation이 필요한 train data에만 사용할 수 있도록 하는 변수이다. is_train이 False라면 load_data()에서는 is_train의 조건문에 따라 실행되지 않을 것이다.
xminymin = np.min(self.landmark, axis=0).astype(np.int32)  # self.landmark shape : (98, 2)
xmaxymax = np.max(self.landmark, axis=0).astype(np.int32)  # 오른쪽 모서리
wh = xmaxymax - xminymin  # width, height

center = ((xminymin + xmaxymax) / 2).astype(np.int32) # (x, y)
xminymin, xmaxymax는 landmark 기준으로 구해지게 되는데, 과정은 아래의 이미지와 같다.
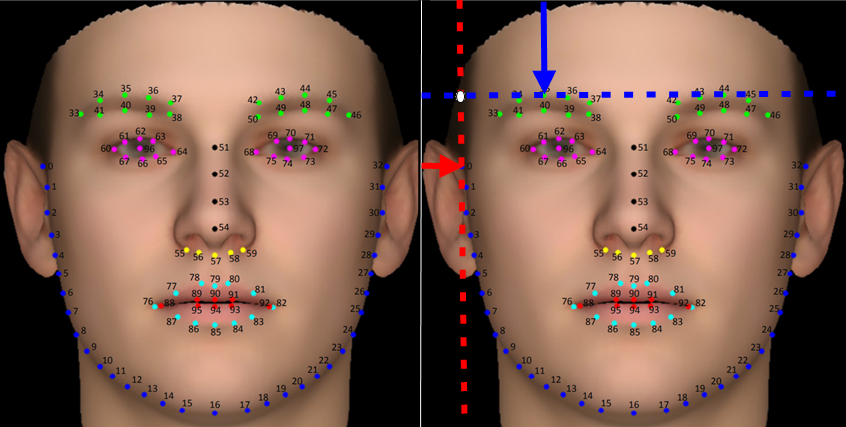
왼쪽 위의 하얀색 점이 xmin과 xmax의 좌표인데, xmaxymax도 이와 같이 구해지게 되는 것을 알 수 있다. Face Detection을 통과한 Face bbox 기준이 아니라 landmark 기준으로 타이트하게 bbox를 구하는 과정이다. 이는 이렇게 만들어진 박스 내부만 Image Augmentation을 하기 위한 과정이고 이로 인해 메모리 효율을 얻어낼 수 있다. PFLD 논문을 보면 알다시피 회전과 각도를 신경썼으므로 회전과 각도를 위한 전처리 단계라고 생각하면 좋다.
xminymin, xmaxymax shape 모두 (1, 2)로 (x,y)쌍을 갖게 되며 wh = xmaxymax - xminymin을 하면 (width, height)가 저장되는 것을 알 수 있다. 박스의 중심을 구하기 위한 center는 두 값을 더한 값을 나누게 되면 중앙값이 나오게 되는 것을 확인할 수 있다.
img = cv2.imread(self.img_path)
boxsize = int(np.max(wh) * 1.2) # 얼굴이 짤리는 것을 방지용
xy = center - boxsize // 2
x1, y1 = xy
x2, y2 = xy + boxsize
height, width, _ = img.shape
이렇게 구한 wh에 1.2를 곱하는 이유는 landmark기준으로 매우 타이트하게 bbox를 만들었으므로 20%정도 offset을 준다고 생각하면 된다.
** 너무 landmark 기준으로 타이트하게 bbox를 잡게 되면 image augmentation을 하면서 이미지를 왜곡시키는 상황이 발생할 수 있으므로 어느정도의 offset을 부여하여 문제를 방지하는 과정이다.
# 왼쪽 위 모서리 처리
dx = max(0, -x1)
dy = max(0, -y1)
x1 = max(0, x1)
y1 = max(0, y1)

# 오른쪽 아래 모서리 처리
edx = max(0, x2 - width)
edy = max(0, y2 - height)
x2 = min(width, x2)
y2 = min(height, y2)
이 과정이 좀 중요한데, 이미지 처리에 필수적인 부분이다. 우리가 opencv로 이미지를 자르거나 어떤 처리를 할때, 이미지의 경계를 넘어가서 이미지가 갖는 배열의 인덱스 크기보다 벗어나면 오류가 발생하는 것을 볼 수 있는데, 이런 오류가 발생하는 것을 미연에 방지하는 코드로 볼 수 있다.
만약, 이미지를 자르거나 회전했는데 그 좌표가 이미지의 경계를 넘어간 좌표라면 문제가 생기는데, 아래의 이미지를 보면 이해하기 쉽다.
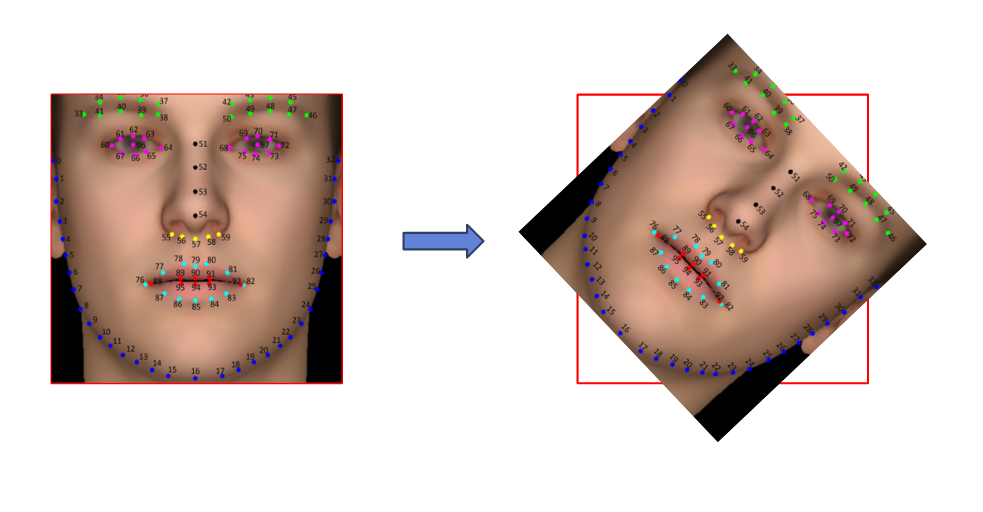
회전했을 경우의 예시인데, 이럴 경우 오른쪽의 이미지는 경계보다 바깥에 위치하게 되고 이럴 경우 opencv가 해당 이미지를 읽지 못하는 상황이 생기게 된다.
if (dx > 0 or dy > 0 or edx > 0 or edy > 0):
   imgT = cv2.copyMakeBorder(imgT, dy, edy, dx, edx, cv2.BORDER_CONSTANT, 0)
따라서 해당 코드를 사용한다면
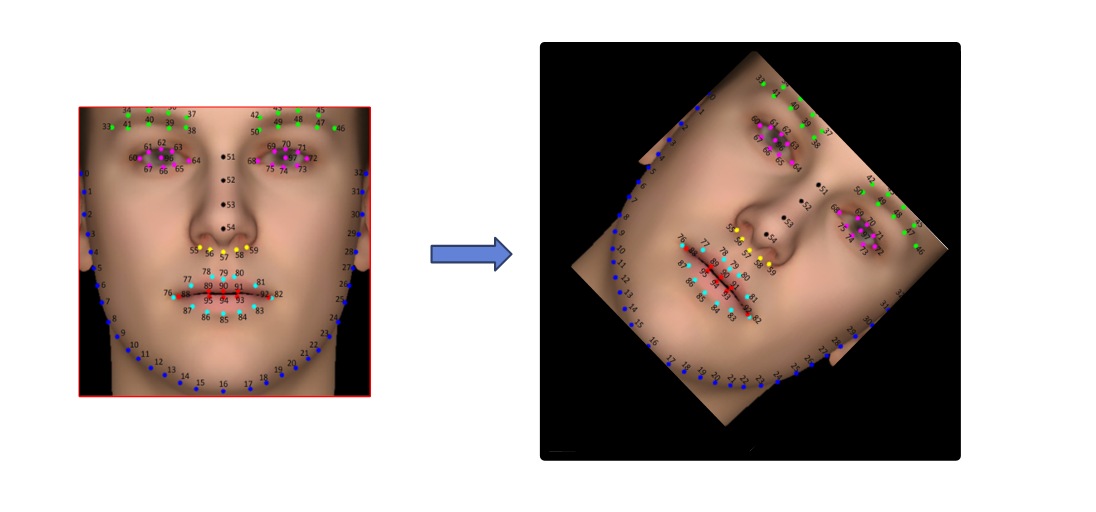
landmark 기준으로 만든 box의 크기는 커지는 안타까운 상황은 발생하지만 opencv가 이미지를 읽는데 생기는 오류는 사라지게 된다. 따라서 해당 코드를 반드시 작성해주는 것이 좋다.
landmark의 박스가 이미지 정중앙에 위치하여 문제가 발생하지 않다면 다행이지만 landmark의 위치가 이미지 위쪽에 있고 이를 회전하게 된다면 해당 landmark box의 모서리 좌표는 이미지의 경계선 밖에 위치할 가능성이 높아지므로 이런 문제도 같이 생각하여 처리해주는 것이 좋다.
Q. 근데 지금 이건 is_train 매개변수가 True가 아니여도 실행되는 코드인데, 왜 하는건가? test 데이터는 rotate나 crop 등 image augmentation을 하지 않는데도 왜 굳이 해야하는가?
A. 해당 함수는 이미지 경계 밖을 나가지 않는다면 정상적으로 실행되는 코드이다. 이미지 경계밖을 나갈 경우에만 조건문으로 실행되므로 아무런 문제가 없다. 다만, test data도 같이 처리해줘도 좋은 이유는 '안정성' 때문이다. 데이터셋 자체에 문제가 있을 수도 있고 약간의 offset이 발생했을 경우도 있으니 말이다.
imgT = cv2.resize(imgT, (self.img_size, self.img_size))
landmark = (self.landmark - xy) / boxsize # 일종의 normalize네

self.imgs.append(imgT)
self.landmarks.append(landmark)
img를 resize를 하는 이유는 PFLD 논문에서 test이든 train이든 img_size는 112로 설정했기 때문이다. 중요한 것은 이때 들어가는 이미지는 전체 이미지가 아니라 landmark 이미지라는 것이다.
landmark는 일종의 normalize인데, 앞에서 boxsize를 설정할때, 1.2배를 해주므로 landmark의 좌표값에도 이 부분의 offset이 필요하며 그 부분은 채워준다고 생각하면 된다.
if is_train:
    while len(self.imgs) < repeat:
        angle = np.random.randint(-30, 30)

        cx, cy = center
        # boxsize : (x, y)
        cx = cx + int(np.random.randint(-boxsize * 0.1, boxsize * 0.1))  # -10% +10% 사이의 값을 랜덤하게 선택
        # 데이터 증강을 위해서임 랜덤 오프셋을 주는것
        cy = cy + int(np.random.randint(-boxsize * 0.1, boxsize * 0.1))
        M, landmark = rotate(angle, (cx, cy), self.landmark)

        imgT = cv2.warpAffine(img, M, (int(img.shape[1] * 1.1), int(img.shape[0] * 1.1)))

        wh = np.ptp(landmark, axis=0).astype(np.int32) + 1
        size = np.random.randint(int(np.min(wh)), np.ceil(np.max(wh) * 1.25))
        xy = np.asarray((cx - size // 2, cy - size // 2), dtype=np.int32)
        landmark = (landmark - xy) / size

        if (landmark < 0).any() or (landmark > 1).any():
            continue
PFLD 논문에서도 말했듯이 Image Augmentation은 학습 이미지 증식으로 모델의 성능을 높이는 데에 의미가 있는데, 해당 코드는 하나의 이미지당 총 10개의 이미지 증강을 하게 된다. 즉 한장의 train data로 10개의 새로운 데이터를 만드는 과정이다.
angle 같은 경우에는 PFLD 논문에서 말했듯이 -30~+30도까지의 랜덤한 데이터가 들어가도록 설계했고
데이터 증강을 위해서 랜덤하게 바뀌는 중앙값을 설정하고 회전한다.
cx = cx + int(np.random.randint(-boxsize * 0.1, boxsize*0.1))
cy = cy + int(np.random.randint(-boxsize * 0.1, boxsize * 0.1))
이와 같이 설계한 이유는 단순히 angle만 부여하여 회전하는 것이 아니라 제한적인 내에서 중앙값을 바꾸어 좀더 다양한 회전 이미지로 증식하기 위함이다.
M, landmark = rotate(angle, (cx, cy), self.landmark)이 이후에 rotate 함수를 사용하는데, rotate 함수는 Affine Transformation에 대해서 알아야 한다.
https://angeloyeo.github.io/2024/06/28/Affine_Transformation.html
해당 블로그에서 자세히 설명했고 시각화에도 유용하여 첨부하였다.
좀더 추가를 하면 아핀변환은 2D 평면에서의 선형 변환으로 점, 직선, 평면의 형상을 유지하면서 위치와 크기를 변경할 수 있는 변환이다. 평행성, 직선성, 비율은 유지되지만, 크기와 각도는 변할 수 있다.
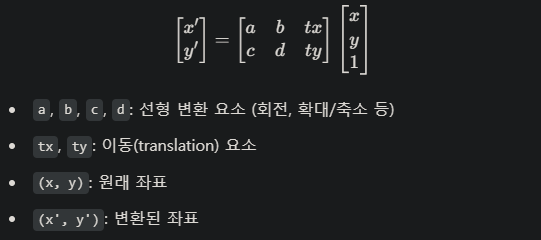
아핀 변환은 2D 평면에서 한점 (x, y)를 새로운 점 (x', y')으로 변환하는데 중점을 둔다. 아핀 변환에서 가능한 변환 종류는 이동, 회전, 확대 축소, 반전 등 여러가지 요소가 있는데, 우선 회전만 본다면 공식은 다음과 같다.
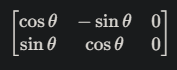
일반적인 회전변환 공식에 x, y 벡터를 뒤에 곱하면 회전 변환된 위치의 x', y'이 나오게 된다. 하지만 rotate 함수의 회전 변환 공식을 보면 조금 다른 것을 확인해 볼 수 있다.
def rotate(angle, center, landmark):
    # center shape : (1, 2) > (x, y)
    rad = angle * np.pi / 180.0
    alpha = np.cos(rad)
    beta = np.sin(rad)

    M = np.zeros((2, 3), dtype=np.float32)
    M[0, 0] = alpha
    M[0, 1] = beta
    M[0, 2] = (1 - alpha) * center[0] - beta * center[1]
    M[1, 0] = -beta
    M[1, 1] = alpha
    M[1, 2] = beta * center[0] + (1 - alpha) * center[1]

    # 아핀 변환
    landmark_ = np.asarray([(M[0, 0] * x + M[0, 1] * y + M[0, 2],
                             M[1, 0] * x + M[1, 1] * y + M[1, 2]) for (x, y) in landmark])

    return M, landmark_
일반적인 회전 변환 방식이 아니라 (1 - alpha) center[0] - beta center[1], beta center[0] + (1 - alpha) center[1] 과 같은 방식을 사용하며
landmark_ = np.asarray([(M[0, 0] x + M[0, 1] y + M[0, 2],M[1, 0] x + M[1, 1] y + M[1, 2]) for (x, y) in landmark]) 이런 과정을 거치는데, 이런 이유는 무엇일까?
위의 코드를 유심히 봐야하는데, 우리는 원점을 기준으로 회전하는 것이 아니다. 원점을 기준으로 일정 부분의 offset을 주고 이를 기준으로 회전한다. 중심점이 원점이 아니라 계속 바뀌게 되므로 이에 따라 공식이 조금 수정되는 것을 볼 수 있다.
(1 - alpha) center[0]은 중심점 x 좌표가 회전 후의 새로운 위치로 변환되기 위한 보정값이며 - beta center[1]는 y좌표의 회전에 따른 보정값이다.
이제 여기에 list comprehension으로 해당되는 회전 변환 행렬에 x, y를 각각 곱해주면 회전변환된 이미지를 가져올 수 있다.
wh = np.ptp(landmark, axis=0).astype(np.int32) + 1
size = np.random.randint(int(np.min(wh)), np.ceil(np.max(wh) * 1.25))
xy = np.asarray((cx - size // 2, cy - size // 2), dtype=np.int32)
landmark = (landmark - xy) / size
np.ptp는 axis를 기준으로 최대 최소 값의 차이를 출력하는 함수이다.
- axis = 0 -> 열을 기준으로 계산한다.
- axis = 1 -> 행을 기준으로 계산한다.
landmark의 shape는 (98, 2)이므로 (x, y)쌍으로 이뤄져있다. x의 최대 최소 차이 값, y의 최대 최소 차이 값이 출력되므로 width, height 값이라고 볼 수 있다.
+1을 하는 이유는 이미지의 첫 인덱스는 1부터 시작하기 때문이다. 우리의 list, numpy의 인덱스는 0부터 시작하기 때문에, +1을 해줘야 이미지의 픽셀값에 정확히 위치할 수 있게된다.
size = np.random.randint(int(np.min(wh)), np.ceil(np.max(wh) * 1.25))
xy = np.asarray((cx - size // 2, cy - size // 2), dtype=np.int32)
landmark = (landmark - xy) / size
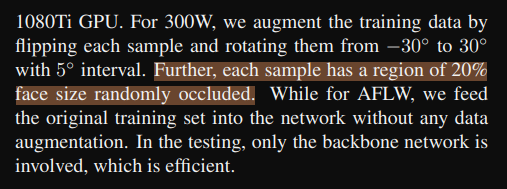
위 과정을 하는 이유는 학습에 들어갈 occlusion때문에 사용한다. PFLD 논문을 보면 20%확률로 랜덤하게 occlusion을 사용한다고 되어 있다.
dx = max(0, -x1)
dy = max(0, -y1)
x1 = max(0, x1)
y1 = max(0, y1)

edx = max(0, x2 - width)
edy = max(0, y2 - height)
x2 = min(width, x2)
y2 = min(height, y2)

imgT = imgT[y1:y2, x1, x2]
if (dx > 0 or dy > 0 or edx > 0 or edy > 0):
    imgT = cv2.copyMakeBorder(imgT, dy, edy, dx, edx, cv2.BORDER_CONSTANT, 0)

imgT = cv2.resize(imgT, (self.image_size, self.image_size))
해당 코드는 위에 설명한 내용과 동일하여 패스
if mirror is not None and np.random.choice((True, False)):
    landmark[:, 0] = 1 - landmark[:0]
    landmark = landmark[mirror_idx]
    imgT = cv2.flip(imgT, 1)
해당 코드는 좌우 반전을 하기 위한 코드이다. 좌우 반전이기 때문에 y축은 그대로 두고 x축만 바뀌면 되므로 1 - landmark[:0]을 한다.
def save_data(self, path, prefix):
    attributes = [self.pose, self.expression, self.illumination, self.make_up, self.occlusion, self.blur]
    attributes = np.asarray(attributes, dtype=np.int32)
    attributes_str = ''.join(list(map(str, attributes)))
    labels = []

    TRACKED_POINTS = [33, 38, 50, 46, 60, 64, 68, 72, 55, 59, 76, 82, 85, 16]
    for i, (img, landmark) in enumerate(zip(self.imgs, self.landmarks)):
        assert landmark.shape == (98, 2)
        save_path = os.path.join(path, prefix + '+' + str(i) + '.png')
        assert not os.path.exists(save_path), save_path
        cv2.imwrite(save_path, img)

        euler_angles_landmark = []
        for index in TRACKED_POINTS:
            euler_angles_landmark.append(landmark[index])
        euler_angles_landmark = np.asarray(euler_angles_landmark).reshape((-1, 28))
        pitch, yaw, roll = calculate_pitch_yaw_roll(euler_angles_landmark[0])
        euler_angles = np.asarray((pitch, yaw, roll), dtype=np.float32)
        euler_angles_str = ' '.join(list(map(str, euler_angles)))
        landmark_str = ' '.join(list(map(str, landmark.reshape(-1).tolist())))

        label = '{} {} {} {}\n'.format(save_path, landmark_str, attributes_str, euler_angles_str)

        labels.append(label)

    return label
attributes들은 위에서 설명한 총 6가지의 variation이다.
여기서 중요한 것은 TRACKED_POINTS이고 이것이 핵심이다. 우리는 euler angle를 구해야하는데, 모든 landmark를 사용하여 euler angle을 구하게 되면 연산량이 많아지고 preprocess 시간이 대폭 늘어나게 된다. 하지만 몇몇개의 landmark들로 pitch, yaw, roll을 구할 수 있다면 되는거 아닐까?
TRACKED_POINTS는 그 모든 것을 해결해준다.
- 33, 38 : 왼쪽과 오른쪽 눈의 중심
- 50, 46 : 눈의 외곽
- 60, 64, 68, 72: 코의 특징적인 점
- 55, 59, 76, 82, 85: 입 주변의 특징적인 점
- 16: 턱 끝(Chin tip)
총 14개의 landmark만 있다면 얼굴의 주요 특징을 표현할 수 있다는 점에 있다. 또한 해당 landmark 위치만 안다면 pose를 추정하기 쉬워지기 때문이다. 따라서 모든 landmark가 필요하지 않다.
euler_angles_landmark = np.asarray(euler_angles_landmark).reshape((-1, 28))euler_angles_landmark는 총 14개의 landmark 좌표이므로 (14, 2) 형태였을테니 reshape(-1, 28)가 가능하다.
이렇게 caculate_pitch_yaw_roll()으로 pitch, yaw, roll을 구하게 되는데, 그 과정의 코드는 아래와 같다.
def calculate_pitch_yaw_roll(landmarks_2D,
                             cam_w=256,
                             cam_h=256,
                             radians=False):
    """ Return the the pitch  yaw and roll angles associated with the input image.
    @param radians When True it returns the angle in radians, otherwise in degrees.
    """

    assert landmarks_2D is not None, 'landmarks_2D is None'

    # Estimated camera matrix values.
    c_x = cam_w / 2
    c_y = cam_h / 2
    f_x = c_x / np.tan(60 / 2 * np.pi / 180)
    f_y = f_x
    camera_matrix = np.float32([[f_x, 0.0, c_x], [0.0, f_y, c_y],
                                [0.0, 0.0, 1.0]])
    camera_distortion = np.float32([0.0, 0.0, 0.0, 0.0, 0.0])

    landmarks_3D = np.float32([
        [6.825897, 6.760612, 4.402142],  # LEFT_EYEBROW_LEFT,
        [1.330353, 7.122144, 6.903745],  # LEFT_EYEBROW_RIGHT,
        [-1.330353, 7.122144, 6.903745],  # RIGHT_EYEBROW_LEFT,
        [-6.825897, 6.760612, 4.402142],  # RIGHT_EYEBROW_RIGHT,
        [5.311432, 5.485328, 3.987654],  # LEFT_EYE_LEFT,
        [1.789930, 5.393625, 4.413414],  # LEFT_EYE_RIGHT,
        [-1.789930, 5.393625, 4.413414],  # RIGHT_EYE_LEFT,
        [-5.311432, 5.485328, 3.987654],  # RIGHT_EYE_RIGHT,
        [-2.005628, 1.409845, 6.165652],  # NOSE_LEFT,
        [-2.005628, 1.409845, 6.165652],  # NOSE_RIGHT,
        [2.774015, -2.080775, 5.048531],  # MOUTH_LEFT,
        [-2.774015, -2.080775, 5.048531],  # MOUTH_RIGHT,
        [0.000000, -3.116408, 6.097667],  # LOWER_LIP,
        [0.000000, -7.415691, 4.070434],  # CHIN
    ])
    landmarks_2D = np.asarray(landmarks_2D, dtype=np.float32).reshape(-1, 2)
    _, rvec, tvec = cv2.solvePnP(landmarks_3D, landmarks_2D, camera_matrix,
                                 camera_distortion)
    rmat, _ = cv2.Rodrigues(rvec)
    pose_mat = cv2.hconcat((rmat, tvec))
    _, _, _, _, _, _, euler_angles = cv2.decomposeProjectionMatrix(pose_mat)
    return map(lambda k: k[0],
               euler_angles)  # euler_angles contain (pitch, yaw, roll)
cv2.solvePnP(landmarks_3D,landmarks_2D, camera_matrix, camera_distortion)가 어찌보면 핵심인데, 주어진 3D 점들이 2D 이미지에서 어떻게 보일지를 계산하고 이를 기반으로 카메라의 위치와 방향을 추정하는 문제이다.
 landmarks_3D = np.float32([
        [6.825897, 6.760612, 4.402142],  # LEFT_EYEBROW_LEFT,
        [1.330353, 7.122144, 6.903745],  # LEFT_EYEBROW_RIGHT,
        [-1.330353, 7.122144, 6.903745],  # RIGHT_EYEBROW_LEFT,
        [-6.825897, 6.760612, 4.402142],  # RIGHT_EYEBROW_RIGHT,
        [5.311432, 5.485328, 3.987654],  # LEFT_EYE_LEFT,
        [1.789930, 5.393625, 4.413414],  # LEFT_EYE_RIGHT,
        [-1.789930, 5.393625, 4.413414],  # RIGHT_EYE_LEFT,
        [-5.311432, 5.485328, 3.987654],  # RIGHT_EYE_RIGHT,
        [-2.005628, 1.409845, 6.165652],  # NOSE_LEFT,
        [-2.005628, 1.409845, 6.165652],  # NOSE_RIGHT,
        [2.774015, -2.080775, 5.048531],  # MOUTH_LEFT,
        [-2.774015, -2.080775, 5.048531],  # MOUTH_RIGHT,
        [0.000000, -3.116408, 6.097667],  # LOWER_LIP,
        [0.000000, -7.415691, 4.070434],  # CHIN
    ])
해당 3D landmark는 3D Face Model에서 추출된 것인데, 정확하게 정의된 얼굴의 표준적인 3D 모델을 기반으로 얼굴의 중요한 랜드마크 포인트들에 대한 고정된 3D 좌표이다. 이 좌표들을 기반으로 2D landmark 점과 같이 pnp 계산을 수행함으로써 회전벡터와 이동벡터를 출력받을 수 있게 된다.
오일러 각도를 구하기 위해선 pnp 알고리즘을 통해 얻은 회전벡터를 회전 행렬로 변환해야하는데, 이는 로드리게스 회전 공식을 통해 구현이 가능하다.
rmat, _ = cv2.Rodrigues(rvec)opencv에서는 이를 구현해 뒀으며 rvec의 회전벡터를 넣으면 회전 행렬을 출력해준다.
여기에
pose_mat = cv2.hconcat((rmat, tvec))를 수행해서 horizontal로 결합하면
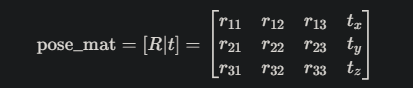
다음과 같은 형태로 3*4 shape를 갖게 되는 행렬을 출력할 수 있다.
이를 cv2.decomposeProjectionMatrix()를 사용해서 euler_angles를 출력하는 것이다.
- pitch : 위아래 고개 움직임
- yaw : 좌우 움직임
- roll : 기울임
preprocess의 핵심적인 내용들은 전부 설명한 것 같다. 이를 통해 학습할 데이터들을 만들고 모델의 성능을 높이는데에 집중하면 된다.
코드 전문
import os
import cv2
import shutil
import numpy as np

from utils import calculate_pitch_yaw_roll

def rotate(angle, center, landmark):
    # center shape : (1, 2) > (x, y)
    rad = angle * np.pi / 180.0
    alpha = np.cos(rad)
    beta = np.sin(rad)

    M = np.zeros((2, 3), dtype=np.float32)
    M[0, 0] = alpha
    M[0, 1] = beta
    M[0, 2] = (1 - alpha) * center[0] - beta * center[1]
    M[1, 0] = -beta
    M[1, 1] = alpha
    M[1, 2] = beta * center[0] + (1 - alpha) * center[1]

    # 아핀 변환
    landmark_ = np.asarray([(M[0, 0] * x + M[0, 1] * y + M[0, 2],
                             M[1, 0] * x + M[1, 1] * y + M[1, 2]) for (x, y) in landmark])


    return M, landmark_

class ImageDate():
    def __init__(self, line, imgdir, image_size=112):
        self.img_size = image_size
        line = line.strip().split()
        assert (len(line) == 207)
        self.list = line
        self.line = line
        self.landmark = np.asarray(list(map(float, line[:196])), dtype=np.float32).reshape(-1, 2)
        self.bbox = np.asarray(list(map(int, line[196:200])), dtype=np.int32)
        flag = list(map(int, line[200:206]))
        flag = list(map(bool, flag))
        self.pose = flag[0]
        self.expression = flag[1]
        self.illumination = flag[2]
        self.make_up = flag[3]
        self.occlusion = flag[4]
        self.blur = flag[5]
        self.img_path = os.path.join(imgdir, line[206])
        self.img = None

        self.imgs = []
        self.landmarks = []
        self.boxes = []

    def load_data(self, is_train, repeat, mirror=None):
        if mirror is not None:
            with open(mirror, 'r') as f:
                lines = f.readlines()
                assert(len(lines) == 1)
                mirror_idx = lines[0].strip().split(',')
                mirror_idx = list(map(int, mirror_idx))

        xminymin = np.min(self.landmark, axis=0).astype(np.int32)  # self.landmark shape : (98, 2)
        xmaxymax = np.max(self.landmark, axis=0).astype(np.int32)  # 오른쪽 모서리
        wh = xmaxymax - xminymin  # width, height
        center = ((xminymin + xmaxymax) / 2).astype(np.int32) # (x, y)
        img = cv2.imread(self.img_path)
        boxsize = int(np.max(wh) * 1.2) # 얼굴이 짤리는 것을 방지용
        xy = center - boxsize // 2
        x1, y1 = xy
        x2, y2 = xy + boxsize
        height, width, _ = img.shape

        dx = max(0, -x1)
        dy = max(0, -y1)
        x1 = max(0, x1)
        y1 = max(0, y1)

        edx = max(0, x2 - width)
        edy = max(0, y2 - height)
        x2 = min(width, x2)
        y2 = min(height, y2)

        imgT = img[y1:y2, x1:x2]
        if (dx > 0 or dy > 0 or edx > 0 or edy > 0):
            imgT = cv2.copyMakeBorder(imgT, dy, edy, dx, edx, cv2.BORDER_CONSTANT, 0)
        if imgT.shape[0] == 0 or imgT.shape[1] == 0:
            imgTT = cv2.cvtColor(img, cv2.COLOR_GRAY2BGR)
            for x, y, in (self.landmark + 0.5).astype(np.int32):
                cv2.circle(imgTT, (x, y), 1, (0, 0, 255))
            cv2.imshow('0', imgTT)
            if cv2.waitKey(0) == 27:
                exit()

        imgT = cv2.resize(imgT, (self.img_size, self.img_size))
        landmark = (self.landmark - xy) / boxsize # 일종의 normalize네
        # (98, 2) 모양을 1.2배 늘린 커스텀 박스의 최상단 x,y 좌표에 -를 하는거임.
        # 이미지나 landmark 모두 custom 박스내에서만 학습을 할테니 그외는 학습에 이용되지 않음.
        #
        self.imgs.append(imgT)
        self.landmarks.append(landmark)

        if is_train:
            while len(self.imgs) < repeat:
                angle = np.random.randint(-30, 30)

                cx, cy = center
                # boxsize : (x, y)
                cx = cx + int(np.random.randint(-boxsize * 0.1, boxsize*0.1)) # -10% +10% 사이의 값을 랜덤하게 선택
                                                                              # 데이터 증강을 위해서임 랜덤 오프셋을 주는것
                cy = cy + int(np.random.randint(-boxsize * 0.1, boxsize * 0.1))
                M, landmark = rotate(angle, (cx, cy), self.landmark)

                imgT = cv2.warpAffine(img, M, (int(img.shape[1] * 1.1), int(img.shape[0] * 1.1)))

                wh = np.ptp(landmark, axis=0).astype(np.int32) + 1
                size = np.random.randint(int(np.min(wh)), np.ceil(np.max(wh) * 1.25))
                xy = np.asarray((cx - size // 2, cy - size // 2), dtype=np.int32)
                landmark = (landmark - xy) / size

                if (landmark < 0).any() or (landmark > 1).any():
                    continue

                x1, y2 = xy
                x2, y2 = xy + size
                height, width, _ = imgT.shape

                dx = max(0, -x1)
                dy = max(0, -y1)
                x1 = max(0, x1)
                y1 = max(0, y1)

                edx = max(0, x2 - width)
                edy = max(0, y2 - height)
                x2 = min(width, x2)
                y2 = min(height, y2)

                imgT = imgT[y1:y2, x1, x2]
                if (dx > 0 or dy > 0 or edx > 0 or edy > 0):
                    imgT = cv2.copyMakeBorder(imgT, dy, edy, dx, edx, cv2.BORDER_CONSTANT, 0)

                imgT = cv2.resize(imgT, (self.image_size, self.image_size))

                if mirror is not None and np.random.choice((True, False)):
                    landmark[:, 0] = 1 - landmark[:0]
                    landmark = landmark[mirror_idx]
                    imgT = cv2.flip(imgT, 1)

                self.imgs.append(imgT)
                self.landmarks.append(landmark)

    def save_data(self, path, prefix):
        attributes = [self.pose, self.expression, self.illumination, self.make_up, self.occlusion, self.blur]
        attributes = np.asarray(attributes, dtype=np.int32)
        attributes_str = ''.join(list(map(str, attributes)))
        labels = []

        TRACKED_POINTS = [33, 38, 50, 46, 60, 64, 68, 72, 55, 59, 76, 82, 85, 16]
        for i, (img, landmark) in enumerate(zip(self.imgs, self.landmarks)):
            assert landmark.shape == (98, 2)
            save_path = os.path.join(path, prefix + '+' + str(i) + '.png')
            assert not os.path.exists(save_path), save_path
            cv2.imwrite(save_path, img)

            euler_angles_landmark = []
            for index in TRACKED_POINTS:
                euler_angles_landmark.append(landmark[index])
            euler_angles_landmark = np.asarray(euler_angles_landmark).reshape((-1, 28))
            pitch, yaw, roll = calculate_pitch_yaw_roll(euler_angles_landmark[0])
            euler_angles = np.asarray((pitch, yaw, roll), dtype=np.float32)
            euler_angles_str = ' '.join(list(map(str, euler_angles)))
            landmark_str = ' '.join(list(map(str, landmark.reshape(-1).tolist())))

            label = '{} {} {} {}\n'.format(save_path, landmark_str, attributes_str, euler_angles_str)

            labels.append(label)

        return label


def get_dataset_list(imgdir, outdir, landmarkdir, is_train):
    with open(landmarkdir, 'r') as f:
        lines = f.readlines()

    # for i in lines:
    #     a = i.strip().split()
    #     a = np.asarray(list(map(float, a[:196])), dtype=np.float32).reshape(-1, 2)
    #     print(a.shape)
    #     print(a[0])
    #     break
        labels = []
        save_img = os.path.join(outdir, 'img')
        if not os.path.exists(save_img):
            os.mkdir(save_img)

        for idx, line in enumerate(lines):
            img = ImageDate(line, imgdir)
            img_name = img.img_path
            img.load_data(is_train, 10, Mirror_file)
            _, filename = os.path.split(img_name)
            filename, _ = os.path.splitext(filename)
            label_txt = img.save_data(save_img, str(idx) + '_' + filename)
            labels.append(label_txt)

            if ((idx + 1) % 100) == 0:
                print('file : {}/{}'.format(idx + 1, len(lines)))

    with open(os.path.join(outdir, 'list.txt'), 'w') as f:
        for label in labels:
            f.writelines(label)


if __name__ == '__main__':
    root_dir = os.path.dirname(os.path.realpath(__file__))
    images_dir = 'D:/DeepLearning/WFLW/WFLW_images'
    Mirror_file = "Mirror98.txt"

    landmark_dir = ['./WFLW_annotations/list_98pt_rect_attr_train_test/list_98pt_rect_attr_test.txt',
                    './WFLW_annotations/list_98pt_rect_attr_train_test/list_98pt_rect_attr_train.txt']

    outdir = ['test_data', 'train_data']

    for landmark_dir, outdir in zip(landmark_dir, outdir):
        outdir = os.path.join(root_dir, outdir)
        # print(landmark_dir)
        if os.path.exists(outdir):
            shutil.rmtree(outdir)
        os.mkdir(outdir)

        if 'list_98pt_rect_attr_test.txt' in landmark_dir:
            is_train = False
        else:
            is_train = True

        imgs = get_dataset_list(images_dir, outdir, landmark_dir, is_train)


    print('end')