[완료된 포스트입니다.]
지난 포스트에 이어 jwt의 인가 부분에 관해 구현하겠습니다
며칠동안 구현 원리를 이해하려고 노력했고 나름 정리했습니다!
1편 인증은 https://velog.io/@joonoo3/Spring-jwt를-통한-인증-인가-원리-구현-Part-1.-인증 여기있어요
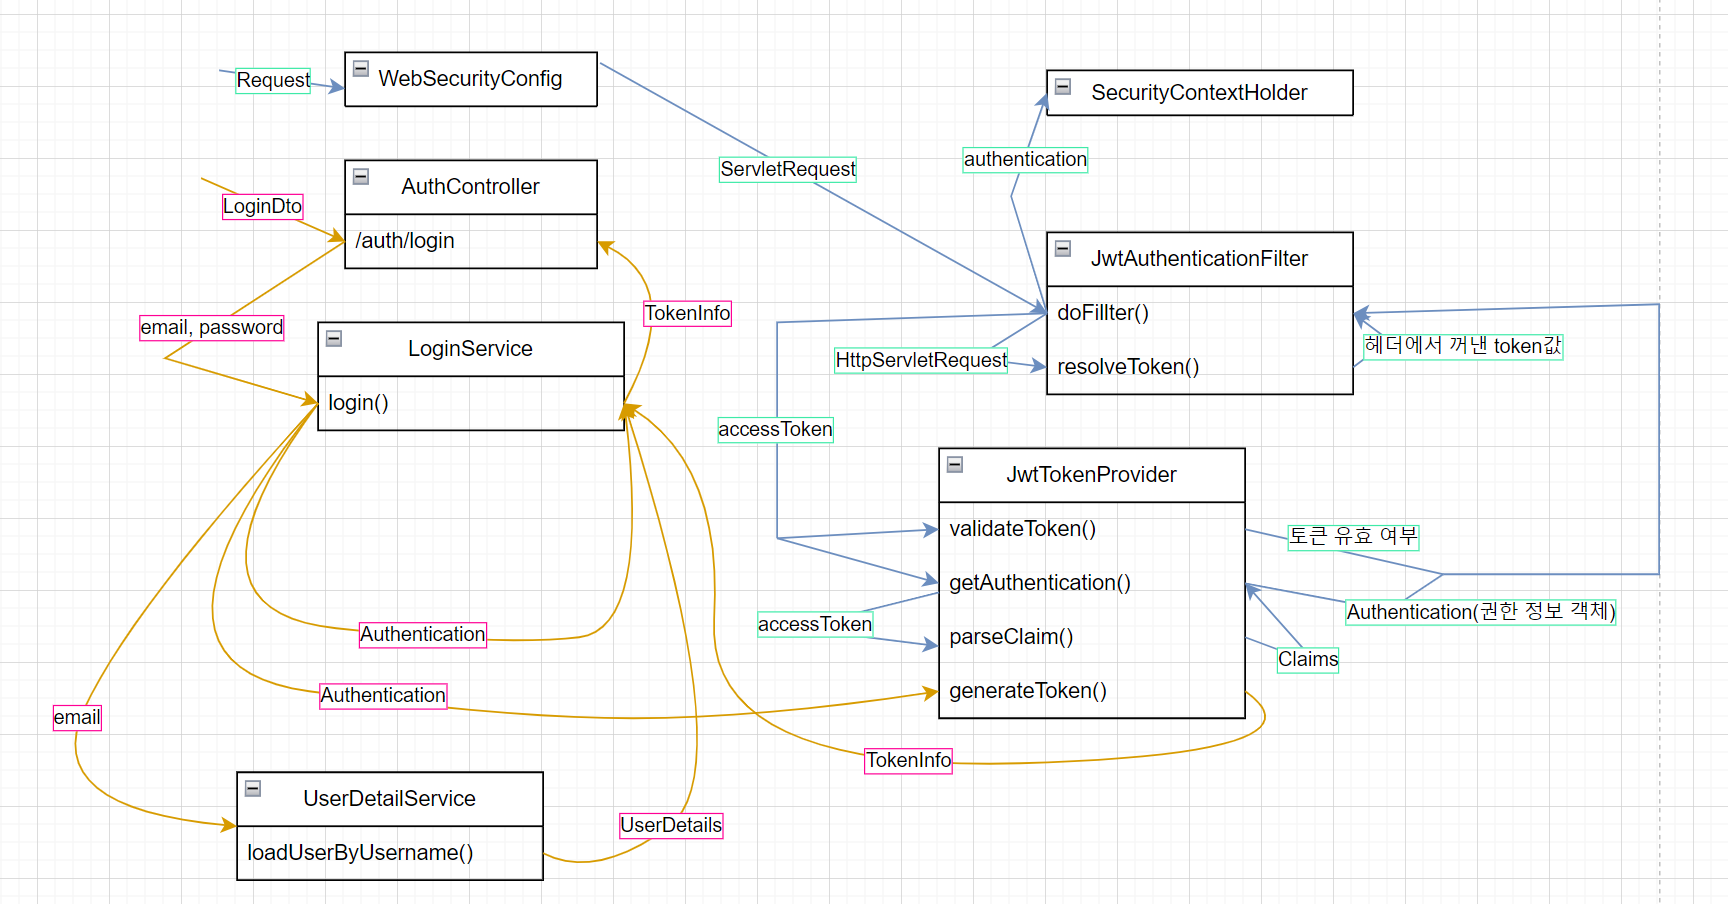
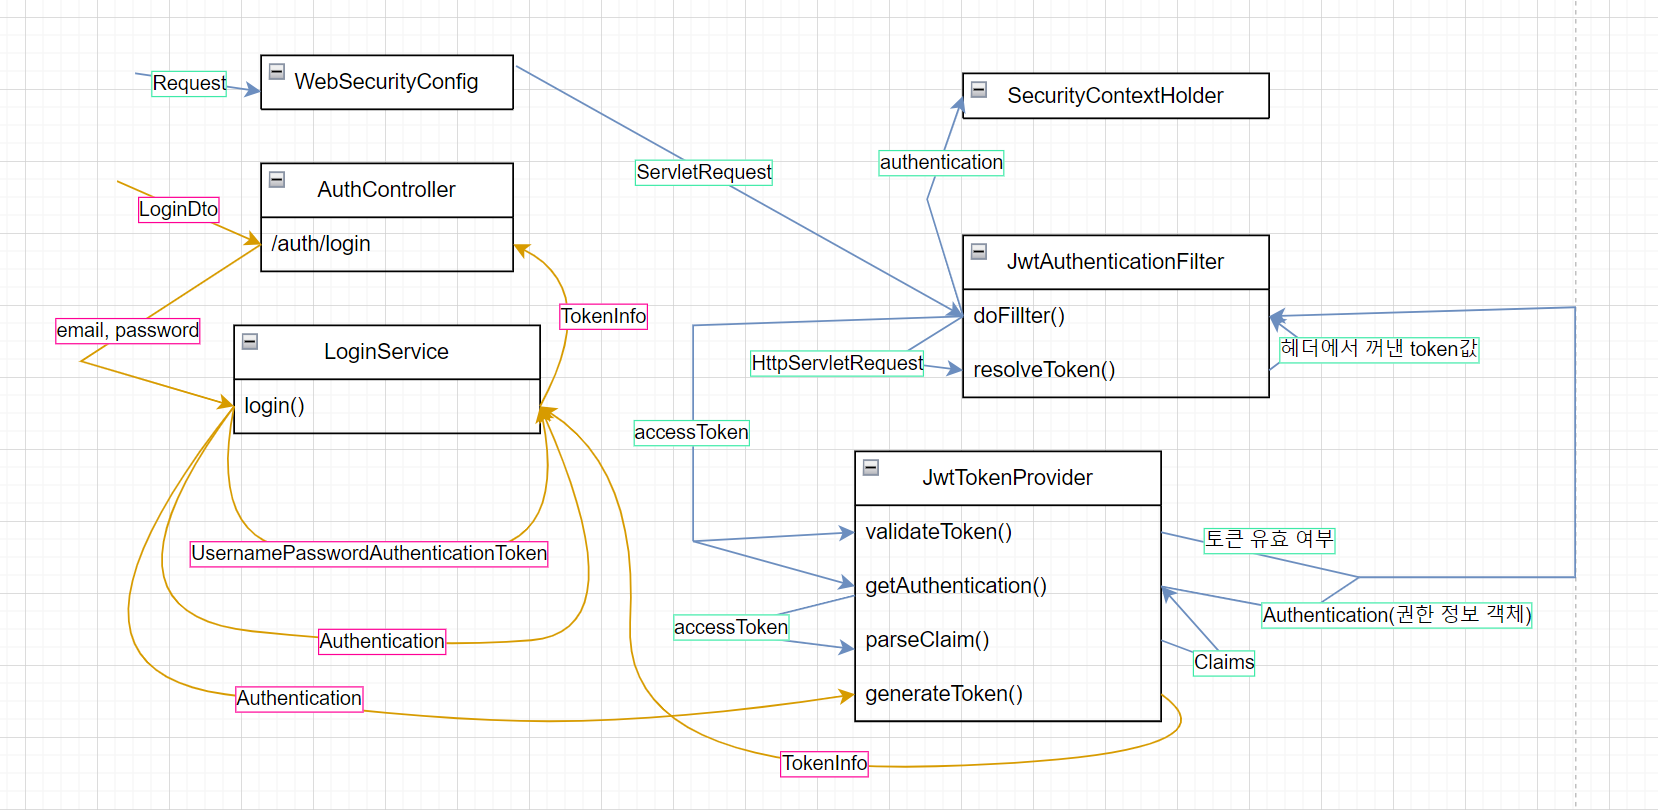
지난번에 올린 다이어그램입니다! 오늘은 파란색 선을 따라 구현할거에요!
인증
WebSecurityConfig.java
@EnableWebSecurity
@Configuration
@AllArgsConstructor
public class WebSecurityConfig {

    private final JwtTokenProvider jwtTokenProvider;

    //세션 관련
    @Bean
    public static ServletListenerRegistrationBean httpSessionEventPublisher() {
        return new ServletListenerRegistrationBean(new HttpSessionEventPublisher());
    }

    @Bean
    public SecurityFilterChain filterChain(HttpSecurity http) throws Exception {

    	//csrf, cors 비활성화
        http.csrf().disable();
        http.cors();

        //세션방식 비활성화
        http.sessionManagement().sessionCreationPolicy(SessionCreationPolicy.STATELESS);

        // "/auth/**"이외 모든 요청 인가 필수
        http.authorizeRequests(request -> request.
                        dispatcherTypeMatchers(DispatcherType.FORWARD).permitAll().
                        requestMatchers(
                                new AntPathRequestMatcher("/auth/**")).permitAll().
                        anyRequest().authenticated())

                //http 기본동작, 로그인 방식 비활성화
                .httpBasic().disable()
                .formLogin().disable()

                //모든 필터 전 JwtAuthenticationFilter 필터 먼저 실행
                //후 UsernamePasswordAuthenticationFilter 필터 실행
                .addFilterBefore(new JwtAuthenticationFilter(jwtTokenProvider)
                , UsernamePasswordAuthenticationFilter.class);
        return http.build();
    }

    ...
}
기본적인 security 순서를 설정해줍니다
csrf, cors는 기본적인 실습이므로 해제해주고
세션이나 폼로그인 방식은 jwt를 쓸 예정이므로 비활성화 시켜줍니다.
JwtAuthenticationFilter.java
@RequiredArgsConstructor
public class JwtAuthenticationFilter extends GenericFilterBean {

    private final JwtTokenProvider jwtTokenProvider;

	//필터 동작 구성
    @Override
    public void doFilter(ServletRequest request, ServletResponse response, FilterChain chain) throws IOException, ServletException {

		//resolveToken에 req를 인자로 넘겨주어 헤더의 토큰 값 추출
        String token = resolveToken((HttpServletRequest) request);

		//토큰 존재 & 유효할 떄
        if(token != null && jwtTokenProvider.validateToken(token)){

            //Authentication 객체 추출
            Authentication authentication = jwtTokenProvider.getAuthentication(token);

            //추출된 Authentication 객체 SecurityContextHolder에 저장
 			SecurityContextHolder.getContext().setAuthentication(authentication);
        }

        //이후 필터 진행
        chain.doFilter(request, response);

    }

    //header에서 토큰 정보 추출
    private String resolveToken(HttpServletRequest request) {
        String bearerToken = request.getHeader("Authorization");
        if(StringUtils.hasText(bearerToken) && bearerToken.startsWith("Bearer")){
            return bearerToken.substring(7);
        }
        return null;
    }

}
JwtTokenProvider.java
@Component
public class JwtTokenProvider {

    private final Key key;

    //application.yml에 설정한 secretKey를 주입받음
    public JwtTokenProvider(@Value("${jwt.secret}") String secretKey) {
        byte[] keyBytes = Decoders.BASE64.decode(secretKey);
        this.key = Keys.hmacShaKeyFor(keyBytes);
    }

   ...

    public boolean validateToken(String accessToken) {
        try {

		// Jwt 객체를 주어진 accessToken을 통해 빌드하며 에러가 있으면 예외처리
		Jwts.parserBuilder().setSigningKey(key).build().parseClaimsJws(accessToken);
            return true;
        } catch (io.jsonwebtoken.security.SignatureException | MalformedJwtException e) {
            logger.info("잘못된 JWT 서명입니다.", e);
        } catch (ExpiredJwtException e) {
            logger.info("만료된 JWT 토큰입니다.", e);
        } catch (UnsupportedJwtException e) {
            logger.info("지원되지 않는 JWT 토큰입니다.", e);
        } catch (IllegalArgumentException e) {
            logger.info("JWT 토큰이 잘못되었습니다.", e);
        }
        return false;
    }

 	//JWT 토큰에서 인증 정보 조회
    public Authentication getAuthentication(String accessToken) {

        //복호화
        Claims claims = parseClaim(accessToken);

        if (claims.get("auth") == null)
        	throw new RuntimeException("권한 정보가 없는 토큰입니다.");

        //권한 정보 얻어오기
        Collection<? extends GrantedAuthority> authorities = Arrays
        	.stream(claims.get("auth").toString().split(","))
            	.map(SimpleGrantedAuthority::new)
                .collect(Collectors.toList());

        //유저 객체 생성
        UserDetails principal = new User(claims.getSubject(), "", authorities);

		//생성된 객체 이용해 token생성
        return new UsernamePasswordAuthenticationToken(principal, "", authorities);
    }

    //복호화한 클레임 반환
    private Claims parseClaim(String accessToken) {
        try {
            return Jwts.parserBuilder().setSigningKey(key).build().parseClaimsJws(accessToken).getBody();
        } catch (ExpiredJwtException e) {
            return e.getClaims();
        }
    }
}
validateToken에서는 전달받은 token의 유효성을 검사합니다.
만약 token이 잘못된 형식이거나 잘못된 값이라면 예외를 반환합니다.
UsernamePasswordAuthenticationToken는 Authentication의 구현체입니다!
정리
사진을 다시 보도록 할게요
1. 미리 정해진 api이외 모든 요청은 WebSecurityConfig에 의해 JwtAuthenticationFilter로 들어갑니다.
2. JwtAuthenticationFilter의 doFilter에서 resolveToken으로 token을 추출하고 JwtTokenProvider의 validateToken, getAuthentication을 통해 Authentication 객체를 추출합니다.
2-1 . 추출 과정에서 JwtTokenProvider는 parseClaim을 통해 클레임을 전달합니다
3. 추출된 Authentication 객체는 SecurityContextHolder에 저장되고 이후 필터가 수행됩니다.
TEST - spring
테스트는 저번글에서 accesstoken을 발급받는 test에 이어서 진행하겠습니다!
@SpringBootTest
@Transactional
@AutoConfigureMockMvc
class PostControllerTest {

    private String accessToken;

    @Autowired
    private MockMvc mockMvc;

    @Autowired
    private WebApplicationContext ctx;

    @Autowired
    private JwtTokenProvider jwtTokenProvider;

    @BeforeEach
    public void setUp() {
        //MockMvc 설정
        this.mockMvc = MockMvcBuilders.webAppContextSetup(ctx)
                .addFilters(new CharacterEncodingFilter("UTF-8", true))  // 필터 추가
                //.addFilters(new JwtAuthenticationFilter(jwtTokenProvider))
                //.addFilters(new UsernamePasswordAuthenticationFilter())
                .apply(springSecurity())
                .alwaysDo(print())
                .build();

    }

    @DisplayName("토큰발급")
    @BeforeEach
    void login() throws Exception {

        //given
        LoginDto loginDto = LoginDto.builder()
                .email("TestEmail@email.com")
                .password("testpassword")
                .build();

        String reqJSON = new Gson().toJson(loginDto);

        //when

        MvcResult mvcResult = mockMvc.perform(
                post("/auth/login")
                        .contentType("application/json")
                        .content(reqJSON)
        ).andReturn();

        //Gson으로 이쁘게 json 출력
        Gson gson = new GsonBuilder().setPrettyPrinting().create();
        accessToken = gson.fromJson(mvcResult.getResponse().getContentAsString(), TokenInfo.class).getAccessToken();

        //then
    }

    @DisplayName("토큰 값 여부에 따른 작동 테스트")
    @Test
    void getEntity() throws Exception {

        //given

        //when

        MvcResult mvcResult = mockMvc.perform(
                        get("/post/list")
                                .contentType("application/json")
                               //.header("Authorization", "Bearer " + accessToken)
                )
                .andReturn();

        int resCode = mvcResult.getResponse().getStatus();

        //then

        //인증 통과됐다면 assert 통과
        Assertions.assertEquals(200, resCode);

    }
}
1. 저번 테스트에서 활용한 코드를 통해 accessToken값을 저장합니다.
2. 토큰 여부에 따라 api가 작동하지는 테스트 합니다.
(filter에 관해 trouble이 발생하였는데 해결 후기는 에 작성해놨습니다!)
(WebApplicationContext에 관해 궁금하다면 )
먼저 테스트할 부분을 주석처리하고 요청을 보내봅니다
 MvcResult mvcResult = mockMvc.perform(
                        get("/post/list")
                                .contentType("application/json")
                               //.header("Authorization", "Bearer "+accessToken)
                                )
                .andReturn();
먼저 테스트할 부분을 주석처리하고 요청을 보내봅니다
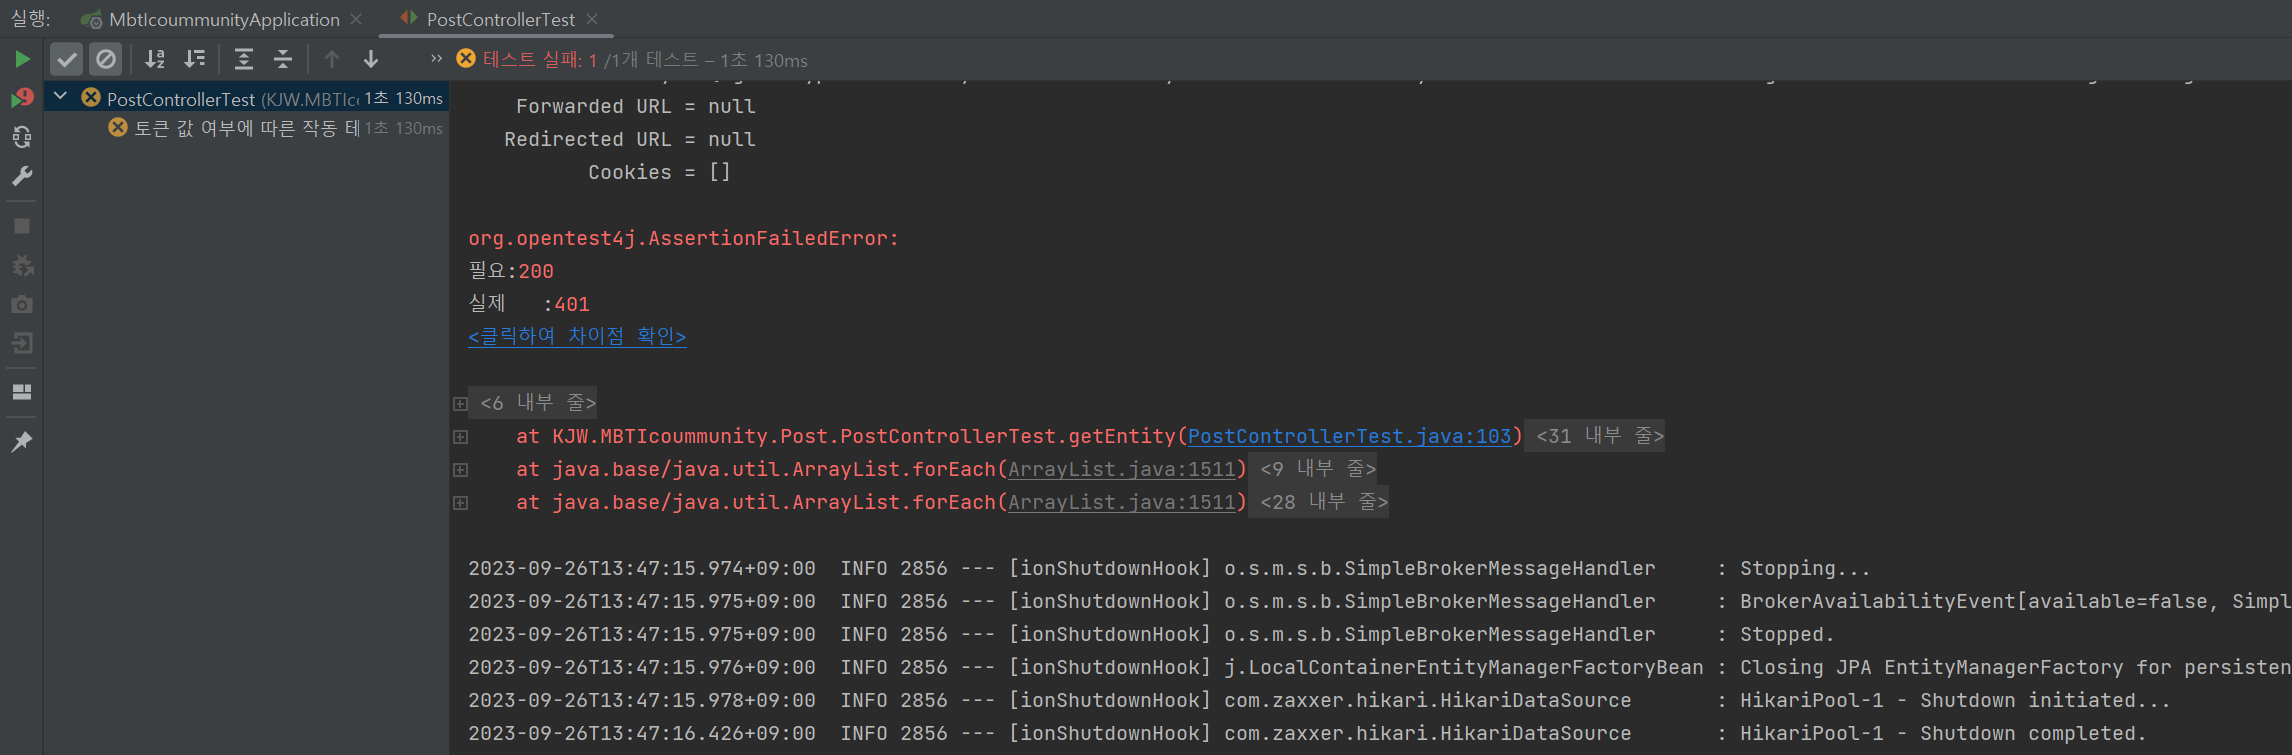
에러 코드가 401로 온 것을 볼 수 있습니다
(커스텀을 안하셨다면 401말고 403으로 오거나 에러를 뿜어낼 수 있습니다! filter에서 exception을 처리하는 부분은 여기에 정리해놨습니다!)
주석을 해제하고 보내볼게요!
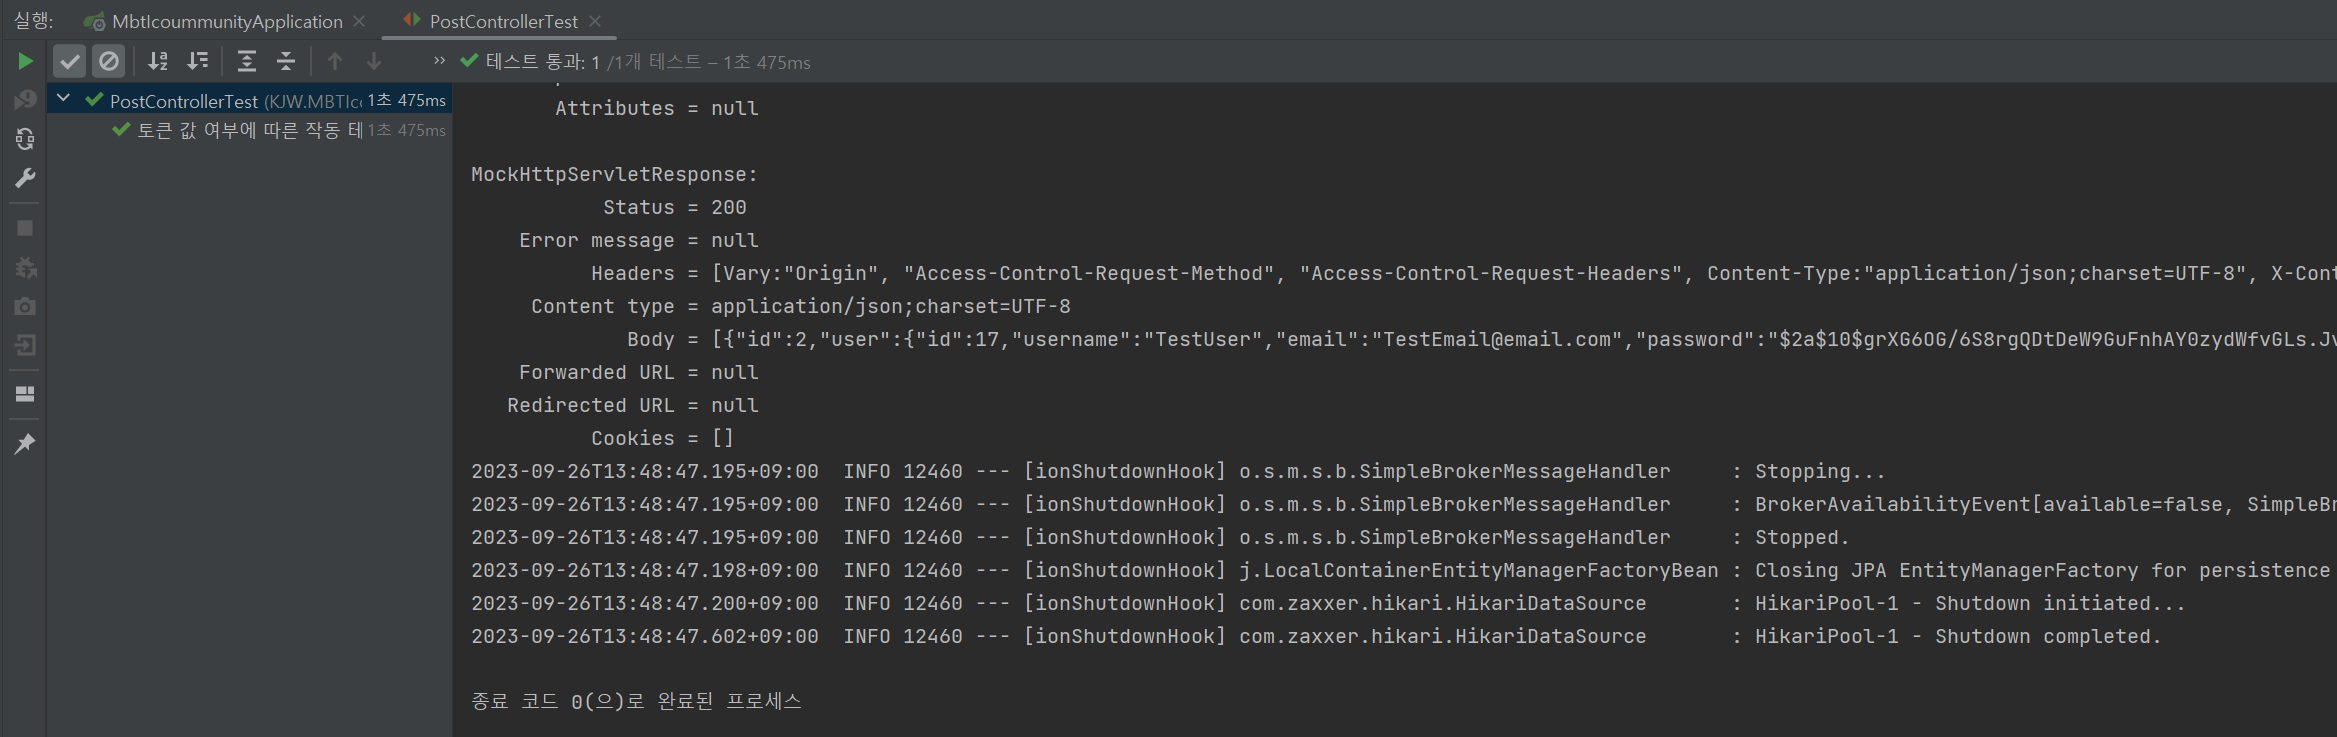
200으로 body까지 잘 도착한 것을 볼 수 있습니다!
통과 완료!
TEST - postman
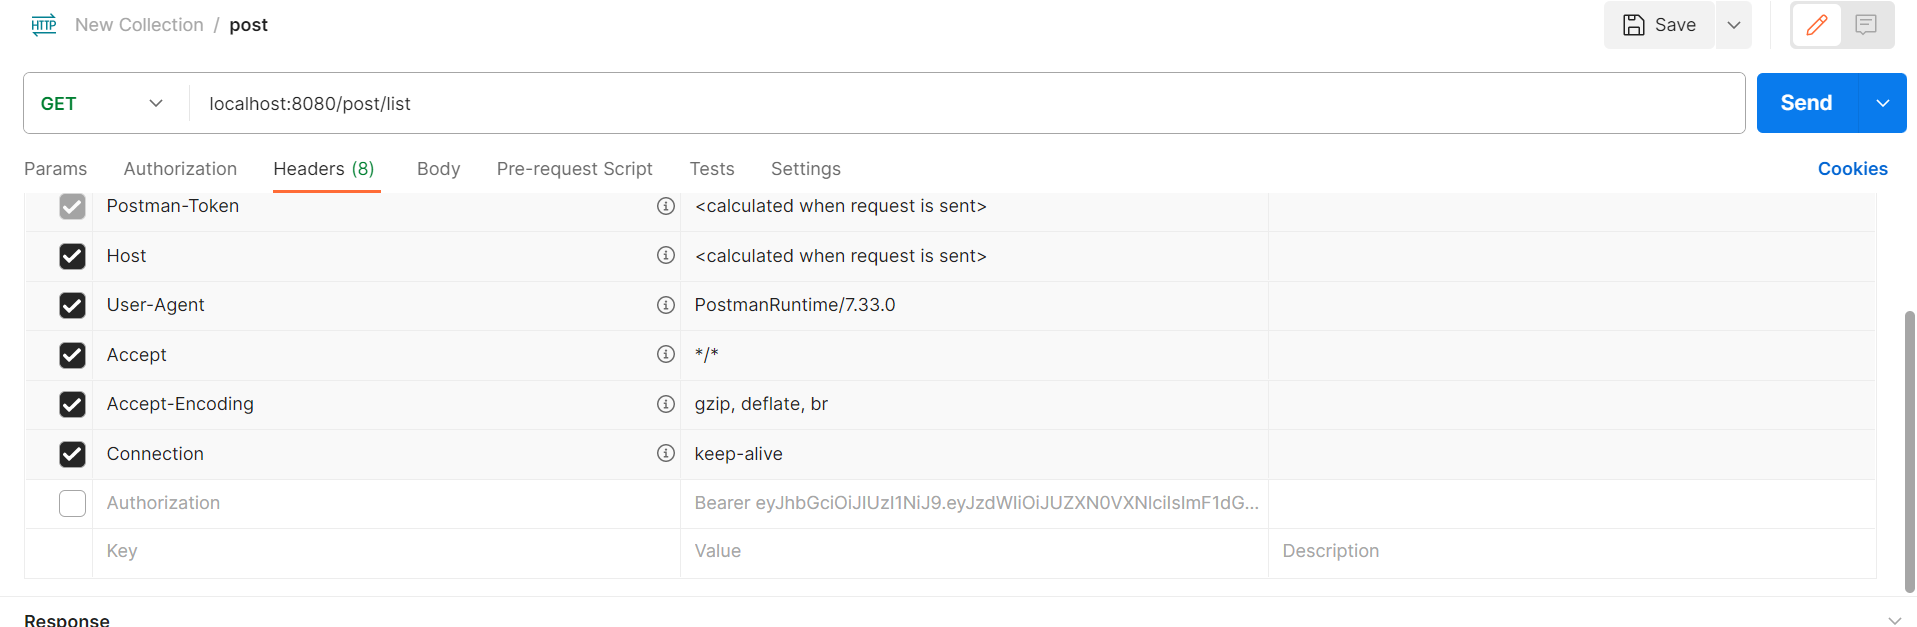
먼저 token을 포함시키지 않고 보내보겠습니다!
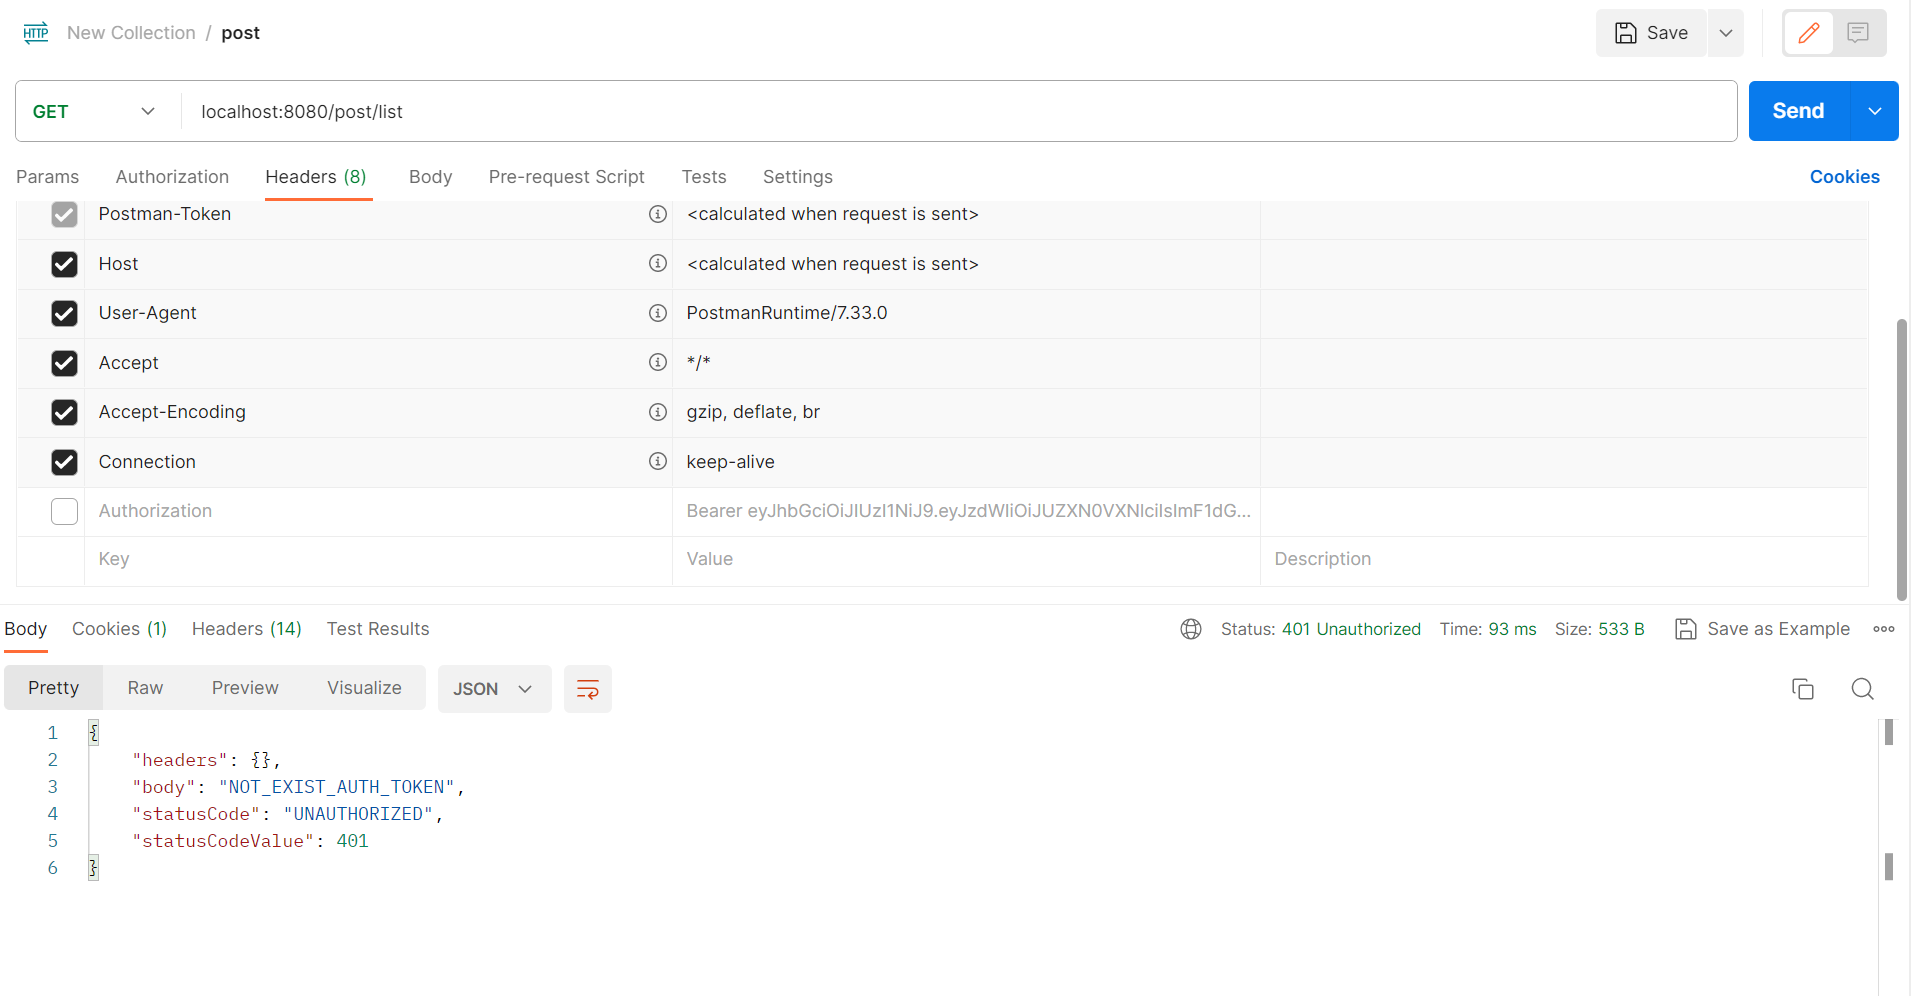
역시 에러 메세지를 반환합니다.
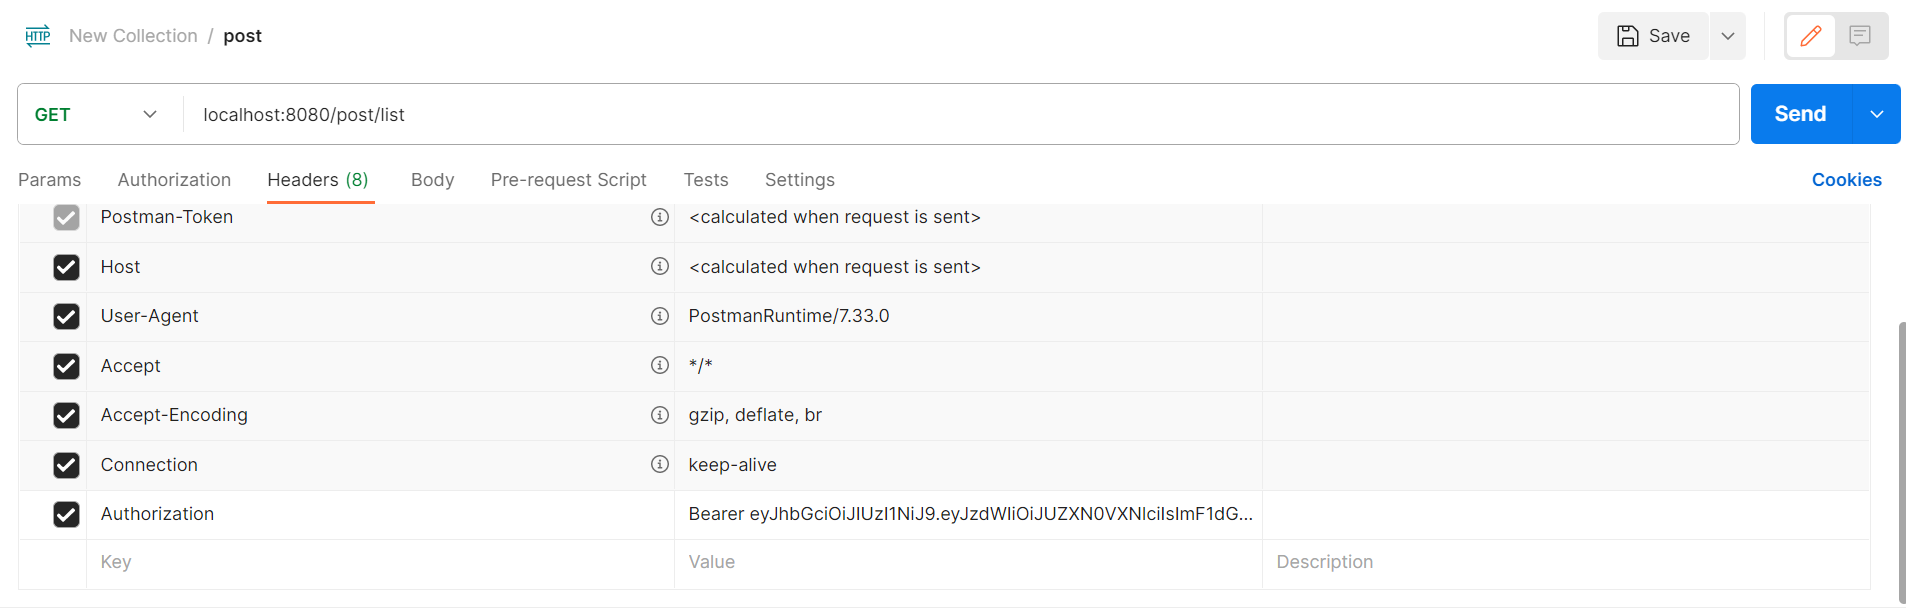
다음은 헤더에 token을 포함시켜 보내볼게요!
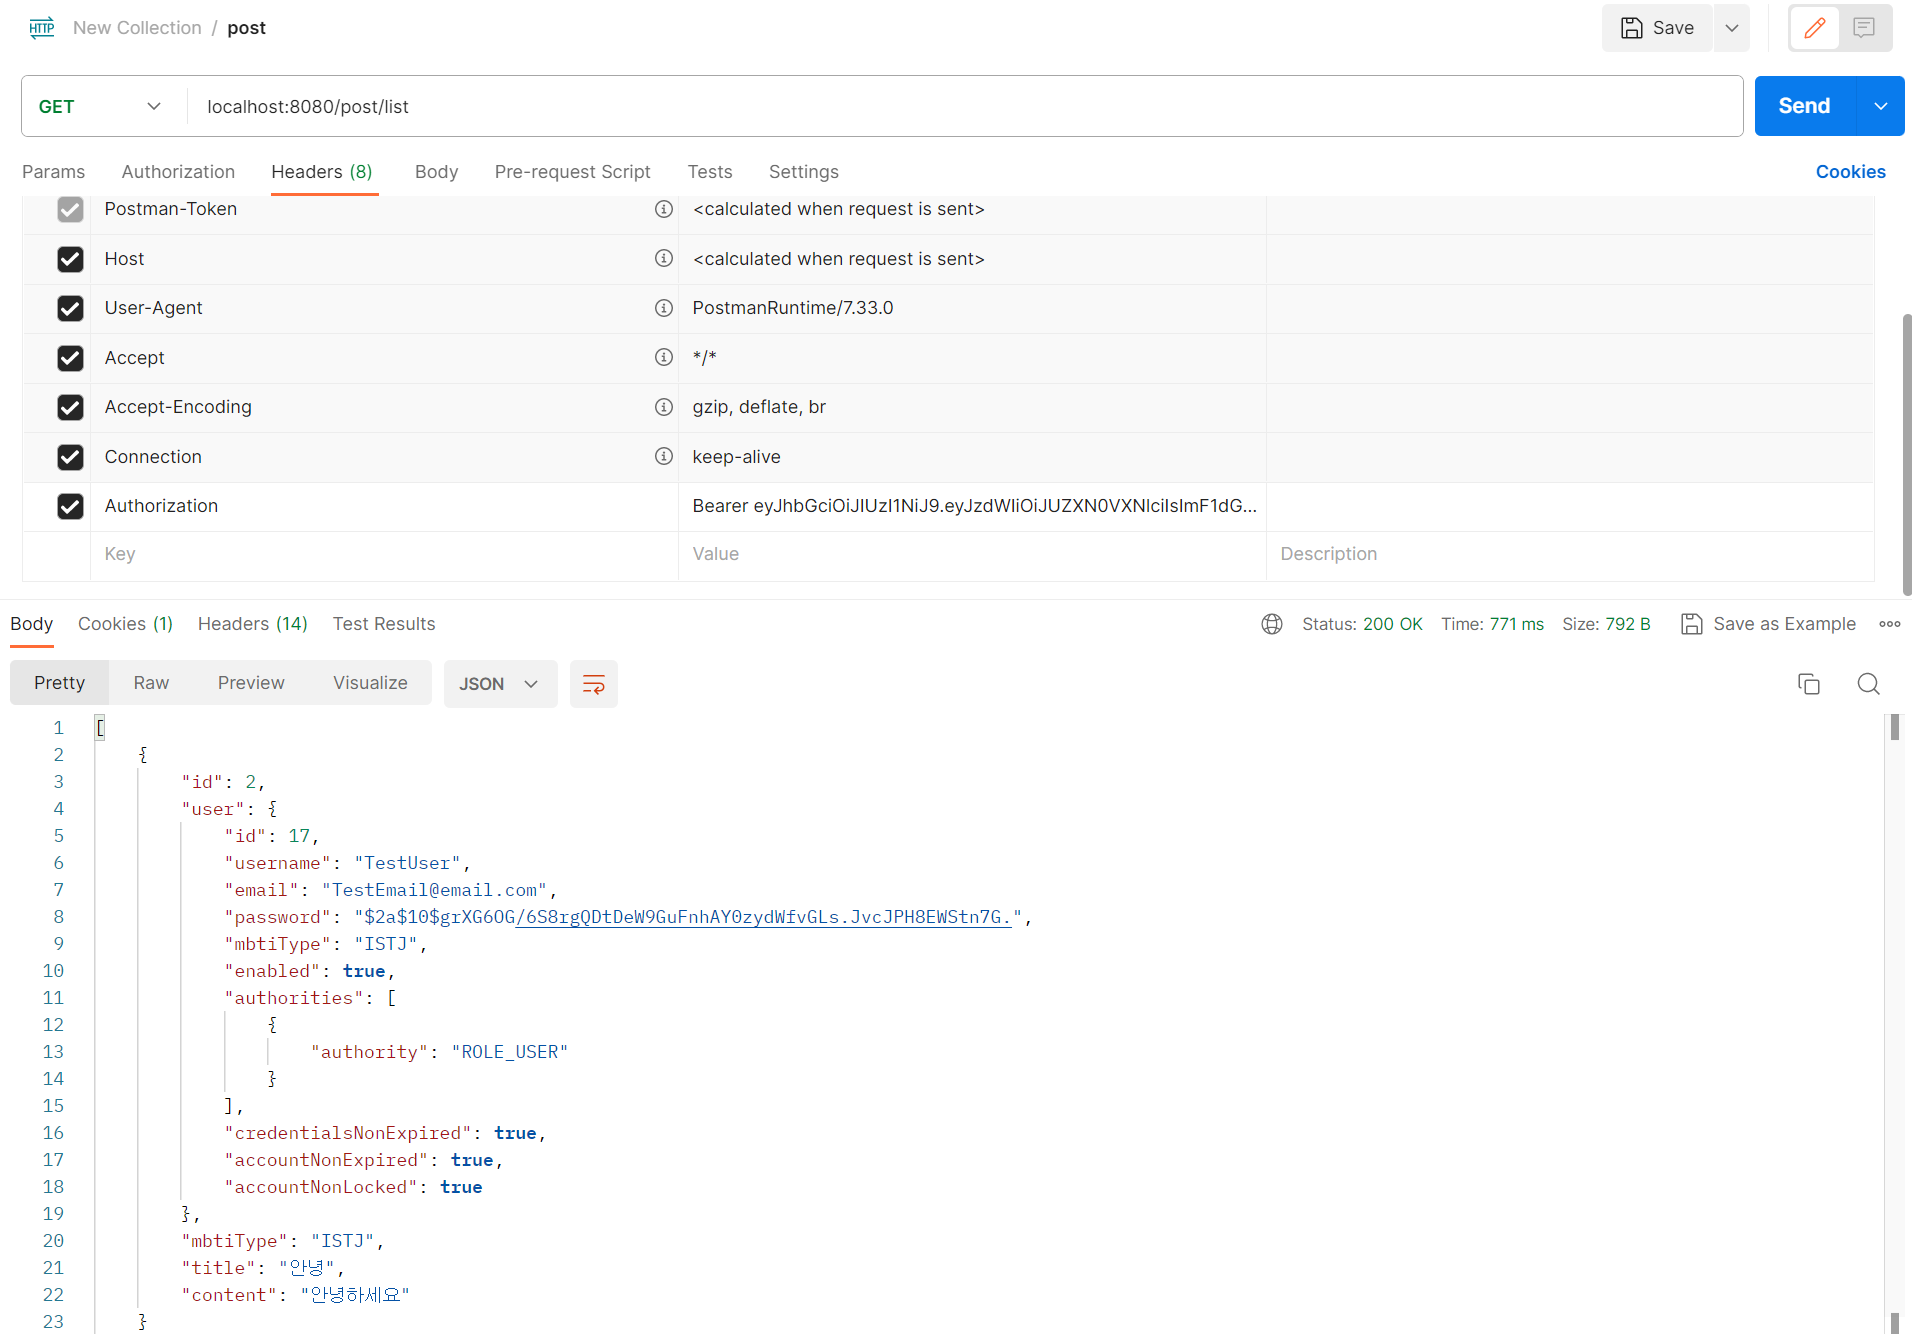
통과 완료!
jwt 기초는 마무리하고 시간이 될 때 refresh token에 관해 정리해보도록 하겠습니다!

코딩은재밌어