음 간만에 글을 쓰게 됐는데,
이번엔 안드로이드 기기에서 웹서버(백엔드) 쪽으로 JSON 값으로 된 값을 전송할려고 한다.
내가 보낼 값들은 FCM 토큰 값, UUID 값 이렇게 두 가지를 보낼거다.
근데 로컬로 켜놨기때문에 http 라는 것을 참고해야한다.
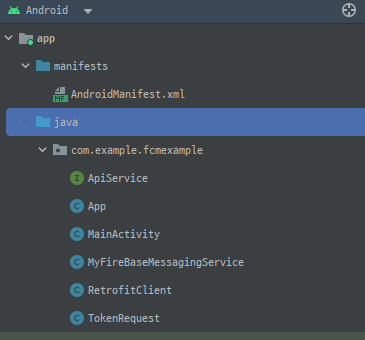
1. network_security_config.xml 파일 생성
http 환경이니까
res/xml 폴더에
network_security_config.xml 파일을 하나 만들자
<?xml version="1.0" encoding="utf-8"?>
<network-security-config>
    <domain-config cleartextTrafficPermitted="true">
        <domain includeSubdomains="true">192.168.114.18</domain>
    </domain-config>
</network-security-config>
그리고 AndroidMainfest.xml에다가
<application
        android:name=".App"
        android:allowBackup="true"
        android:dataExtractionRules="@xml/data_extraction_rules"
        android:fullBackupContent="@xml/backup_rules"
        android:networkSecurityConfig="@xml/network_security_config"
        android:icon="@mipmap/ic_launcher"
        android:label="@string/app_name"
        android:roundIcon="@mipmap/ic_launcher_round"
        android:supportsRtl="true"
        android:theme="@style/Theme.FCMExample"
        tools:targetApi="31">
android:networkSecurityConfig="@xml/network_security_config"
해당 내용을 application 영역에 추가해주자
2. Retrofit2
나는 레트로핏2을 사용해서 전송하였다.
build.gradle(app) 에다가
라이브러리 추가하자
	implementation 'com.squareup.retrofit2:retrofit:2.9.0'
    implementation 'com.squareup.retrofit2:converter-gson:2.9.0'
    implementation 'com.google.code.gson:gson:2.8.6'
3. ApiService
다음으로 apiservice 인터페이스를 생성해준다.
public interface ApiService {

    @POST("/regToken")
    Call<Void> sendToken(@Body TokenRequest tokenRequest);
}
4. RetrofitClient
public class RetrofitClient {
    private static Retrofit retrofit = null;

    public static Retrofit getClient(String baseUrl){
        if(retrofit == null) {
            retrofit = new Retrofit.Builder()
                    .baseUrl(baseUrl)
                    .addConverterFactory(GsonConverterFactory.create())
                    .build();
        }
        return retrofit;
    }
5. TokenRequest
토큰값과 uuid를 담을 객체 생성
public class TokenRequest {
    private String token;
    private String uuid;

    public TokenRequest(String token, String uuid) {
        this.token = token;
        this.uuid = uuid;
    }

    public String getToken() {
        return token;
    }

    public void setToken(String token) {
        this.token = token;
    }

    public String getUuid() {
        return uuid;
    }

    public void setUuid(String uuid) {
        this.uuid = uuid;
    }
}
6. MainActivity
나는 테스트앱이므로 앱이 켜지자말자 (onCreate) 부분에서 토큰값과 uuid가 전송되도록 하였다.
public class MainActivity extends AppCompatActivity {

    private static final String TAG = "MainActivity";
    private static final String SERVER_URL = "http://내 로컬 ip/regToken";
    private OkHttpClient client = new OkHttpClient();
    private Gson gson = new Gson();

    @Override
    protected void onCreate(Bundle savedInstanceState) {
        super.onCreate(savedInstanceState);
        setContentView(R.layout.activity_main);

        FirebaseMessaging.getInstance().getToken()
                .addOnCompleteListener(new OnCompleteListener<String>() {
                    @Override
                    public void onComplete(@NonNull Task<String> task) {
                        if (!task.isSuccessful()) {
                            Log.w(TAG, "토큰 실패", task.getException());
                            return;
                        }

                        String token = task.getResult();
                        String uuid = App.getInstance().getUUID();

                        Log.d("토큰 값 : ", token);
                        Log.d("uuid 값 : ", uuid);

                        TokenRequest tokenRequest = new TokenRequest(token, uuid);
                        try {
                            sendTokenToServer(tokenRequest);
                        } catch (IOException e) {
                            e.printStackTrace();
                            Log.e(TAG, "토큰 전송 실패", e);
                        }
                    }
                });
    }

    private void sendTokenToServer(TokenRequest tokenRequest) throws IOException {
        MediaType JSON = MediaType.parse("application/json; charset=utf-8");
        String json = gson.toJson(tokenRequest);

        RequestBody body = RequestBody.create(JSON, json);
        Request request = new Request.Builder()
                .url(SERVER_URL)
                .post(body)
                .build();

        client.newCall(request).enqueue(new Callback() {
            @Override
            public void onFailure(Call call, IOException e) {
                Log.e(TAG, "서버 요청 실패: " + e.getMessage());
            }

            @Override
            public void onResponse(Call call, Response response) throws IOException {
                if (response.isSuccessful()) {
                    Log.d(TAG, "서버 요청 성공: " + response.body().string());
                } else {
                    Log.e(TAG, "서버 요청 실패: " + response.message());
                }
            }
        });
    }
}
그리고 콘솔에 성공여부, 실패여부를 쓸 수 있도록 해놨으니
oncreate 되자말자 콘솔에 여부를 알 수 있다.
또한 응답값도 response.body().toString()으로 받을 수 있다!
간단한 api 호출 예제를 한번 테스트해보았다...
바쁜 요즘,, 간만에 글을 끄적였다..
성격존나급한 개발자