2. AOP - Aspect? 관점? 핵심 관심사? 횡단 관심사?
스프링의 3대 프로그래밍 모델 중 두 번째는 AOP다. AOP는 Aspect-Oriented Programming의 약자이고, 이를 번역하면 관점 지향 프로그래밍이 된다.
스프링 DI가 의존성(new)에 대한 주입이라면 스프링 AOP는 로직(code) 주입이라고 할 수 있다. 프로그램을 작성하다보면 다수의 모듈에 공통적으로 나타나느 부분이 존재하는데, 바로 이것을 횡단 관심사(cross-cutting concern)라고 한다.
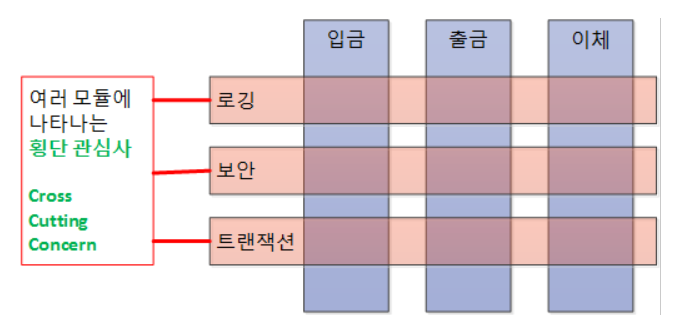
핵심 관심사는 모듈별로 다르지만 횡단 관심사는 모듈별로 중복되어 나타나는 부분이다. 프로그래머의 입장에서 "반복/중복은 분리해서 한 곳에서 관리하라"는 말이 떠오르지만 AOP에서는 더욱 진보된 방법을 사용한다.
스프링 DI가 의존성에 대한 주입이라면 스프링 AOP는 로직 주입이라고 볼 수 있다. 로직을 주입한다면 어디에 주입할 수 있을까?
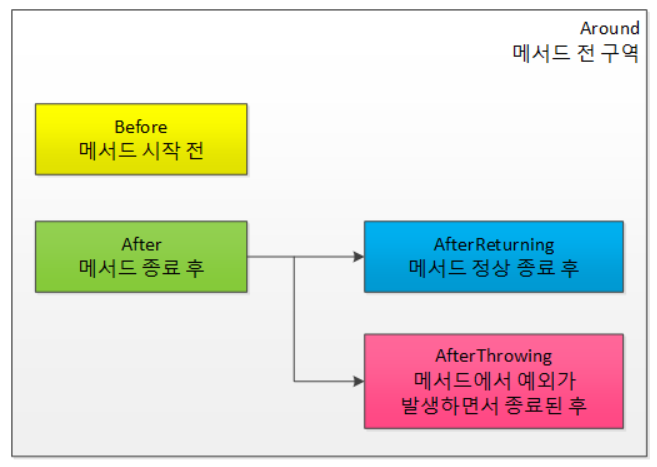
객체 지향에서 로직(코드)이 있는 곳은 당연히 메서드의 안쪽이다. 그럼 메서드에서 코드를 주입할 수 있는 곳은 몇 군데일까?
아래 그림에서 볼 수 있듯이 Around, Before, After, AfterReturning, AfterThorwing으로 총 5군데다.
1. 예제
Person.java
package aop002;

public interace Person {
    void runSomthing();
}
Person 인터페이스를 구현하도록 Boy.java를 작성한다. 그리고 핵심 관심사가 아닌 부분, 횡단 관심사는 작성하지 않는다.
Boy.java
package aop002;

public class Boy implements Person {
    public void runSomething() {
        System.out.println("컴퓨터로 게임을 한다.");
    }
}
이제 Start.java를 스프링 프레임워크 기반에서 구동될 수 있게 작성하자.
Start.java
package aop002;

import org.springframework.context.ApplicationContext;
import org.springframework.context.support.ClassPathApplicationContext;

public class Start {
    public static void main(String[] args) {
        ApplicationContext context = new ClassPathxmlAppliationContext("aop002/aop002.xml");

        Person romeo = context.getBean("boy", Person.class);

        romeo.runSomething();
    }
}
그리고 스프링 설정 파일인 aop002.xml을 만든다.
aop002.xml
<?xml version="1.0" encoding="UTF-8"?>
<beans xmlns="http://www.springframework.org/schema/beans"
       xmlns:xsi="http://www.w3.org/2001/XMLSchema-instance" xmlns:aop="http://www.springframework.org/schema/aop"
       xsi:schemaLocation=
       "http://www.springframework.org/schema/aop
        http://www.springframework.org/schema/aop/spring-aop-3.1.xsd
        http://www.springframework.org/schema/beans
        http://www.springframework.org/schema/beans/spring-beans.xsd">

  <aop:aspectj-autoproxy />

  <bean id="myAspect" class="aop002.MyAspect" />
  <bean id="boy" class="aop002.Boy" />
</beans>
MyAspect.java
package aop002;

import org.aspectj.lang.annotation.Aspect;
import org.aspectj.lang.annotation.Before;
import org.aspectj.lang.JoinPoint;

@Aspect
public class MyAspect {
    @Before("execution(public void aop002.Boy.runSomething ())")
    public void before(JoinPoint joinPoint) {
        System.out.println("얼굴 인식 확인: 문을 개방하라");
        // System.out.println("열쇠로 문을 열고 집에 들어간다.");
    }
}
또는
MyAspect.java
package aop002;

import org.aspectj.lang.annotation.Aspect;
import org.aspectj.lang.annotation.Before;
import org.aspectj.lang.JoinPoint;

@Aspect
public class MyAspect {
    @Before("execution(* runSomething ())")
    public void before(JoinPoint joinPoint) {
        System.out.println("얼굴 인식 확인: 문을 개방하라");
        // System.out.println("열쇠로 문을 열고 집에 들어간다.");
    }
}
간단하게 처리하기 위해 어노테이션을 사용했다.
- @Aspect는 이 클래스를 이제 AOP에서 사용하겠다는 의미다.
- @Before는 대상 메서드 실행 전에 이 메서드를 실행하겠다는 의미다.
JoinPoint는 @Before에서 선언된 메서드인 aop002.Boy.runSomething()을 의미한다.
실행하면 다음과 같은 실행 결과가 나온다.
얼굴 인식 확인: 문을 개방하라
컴퓨터로 게임을 한다.
2. 설명
Boy.java를 보면 횡단 관심사는 모두 사라졌고 오직 핵심 관심사만 남았다. 개발할 때는 한 개의 Boy.java 파일을 4개의 파일로 분할해서 개발하는 수고를 해야 하지만 추가 개발과 유지보수 관점에서 보면 무척이나 편한 코드가 된 것을 알 수 있다. AOP를 적용하면서 Boy.java에 단일 책임 원칙(SPR)을 자연스릅게 적용하게 된 것이다.
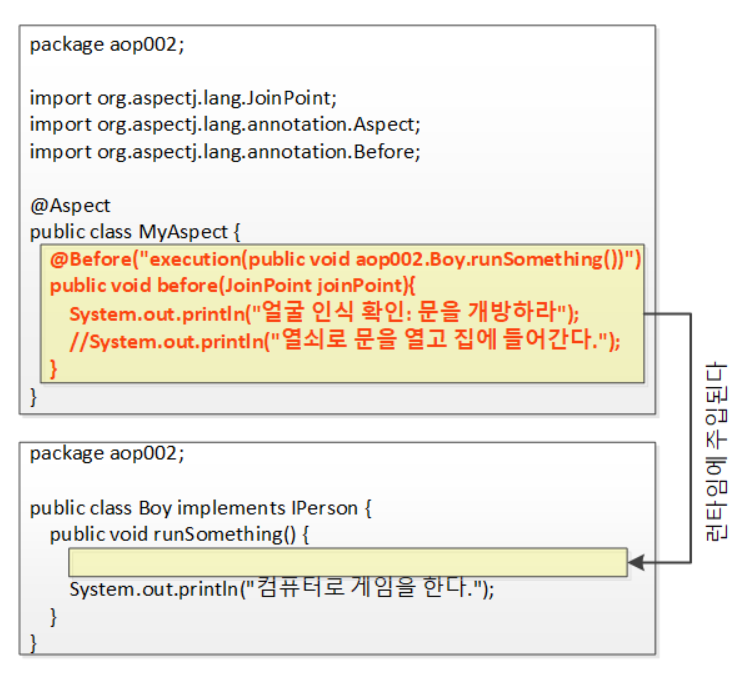

@Before("execution(public void aop002.Boy.runSomething ())") 부분을 아래와 같이 고쳐보자.
@Before("execution(* runSomething ())")수정사항을 저장한 후 다시 실행하면 잘 동작한다. 이는 Girl.java의 runSomething() 메서드도 @Before를 통해 같은 로직을 주입해 줄 수 있다는 것을 의미한다.
또한 Peson.java 인터페이스가 필요한 이유는 뭘까? 스프링 AOP가 인터페이스 기반이기 때문이다.
<aop:aspectj-autoproxy />는 뭘까? aspect는 aop 관련 용어이고 j는 자바이고, auto는 자동이고 proxy는 뭘까? proxy는 스프링 디자인 패턴의 프록시 패턴을 이용해 횡단 관심사를 핵심 관심사에 주입하는 것이다.
프록시 없이 Start.java의 main() 메서드에서 romeo 객체의 runSomething() 메서드를 직접 호출하는 방식은 아래 그림과 같다.
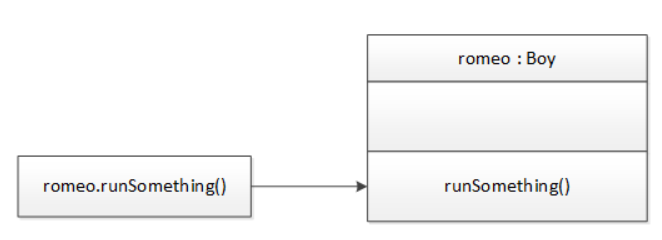
아래 그림은 프록시를 이용해 runSomething() 메서드를 호출하는 모습을 보여준다.
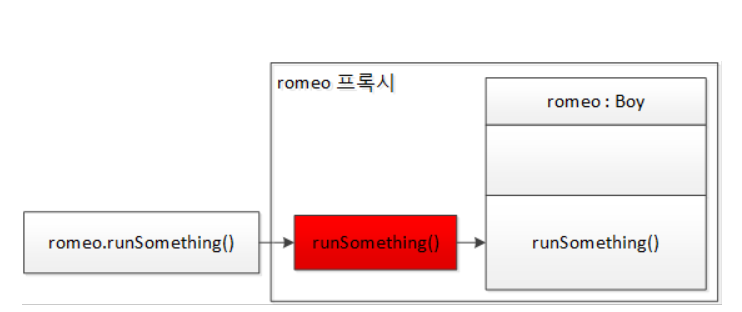
호출하는 쪽에서 romeo.runSomething() 메서드를 호출하면 프록시가 그 요청을 받아 진짜 romeo 객체에게 요청을 전달한다. 그런데 그림 하단 중앙의 runSomething() 메서드는 호출을 그냥 전달만 할까? 아니다. 결론적으로 중앙의 runSomething() 메서드는 주고받는 내용을 감시하거나 조작할 수 있다.
스프링 AOP는 프록시를 사용한다. 그런데 스프링 AOP에서 재미있는 것은 호출하는 쪽(romeo.runSomething() 메서드 호출)에서나 호출당하는 쪽(romeo 객체) 그 누구도 프록시가 존재하는지조차 모른다는 것이다. 오직 스프링프레임워크만 프록시의 존재를 안다.
결국, <aop:aspectj-autoproxy />는 스프링 프레임워크에게 AOP 프록시를 사용하라고 알려주는 지시자인 것이다. 게다가 auto가 붙었으니 자동으로 말이다.
스프링 AOP의 핵심은 아래 세 개의 문장으로 요약할 수 있다.
- 스프링 AOP는 인터페이스(interface) 기반이다.
- 스프링 AOP는 프록시(proxy) 기반이다.
- 스프링 AOP는 런타임(runtime) 기반이다.
3. 용어
| 용어 | 영한 사전 |
| Aspect | 관점, 측면, 양상 |
| Advisor | 조언자, 고문 |
| Advice | 조언, 충고 |
| JoinPoint | 결합점 |
| Poincut | 자르는 점 |
Pointcut - Aspect 적용 위치 지정자
MyAspect.java
package aop002;

import org.aspectj.lang.annotation.Aspect;
import org.aspectj.lang.annotation.Before;
import org.aspectj.lang.JoinPoint;

@Aspect
public class MyAspect {
    @Before("execution(* runSomething ())")
    public void before(JoinPoint joinPoint) {
        System.out.println("얼굴 인식 확인: 문을 개방하라");
        // System.out.println("열쇠로 문을 열고 집에 들어간다.");
    }
}
위의 예제에서 runSomething()이 바로 Pointcut이다. 그럼 @Before("execution( runSomething ())")의 의미는 뭘가? 지금 선언하고 있는 메서드(public void before)를 (* runSomething ())")가 실행되기 전(@Before)에 실행하라는 의미다. 여기서 public void before는 횡단 관심사를 실행하는 메서드가 된다.
결국 Pointcut이라고 하는 것은 횡단 관심사를 적용할 타깃 메서드를 선택하는 지시자(메서드 선택 필터)인 것이다. 이를 줄여서 표현하면 Pointcut이란 "타깃 클래스의 타깃 메서드 지정자"라고 할 수 있다. 그럼 왜 Pointcut을 왜 Aspect 적용 위치 지정자라고 했을까?
스프링 AOP만 보자면 Aspect를 메서드에만 적용할 수 있으니 타깃 메서드 지정자라는 말이 틀리지 않다. 그렇지만 AspectJ처럼 스프링 AOP 이전부터 있었고 지금도 유용하게 사용되는 다른 AOP 프레임워크에서는 메서드뿐만 아니라 속성 등에서 Aspect를 적용할 수 있기에 그것들까지 고려한다면 Aspect 적용 위치 지정자(지시자)가 맞는 표현이다. Pointcut을 메서드 선정 알고리즘이라고도 한다.
타깃 메서드 지정자에는 익히 잘 알려진 정규식과 AspectJ 표현식 등을 사용할 수 있다. 간단하게 소개하면 다음과 같다.
[접근제한자패턴] 리턴타입패턴 [패키지&클래스패턴.]메서드이름패턴(파라미터패턴)[throws 예외패턴]여기서 대괄호[]는 생략이 가능하다는 의미다. 필수 요소는 리턴 타입 패턴, 메서드이름패턴, 파라미터 패턴뿐이다.
JoinPoint - 연결 가능한 지점
Pointcut은 JoinPoint의 부분 집합이다. 앞에서 스프링 AOP는 인터페이스를 기반으로 한다고 설명했다. 그럼 인터페이스는 또 무엇일까? 인터페이스는 추상 메서드의 집합체다. 그럼 삼단 논법에 의해 스프링 AOP는 메서드에만 적용 가능하다는 결론에 도달한다.
Pointcut의 후보가 되는 모든 메서드들이 JoinPoint 즉, Aspect 적용이 가능한 지점이 된다. 그래서 다시 삼단 논법을 적용하면 JoinPoint란 "Aspect 적용이 가능한 모든 지점을 말한다"라고 결론지을 수 있다. 따라서 Aspect를 적용할 수 있는 지점 중 일부가 Pointcut이 되므로 Pointcut은 JoinPoint의 부분집합인 셈이다.
스프링 AOP에서 JoinPoint란 스프링 프레임워크가 관리하는 빈의 모든 메서드에 해당한다. 이것이 광의의 JoinPoint다. 협의의 JoinPoint는 코드 상에서 확인할 수 있다.
package aop002;

import org.aspectj.lang.annotation.Aspect;
import org.aspectj.lang.annotation.Before;
import org.aspectj.lang.JoinPoint;

@Aspect
public class MyAspect {
    @Before("execution(* runSomething ())")
    public void before(JoinPoint joinPoint) {
        System.out.println("얼굴 인식 확인: 문을 개방하라");
        // System.out.println("열쇠로 문을 열고 집에 들어간다.");
    }
}
여기서 JoinPoint의 실체란 그때그때 다르다. romeo.runSomething() 메서드를 호출한 상태라면 JoinPoint는 romeo 객체의 runSomething() 메서드가 된다. juliet.runSomething() 메서드를 호출한 상태라면 JoinPoint는 juliet 객체의 runSomething() 메서드가 된다.
JoinPoint 파라미터를 이용하면 실행 시점에 실제 호출된 메서드가 무엇인지, 실제 호출된 메서드를 소유한 객체가 무엇인지, 또 호출된 메서드의 파라미터는 무엇인지 등의 정보를 확인할 수 있다. 지금까지 배운 내용을 정리해 보자.
- 광의의 JoinPoint란 Aspect 적용이 가능한 모든 지점이다.
- 협의의 joinPoint란 호출된 객체의 메서드다.
Advice - 언제, 무엇을!
Advice는 pointcut에 적용할 로직, 즉 메서드를 의미하는데, 여기에 더해 언제라는 개념까지 포함하고 있다. 결국 Advice란 Pointcut에 언제, 무엇을 적용할지 정의한 메서드다. Advice를 타깃 객체의 타깃 메서드에 적용될 부가 기능이라고 표현한 책도 있다.
package aop002;

import org.aspectj.lang.annotation.Aspect;
import org.aspectj.lang.annotation.Before;
import org.aspectj.lang.JoinPoint;

@Aspect
public class MyAspect {
    @Before("execution(* runSomething ())")
    public void before(JoinPoint joinPoint) {
        System.out.println("얼굴 인식 확인: 문을 개방하라");
        // System.out.println("열쇠로 문을 열고 집에 들어간다.");
    }
}
위의 예제를 보면 지정된 Pointcut이 시작되기 전(@Before)에 before() 메서드를 실행하라고 돼있음을 확인할 수 있다.
Aspect - Advisor의 집합체
AOP에서 Aspect는 여러 개의 Advice와 여러 개의 Pointcut의 결합체를 의미하는 용어다. 수식으로 표현하면 아래와 같다.
Aspect = Advice들 + Pointcut들Advisor - 언제, 어디서, 무엇을!
Advisor는 다음과 같은 수식으로 표현할 수 있다.
Advisor = 한 개의 Advice + 한 개의 PointcutAdvisor는 스프링 AOP에서만 사용하는 용어이며 다른 AOP 프레임워크에서는 사용하지 않는다. 또 스프링 버전이 올라가면서 이제는 쓰지 말라고 권고하는 기능이기도 하다. 스프링이 발전해 오면서 다수의 Adivce와 다수의 Pointcut을 다양하게 조합해서 사용할 수 있는 방법, 즉 Aspect가 나왔기 때문에 하나의 Advice와 하나의 Pointcut만을 결합하는 Advisor를 사용할 필요가 없어졌기 때문이다.
4. 어노테이션 기반 AOP -> POJO와 XML 기반 AOP
어노테이션 기반 MyAspect.java
package aop002;

import org.aspectj.lang.annotation.Aspect;
import org.aspectj.lang.annotation.Before;
import org.aspectj.lang.JoinPoint;

@Aspect
public class MyAspect {
    @Before("execution(* runSomething ())")
    public void before(JoinPoint joinPoint) {
        System.out.println("얼굴 인식 확인: 문을 개방하라");
        // System.out.println("열쇠로 문을 열고 집에 들어간다.");
    }
}
POJO & XML 기반 MyAspect.java - 스프링 프레임워크에 종속되지 않음
package aop003;

import org.aspectj.lang.annotation.Aspect;
import org.aspectj.lang.annotation.Before;
import org.aspectj.lang.JoinPoint;

public class MyAspect {
    public void before(JoinPoint joinPoint) {
        System.out.println("얼굴 인식 확인: 문을 개방하라");
        // System.out.println("열쇠로 문을 열고 집에 들어간다.");
    }
}
기존 코드와 변경된 코드를 비교해 보면 @Aspect 어노테이션과 @Before 어노테이션이 사라졌다. 그리하여 aop003 패티지의 MyAspect.java는 스프링 프레임워크에 의존하지 않는 POJO가 된다.
스프링 설정 파일인 aop003.xml의 변화를 살펴보자.
어노테이션 기반 스프링 설정 파일 aop002.xml
<?xml version="1.0" encoding="UTF-8"?>
<beans xmlns="http://www.springframework.org/schema/beans"
       xmlns:xsi="http://www.w3.org/2001/XMLSchema-instance" xmlns:aop="http://www.springframework.org/schema/aop"
       xsi:schemaLocation=
       "http://www.springframework.org/schema/aop
        http://www.springframework.org/schema/aop/spring-aop-3.1.xsd
        http://www.springframework.org/schema/beans
        http://www.springframework.org/schema/beans/spring-beans.xsd">

  <aop:aspectj-autoproxy />

  <bean id="myAspect" class="aop002.MyAspect" />
  <bean id="boy" class="aop002.Boy" />
  <bean id="girl" class="aop002.Girl" />
</beans>
POJO & XML 기반 스프링 설정 파일 aop003.xml - aop 관련 태그 추가
<?xml version="1.0" encoding="UTF-8"?>
<beans xmlns="http://www.springframework.org/schema/beans"
       xmlns:xsi="http://www.w3.org/2001/XMLSchema-instance" xmlns:aop="http://www.springframework.org/schema/aop"
       xsi:schemaLocation=
       "http://www.springframework.org/schema/aop
        http://www.springframework.org/schema/aop/spring-aop-3.1.xsd
        http://www.springframework.org/schema/beans
        http://www.springframework.org/schema/beans/spring-beans.xsd">

  <aop:aspectj-autoproxy />

  <bean id="myAspect" class="aop003.MyAspect" />
  <bean id="boy" class="aop003.Boy" />
  <bean id="girl" class="aop003.Girl" />

  <aop:config>
    <aop:aspect ref="MyAspect">
      <aop:before method="before" pointcut="execution(* runSomething())" />
    </aop:aspect>
  </aop:config>
</beans>
5. AOP 기초 완성
이번에는 After 어드바이스를 살펴보자. After 어드바이스는 해당 JoinPoint 메서드를 실행한 후에 실행된다.
변경된 MyAspect.java
package aop004;

import org.aspectj.lang.annotation.Aspect;
import org.aspectj.lang.annotation.Before;
import org.aspectj.lang.JoinPoint;

public class MyAspect {
    public void before(JoinPoint joinPoint) {
        System.out.println("얼굴 인식 확인: 문을 개방하라");
        // System.out.println("열쇠로 문을 열고 집에 들어간다.");
    }

    public void lockDoor(JoinPoint joinPoint) {
        System.out.println("주인님 나갔다: 어이 문 잠가!!!");
    }
}
변경된 스프링 설정 파일 aop004.xml
<?xml version="1.0" encoding="UTF-8"?>
<beans xmlns="http://www.springframework.org/schema/beans"
       xmlns:xsi="http://www.w3.org/2001/XMLSchema-instance" xmlns:aop="http://www.springframework.org/schema/aop"
       xsi:schemaLocation=
       "http://www.springframework.org/schema/aop
        http://www.springframework.org/schema/aop/spring-aop-3.1.xsd
        http://www.springframework.org/schema/beans
        http://www.springframework.org/schema/beans/spring-beans.xsd">

  <aop:aspectj-autoproxy />

  <bean id="myAspect" class="aop004.MyAspect" />
  <bean id="boy" class="aop004.Boy" />
  <bean id="girl" class="aop004.Girl" />

  <aop:config>
    <aop:aspect ref="MyAspect">
      <aop:before method="before" pointcut="execution(* runSomething())" />
      <aop:after method="lockDoor" pointcut="execution(* runSometing())" />
    </aop:aspect>
  </aop:config>
</beans>
어노테이션으로 구현하면 다음과 같다.
MyAspect.java
package aop005;

import org.aspectj.lang.annotation.After;
import org.aspectj.lang.annotation.Aspect;
import org.aspectj.lang.annotation.Before;
import org.aspectj.lang.JoinPoint;

@Aspect
public class MyAspect {
    @Before("execution(* runSomething ())")
    public void before(JoinPoint joinPoint) {
        System.out.println("얼굴 인식 확인: 문을 개방하라");
        // System.out.println("열쇠로 문을 열고 집에 들어간다.");
    }

    @After("execution(* runSometing())")
    public void lockDoor(JoinPoint joinPoint) {
        System.out.println("주인님 나갔다: 어이 문 잠가!!!");
    }
}
어노테이션 기반 aop005.xml
<?xml version="1.0" encoding="UTF-8"?>
<beans xmlns="http://www.springframework.org/schema/beans"
       xmlns:xsi="http://www.w3.org/2001/XMLSchema-instance" xmlns:aop="http://www.springframework.org/schema/aop"
       xsi:schemaLocation=
       "http://www.springframework.org/schema/aop
        http://www.springframework.org/schema/aop/spring-aop-3.1.xsd
        http://www.springframework.org/schema/beans
        http://www.springframework.org/schema/beans/spring-beans.xsd">

  <aop:aspectj-autoproxy />

  <bean id="myAspect" class="aop005.MyAspect" />
  <bean id="boy" class="aop005.Boy" />
  <bean id="girl" class="aop005.Girl" />
</beans>
lockDoor() 메서드의 인자는 JoinPoint 객체 하나인데, 원한다면 대상 메서드는 runSomething()의 반환값도 인자로 받을 수 있고, 프록시를 통해 최종 반환값을 조작하는 것도 가능하다.
그런데 XML 기반의 설정 파일을 보면 중복되는 내용이 있다.
XML 기반 파일이면 aop004.xml만 변경하면 된다.
리팩터링된 POJO 및 XML 기반 스프링 설정 파일 : aop004.xml
<?xml version="1.0" encoding="UTF-8"?>
<beans xmlns="http://www.springframework.org/schema/beans"
       xmlns:xsi="http://www.w3.org/2001/XMLSchema-instance" xmlns:aop="http://www.springframework.org/schema/aop"
       xsi:schemaLocation=
       "http://www.springframework.org/schema/aop
        http://www.springframework.org/schema/aop/spring-aop-3.1.xsd
        http://www.springframework.org/schema/beans
        http://www.springframework.org/schema/beans/spring-beans.xsd">

  <aop:aspectj-autoproxy />

  <bean id="myAspect" class="aop004.MyAspect" />
  <bean id="boy" class="aop004.Boy" />
  <bean id="girl" class="aop004.Girl" />

  <aop:config>
	<aop:pointcut expression="execution(* runSomething())" id="iampc" />
    <aop:aspect ref="myAspect">
      <aop:before method="before" pointcut-ref="iampc" />
      <aop:after method="lockDoor" pointcut-ref="iampc" />
    </aop:aspect>
  </aop:config>
</beans>
어노테이션 기반이면 MyAspect.java만 변경하면 된다.
리팩터링된 어노테이션 기반 MyAspect.java
package aop005;

import org.aspectj.lang.annotation.After;
import org.aspectj.lang.annotation.Aspect;
import org.aspectj.lang.annotation.Before;
import org.aspectj.lang.annotation.Pointcut;
import org.springframework.stereotype.Component;
import org.aspectj.lang.JoinPoint;

@Component
@Aspect
public class MyAspect {
    @Pointcut("execution(* runSomething ())")
    public void iampc() {
	    // 여긴 무엇을 작성해도 의미가 없어요.
    }

    @Before("iampc()")
    public void before(JoinPoint joinPoint) {
        System.out.println("얼굴 인식 확인: 문을 개방하라");
    }

    @After("iampc()")
    public void lockDoor(JoinPoint joinPoint) {
        System.out.println("주인님 나갔다: 어이 문 잠가!!!");
    }
}
참고
- 스프링 입문을 위한 자바 객체지향의 원리와 이해
