로그를 왜 사용할까?
로그를 사용하는 이유는 여러 가지가 있는데, 주된 이유는 애플리케이션의 상태와 흐름을 모니터링하고 문제를 디버깅하는 데 큰 도움이 되기 때문이다. 더 구체적으로 몇 가지 이유를 살펴보자.
-
디버깅
애플리케이션이 정상적으로 동작하지 않거나 오류가 발생했을 때, 로그를 통해 어떤 과정에서 문제가 발생했는지 추적할 수 있다. 문제가 있을만한 부분을 찾아가며 일일히 테스트해보지 않아도 로그를 통해 쉽게 발견할 수 있다(시간 단축). -
실시간 모니터링
로그는 애플리케이션이 현재 어떻게 동작하고 있는지 실시간으로 파악할 수 있게 도와준다. 특히 서버가 어떤 요청을 받고 어떻게 응답했는지, 어떤 오류가 발생했는지를 바로 확인할 수 있다. (덕분에 프로젝트에서 REST API를 구현하는 과정이 훨씬 쾌적했다.) -
성능 최적화
로그를 통해 어떤 부분에서 성능 저하가 발생하는지 파악할 수 있다. 예를 들어, API 호출 시간이나 DB 쿼리 시간이 로그에 남으면 이를 분석해 성능 병목 현상을 찾아낼 수 있다. -
보안 및 감사
로그는 보안상의 문제가 발생했을 때 매우 유용하다. 누가, 언제, 어떤 요청을 보냈는지 기록을 남겨 두면, 이후에 이를 통해 악의적인 접근이나 보안 위협을 추적할 수 있다. 또 중요한 작업이나 이벤트가 발생했을 때 이를 기록하는 것이 감사 용도로도 쓰일 수 있다. -
이슈 재현
개발 중이나 운영 중에 발생하는 버그나 이슈를 재현하기 위해서 로그를 분석할 수 있다. 특히 서버 환경에서 문제를 재현하기 어려운 상황에서는 로그가 유일한 단서가 되기도 한다. -
애플리케이션 상태 확인
로그를 통해 애플리케이션이 어떻게 실행되고 있는지 확인할 수 있다. 주요 이벤트나 상태 변화를 기록해 두면, 배포 후에도 애플리케이션이 정상적으로 동작하는지 쉽게 모니터링할 수 있다.
📌 로그 level
해당 로그 메시지가 얼마나 중요한지를 알려주는 정보이다.
TRACE < DEBUG < INFO < WARN < ERROR < FATAL
1) TRACE
- 가장 상세한 로그 레벨로, 애플리케이션의 실행 흐름과 디버깅 정보를 상세히 기록한다. 주로 디버깅 시에 사용된다.
2) DEBUG
- 디버깅 목적으로 사용되며, 개발 단계에서 상세한 정보를 기록한다.
- 애플리케이션의 내부 동작을 이해하고 문제를 분석하는 데 도움을 준다.
3) INFO
- 정보성 메시지를 기록한다.
- 애플리케이션의 주요 이벤트나 실행 상태에 대한 정보를 전달한다.
4) WARN
- 경고성 메시지를 기록한다.
- 예상치 못한 문제나 잠재적인 오류 상황을 알리는 메시지이다.
- 애플리케이션이 정상적으로 동작하지만 주의가 필요한 상황을 알려준다.
5) ERROR
- 오류 메시지를 기록한다.
- 심각한 문제 또는 예외 상황을 나타내며, 애플리케이션의 정상적인 동작에 영향을 미칠 수 있는 문제를 알린다.
6) FATAL
- 가장 심각한 오류 메시지를 기록한다.
- 애플리케이션의 동작을 중단시킬 수 있는 치명적인 오류를 나타낸다.
- 일반적으로 이러한 오류는 복구가 불가능하거나 매우 어려운 상황을 의미한다.
📌 로그 설정하기
1. nest 기본 로그 설정
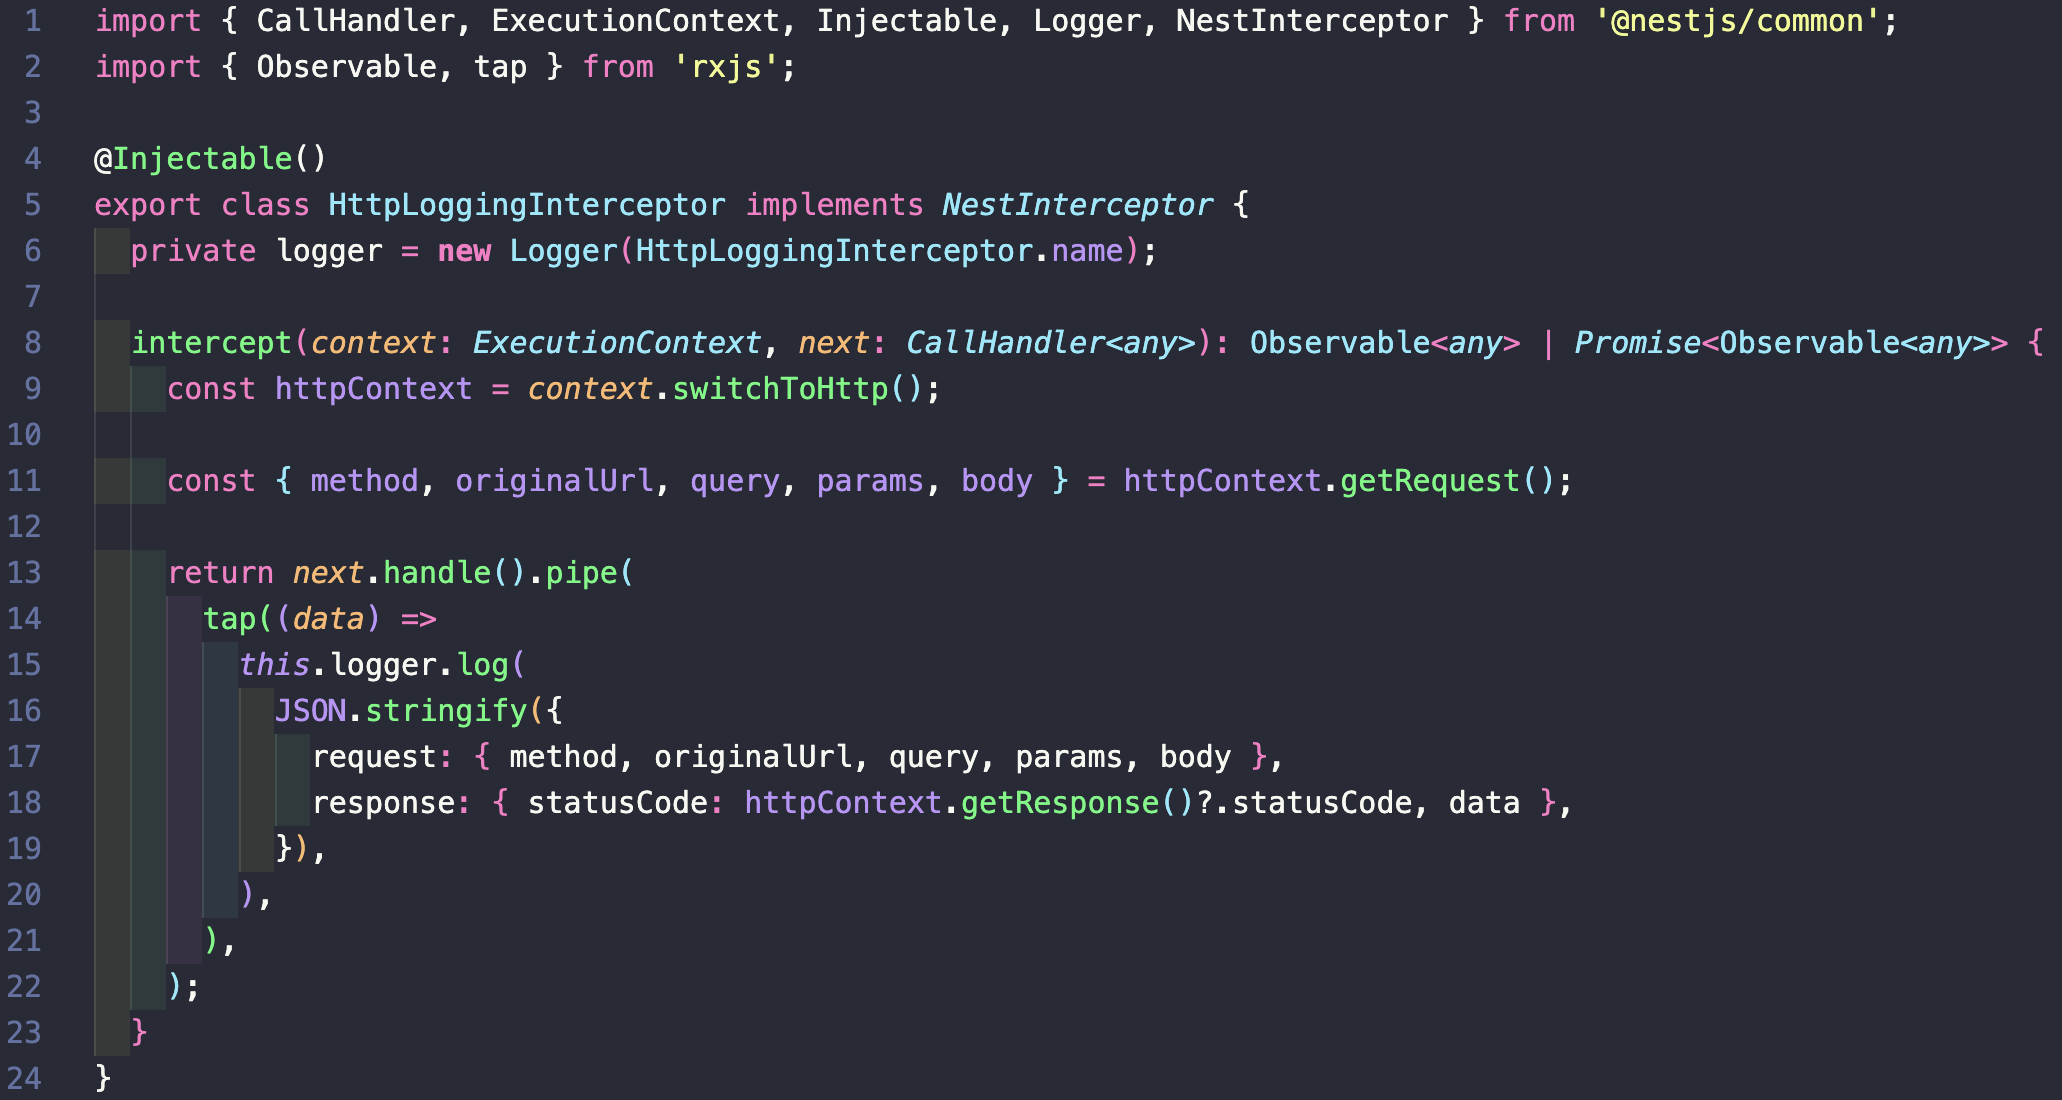
- src/common/http-logging.interceptor.ts
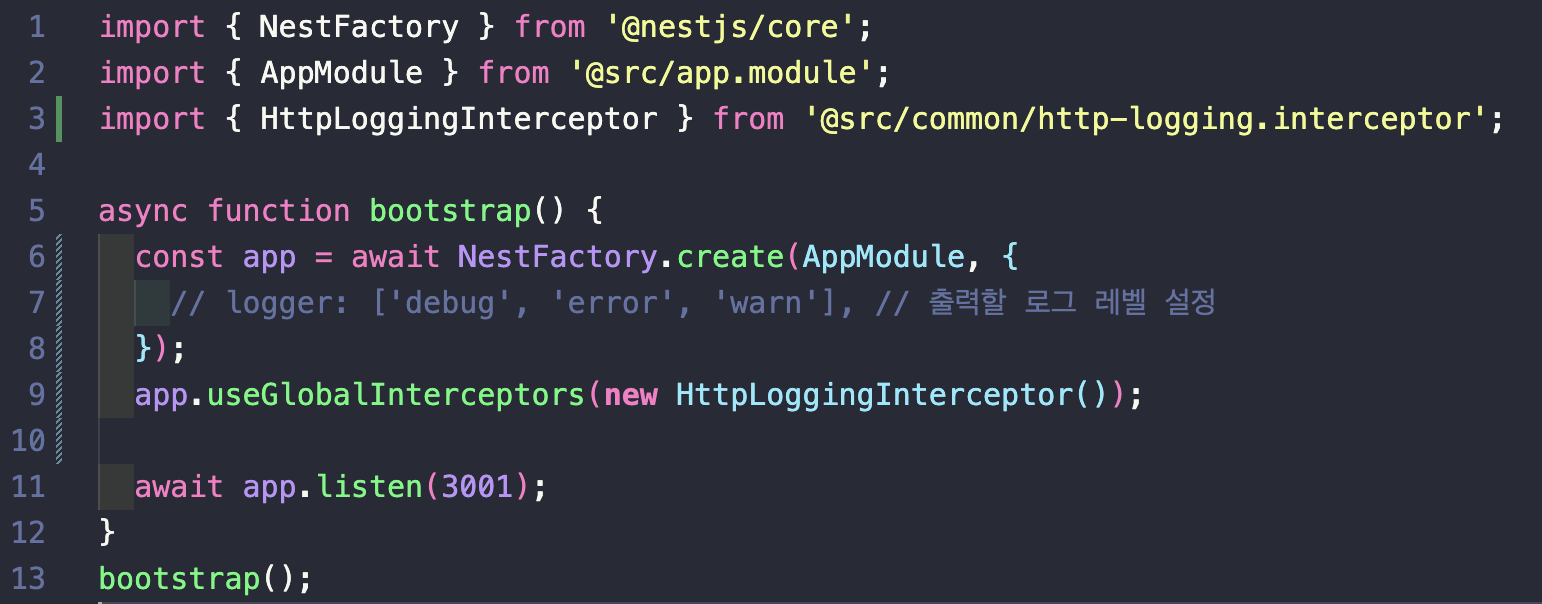
- main.ts
1) Logger 인스턴스 생성
- private logger = new Logger(HttpLoggingInterceptor.name) 에서 Logger 클래스를 사용해, HttpLoggingInterceptor 클래스 내에서 logger 인스턴스를 생성하고 있다. 이를 통해 로깅 작업을 수행할 수 있다.
2) 로그 기록
- tap 연산자를 사용해 HTTP 요청 및 응답 정보를 가로채서 로깅 작업을 수행하는 역할을 한다. logger.log() 메서드를 호출해 로그를 기록한다.
- 로그에는 요청의 메서드, URL, 쿼리 매개변수, 경로 매개변수, 본문 등의 정보와 응답의 상태 코드, 데이터가 포함된다.

2. Winston 로그 설정
1) Winston 라이브러리 설치
$ npm install winston nest-winston
$ npm install winston-daily-rotate-file
$ npm i moment-timezone
$ npm i app-root-path2) Winston 설정
import { utilities, WinstonModule } from 'nest-winston';
import winstonDaily from 'winston-daily-rotate-file';
import winston from 'winston';
import moment from 'moment-timezone';
import appRoot from 'app-root-path';

const appendTimestamp = winston.format((info, opts) => {
  if (opts.tz) {
    info.timestamp = moment().tz(opts.tz).format();
  }
  return info;
});

// 로그 저장 파일 옵션
const dailyOptions = (level: string) => {
  return {
    level,
    datePattern: 'YYYY-MM-DD', // 날짜 포맷
    dirname: `${appRoot.path}/logs` + `/${level}`, // 저장할 URL: 여기서는  루트에 logs라는 폴더가 생기고 그 아래에 level 폴더
    filename: `%DATE%.${level}.log`,
    maxFiles: 20,
    zippedArchive: true, // 로그가 쌓였을 때 압축
    colorize: true, // 로그 메세지에 색상 추가
    handleExceptions: true, // 로거가 애플리케이션에서 발생하는 예외를 자동으로 감지해 기록
    json: false, // JSON 형식이 아닌 일반 텍스트 형식으로 출력
  };
};

// 로거 설정
export const winstonLogger = WinstonModule.createLogger({
  transports: [
    // 콘솔 출력 옵션 지정
    new winston.transports.Console({
      format: winston.format.combine(
        winston.format.timestamp(),
        winston.format.colorize(),
        utilities.format.nestLike('Application-Name', {
          prettyPrint: true, // 로그를 더 읽기 쉽게 정리해 출력
        }),
      ),
    }),

    // 해당 로그는 파일로 관리
    new winstonDaily(dailyOptions('warn')),
    new winstonDaily(dailyOptions('error')),
    new winstonDaily(dailyOptions('fatal')),
  ],
  // 포멧 지정
  format: winston.format.combine(
    appendTimestamp({ tz: 'Asia/Seoul' }), // 서울 시간대를 기준으로 기록
    winston.format.json(),
    winston.format.printf((info) => {
      return `${info.timestamp} - ${info.level} ${info.message}`;
    }),
  ),
});
❗️ 위처럼 적용시 logger.info 인식안됨
→ no transport 이 뜬다.
→ module에서 직접 import 해주는 방식으로 변경
// logger.config.ts

import * as winston from 'winston';
import moment from 'moment-timezone';
import appRoot from 'app-root-path';

export const appendTimestamp = winston.format((info, opts) => {
  if (opts.tz) {
    info.timestamp = moment().tz(opts.tz).format();
  }
  return info;
});

export const dailyOptions = (level: string) => {
  return {
    level: 'info',
    datePattern: 'YYYY-MM-DD',
    dirname: `${appRoot.path}/logs` + `/${level}`,
    filename: `%DATE%.${level}.log`,
    maxFiles: 20,
    zippedArchive: true,
    colorize: true,
    handleExceptions: true,
    json: false,
    format: winston.format.combine(
      appendTimestamp({ tz: 'Asia/Seoul' }),
      winston.format.json(),
      winston.format.printf((info) => {
        return `${info.timestamp} - ${info.level} ${info.message}`;
      }),
    ),
  };
};
// logger.module.ts
import { Module, Global } from '@nestjs/common';
import * as winston from 'winston';
import {
utilities as nestWinstonModuleUtilities,
WinstonModule,
} from 'nest-winston';
import { ConfigModule } from '@nestjs/config';
import winstonDaily from 'winston-daily-rotate-file';
import { dailyOptions } from './logger.config';
@Global()
@Module({
imports: [
ConfigModule.forRoot({ isGlobal: true }),
WinstonModule.forRoot({
transports: [
new winston.transports.Console({
level: 'info',
format: winston.format.combine(
winston.format.timestamp(),
winston.format.colorize(),
nestWinstonModuleUtilities.format.nestLike('user-server', {
prettyPrint: true,
}),
),
}),
new winstonDaily(dailyOptions('info')),
new winstonDaily(dailyOptions('warn')),
new winstonDaily(dailyOptions('error')),
new winstonDaily(dailyOptions('fatal')),
],
}),
],
})
export class LoggerModule {}
참고: 아래처럼 모든 로그를 저장함과 동시에 error 로그만 따로 저장도 가능
const transport: winston.transport[] = [
      new winstonDaily({
        filename: '%DATE%.log',
        datePattern: 'YYYY-MM-DD-HH',
        dirname: logDir,
        zippedArchive: true,
        maxSize: '20m',
        maxFiles: '7d',
      }),
      new winstonDaily({
        filename: '%DATE%.error.log',
        datePattern: 'YYYY-MM-DD-HH',
        dirname: logDir + '/error',
        zippedArchive: true,
        maxSize: '20m',
        maxFiles: '7d',
        level: 'error',
      }),
    ];
3) 미들웨어 설정
import { Injectable, Logger, NestMiddleware } from '@nestjs/common';
import { Request, Response, NextFunction } from 'express';

@Injectable()
export class LoggingMiddleware implements NestMiddleware {
  private logger = new Logger('HTTP'); //HTTP 로그를 기록하는 logger 프로퍼티를 선언
  use(req: Request, res: Response, next: NextFunction) {
    //미들웨어 로직을 정의
    const { ip, method, originalUrl } = req; //IP 주소, HTTP 메서드 및 원본 URL을 추출
    const userAgent = req.get('user-agent') || '';
    res.on('finish', () => {
      //로깅 상세설정
      const { statusCode, statusMessage } = res;
      const logLevel = statusCode >= 400 ? 'error' : 'log';
      this.logger[logLevel](
        `Request from ${ip} to ${method} ${originalUrl} - ${statusCode} ${statusMessage} - ${userAgent}`,
      );
    });
    next();
  }
}
logger 설정 + 미들웨어 함께 사용하는 이유
- 기본 winston logger: 로직에 커스텀 로그 출력 추가 가능 / 커스텀 용이 / 로그 파일 저장
- 기본 winston 로그는
${info.timestamp} - ${info.level} - ${info.message}로 설정 - 미들웨어 로그는
Request from ${ip} to ${method} ${originalUrl} - ${statusCode} ${statusMessage} - ${userAgent}→ 요청 자체에 대한 정보 기록

커스텀 로그 추가
import { Logger } from 'winston';
import { WINSTON_MODULE_NEST_PROVIDER } from 'nest-winston';

@Injectable()
export class AuthService {
  private readonly cognitoClient: CognitoIdentityServiceProvider;
  private readonly clientId: string;
  constructor(
    @Inject(WINSTON_MODULE_NEST_PROVIDER) private readonly logger: Logger, // 의존성 주입
    private readonly configService: ConfigService,
    private readonly userService: UserService,
  ) {
    this.cognitoClient = new CognitoIdentityServiceProvider({
      region: 'ap-northeast-2',
    });

    this.clientId = this.configService.get<string>('CLIENT_ID');
  }

...

// 예시

  async resendConfirmationCode(emailDto: EmailDto) {
    const { email } = emailDto;
    const params = {
      ClientId: this.clientId,
      Username: email,
    };

    try {
      const res = await this.cognitoClient
        .resendConfirmationCode(params)
        .promise();
      return res;
    } catch (e) {
      this.logger.error('Failed to resend confirmation code: ' + e.message); // 로그 추가
      throw new HttpException(
        'Failed to resend confirmation code.',
        HttpStatus.BAD_REQUEST,
      );
    }
  }