
💖 Maven 프로젝트 생성
- Dynamic Web Project 생성
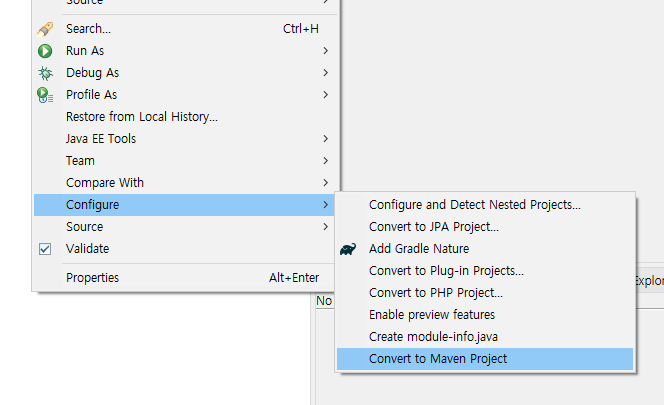
- 생성된 프로젝트 폴더 우클릭 : Configure -> Convert to Maven Project 클릭
- pom.xml 파일을 통해 Maven 설정
: 기존에 작성되어 있던 build 태그 안에 라이브러리 추가 코드를 작성하면 maven이 알아서 라이브러리를 추가해준다
https://mvnrepository.com/ 에서 복붙
<!-- 라이브러리를 추가 -->
<dependencies>
  		<!-- spring webmvc -->
		<dependency>
			<groupId>org.springframework</groupId>
			<artifactId>spring-webmvc</artifactId>
			<version>5.3.25</version>
		</dependency>
  		<!-- 로그 기록해주는 라이브러리 -->
		<dependency>
			<groupId>log4j</groupId>
			<artifactId>log4j</artifactId>
			<version>1.2.17</version>
		</dependency>
		<dependency>
			<groupId>org.slf4j</groupId>
			<artifactId>slf4j-simple</artifactId>
			<version>1.7.36</version>
		</dependency>
	</dependencies>
그 외에는 아래 블로그 참조
https://velog.io/@debut12/Spring-MVC-Maven-dependency-%EC%84%A4%EC%A0%95%ED%95%98%EA%B8%B0
💖 url 과 Servlet 매핑 - web.xml
: (톰캣) web.xml에서 아래의 코드를 작성하여 url과 Servlet을 매핑
DispatcherServlet
: 요청을 받아 공통적인 작업을 수행한 뒤 해당 요청에 적합한 컨트롤러의 메소드 실행
<!-- 요청 정보를 분석해서 컨트롤러를 선택하는 서블릿을 지정한다. -->
<servlet>
  	<servlet-name>dispatcherServlet</servlet-name>
  	<!-- Spring MVC에서 제공하고 있는 기본 서블릿을 지정한다. -->
  	<servlet-class>
      org.springframework.web.servlet.DispatcherServlet
  	</servlet-class>

  	<!-- Spring MVC 설정을 위한 xml 파일을 지정한다. -->
    <init-param>
  		<param-name>contextConfigLocation</param-name>
  		<param-value>
  			/WEB-INF/spring/servlet-context.xml
  		</param-value>
  	</init-param>

  	<load-on-startup>1</load-on-startup> <!-- 1번째로 읽으라는 의미 -->
</servlet>

<servlet-mapping>
  	<servlet-name>dispatcherServlet</servlet-name>
  	<url-pattern>*.do</url-pattern>		<!-- .do 파일은 모두 controller로 이동 -->
</servlet-mapping>- 한글설정
  <filter>
  	<filter-name>encodingFilter</filter-name>
  	<filter-class>org.springframework.web.filter.CharacterEncodingFilter</filter-class>

  	<init-param>
  		<param-name>encoding</param-name>
  		<param-value>UTF-8</param-value>
  	</init-param>

  	<init-param>
  		<param-name>forceEncoding</param-name>	<!-- 강하게 인코딩. true로 설정 -->
  		<param-value>true</param-value>
  	</init-param>

  </filter>

  <filter-mapping>
	<filter-name>encodingFilter</filter-name>
	<url-pattern>/*</url-pattern>	<!-- 모든 패턴 -->
  </filter-mapping>
💖 Spring 환경 설정
: 스프링 컨테이너에 대한 환경 설정 -> 객체들을 관리하는 bean Factory
ViewResolver
: Model에 저장된 데이터를 사용해 View를 그리는 역할
- servlet-context.xml
<?xml version="1.0" encoding="UTF-8"?>
<beans xmlns="http://www.springframework.org/schema/beans"
   xmlns:xsi="http://www.w3.org/2001/XMLSchema-instance"
   xmlns:context="http://www.springframework.org/schema/context"
   xmlns:mvc="http://www.springframework.org/schema/mvc"
   xsi:schemaLocation="http://www.springframework.org/schema/mvc http://www.springframework.org/schema/mvc/spring-mvc-4.3.xsd
      http://www.springframework.org/schema/beans http://www.springframework.org/schema/beans/spring-beans.xsd
      http://www.springframework.org/schema/context http://www.springframework.org/schema/context/spring-context-4.3.xsd">

	<!-- spring MVC annotation(주석문, 지시문)을 사용하기 위한 설정 -->
	<context:annotation-config />

	<!--
		view 폴더의 위치, 확장자명을 설정 -> InternalResourceViewResolver안에 2개의 변수(prefix, suffix)

		InternalResourceViewResolver viewResolver = new InternalResourceViewResolver();
		viewResolver.prefix = "/WEB-INF/views/" -> view 폴더
		viewResolver.suffix = ".jsp" -> 확장자명

	 -->
	<bean id="viewResolver" class="org.springframework.web.servlet.view.InternalResourceViewResolver">
		<property name="prefix" value="/WEB-INF/views/" />
		<property name="suffix" value=".jsp" />
	</bean>

	<!-- 공통 패키지(경로) -->
	<context:component-scan base-package="mul.cam.a" />
</beans>
💖 Controller
🔥 @Controller
: 클래스 선언부 위에 @Controller를 작성하면 스프링은 이 클래스를 컨트롤러로 인식
@Controller
public class HelloController {
		     ...
}
1) 모든 요청을 받아들이는 DispatcherServlet이 특정 요청을 처리할 수 있도록
@Controller어노테이션이 작성된 클래스를 읽어들인다.
2) 그 클래스의 많은 어노테이션 중@RequestMapping어노테이션을 읽어들인다.
3) 어떤 URL이 왔을 때 어떤 메서드를 실행한 것인지를 Mapping.
🔥 @RequestMapping
: 들어온 요청을 특정 메소드와 매핑하기 위해 사용
// get방식
@RequestMapping(value = "home.do", method = RequestMethod.GET)

// get, post방식 둘 다 가능
@RequestMapping(value = "home.do", method = {RequestMethod.GET, RequestMethod.POST}
🔥 @PostMapping, @GetMapping
: @PostMapping은 post방식으로만 @GetMapping은 get방식으로만 가능
@PostMapping("home.do")
@GetMapping("home.do")- java (controller)
package mul.cam.a;

@Controller
public class HelloController {
	private static Logger logger = LoggerFactory.getLogger(HelloController.class);	// Logger를 사용할 준비(log찍기)

	@RequestMapping(value = "home.do", method = RequestMethod.GET) // method -> get, post 설정
	public String homeMethod() {	// mapping이 들어오면 homeMethod 실행
		// System.out.println("HelloController homeMethod() " + new Date());
		logger.info("HelloController homeMethod() " + new Date());

		return "home";
	}

    // Controller -> View
    @RequestMapping(value = "hello.do", method = RequestMethod.GET)
	public String hello(Model model) {	// 객체모델. Model은 아무데나 추가해도 됨

		String name = "홍길동";
		model.addAttribute("name", name); 	// == request.setAttribute

		// 데이터를 home.jsp로 보내줌
		return "home";
	}

    // View -> Controller
    @RequestMapping(value = "world.do", method = RequestMethod.POST)
	public String world(String name, int age) {	// 입력받은 매개변수 받기
		logger.info("HelloController world() " + new Date());

		System.out.println("이름: " + name);
		System.out.println("나이: " + age);

		return "home";
	}

    // list
	@GetMapping("mylist.do")
	public String mylist(Model model) {
		logger.info("HelloController mylist() " + new Date());

		List<HumanDto> list = new ArrayList<>();
		list.add(new HumanDto("홍길동", 24));
		list.add(new HumanDto("성춘향", 16));
		list.add(new HumanDto("허준", 25));

		model.addAttribute("list", list);

		return "home";
	}
}- jsp (view)
// Controller -> View
<a href="hello.do">hello</a><br>
<%
	String name = (String)request.getAttribute("name");
	if(name != null && !name.equals("")) {
		%>
		이름 :<%=name %>
		<%
	}
%>

<br><br>

 // View -> Controller
<form action="world.do" method="post">
이름: <input type="text" name="name"><br>
나이: <input type="text" name="age">
<input type="submit" value="world로 이동">
</form>

<br><br>

// list객체를 받아서 table만들기
<a href="mylist.do">리스트</a>

<%
 	List<HumanDto> list = (List<HumanDto>)request.getAttribute("list");
 	if(list != null && list.isEmpty() == false) {
 		%>
 		<table border="1">
 			<tr>
 				<th>번호</th>
 				<th>이름</th>
 				<th>나이</th>
 			</tr>
 				<%
 					for(int i = 0; i < list.size(); i++) {
 						HumanDto dto = list.get(i);
 				%>
 				<tr>
 					<th><%=i+1 %></th>
 					<td><%=dto.getName() %></td>
 					<td><%=dto.getAge() %></td>
 				</tr>
 				<%
 					}
 				%>
 		</table>
 		<%
 	}
 %>
Reference

🦋개발 공부 기록🦋