☕ 개요
이번 글에서는 Spring AOP를 활용하여, 프록시를 구현하는 방법들에 대해서 알아보도록 하겠다.
다양한 활용법이나 다양한 문법에 대해서 알아보는 것은 아니고, 기본적인 사용법과 Spring AOP의 기본적인 동작 원리에 대해서 알아보도록 하겠다.
AOP 스타터
dependencies {
	implementation 'org.springframework.boot:spring-boot-starter-aop'
}
본격적으로 시작하기에 앞서서 위 라이브러리를 설치해주어야한다.
AOP 스타터 라이브러리를 설치해주면, 스프링에서 제공하는 다양한 프록시 관련된 기능을 사용할 수 있게 된다.
대표적으로 AnnotationAwareAspectAutoProxyCreator라는 빈 후처리기가 Bean으로 자동으로 등록된다.
AnnotationAwareAspectAutoProxyCreator
이름도 긴 이 친구를 조목 조목 뜯어볼 필요는 없지만, 이 클래스가 Spring AOP의 가장 기본이 되는 중요한 컴포넌트이니, 이 컴포넌트의 역할에 대해서 알아보도록 하자. 이 컴포넌트가 하는 일은 아래와 같다.
@Aspect어노테이션이 붙은 클래스를 Advisor로 변환해서 저장한다.- 스프링에 등록된 'Advisor빈'들을 자동으로 찾아서 프록시가 필요한 곳에 프록시를 적용해준다.
📌 참고) Pointcut이 사용되는 경우 2가지
- 프록시 적용 판단 : 생성 단계
- 어드바이스 적용 여부 판단 : 사용 단계
코드로 동작 확인하기
이제, Spring에서 제공하는 AOP 기능에 대해서 코드를 통해서 알아보도록 하자.
1) 비지니스 로직 클래스 만들기
import lombok.extern.slf4j.Slf4j;
import org.springframework.stereotype.Service;

@Slf4j
@Service
public class SomeService {
    public void find() {
        log.info("SomeService.find()");
    }

    public void save() {
        log.info("SomeService.save()");
    }
}
로그 찍는 기능 밖에 없지만, 복잡한 비지니스 로직을 담당하는 서비스 컴포넌트라고 가정하자. ㅎㅎ
2) 실행 시간 측정 Advice 클래스 만들기
import lombok.extern.slf4j.Slf4j;
import org.aopalliance.intercept.MethodInterceptor;
import org.aopalliance.intercept.MethodInvocation;
import org.springframework.stereotype.Component;

@Slf4j
@Component
public class TimeAdvice implements MethodInterceptor {
    @Override
    public Object invoke(MethodInvocation invocation) throws Throwable {
        log.info("TimeAdvice.invoke() 실행");
        long startMs = System.currentTimeMillis();

        Object target = invocation.proceed();

        long endMs = System.currentTimeMillis();
        log.info("TimeAdvice.invoke() 종료 {}ms", endMs - startMs);
        return target;
    }
}
이번 글에서는 2가지의 Advisor를 적용해볼 것인데, 그 중에 하나인 실행 시간 측정 기능을 갖고 있는 Advice 클래스를 만들어주자.
3) @Aspect를 활용한 클래스 만들기
import lombok.extern.slf4j.Slf4j;
import org.aspectj.lang.ProceedingJoinPoint;
import org.aspectj.lang.annotation.Around;
import org.aspectj.lang.annotation.Aspect;
import org.springframework.stereotype.Component;

@Slf4j
@Aspect
@Component
public class LogAspect {

    @Around("execution(* hello.springaop.v5autoproxy..find(..))")
    public Object execute(ProceedingJoinPoint joinPoint) throws Throwable {
        String message = joinPoint.getSignature().toShortString();
        Object result = joinPoint.proceed();
        log.info("LogAspet={}", message);
        return result;
    }

}@Aspect를 활용한 Advisor역할을 할 클래스를 하나 만들어주자.
여기서 @Around가 Pointcut의 역할을 하는 것이고, 그 안에 로직이 Advice역할을 하는 것이다.
4) 설정 클래스 만들기
import lombok.RequiredArgsConstructor;
import lombok.extern.slf4j.Slf4j;
import org.springframework.aop.Advisor;
import org.springframework.aop.aspectj.AspectJExpressionPointcut;
import org.springframework.aop.support.DefaultPointcutAdvisor;
import org.springframework.context.annotation.Bean;
import org.springframework.context.annotation.Configuration;

@Slf4j
@Configuration
@RequiredArgsConstructor
public class AutoProxyConfig {

    private final TimeAdvice timeAdvice;

    @Bean
    public Advisor advisor1() {
        AspectJExpressionPointcut pointcut = new AspectJExpressionPointcut();
        pointcut.setExpression("execution(* hello.springaop.v5autoproxy..save(..))");

        return new DefaultPointcutAdvisor(pointcut, timeAdvice);
    }
}TimeAdvice를 포함하는 Advisor를 Bean으로 등록해주자.
Bean 등록 코드 중, Pointcut은 AspectJ 문법을 사용해서 정의한 것이고, hello.springaop.v5autoproxy 패키지 하위에 .save()메서드에 프록시를 적용하겠다는 의미이다.
5) 테스트 코드로 동작 확인하기
import hello.springaop.v5autoproxy.SomeService;
import lombok.extern.slf4j.Slf4j;
import org.junit.jupiter.api.DisplayName;
import org.junit.jupiter.api.Test;
import org.springframework.beans.factory.annotation.Autowired;
import org.springframework.boot.test.context.SpringBootTest;

@Slf4j
@SpringBootTest
public class AutoProxyTest {

    @Autowired
    private SomeService someService;

    @Test
    @DisplayName("AutoProxyTest")
    public void autoProxyTest() throws Exception {
        someService.find();
        someService.save();
    }
}
테스트 코드 자체는 간단하다.
SomeService의 find, save 메서드를 각각 실행해보고, 프록시가 잘 적용됐는지 확인해보면 된다.
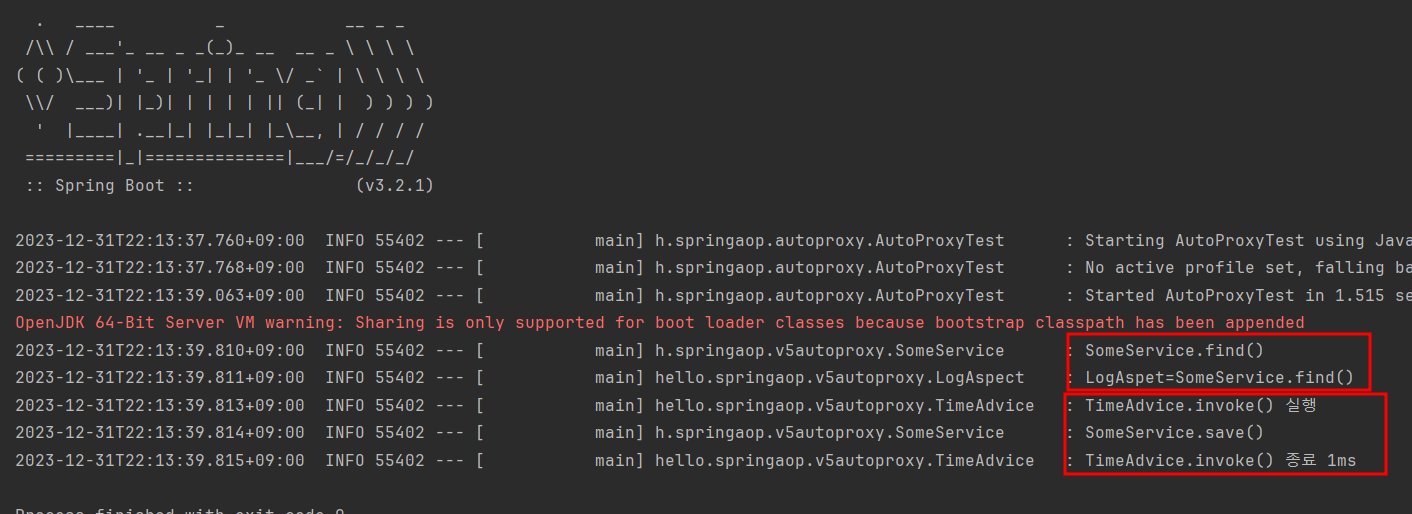
실행 결과를 확인해보면, find메서드에는 @Aspect로 만들어준 프록시 기능이 잘 적용된 것을 확인할 수 있고, save메서드에는 직접 Bean으로 등록해준 Advisor에 해당하는 프록시 기능이 잘 적용된 것을 확인할 수 있다.
☕ 마무리
이번 글에선느 스프링의 AOP에 대한 기본적인 동작 방식과 사용법에 대해서 알아보았다.
다음 글에서는 스프링 AOP에 대해서 좀 더 자세히 다뤄보도록 하겠다.
그럼 이만 마치도록 하겠다. 😊