☕️ 개요
이번 글에서는 Virtual thread의 원리나 특징에 대한 설명보다는 Spring boot에서 Virtual thread를 사용하는 예제를 통해서, 설정하는 방법이나 성능적인 측면을 살펴보도록 하겠다.
👨🍳 준비물
🔗 깃헙
1) build.gradle
plugins {
    id 'java'
    id 'org.springframework.boot' version '3.5.6'
    id 'io.spring.dependency-management' version '1.1.7'
}

group = 'study'
version = '0.0.1-SNAPSHOT'

java {
    sourceCompatibility = '25'
}

configurations {
    compileOnly {
        extendsFrom annotationProcessor
    }
}

repositories {
    mavenCentral()
}

dependencies {
    implementation 'org.springframework.boot:spring-boot-starter-data-jpa'
    implementation 'org.springframework.boot:spring-boot-starter-web'
    implementation 'org.springframework.boot:spring-boot-starter-actuator'
    implementation 'io.micrometer:micrometer-registry-prometheus'

    compileOnly 'org.projectlombok:lombok'
    runtimeOnly 'com.mysql:mysql-connector-j'
    annotationProcessor 'org.projectlombok:lombok'

    testImplementation 'org.springframework.boot:spring-boot-starter-test'
    testCompileOnly 'org.projectlombok:lombok'
    testAnnotationProcessor 'org.projectlombok:lombok'
}

tasks.named('test') {
    useJUnitPlatform()
}
이 프로젝트에서는 JDK25버전과 현 시점 최신 버전인 Spring boot 3.5.6버전을 사용하도록 하겠다.
JDK25버전을 사용하는 이유는 JDK24에 포함된 JEP491에서 synchronized 키워드 사용시 발생하던 Pinning 이슈가 해결되었기 때문이다.
2) docker-compose.yaml
services:
  mysql:
    container_name: mysql
    image: mysql:8.4.1
    environment:
      - MYSQL_ROOT_PASSWORD=1234
      - MYSQL_DATABASE=vt
    ports:
      - "3306:3306"
    command: [ 'mysqld', '--character-set-server=utf8mb4', '--collation-server=utf8mb4_general_ci' ]
이번 글에서는 MySQL을 DB로써 사용할 것이므로, 위와 같이 Docker compose 파일을 작성해준다.
3) application.yaml
spring:
  application:
    name: virtual-thread-app
  threads:
    virtual:
      enabled: true
  profiles:
    active: local
  datasource:
    driver-class-name: com.mysql.cj.jdbc.Driver
    url: jdbc:mysql://localhost:3306/vt
    username: root
    password: 1234
    hikari:
      maximum-pool-size: 100
      minimum-idle: 100
  jpa:
    hibernate:
      ddl-auto: create-drop
management:
  endpoints:
    web:
      exposure:
        include: health,metrics,prometheus
  metrics:
    enable:
      jvm: true
      system: true
      process: true
커넥션 풀 사이즈를 100으로 하고, Virtual thread 기능을 기본적으로 활성화해준다.
💡 spring.threads.virtual.enabled을 true로 설정하면?
- 별도의 설정이 없다면,
TaskExecutor와AsyncTaskExecutor가 Virtual thread가 생성되도록 바뀐다.- 임베디드 WAS에서 HTTP요청을 가상 스레드에서 처리한다. 즉, 요청마다 가상 스레드가 하나씩 생성되어서 처리가 된다.
📔 코드 작성
실질적인 기능 테스트를 위해서 필요한 코드들을 먼저 작성해보자.
1) 엔티티 작성
@Getter
@NoArgsConstructor
@Entity
@Table(name = "posts")
public class Post {

	@Id
	@GeneratedValue(strategy = GenerationType.IDENTITY)
	private Long id;
	private String title;
	private String content;
	@CreationTimestamp
	private LocalDateTime createdAt;
	@UpdateTimestamp
	private LocalDateTime updatedAt;

	public static Post create(String title, String content) {
		Post post = new Post();
		post.title = title;
		post.content = content;
		return post;
	}

}
'게시글'을 나타내는 매우 간단한 형태의 엔티티를 하나 만들어준다.
2) 레포지토리 작성
public interface PostJpaRepository extends JpaRepository<Post, Long> {}레포지토리 또한 아주 간단하게 JpaRepository를 상속해서 하나 만들어준다.
3) 서비스 작성
@Service
@Transactional
@RequiredArgsConstructor
public class PostServiceImpl {

	private final PostJpaRepository postJpaRepository;

	public Post writePost(String title, String content) {
		return postJpaRepository.saveAndFlush(Post.create(title, content));
	}

	public Post writeRandomPost() {
		return writePost(UUID.randomUUID().toString(), UUID.randomUUID().toString());
	}

}
'게시글'을 작성하는 메서드들로 간단하게 서비스 클래스도 작성해준다.
4) 컨트롤러 작성
@Slf4j
@RequiredArgsConstructor
@RestController
@RequestMapping("/api/posts")
public class PostController {

	private final PostServiceImpl postService;

	@GetMapping
	public void sleep() throws InterruptedException {
		log.info("sleeping...");
		Thread.sleep(1000);
	}

	@PostMapping
	public void writeRandomPost() {
		Post post = postService.writeRandomPost();
		log.info("글 생성: {}", post.getId());
	}

	public void writeRandomPosts(int count, ExecutorService executor) {
		List<CompletableFuture<Post>> futures = new ArrayList<>();
		for (int i = 0; i < count; i++) {
			futures.add(CompletableFuture.supplyAsync(postService::writeRandomPost, executor));
		}
		String result = allOf(futures.toArray(new CompletableFuture[0]))
			.thenApply(v -> {
				StringBuilder sb = new StringBuilder();
				for (int i = 0; i < futures.size(); i++) {
					if (i > 0) {
						sb.append(", ");
					}
					sb.append(futures.get(i).join().getId());
				}
				log.info(sb.toString());
				return sb.toString();
			}).join();
		log.info(result);
	}

	@PostMapping("/{count}/platform")
	public void writeRandomPostByPlatformThread(
		@PathVariable int count
	) {
		writeRandomPosts(count, Executors.newFixedThreadPool(100));
	}

	@PostMapping("/{count}/virtual")
	public void writeRandomPostByVirtualThread(
		@PathVariable int count
	) {
		writeRandomPosts(count, Executors.newVirtualThreadPerTaskExecutor());
	}

}
컨트롤러는 코드 양이 좀 많은데 writeRandomPosts 메서드가 주요하므로, 이에 대해서만 이야기하겠다.
	public void writeRandomPosts(int count, ExecutorService executor) {
		List<CompletableFuture<Post>> futures = new ArrayList<>();
		for (int i = 0; i < count; i++) {
			futures.add(CompletableFuture.supplyAsync(postService::writeRandomPost, executor));
		}
		String result = allOf(futures.toArray(new CompletableFuture[0]))
			.thenApply(v -> {
				StringBuilder sb = new StringBuilder();
				for (int i = 0; i < futures.size(); i++) {
					if (i > 0) {
						sb.append(", ");
					}
					sb.append(futures.get(i).join().getId());
				}
				log.info(sb.toString());
				return sb.toString();
			}).join();
		log.info(result);
	}
어려운 로직은 아니고, count만큼 글을 작성하는 메서드를 호출하며 이 작업들을 파라미터로 받은 executor를 통해서 처리하는 로직이 작성되어 있다.
그리고, 작성된 '게시글'들의 Id를 콤마 구분자로 구분지어 하나의 문자열로 응답한다.
🔥 테스트: WAS 처리량
💡 부하 테스트할 때에는 K6를 사용하며, K6에 대한 설명은 생략한다.
1) K6 테스트 코드 작성
export const options = {
	vus: 200,
	duration: '5s',
};

export default function () {
	http.get('http://localhost:8080/api/posts');
}
위와 같이 테스트 코드를 작성한다.
테스트하고자하는 API는 특별한 로직없이 Thread.sleep(1)을 통해서 1초 대기 후, 응답하는 API이다.
2) Virtual thread 활성화
spring:
  threads:
    virtual:
      enabled: true
위와 같이 Spring의 Virtual thread 기능을 활성화해주고, 테스트 코드를 실행해보자.
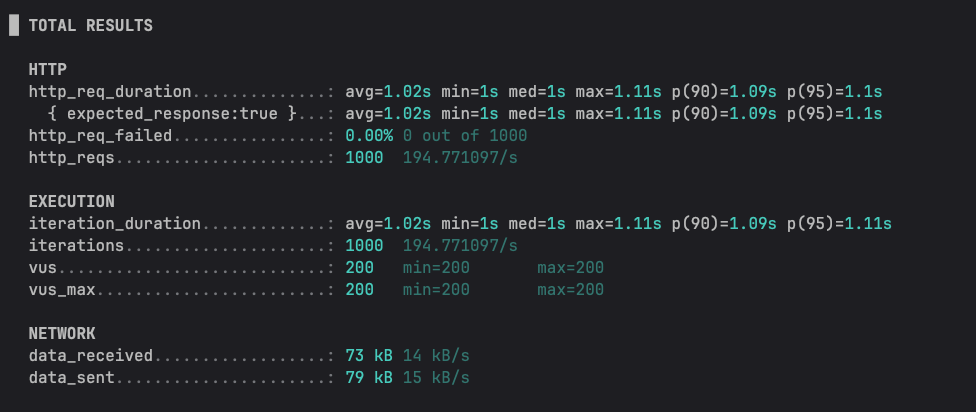
실행 결과는 이렇게 나왔고, 평균 TPS는 194정도 나와주었다.
3) Virtual thread 비활성화
spring:
  threads:
    virtual:
      enabled: false
위와 같이 Spring의 Virtual thread 기능을 비활성화해주고, 테스트 코드를 실행해보자. Tomcat의 최대 쓰레드 수를 10으로 제한했기 때문에 당연하게도 매우 낮은 처리량이 기록될 것으로 예상된다.
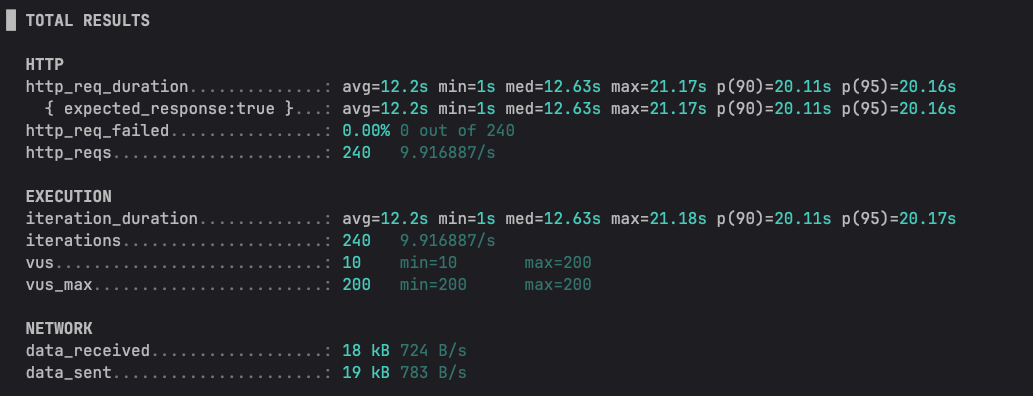
실제로도 TPS가 9.9로 매우 낮게 측정되었다.
4) 결론
너무 억지(?)스럽게 만들어낸 결과이긴하지만 이 테스트를 통해서 알 수 있는 것은 Spring의 Virtual thread 기능을 활성화할 경우, WAS는 HTTP요청을 가상 스레드에서 처리하게 되고, 사실상 WAS의 스레드 수는 큰 의미가 없어지며, 처리량이 대폭 상승하는 것을 확인할 수 있다.
🔥 테스트: 스레드 처리량
💡 이번 테스트에서는 Spring의 Virtual thread 옵션을 모두 활성화하였다.
1) K6 테스트 코드 작성
export const options = {
	vus: 200,
	duration: '5s',
};

export default function () {
	http.post('http://localhost:8080/api/posts/3/virtual');
}
export const options = {
vus: 200,
duration: '5s',
};
export default function () {
http.post('http://localhost:8080/api/posts/3/platform');
}Virtual thread를 사용해서 병렬 처리하는 API와 Platform thread를 사용해서 병렬 처리하는 API를 호출하는 테스트 코드를 각각 작성해주고, 이 둘의 실행을 통해서 성능을 비교해본다.
2) Virtual thread 사용

Virtual thread를 사용해서 병렬 처리를 한 결과 210정도의 TPS를 기록하였다.
3) Platform thread 사용
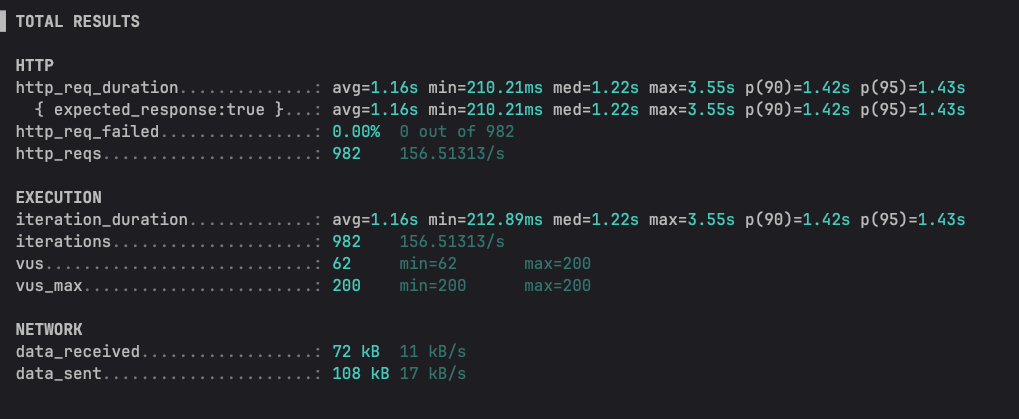
Platform thread를 사용해서 병렬 처리를 한 결과 156정도의 TPS를 기록하였다.
4) 결론
이 테스트를 통해서 명백히 Platform thread보다 Virtual thread의 처리량이 앞서는 것을 확인할 수 있었다.
🔥 테스트: CPU, 메모리 사용량
이번에는 바로 직전에 수행한 테스트 코드를 통해서 Platform thread와 Virtual thread가 각각 얼마 만큼 CPU와 메모리를 잡아먹을지(?) 테스트해보겠다.
💡 서버의 Heap 메모리는 VM옵션(
-Xmx512m -Xms512m)을 통해서 512MB로 설정
2) Virtual thread 사용
k6 run thread-virtual.js && curl http://localhost:8080/actuator/prometheus | grep -E "(jvm_memory|jvm_threads|process_cpu)"이전 섹션에서 사용한 K6 테스트 코드를 실행한 직후에 프로메테우스 지표를 찍도록 명령어를 구성하였고, 실행 결과는 아래와 같다.
- 평균 응답 시간: 566ms
- p95 응답 시간: 720ms
- CPU 사용률: 0에 수렴 (맥북 M4 프로의 위엄..?)
- CPU 사용 시간: 10.8초
- 전체 라이브 스레드: 38개
- Heap 메모리 사용량: 195MB (다른 영역보다 Eden영역이 Platform thread에 비해서 훨씬 적었다)
3) Platform thread 사용
k6 run thread-platform.js && curl http://localhost:8080/actuator/prometheus | grep -E "(jvm_memory|jvm_threads|process_cpu)"이전 섹션에서 사용한 K6 테스트 코드를 실행한 직후에 프로메테우스 지표를 찍도록 명령어를 구성하였고, 실행 결과는 아래와 같다.
- 평균 응답 시간: 1050ms
- p95 응답 시간: 1390ms
- CPU 사용률: 0에 수렴 (맥북 M4 프로의 위엄..?)
- CPU 사용 시간: 13.2초
- 전체 라이브 스레드: 2981개
- Heap 메모리 사용량: 288MB
4) 결론
전반적인 지표가 Virtual thread가 더 높은 효율성을 보이는 것을 확인할 수 있다. 그리고 당연하게도 실질적인 스레드 사용량이 현저히 적어서 스레드 각각에 할당되는 스택 메모리를 매우 많이 절약할 수 있음을 확인하였다.
즉, Virtual thread를 사용함으로써 서버의 처리량을 높일 수 있는 것은 물론, 서버 자원을 매우 효율적으로 사용할 수도 있는 것이다.
그리고, 현실에서 서버를 운영할 때에는 '맥북 M4 프로' 같은 것으로는 당연히 돌리지 않고, 제한된 CPU와 메모리 용량을 사용하게 되는 것을 고려했을 때 Virtual thread가 낮은 서버 용량으로도 높은 성능을 뽑을 수 있는 매우 매우 강력한 도구인 것을 다시 한 번 확인할 수 있는 것 같다.
더불어 JPA가 아닌 Reactive 진영의 DB 기술들을 사용한다면, 정말 엄청난 성능 향상을 기대할 수 있겠다고 문득 생각이 들었다. ㅎㅎ