해당 글은 공식문서를 번역 및 내용을 추가하여 작성하였습니다.
왜 React를 공부해?
현 시점(24.04.04)에서 필자는 백엔드 엔지니어를 희망하고 있지만..
대학에서 진행하고 있는 졸업 프로젝트에서 프론트 담당자가 딱히 정해져 있지 않기에...
프론트 역할까지 해야하는 상황이다... 해야지 뭐
Create React app in Local
React를 빠르게 배우기 위해서 로컬에 react app을 생성하였다.
Create React App 깃허브에 들어가면 어떻게 react app을 생성하는지 자세히 나와있으니 참고바란다!
react app을 설치하기 앞서 아래의 플랫폼 혹은 도구들이 로컬 환경에 설치되어야 한다.
- Node : 14.0.0 or later version
- npm or npx or yarn : package를 설치해주기 위한 tool, 자세한 버전은 공식문서를 확인하시길..
필자는 이미 Node.js 환경과 npm이 설치된 상황이다!
npm init react-app my-appterminal 창에 위와 같은 명령어를 입력하면 my-app이라는 directory가 생성되고 해당 directory 안에 react-app이라는 프로젝트가 생성된다.
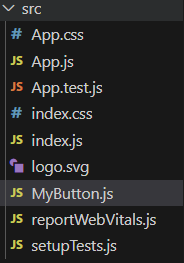
my-app
├── README.md
├── node_modules
├── package.json
├── .gitignore
├── public
│   ├── favicon.ico
│   ├── index.html
│   └── manifest.json
└── src
    ├── App.css
    ├── App.js
    ├── App.test.js
    ├── index.css
    ├── index.js
    ├── logo.svg
    └── serviceWorker.js
    └── setupTests.js
해당 프로젝트의 package.json에 들어가보면
 위와 같이 name, version, dependecies 등의 정보들이 정의되어있다. 이는 우리가 앞에서
 npm init react-app init이라는 명령어를 통해서 어떻게 react-app이라는 package가 설치되었는지 알 수 있다.
해당 명령어를 통해서package.json를 실행하게되고, package.json에 작성된 dependecies들을 가져오거나 scripts를 실행시킴으로써 react-app이라는 package 환경이 setting 되는 것이다.
npm start 명령어로 react app을 실행시키면 localhost:3000에서 확인할 수 있다.
Quick Start
이제 React를 빠르게 익혀보자
Creating and nesting components
React app들은 component들로 만들어진다.
- Component
UI(user interfase)의 한 조각
각 컴포넌트들은 자기 자신만의 logic 혹은 appearance들을 가진다.
Component는 button 같이 작을 수도 있고 entire page같이 거대할 수 있다.
React Component는 markup(JSX임!!)을 return하는 JavaScript 함수라고 할 수 있다!!
MyButton이라는 Component 생성
src 디렉토리 안에 MyButton.js 라는 Module을 만들고 아래와 같이mybutton함수를 선언해준다.
export default function myButton() {
  return <button>I'm a button</button>;
}
보통은 위와 같이 Component 하나에 대해서 module로서 생성한다.
이후 Component로서 사용할 함수에 export default 라는 keyword를 붙여준다.
export에 대해서 알고 있다면 MDN 문서를 참고하시라~
export
: module에 정의한 함수, 상수, 배열, 클래스 등을 외부 파일에서 import해서 사용하기 위한 keyword이다.export default
: file에서 main component를 명시하기 위한 keyword이다.
: 하나의 file(module)에export default가 하나만 존재한다.
: 특정 module를 import할 때 정확한 이름을 알 수 없어도 import가 가능하다. 즉, 이름을 마음대로 바꿔서 import가 가능하다.// 📁 user.js export default class User { constructor(name) { this.name = name; } } // 📁 main.js import MyUser from './user.js'; // User가 아닌 MyUser!! new User('John');
🤔 잠깐 export를 여러 개 할 수 있나용?
만약 한 module에 export해야 하는 것이 여러 개라면 default export가 아닌 named export를 사용하여 여러개를 export 할 수 있다. 단, import 할 때 반드시 export한 name을 사용한다.// 📁 say.js export function sayHi() { ... } export function sayBye() { ... } export function becomeSilent() { } // 📁 main.js import {sayHi, sayBye} from './say.js'; // 반드시 중괄호 안에 해당 이름을 가져와야
MyAppComponent에서MyButtonComponent import
import MyButton from "./MyButton.js"; // MyButton.js 모듈로 부터 MyButton 컴포넌트 가져오기
import "./App.css";

export default function MyApp() {
  return (
    <div>
      <h1>Welcome to my app</h1>
      <MyButton />
    </div>
  );
}
즉 위와 같이 MyApp에서 MuButton Component를 구성한 것처럼, Component안에 다른 Component를 중첩할 수 있다.
이때, <MyButton /> 처럼 대문자로 시작하는데, 이를 통해 React Component라는 것을 알 수 있다. HTML 태그는 반드시 소문자로 시작해야하지만, React Component는 반드시 대문자로 시작해야 하기 때문이다.
- 결과
npm start로 실행시키면 localhost:3000에서 아래와 같이 확인할 수 있다.

Writing makeup with JSX
앞에서 우리가 보았던 markup syntax는 JSX라고 한다. 반드시 필요한 것은 아니지만, 대부분의 React project에서는 편의를 위해 JSX를 사용한다.
function AboutPage() {
  return (
    <> // <> 제거시 에러 발생!!
      <h1>About</h1>
      <p>Hello there.<br />How do you do?</p>
    </>
  );
}
JSX는 태그를 반드시 close 해야한다는 엄격함이 있다. 또한 Component는 여러 개의 JSX 태그를 return할 수 없다. <div>...</div> 나 empty <>..</>와 같이 shared parent로 태그들을 감싸야 한다.
Adding styles
<img className="avatar" />React에서는 className으로 CSS class를 명시한다. HTML에서 class attribute와 동일한 방식으로 작동한다.
/* In your CSS */
.avatar {
  border-radius: 50%;
}
분리된 CSS file에 CSS 규칙을 적으면 된다!
Displaying data
JSX는 Javascript에 markup을 사용할 수 있게 해준다. 이때 중괄호{}를 이용하여 Javascript를 사용할 수 있다. 즉, code 상의 어떤 variable을 포함하고 보여줄 수 있다.
- Example
return (
  <h1>
    {user.name} // javascript를 사용한 부분!
  </h1>
);
jsx에서 user.name을 display한다.
또한 JXS attibutes에서도 Javascript를 사용할 수 있다. 단, "" 대신에 {}를 사용해야 한다.
- Example
return (
  <img
    className="avatar"
    src={user.imageUrl}
  />
);
위의 예시를 보면 className 속성에서는 CSS class로서 "avatar" string이 전달되지만, src 속성에서는 Javascript의 user.imageUrl 변수 값을 읽고 해당 값을 src 속성으로 전달된다
- 결과

/* 📁 App.css */
.avatar {
  border-radius: 50%;
}
/* 📁 App.js */
import "./App.css"; // css 파일을 가져옴
const user = {
name: "Hedy Lamarr",
imageUrl: "https://i.imgur.com/yXOvdOSs.jpg",
imageSize: 90,
};
export default function Profile() {
return (
<>
<h1>{user.name}</h1>
<img
className="avatar"
src={user.imageUrl}
alt={"Photo of " + user.name}
style={{
width: user.imageSize,
height: user.imageSize,
}}
/>
</>
);
}style{{}}
style={}의 {} 안에는{속성명: 속성값}으로 값을 지정해준다. style이 JavaScript variable에 따라 달라지는 경우 style 속성을 사용할 수 있다.
Conditional rendering
Javascript에서 일반적으로 작성하는 것처럼 React에서도 조건문을 작성하면 된다.
- Example
let content;
if (isLoggedIn) { // 로그인이 되었다면
  content = <AdminPanel />; // Admin을 보여줌
} else {
  content = <LoginForm />; // 아니라면 LoginForm을 보여줌
}
return (
  <div>
    {content}
  </div>
);
위의 예제는 if statement를 이용해서 JSX를 conditionally하게 사용하는 것을 보여준다.
<div>
  {isLoggedIn ? (
    <AdminPanel />
  ) : (
    <LoginForm />
  )}
</div>if와 다르게 conditional ? operator는 JSX 안에서 적용된다.
<div>
  {isLoggedIn && <AdminPanel />}
</div>
else branch가 필요없다면 && syntax를 사용하면 된다.
Rendering lists
for loop나 array의 map() 함수와 같은 JavaScript feature를 사용하여 Component list를 rendering한다.
- Example
const products = [
  { title: 'Cabbage', id: 1 },
  { title: 'Garlic', id: 2 },
  { title: 'Apple', id: 3 },
];
'product'라는 list를 갖고 있다 해보자.
const listItems = products.map(product =>
  <li key={product.id}>
    {product.title}
  </li>
);

return (
  <ul>{listItems}</ul>
);
Component 안에 map() 함수를 사용하여 products의 배열을 <li> items들의 배열로 transform한다.
여기서 관심있게 봐야 하는 것은 <li>의 key 속성이다. list에서 각 item에 대해 해당 item을 고유하게 식별하는 string 혹은 number를 넘겨준다.
일반적으로 key는 database ID와 같은 나의 데이터로부터 가져와야 한다. React는 나중에 insert, delete 또는 reorder할 경우 어떤 일이 발생했는지 확인하기 위해 키를 사용한다.
- 결과

/* 📁 ShoppingList.js */
const products = [
  { title: 'Cabbage', isFruit: false, id: 1 },
  { title: 'Garlic', isFruit: false, id: 2 },
  { title: 'Apple', isFruit: true, id: 3 },
];

export default function ShoppingList() {
  // 주어진 배열을 이용해서 List를 생성하는 Component
  const listItems = products.map(product =>
    <li
      key={product.id}
      style={{
        color: product.isFruit ? 'magenta' : 'darkgreen'
      }}
    >
      {product.title}
    </li>
  );

  return (
    <ul>{listItems}</ul>
  );
}
/* 📁 ShoppingList.js */
import ShoppingList from "./Shoppinglist";
import "./App.css";
export default function App() {
return (
<>
<ShoppingList />
</>
);
}Responding to events
Component 안에 event handler function을 선언함으로써 event들을 응답할 수 있다.
function MyButton() {
  function handleClick() { // event handler function
    alert('You clicked me!');
  }

  return (
    <button onClick={handleClick}>
      Click me
    </button>
  );
}
onClick={handleClick}
함수의 끝에 parentheses()가 없다! 그 이유는 event handler 함수를 호출하면 안 되기 때문이다. 오직 전달만 하기 위해서다. 사용자가 button을 클릭할 때 React가 알아서 event handler를 호출할 것이다~
Updating the screen
종종 Component가 일부 정보를 "기억"하거나 보여주기를 원할 것이다. 예를 들어 button이 클릭된 횟수를 count하기를 원할 수도 있으니!! 이때 Component에 state를 추가한다.
- import
useStatefrom React
import { useState } from 'react';- declare a
state variableinside component
function MyButton() {
  const [count, setCount] = useState(0);
// ...userState로부터 2가지를 얻을 수 있다.
- count : the current state
- setCount : the function that lets you update it
state는 어떤 이름이든 가능하다. 하지만 [something, setSomething]과 같은 conevention을 사용한다.
처음에 button이 표시될 때 count는 0이다 왜냐하면 useState()에 0을 전달했기 때문! state를 변하기를 원할 때 setCount()를 호출해서 새로운 value를 전달하면 된다.
- Example
/* 📁 MyButton.js */
import { useState } from "react";

export default function MyButton() {
  const [count, setCount] = useState(0);

  function handleClick() {
    setCount(count + 1);
  }

  return <button onClick={handleClick}> Clicked {count} times </button>;
}
위의 예제는 버튼을 클릭하면 count 값이 증가한다.
사용자가 버튼을 클릭하면 React에서 handleClick을 호출하고, count 값이 0,1,2.... 와 같이 1씩 증가한다.
- 결과
/* 📁 App.js */
import MyButton from "./MyButton";
import "./App.css";
export default function App() {
return (
<>
<h1>Counters that update separately</h1>
<MyButton />
<MyButton />
</>
);
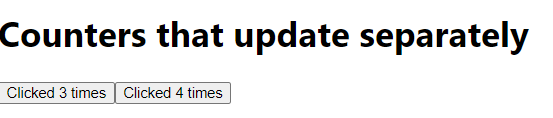
}위와 같이 같은 Component를 여러 번 render하면, 각각은 자신만의 state를 갖게 돤다
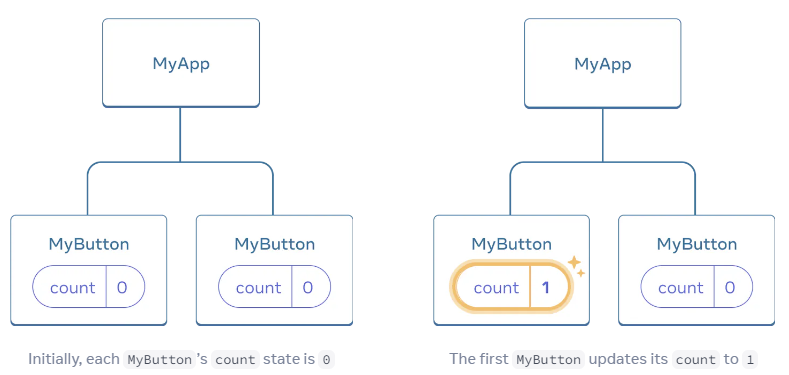
각 버튼을 클릭해보면 count 숫자가 분리되어 증가한다.
각 버튼은 자기 자신의 count state를 "기억한다" 그리고 다른 버튼에 영향을 주지 않는다.
Using Hooks
-
use로 시작하는 함수들은
Hooks라고 한다.
사실useState는 react에서 제공된 built-in(내장된) 함수이다. 다른 built-in Hooks를 찾고 싶다면 API reference를 참고하길 바란다. -
Hooks는 다른 함수에 비해 더 제한적이다. Component들(혹은 다른 Hooks)의 상단에만 Hooks을 호출할 수 있다.
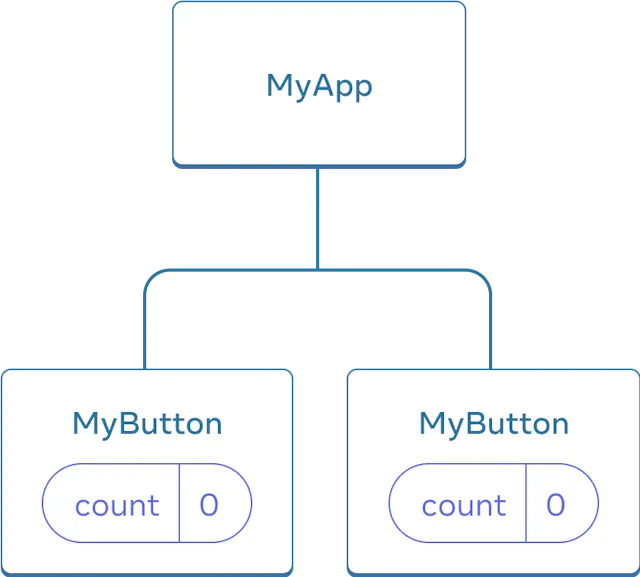
Sharing data between components
 이전 Example에서, 각
 MyButton 자기 자신만의 독립된 count를 가졌고 각 button이 클릭되었을 때 클릭된 버튼에 대한 count만 바뀌었다.
그.러.나.
data를 share하고 항상 같이 update되는 components가 필요할 수도 있자냐?!?
 두
두 MyButton components가 같은 count를 display하고 함께 update하도록 하려면, individual button의 각 state를 "위쪽에서" 모든 Mybutton을 포함하는 가장 가까운 component로 이동해야 한다.
즉 MyButton example에서는 MyApp으로 state를 이동한다.
그 결과 두 button 중 하나를 클릭하면, MyApp에 있는 count는 변할 것이고, 이는 각 Mybutton에 있는count도 함께 변할 것이다.
1. move the state up from MyButton into MyApp
/* 📁 App.js(MyApp.js) */
import MyButton from "./MyButton";
import "./App.css";

export default function App() {
  const [count, setCount] = useState(0);

  function handleClick() {
    setCount(count + 1);
  }

 ...

}
2. pass the state down from MyApp to each MyButton with the shared click handler
import MyButton from "./MyButton";
import "./App.css";

export default function App() {
  const [count, setCount] = useState(0);

  function handleClick() {
    setCount(count + 1);
  }

  return (
    <>
      <h1>Counters that update separately</h1>
      <MyButton count={count} onClick={handleClick} />
      <MyButton count={count} onClick={handleClick} />
    </>
  );
}
이전에 <img>와 같은 태그를 사용한 것처럼, JSX 중괄호를 사용해서 MyButton에 information 전달 가능하다.
이와 같이 전달하는 information을 props라고 한다.
이를 통해 MyApp Components에는 count state와 handlerClick event handler가 포함되어 있다. 또한 두 가지 모두 props로서 각 button에 전달된다.
3. change MyButton to read the props you have passed from its parent component
/* 📁 MyButton.js */
export default function MyButton({ count, onClick }) {
  return <button onClick={onClick}> Clicked {count} times </button>;
}
button을 클릭하면 onClick handler가 실행된다.
-> 각 button의 onClick prop은 MyApp(App)에서handleClick 함수로 설정되었다.
-> 따라서 setCount(count+1)를 호출하여 count state variable을 증가시킨다.
-> 새 count 값은 각 button에 prop으로 전달되므로 모두 새 값을 표시된다.
이를 “lifting state up"라 한다.
By moving state up, you’ve shared it between components.