Widget
- state와 configuration을 가진다
- state가 바뀌면, widget도 새롭게 build된다.
import 'package:flutter/material.dart';

void main() {
  runApp(
    Center(
      child: Text(
        "Hello, world!",
        textDirection: TextDirection.ltr,
      )
    )
  );
}
가장 기본적인 Flutter app의 구조.
runApp() 은 widget을 인자로 받아 해당 위젯을 widget tree의 root widget으로 만들어준다.
보통 위젯을 만들 때 StatelessWidget 이나 StatefulWidget 의 sugclass들인 위젯들을 만들게 된다.
위젯의 main job은 build 함수를 구현하는 것. build 함수는 하위 수준의 위젯으로 위젯을 설명한다.
- build
build 함수는 해당 위젯의 사용자 인터페이스 부분을 설명한다. 프레임워크는 위젯이 BuildContext의 트리에 추가되거나, 위젯의 의존성이 바뀌었을 때 build 함수를 실행시킨다.
함수가 호출되면 프레임워크는 해당 위젯의 하위 트리의 위젯들을 build함수로부터 return된 위젯들로 바꾼다.
Basic widgets
-
text
-
Row, Column
horizontal(Row), vertical(Column) direction의 layout을 만들게 해준다.
-> 안드로이드의 Linear Layout.
- Stack
Row와 Column이 일렬로 나열한다면, Stack은 위젯들을 서로 겹치게 배열한다.
Positioned 위젯을 사용하여 Stack의 자식 위젯에 대한 상대적인 위치를 설정할 수 있다.
- Container
(일단은 보이지 않는) 네모난 element를 만들어준다. BoxDecoration을 통해 속성을 변경할 수 있다. 위젯들을 둘러싸서 background를 만들거나 할 때 사용한다.
- Placeholder
실제 위젯을 넣기 전에 임시로 위젯을 배치할 수 있다.
-
AppBar
-
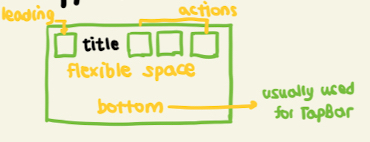
Scaffold
홈 스크린의 위젯 트리를 구성하는 appBar, Title, Body를 기본 제공한다.
Material Component
- 머티리얼 디자인이란 플랫 디자인의 장점을 살리면서도 빛에 따른 종이의 그림자 효과를 이용하여 입체감을 살리는 디자인 방식을 말한다
- Material app은 MaterialApp 위젯으로부터 시작할 수 있다.
- MaterialApp 위젯으로 만들 수 있는 유용한 위젯들 중 하나는 Navigator이다
import 'package:flutter/material.dart';
void main() {
runApp(MaterialApp(
title: 'Flutter Tutorial',
home: TutorialHome(),
));
}
class TutorialHome extends StatelessWidget {
Widget build(BuildContext context) {
return Scaffold(
appBar: AppBar(
leading: IconButton(
icon: Icon(Icons.menu),
tooltip: 'Navigation menu',
onPressed: null,
),
title: Text('Expample title'),
actions: <Widget>[
IconButton(
icon: Icon(Icons.search),
tooltip: 'Search',
onPressed: null,
)
]
),
body: Center(
child: Text('Hello World!'),
),
floatingActionButton: FloatingActionButton(
tooltip: 'Add',
child: Icon(Icons.add),
onPressed: null,
),
);
}
}Handling Gestures
class MyButton extends StatelessWidget {
Widget build(BuildContext context) {
return GestureDetector(
onTap: () {
print('My Button tapped');
},
child: Container(
height: 36.0,
padding: const EdgeInsets.all(8.0),
margin: const EdgeInsets.symmetric(horizontal: 8.0),
decoration: BoxDecoration(
borderRadius: BorderRadius.circular(5.0),
color: Colors.lightGreen[500],
),
child: Center(
child: Text('btn'),
)
)
);
}
}GestureDetector 위젯은 무언가 보여주지는 않지만 유저의 제스처를 인식하는 역할을 한다. 위의 예제에서는 onTap, 즉 유저가 버튼을 눌렀을 때의 제스처가 일어났을 때 일어날 콜백함수를 넣어주고 있다.
Changing widgets in response to input
- stateless widget에만 해당한다.
- stateless 위젯은 부모 위젯으로부터 받은 인자들을 final 변수에 저장한다. Build()함수가 실행되면 해당 인자들을 이용하여 새롭게 하위 위젯들을 생성하겠지.
class Counter extends StatefulWidget {
// This class is the configuration for the state. It holds the
// values (in this case nothing) provided by the parent and used by the build
// method of the State. Fields in a Widget subclass are always marked "final".
_CounterState createState() => _CounterState();
}
class _CounterState extends State<Counter> {
int _counter = 0;
void _increment() {
setState(() {
_counter++;
});
}
Widget build(BuildContext context) {
return Row(
children: <Widget>[
RaisedButton(
onPressed: _increment,
child: Text('Increment'),
),
Text('Count: $_counter'),
],
);
}
}setState(): 해당 함수가 호출되었다는 것은 프레임워크에게 해당 state에서 무언가 변화하였음을 알려주어build함수가 실행되게 만든다.build(): setState함수가 호출될때마다 다시 작동한다. 재작동하는 것이 굉장히 효율적이기 때문에 위젯을 하나하나 바꿔주기보다는 그냥 rerunning 하는 게 편하다.
애니메이션
애니메이션용 위젯으로 위젯을 감싸는 방식으로 애니메이션을 삽입할 수 있다.
캔버스로 그리기
Flutter에서 사용자가 캔버스로 그리는 작업을 도와주는 클래스로는 CustomPaint 와 CustomPainter, 두 가지가 있다.
import 'package:flutter/material.dart';

void main() => runApp(MaterialApp(home: DemoApp()));

class DemoApp extends StatelessWidget {
  Widget build(BuildContext context) => Scaffold(body: Signature());
}

class Signature extends StatefulWidget {
  SignatureState createState() => SignatureState();
}

class SignatureState extends State<Signature> {
  List<Offset> _points = <Offset>[];
  Widget build(BuildContext context) {
    return GestureDetector(
      onPanUpdate: (DragUpdateDetails details) {
        setState(() {
          RenderBox referenceBox = context.findRenderObject();
          Offset localPosition =
          referenceBox.globalToLocal(details.globalPosition);
          _points = List.from(_points)..add(localPosition);
        });
      },
      onPanEnd: (DragEndDetails details) => _points.add(null),
      child: CustomPaint(painter: SignaturePainter(_points), size: Size.infinite),
    );
  }
}

class SignaturePainter extends CustomPainter {
  SignaturePainter(this.points);
  final List<Offset> points;
  void paint(Canvas canvas, Size size) {
    var paint = Paint()
      ..color = Colors.black
      ..strokeCap = StrokeCap.round
      ..strokeWidth = 5.0;
    for (int i = 0; i < points.length - 1; i++) {
      if (points[i] != null && points[i + 1] != null)
        canvas.drawLine(points[i], points[i + 1], paint);
    }
  }
  bool shouldRepaint(SignaturePainter other) => other.points != points;
}
스크린 간 이동하기
Flutter는 하나의 Activity 안에서 Navigator와 Route를 통해 스크린 사이를 이동한다.
Route : 스크린이나 페이지를 추상화한 것
Navigator : route를 관리하는 위젯. 스택으로 작동하여 이동하려는 새로운 route로 push() 할 수 있고, pop()을 통해서 되돌아갈 수도 있다.
route를 이용한 페이지 간 이동에는 두 가지 방법이 있다
- route이름의 Map을 지정하기
import 'package:flutter/material.dart';
void main() {
runApp(MaterialApp(
home: MyAppHome(), // becomes the route named '/'
routes: <String, WidgetBuilder> {
'/a': (BuildContext context) => MyPage('page A'),
},
));
}
class MyAppHome extends StatelessWidget {
Widget build(BuildContext context) {
return ElevatedButton(
onPressed: () =>
{
Navigator.of(context).pushNamed('/a')
}
, child: Text("great"));
}
}
class MyPage extends StatelessWidget {
final String title;
MyPage(this.title);
Widget build(BuildContext context) {
return Scaffold(
body: ElevatedButton(
child: Center(child: Text(title)),
onPressed: () => Navigator.of(context).pop()
)
);
}
}- route로 바로 이동하기(MaterialPageRoute)
import 'package:flutter/material.dart';
void main() {
runApp(MaterialApp(
title: 'Navigation Basics',
home: FirstRoute(),
));
}
class FirstRoute extends StatelessWidget {
Widget build(BuildContext context) {
return Scaffold(
appBar: AppBar(
title: Text('First Route'),
),
body: Center(
child: RaisedButton(
child: Text('Open route'),
onPressed: () {
Navigator.push(
context,
MaterialPageRoute(builder: (context) => SecondRoute()),
);
},
),
),
);
}
}
class SecondRoute extends StatelessWidget {
Widget build(BuildContext context) {
return Scaffold(
appBar: AppBar(
title: Text("Second Route"),
),
body: Center(
child: RaisedButton(
onPressed: () {
Navigator.pop(context);
},
child: Text('Go back!'),
),
),
);
}
}비동기 UI
Dart는 단일 스레드 실행모델이다.
js에서 쓰듯 async, await을 이용할 수 있다.
loadData() async {
  String dataURL = "https://jsonplaceholder.typicode.com/posts";
  http.Response response = await http.get(dataURL);
  setState(() {
    widgets = json.decode(response.body);
  });
}
네트워크 호출
http package 를 이용
- pubspec.yaml 에 의존성 추기
dependencies: ... http: ^0.11.3+16네트워크 호출
import 'dart:convert';import 'package:flutter/material.dart';import 'package:http/http.dart' as http;[...] loadData() async { String dataURL = "https://jsonplaceholder.typicode.com/posts"; http.Response response = await http.get(dataURL); setState(() { widgets = json.decode(response.body); }); }}ProgressIndicator
ProgressBar와 마찬가지