현재 수강 중인 온라인 강의
➡️ Nomad Coder - Javascript for Beginners
#3.1 HTML in Javascript
.getElementById() 함수
: 원하는 요소를 id를 통해 불러오는 메소드
const title = document.getElementById("title");
// HTML document에 있는 title이라는 id가 붙여진 요소를 가져옴

console.dir(title);
// title을 가져온 것을 볼 수 있음, 그 안의 모든 속성들까지도.
자바스크립트는 HTML 요소를 가져오지만, HTML 요소를 시각적으로 보여주는 것은 아님
→ HTML 요소를 객체로서 가져와 모든 속성들을 조작할 수 있게 해줌
title.innerText = "Got you!"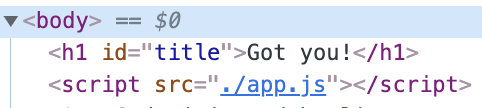
→ 자바스크립트로부터 내용이 변경된 HTML 요소 ✨
#3.2 Searching For Elements
대부분의 경우 id를 사용하지 않음, 대부분 classname이나 둘다 쓰는 경우가 많음
💡 Cannot set property ‘innerText’ of null = null(아무것도 없음)의 innerText 속성에 접근하려 했다
.getElementsByClassName('classname')
: class로 요소들을 불러오는 메소드 (동일 class가 있는 요소가 여러개일 수도 있으니 elements.
const hellos = document.getElementsByClassName("hello");

console.log(hellos);
// HTMLCollection(5) [h1.hello, h1.hello, h1.hello, h1.hello, h1.hello]
→ Array 자료형으로 가져옴
클래스가 붙은 태그 안에 있는 요소를 가져올 때는?
<!-- HTML -->
<div class="hello">
    <h1>Grab me!</h1>
</div>
1) 1차원적인 방법 : 모든 h1태그들을 가져오기
const hello = document.getElementsByTagName("h1");
console.log(hello);
// HTMLCollection [h1]
2) querySelector : CSS 방식으로 요소를 검색할 수 있는 메소드
const hello = document.querySelector(".hello h1");
console.log(hello);
// <h1>Grab me!</h1>
→ 이 방법이 가장 좋음! 💡 querySelector는 조건에 맞는 가장 첫 요소만 가져옴
3) querySelectorAll : CSS notation에 부합하는 모든 요소들을 가져옴
✨ querySelector는 심지어 “.hello h1:first-child” 등의 CSS Selector도 사용할 수 있음
#3.3 Events
.getElementById(), .getElementsByClassName(), .getElementsByTagName() 보다
.querySelect() .querySelectAll 이 최고!
console.log → 해당 element를 바로 콘솔에 찍기
console.dir → 객체 object 로서의 해당 element의 내용을 보여줌
💡 element의 style 속성에 들어가면 적용된 모든 CSS 속성들이 Javascript 객체의 형태로 나열되어있음!
= 자바스크립트로 style도 변경시킬 수 있음
console.dir(hello.style);

accentColor: ""
additiveSymbols: ""
alignContent: ""
alignItems: ""
alignSelf: ""
alignmentBaseline: ""
all: ""
animation: ""
animationDelay: ""
animationDirection: ""
animationDuration: ""
animationFillMode: ""
animationIterationCount: ""
animationName: ""
animationPlayState: ""
animationTimingFunction: ""
appRegion: ""
appearance: ""
ascentOverride: ""
aspectRatio: ""
backdropFilter: ""
backfaceVisibility: ""
background: ""
backgroundAttachment: ""
backgroundBlendMode: ""
...
event
: 마우스 클릭, 호버, 입력, 엔터키, 와이파이 연결 끊김 등의 모든 일어나는 이벤트들
addEventListener("이벤트")
// 클릭 시 폰트 색상이 파란색으로 변함
const handleTitleClick = () => {
  title.style.color = "blue";
};

title.addEventListener("click", handleTitleClick);
→ 1st argument : title을 click하는 이벤트를 계속 듣고있는 것
→ 2nd argument : 해당 이벤트 실행 시 수행할 동작 (예시엔 함수로 주어짐)
✨ 함수명 뒤에 ()가 붙지 않는 것 주의! 이벤트 발생 시 addEventListener 메소드가 함수를 실행시켜줌
#3.4 Events part 2
Events
해당 요소에 어떤 이벤트를 listen 할 수 있을지 찾는 방법
→ 구글에 요소 이름 + mdn 검색
→ Web API라고 되어있는 문서로 가기!
Element - Web APIs | MDN
HTMLElement - Web APIs | MDN
원하는 이벤트명을 쉽게 찾는 방법
console.dir(원하는 요소); 를 콘솔창에 찍어 객체 속성을 살펴보면 모든 on~ 속성들이 이벤트들이다.
예시)
mouseenter : 커서가 해당 요소 위에 있을 때 (클릭 X)
mouseleave : 커서가 해당 요소에서 벗어날 때
const handleMouseEnter = () => {
  title.innerText = "Mouse is here!";
};

const handleMouseLeave = () => {
  title.innerText = "Mouse is gone...";
};

title.addEventListener("mouseenter", handleMouseEnter);
title.addEventListener("mouseleave", handleMouseLeave);.gif)
#3.5 More Events
event를 사용하는 방법 - 두 가지
-
.addEventListener사용title.addEventListener("click", handleTitleClick); title.addEventListener("mouseenter", handleMouseEnter); title.addEventListener("mouseleave", handleMouseLeave); -
oneventname속성 사용title.onclick = handleTitleClick; title.onmouseenter = handleMouseEnter; title.onmouseleave = handleMouseLeave;
✨ addEventListener를 사용하는 것이 좋은 이유
: 나중에 .removeEventListener를 사용할 수 있음 + 더 보기 좋음
Window interface
Window - Web APIs | MDN
= 브라우저 창
예시1) resize 이벤트
const handleWindowResize = () => {
  document.body.style.backgroundColor = "tomato";
};
//✨ body는 document.body로 바로 접근이 가능함

window.addEventListener("resize", handleWindowResize);
: 브라우저 창의 크기를 변경하면 배경색이 tomato로 변함
예시2) copy 이벤트
const handleWindowCopy = () => {
  alert("Copier!");
};

window.addEventListener("copy", handleWindowCopy);
: copy 시 얼럿창 출력
예시3) online offline 이벤트
const handleWindowOffline = () => {
  alert("SOS! No WiFi");
};
window.addEventListener("offline", handleWindowOffline);

const handleWindowOnline = () => {
  alert("All Good");
};
window.addEventListener("online", handleWindowOnline);
: 인터넷 연결 / 끊김을 감지할 수 있음!
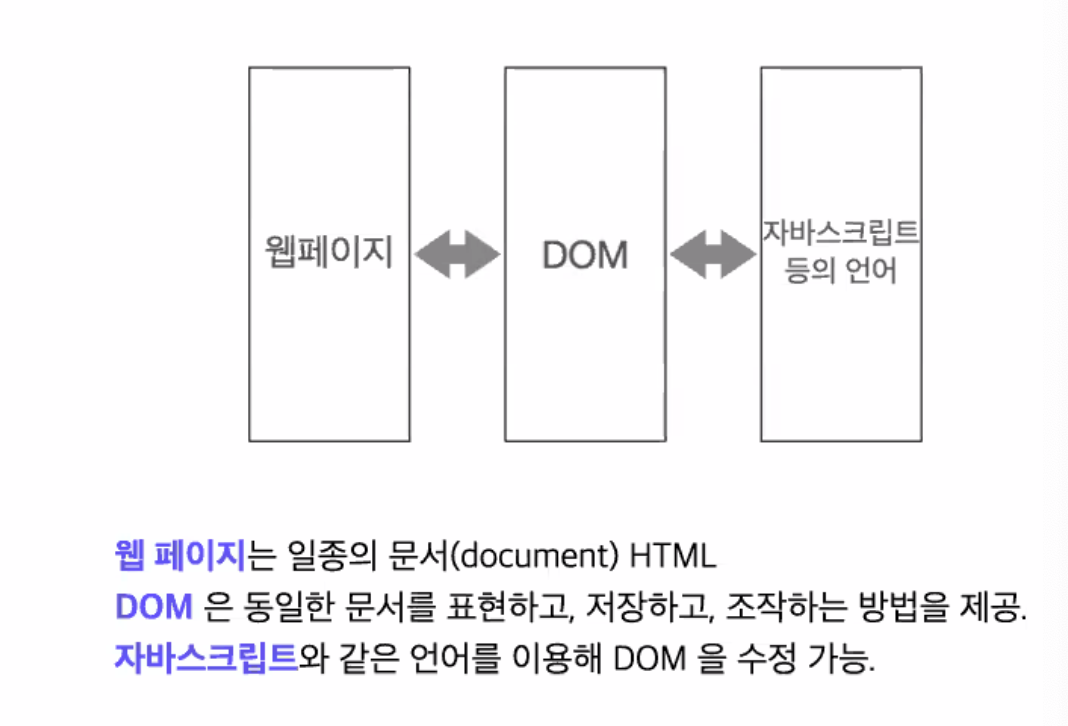
DOM
#3.6 CSS in Javascript
addEventListener + if ... else
의도 : 클릭 시 파란색 → 또한번 클릭 시 토마토색 → 반복...
const h1 = document.querySelector("div.hello:first-child h1");

const handleTitleClick = () => {
  if (h1.style.color === "blue") {  // getter
    h1.style.color = "tomato"; // setter
  } else {
    h1.style.color = "blue";
  }
};

h1.addEventListener("click", handleTitleClick);
→ if문을 사용하여 클릭시마다 색상이 변경되도록 할 수 있음!
🔥 변수 선언을 통해 더 깔끔하게 정리
const h1 = document.querySelector("div.hello:first-child h1");

const handleTitleClick = () => {
  const currentColor = h1.style.color;
  let newColor;
  if (currentColor === "blue") {  // getter
    newColor = "tomato";  // setter
  } else {
    newColor = "blue";
  }
  h1.style.color = newColor;
};

h1.addEventListener("click", handleTitleClick);