guard let response = response as? HTTPURLResponse else {
    // 조건 실패 시 실행되는 코드
    return
}
guard는 조건이 실패할 경우에만 코드 블록을 실행하고 종료하는 Swift의 제어문입니다.
조건이 성공하면 다음 코드가 계속 실행됩니다.
guard let은 옵셔널 바인딩에 사용됩니다.
as?는 "타입 캐스팅" 연산자입니다.
옵셔널 타입 캐스팅을 수행하며, 성공하면 해당 타입으로 변환하고, 실패하면 nil을 반환합니다.
response as? HTTPURLResponse는 response 객체가 HTTPURLResponse 타입인지 확인합니다.
response가 HTTPURLResponse인지 확인하고 안전하게 변환합니다.
만약 변환에 실패하면 nil이 반환됩니다.
let quote = try JSONDecoder().decode(Quote.self, from: data)- JSONDecoder()
JSONDecoder는 JSON 데이터를 Swift 객체로 디코딩하는 도구입니다.
예를 들어, JSON 데이터를 Swift의 struct나 class로 변환할 때 사용됩니다. - .decode(:from:)
decode(:from:) 메서드는 JSON 데이터를 디코딩하는 역할을 합니다.
첫 번째 인자: 어떤 타입으로 디코딩할지 알려줍니다.
두 번째 인자: 실제 JSON 데이터 (Data 타입)를 전달합니다. - Quote.self
Quote: JSON 데이터를 변환할 타입입니다.
.self: 타입 그 자체를 나타내는 키워드입니다.
의미:
Quote.self는 Quote 타입의 메타타입을 나타냅니다.
Swift에서 .self를 사용하면 타입 또는 객체 그 자체를 나타낼 수 있습니다.
그럼 왜 Quote라고 안하고 Quote.self라고 하는걸까?
Quote와 Quote.self의 차이점
Quote: 타입을 생성하거나, 타입에 관련된 작업을 할 때 사용됩니다.
Quote.self: "타입 그 자체"를 나타냅니다.
Quote를 그냥 쓰면 Swift 컴파일러는 타입을 생성하려는 시도로 이해합니다.
''의 의미
외부 매개변수 이름은 함수를 호출할 때 사용됩니다.
를 사용하면 외부 매개변수 이름을 생략하고 값만 전달합니다.
외부 매개변수 이름을 사용하는 경우
func fetchCharacter(name: String) async throws -> Character { }호출 시:
try await fetchCharacter(name: "Walter White")외부 매개변수 이름을 생략하는 경우 (_)
func fetchCharacter(_ name: String) async throws -> Character { }호출 시:
try await fetchCharacter("Walter White")
let decoder = JSONDecoder()
decoder.keyDecodingStrategy = .convertFromSnakeCase.convertFromSnakeCaseJSON 키가 snake_case로 되어 있을 경우, 이를 자동으로 camelCase로 변환합니다.
Swift에서는 일반적으로 프로퍼티 이름에 camelCase를 사용합니다.
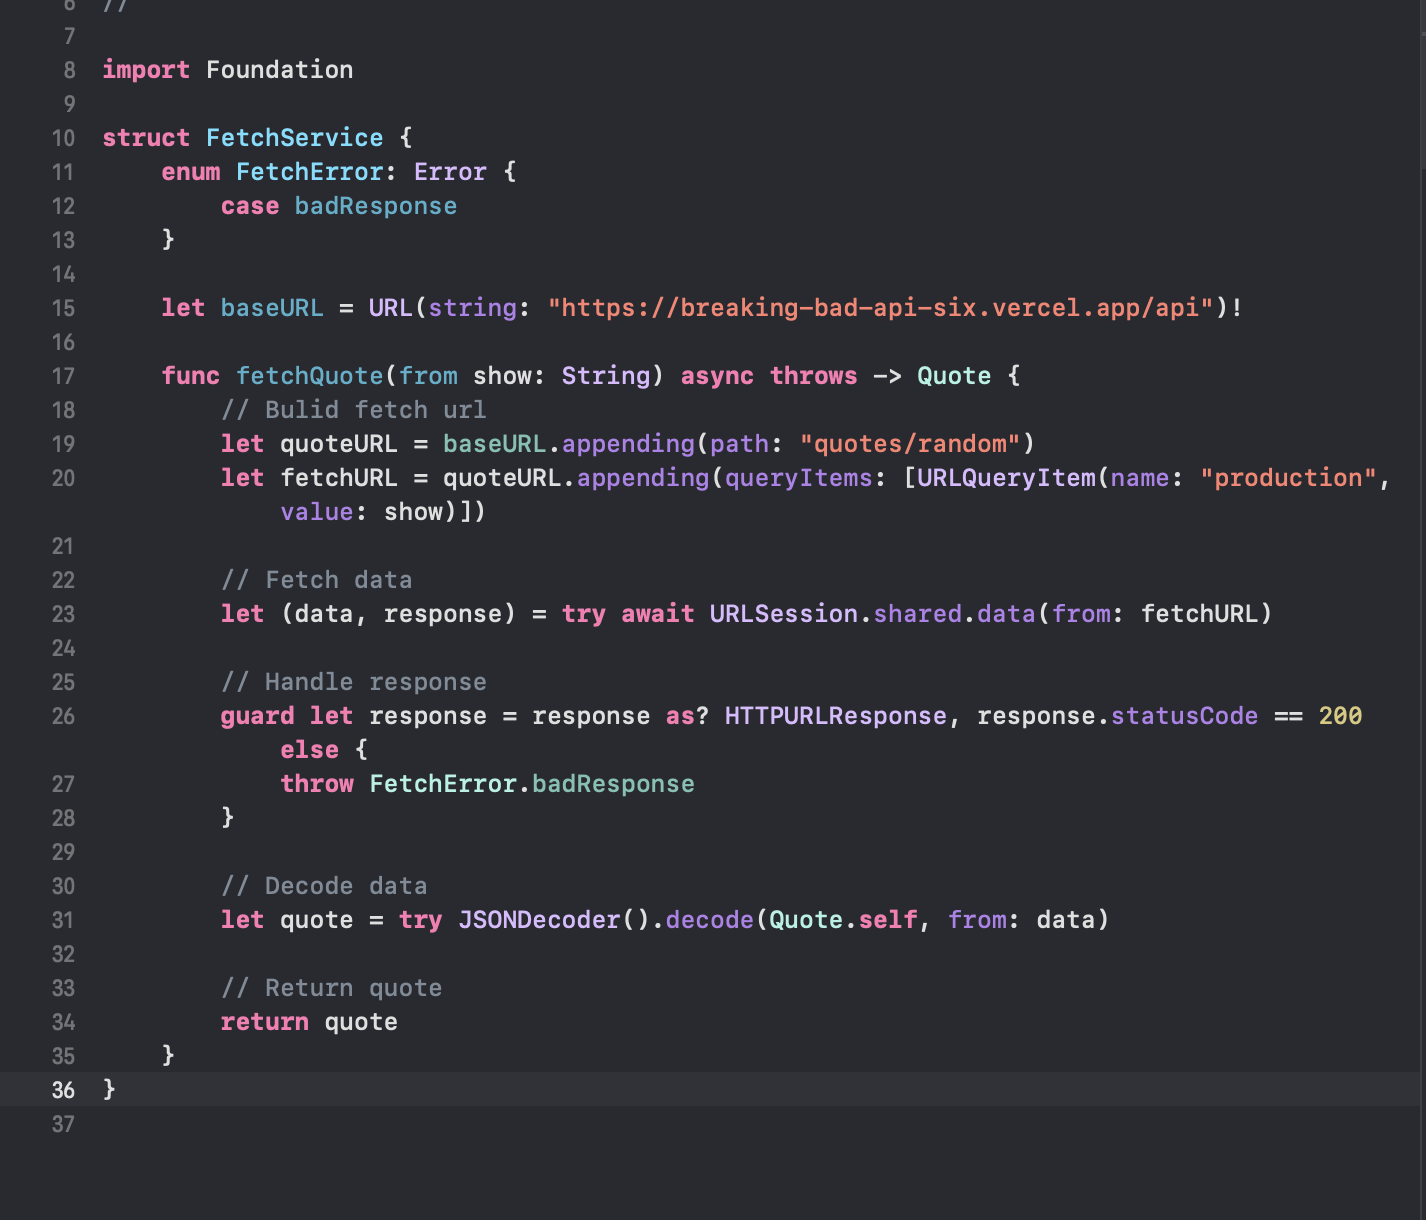
import Foundation

struct FetchService {
    enum FetchError: Error {
        case badResponse
    }

    let baseURL = URL(string: "https://breaking-bad-api-six.vercel.app/api")!

    func fetchQuote(from show: String) async throws -> Quote {
        // Bulid fetch url
        let quoteURL = baseURL.appending(path: "quotes/random")
        let fetchURL = quoteURL.appending(queryItems: [URLQueryItem(name: "production", value: show)])

        // Fetch data
        let (data, response) = try await URLSession.shared.data(from: fetchURL)

        // Handle response
        guard let response = response as? HTTPURLResponse, response.statusCode == 200 else {
            throw FetchError.badResponse
        }

        // Decode data
        let quote = try JSONDecoder().decode(Quote.self, from: data)

        // Return quote
        return quote
    }

    func fetchCharacter(_ name: String) async throws -> Character {
        let characterURL = baseURL.appending(path: "characters")
        let fetchURL = characterURL.appending(queryItems: [URLQueryItem(name: "name", value: name)])

        let (data, response) = try await URLSession.shared.data(from: fetchURL)

        guard let response = response as? HTTPURLResponse, response.statusCode == 200 else {
            throw FetchError.badResponse
        }

        let decoder = JSONDecoder()
        decoder.keyDecodingStrategy = .convertFromSnakeCase

        let characters = try decoder.decode([Character].self, from: data)

        return characters[0]
    }

    func fetchDeath(for character: String) async throws -> Death? {
        let fetchURL = baseURL.appending(path: "deaths")

        let (data, response) = try await URLSession.shared.data(from: fetchURL)

        guard let response = response as? HTTPURLResponse, response.statusCode == 200 else {
            throw FetchError.badResponse
        }

        let decoder = JSONDecoder()
        decoder.keyDecodingStrategy = .convertFromSnakeCase

        let deaths = try decoder.decode([Death].self, from: data)

        for death in deaths {
            if death.character == character {
                return death
            }
        }

        return nil
    }
}
MVVC는 뭘까?
Model : MVC의 Model과 동일하게 데이터와 비즈니스 로직을 담당합니다.
View : 사용자 인터페이스(UI)를 담당합니다.
View는 상태(State)를 바인딩하여 ViewModel로부터 데이터를 받아 표시합니다.
ViewModel : View와 Model 사이의 중간자 역할을 합니다.
비즈니스 로직 처리 후 View에 필요한 데이터를 가공해 전달합니다.
ViewModel은 View와의 데이터 바인딩(Observable 객체)을 통해 View를 갱신합니다.
- 클래스는 참조 타입
class는 참조 타입(Reference Type)입니다.
이 말은 여러 객체(뷰 또는 다른 참조자)가 같은 클래스 인스턴스를 공유하고 상태를 감시할 수 있다는 뜻입니다.
@Observable
class ViewModel {
    var name: String = "Walter White"
}
ViewModel 인스턴스를 여러 SwiftUI 뷰에서 사용한다고 가정합니다.
name 값이 변경되면 모든 뷰가 동일한 인스턴스를 참조하고 있기 때문에 상태 변화가 공유됩니다.
이렇게 하나의 객체를 통해 상태를 통합적으로 관리할 수 있습니다.
let vm1 = ViewModel()
let vm2 = vm1  // 같은 인스턴스를 참조
vm1.name = "Heisenberg"

print(vm2.name)  // "Heisenberg"
struct는 값 타입이므로 복사본을 생성합니다.
복사된 값은 서로 독립적이기 때문에 상태가 제대로 동기화되지 않습니다.
반면 class는 참조 타입이므로 상태의 변경 사항이 공유됩니다.
클래스에서 init()을 사용하는 이유는 객체를 초기화하기 위해서입니다.
Swift에서 클래스는 생성자(Initializer)를 통해 객체를 생성하고 초기 상태를 설정할 수 있습니다. init()은 그 생성자의 일종으로, 클래스 인스턴스를 생성할 때 호출되며 속성에 초기 값을 할당하거나 초기 설정 작업을 수행합니다.
class Person {
    var name: String
    var age: Int


    init(name: String, age: Int) {
        self.name = name
        self.age = age
    }
}

let person = Person(name: "John", age: 25)
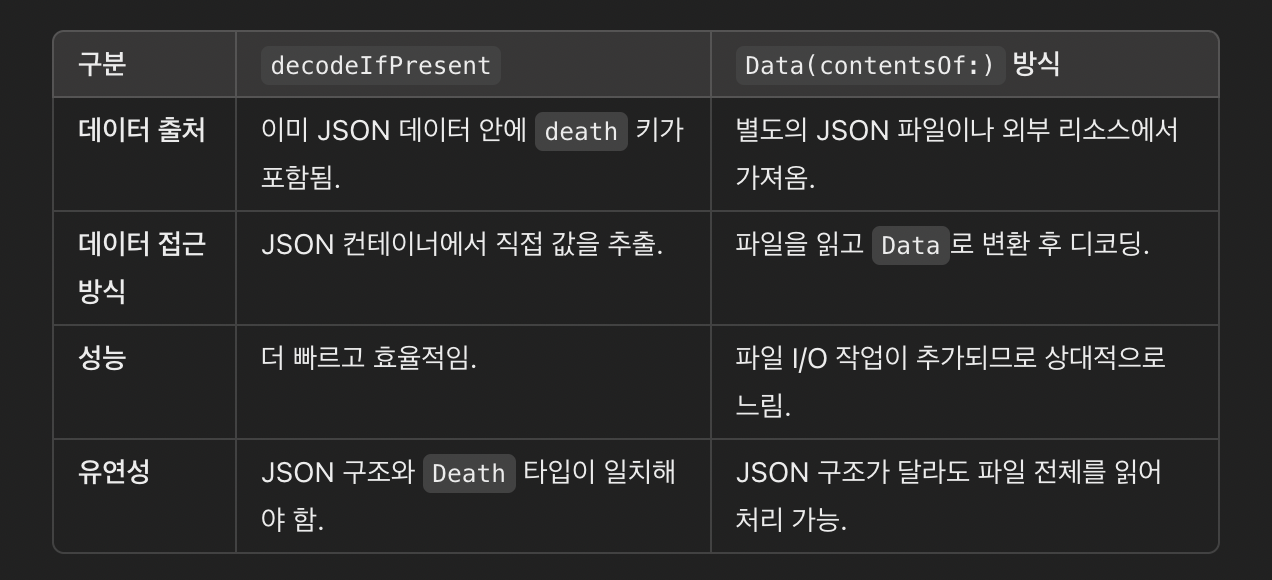
let quoteData = try! Data(contentsOf: Bundle.main.url(forResource: "samplequote", withExtension: "json")!)Bundle.main.url(forResource:withExtension:)는 특정 리소스 파일의 URL을 반환합니다.
forResource: 파일 이름 ("samplequote")
withExtension: 파일 확장자 ("json")
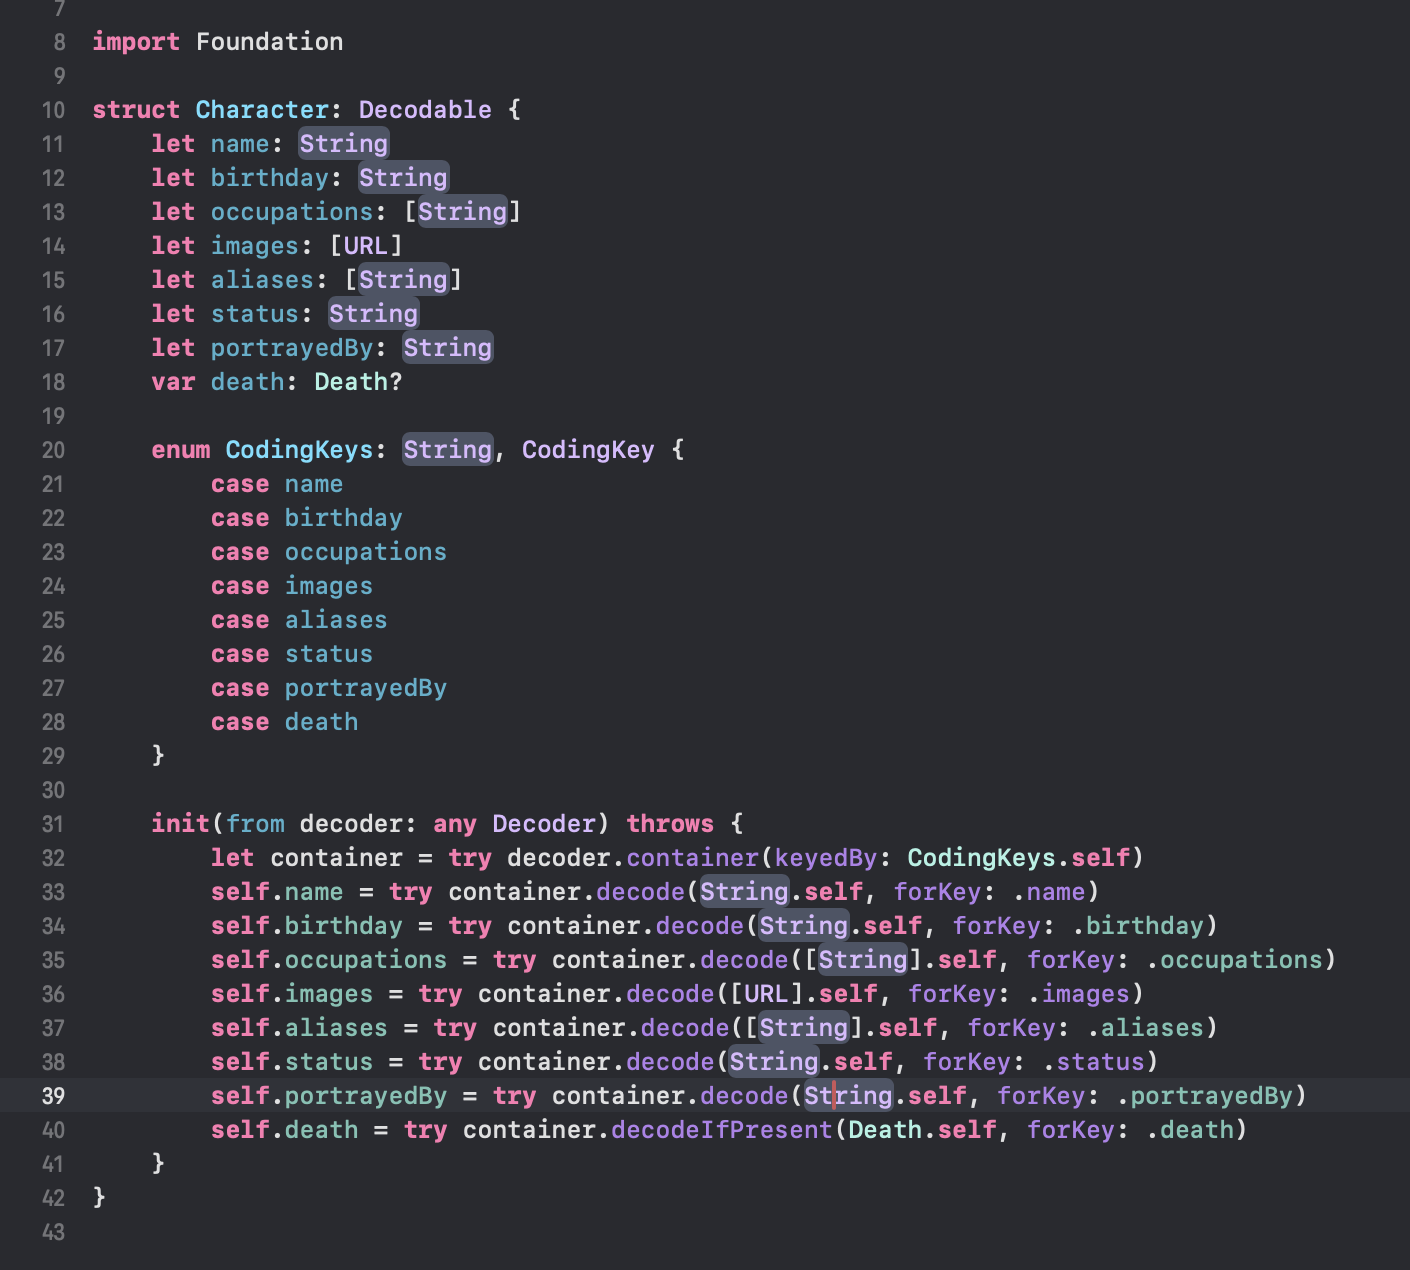
기본적으로 Swift는 자동으로 디코딩을 해줍니다.
하지만 옵셔널 처리(like death)를 위해 decodeIfPresent를 사용하려면 init이 필요합니다.
앞으로 JSON 키가 변경될 가능성이나 확장성을 대비한 코드입니다.
let deathData = try Data(contentsOf: Bundle.main.url(forResource: "death", withExtension: "json")!)코드에서 !가 필요한 이유는 옵셔널 강제 언래핑 때문입니다.
Swift의 메서드 Bundle.main.url(forResource:withExtension:)는 옵셔널 타입(URL?)을 반환하기 때문에 !를 사용해 강제로 언래핑하고 있습니다.
viewModel에 getData 함수를 추가한다.
func getData(for show: String) async {
        status = .fetching

        do {
            quote = try await fetcher.fetchQuote(from: show)

            character = try await fetcher.fetchCharacter(quote.character)

            character.death = try await fetcher.fetchDeath(for: character.name)

            status = .success
        } catch {
            status = .failed(error: error)
        }
    }
야호! 그러면 드디어 json decoding 작업 끝... async로 처리할려니깐 해야할게 짱 많네요.