
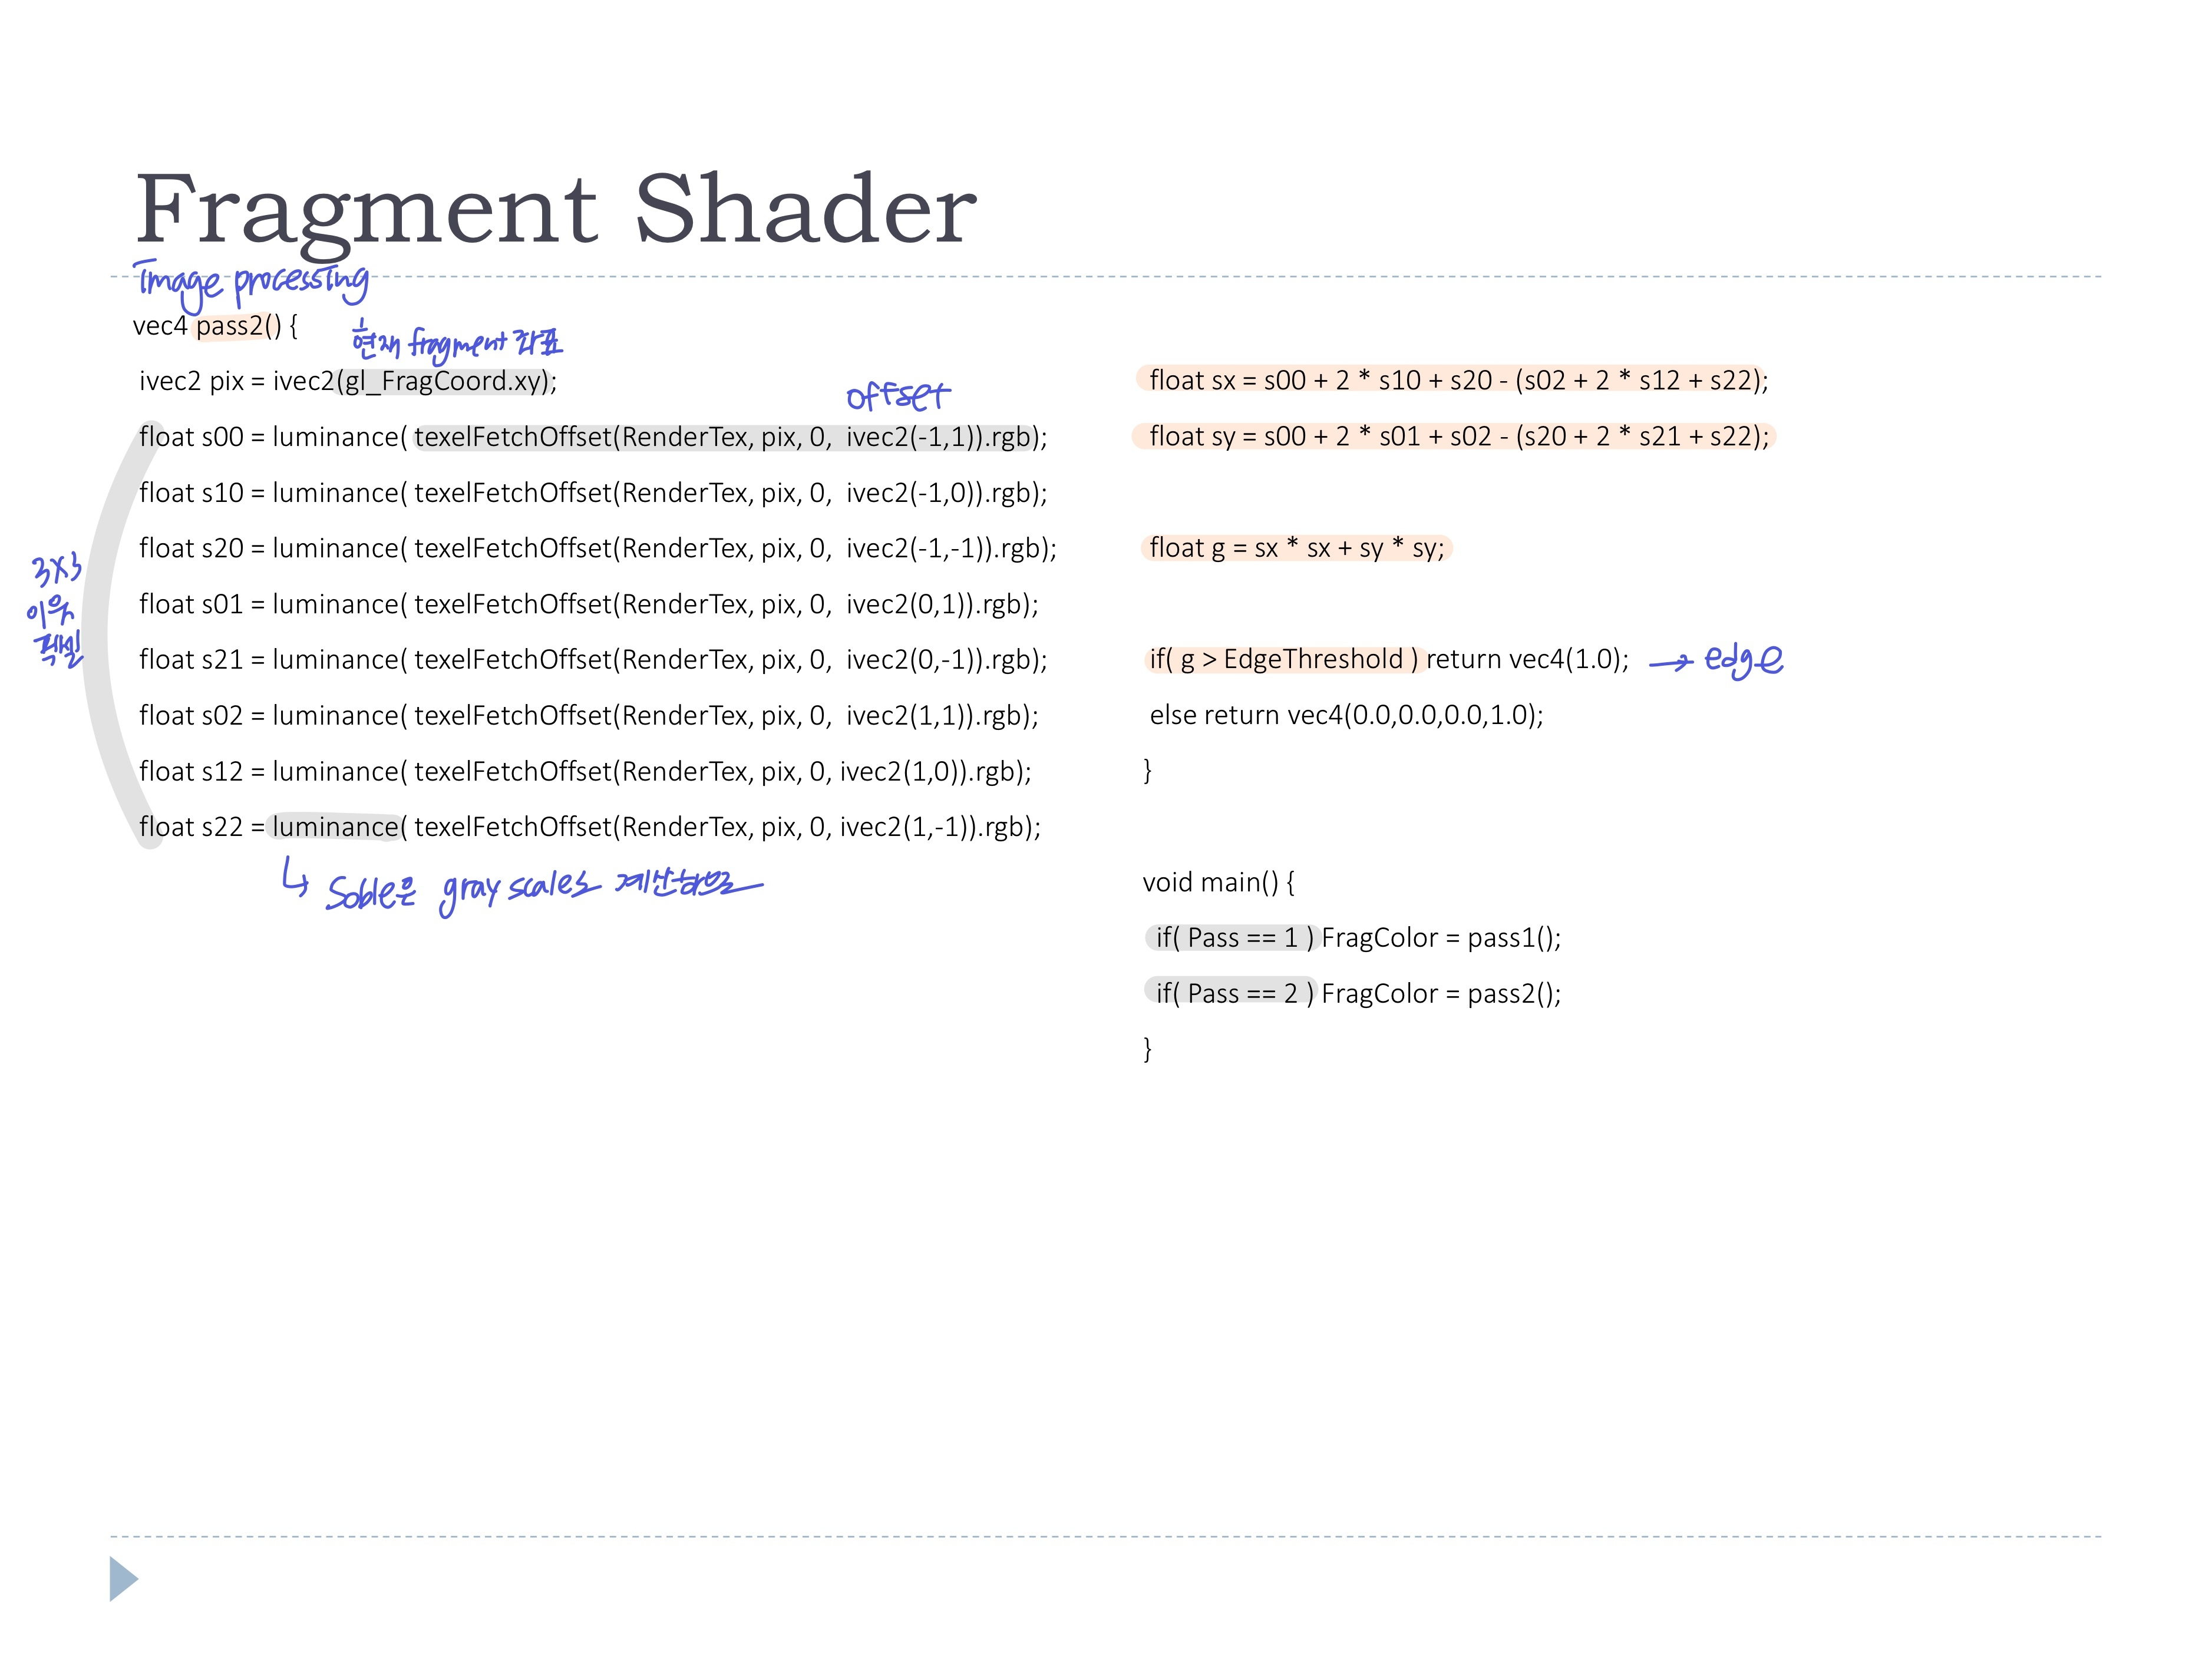
- 프레임버퍼의 픽셀들로 연산
- multiple passes
- pipeline 여러번 거치며 후처리
- 첫 pass는 3D렌더링 후 pixel data(texture)를 생산
- 이후 pass들은 픽셀에 효과나 후처리를 적용 (single fullscreen quad를 그려서 texture를 매핑)
- Convolution filters
- image processing filter로 이미지 픽셀 값 바꿈
- edge detection, smoothing, sharpening, ...
- Deferred shading
- 첫 pass에서 color뿐만 아니라 normal, depth등의 geometry 정보도 texture 형태로 저장 (Geometry buffer에 저장
GBuffer) - 이후 pass에서 GBuffer의 데이터만을 사용하여 shading 연산
- 보이는 부분에 대해서만 정보가 저장되므로 연산 절약
- 첫 pass에서 color뿐만 아니라 normal, depth등의 geometry 정보도 texture 형태로 저장 (Geometry buffer에 저장
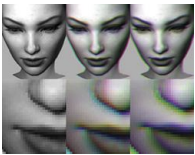
◾ Edge detection filter
- Edge: 값(밝기)이 급격히 변하는 부분 (feature)
- ex-배경과 teapot의 색이 달라 경계에서 값이 급격히 변함
- 오브젝트의 경게면을 찾고 표면의 topology 변화

- edge detection에 여러가지의 방법 존재
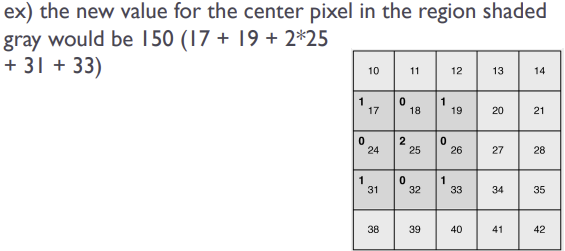
1. Convolution filter (=Convolution kernel)
- 한 픽셀을 기준으로 주변 픽셀들의 weighted sum으로 그 픽셀의 값을 대체 (matrix)
2. Sobel operator
- 2개의 convolution kernel을 사용
- 각 픽셀의 gradient(vec)계산
- vertical/horizontal의 gradient를 따로 계산
- gradient 크기가 > threshold보다 크다 -> edge
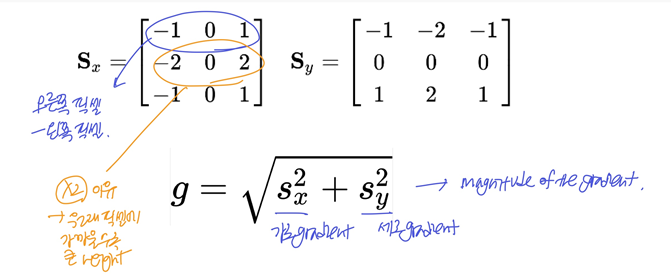
- 단점: threshold를 적절히 지정해줘야함
- fragment shader에서 계산
code
1. OpenGL Application 세팅 과정
- FBO 세팅
- main window와 같은 크기로
- FBO의 첫 color attachment와 texture object를 unit0에 연결
- filtering: GL_NEARET -> texture에서 값을 가져올 때, 주변과 interpolation하지 않고 가져오겠다.
- Uniform variables
- width, height: 해상도 (texcoord를 알기 위해, but 요새는
texelFetchoffset함수로 알 수 있어서 필요 없긴함) - EdgeThreshold: gradient크기^2와 비교할 값
- RenderTex: FBO에 있는 texture
- width, height: 해상도 (texcoord를 알기 위해, but 요새는
2. Fragment shader
- 역할이 다른 두개의 Pass 함수는 shader를 2개 만들거나, 한 shader program안에서 조건문으로 나눔
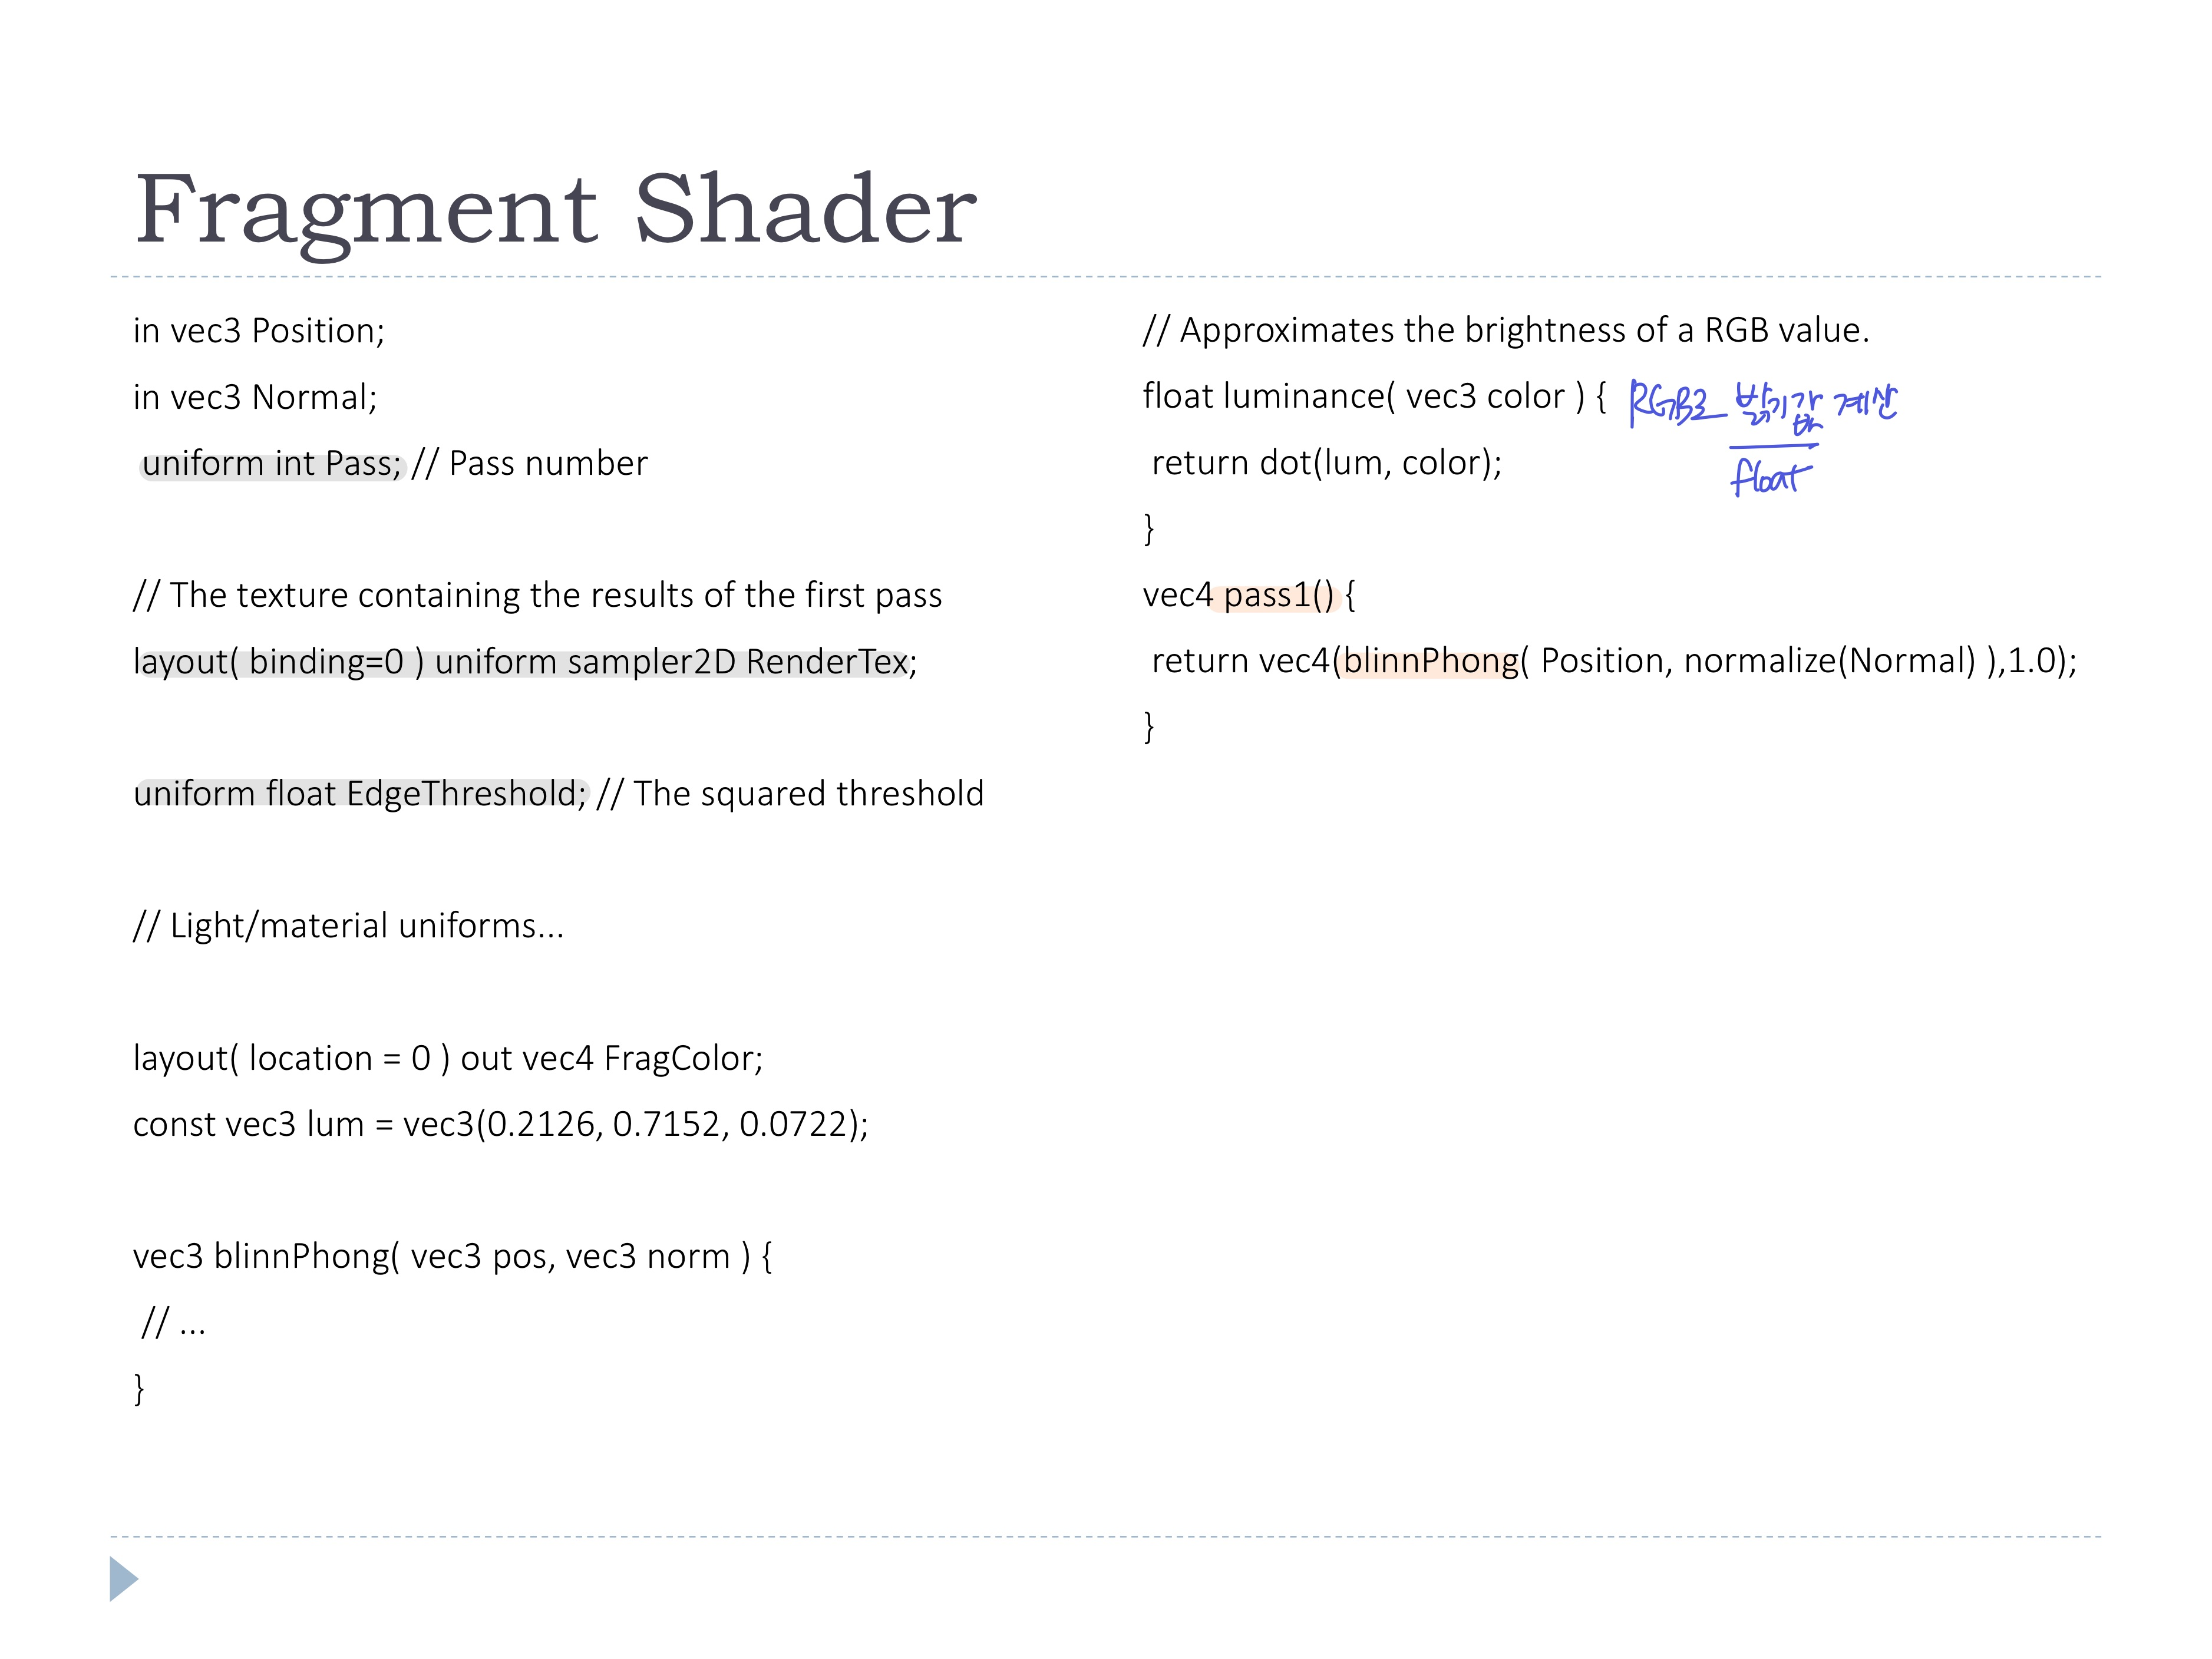
- gl_FragmentCoord.xy -> 현재 fragment좌표로 픽셀값을 나타냄 (texCoord 아님)
- 3x3 이웃 픽셀들의 값을 얻어오기 위해
texelFetch: texCoord[-1, 1]로 텍스처 정보를 들고오는texture함수와 다르게 픽셀로 텍스처 정보를 들고오는 함수texelFetchoffset: offset을 지정하여 원하는 위치의 texel값을 읽어올 수 있는 함수
- sobel 계산 후, threshold와 비교하여 edge 판별
3. OpenGL Application 렌더링 과정
-
Pass 1
- FBO 바인딩, color/depth buffer 초기화
- uniform 변수
Pass를 1로 설정 - 좌표계 변환 및 모델 렌더링
void SceneEdge::pass1() { prog.setUniform("Pass", 1); glBindFramebuffer(GL_FRAMEBUFFER, fboHandle); glEnable(GL_DEPTH_TEST); glClear(GL_COLOR_BUFFER_BIT | GL_DEPTH_BUFFER_BIT); view = glm::lookAt(vec3(7.0f * cos(angle),4.0f,7.0f * sin(angle)), vec3(0.0f,0.0f,0.0f), vec3(0.0f,1.0f,0.0f)); projection = glm::perspective(glm::radians(60.0f), (float)width/height, 0.3f, 100.0f); . . . (draw) } -
Pass 2
- FBO unbind (defalut framebuffer로 돌아가기), color/depth buffer 초기화
- uniform 변수
Pass를 2로 설정 - model, view, projection mat을 identity mat로 설정 (다 1로 설정)
(모델 렌더링하는게 아니라서 좌표 변환이 필요X, 근데 쉐이더에 값 넘어가서)
-> GLSL에서 아무런 변환을 적용하지 않으면 view volume은 [-1, 1] 큐브(parallel)하다. 따라서 quad를 꽉채워서 그리려면 vertex를 (-1, -1, 0)~(1, 1, 0)으로 설정하면 된다 - 화면에 꽉 채워서 single quad를 렌더링
void SceneEdge::pass2() { prog.setUniform("Pass", 2); glBindFramebuffer(GL_FRAMEBUFFER, 0); glActiveTexture(GL_TEXTURE0); glBindTexture(GL_TEXTURE_2D, renderTex); glDisable(GL_DEPTH_TEST); glClear(GL_COLOR_BUFFER_BIT); model = mat4(1.0f); view = mat4(1.0f); projection = mat4(1.0f); setMatrices(); // Render the full-screen quad glBindVertexArray(fsQuad); glDrawArrays(GL_TRIANGLES, 0, 6); glBindVertexArray(0); } -
두 pass 사이에 blur pass를 추가하면 noise를 줄여 더 좋은 결과를 얻을 수 있음
◾ Helper Textures
- 한 픽셀당 9개의 texture data를 접근하고 있어서 좀 느림
-> 추가 텍스처(helper image)를 사용해 각 채널에 하나의 texel만 저장한다

◾ Gaussian blur filter
- blur filter
- 이미지의 노이즈 제거
- 이웃 픽셀들의 weighted sum을 사용해 주변 픽셀들 값 섞기 (중심 픽셀에 가까울수록 큰 weight)
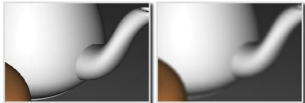
- Gaussian blur
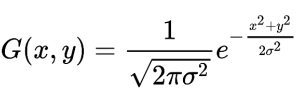
- 이차원 gaussian function으로 이웃 픽셀의 weight 설정
- : variance, Gaussian curve의 가로 길이를 결정함
-> 블러 정도 조절
-> 가 크면 납작하고(블러 많이), 가 작으면 뾰족한 정규분포(블러 약하게)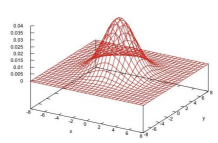
- 정규분포형태라 0에 수렴하지 않음 -> 즉, 모든 픽셀에 weight를 줘서 계산해야한다는 의미를 가지지만 오래 걸리겠죠
- 적절히 계산을 구현하기 위해
- 이웃 픽셀 범위를 지정하고
- 범위가 바뀌었으니 Gaussian function의 값을 normalizing (weight를 다 더하면 1이 되도록)
separable
- 2차원 Gaussian은 1차원 Gaussian 2개의 곱으로 decompoesd될 수 있다
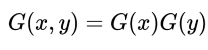
- 2차원 Gaussian으로 한번에 계산 ->
weight * pixel value를 한 픽셀당 81번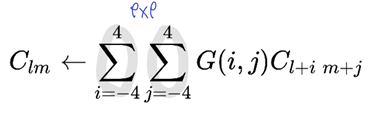
- 1차원 Gaussian으로 두번에 계산 ->
weight * pixel value를 한 픽셀당 18번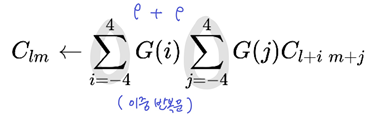
- 2차원 Gaussian으로 한번에 계산 ->
- 같은 연산이지만 시간이 많이 줄어든다
Code
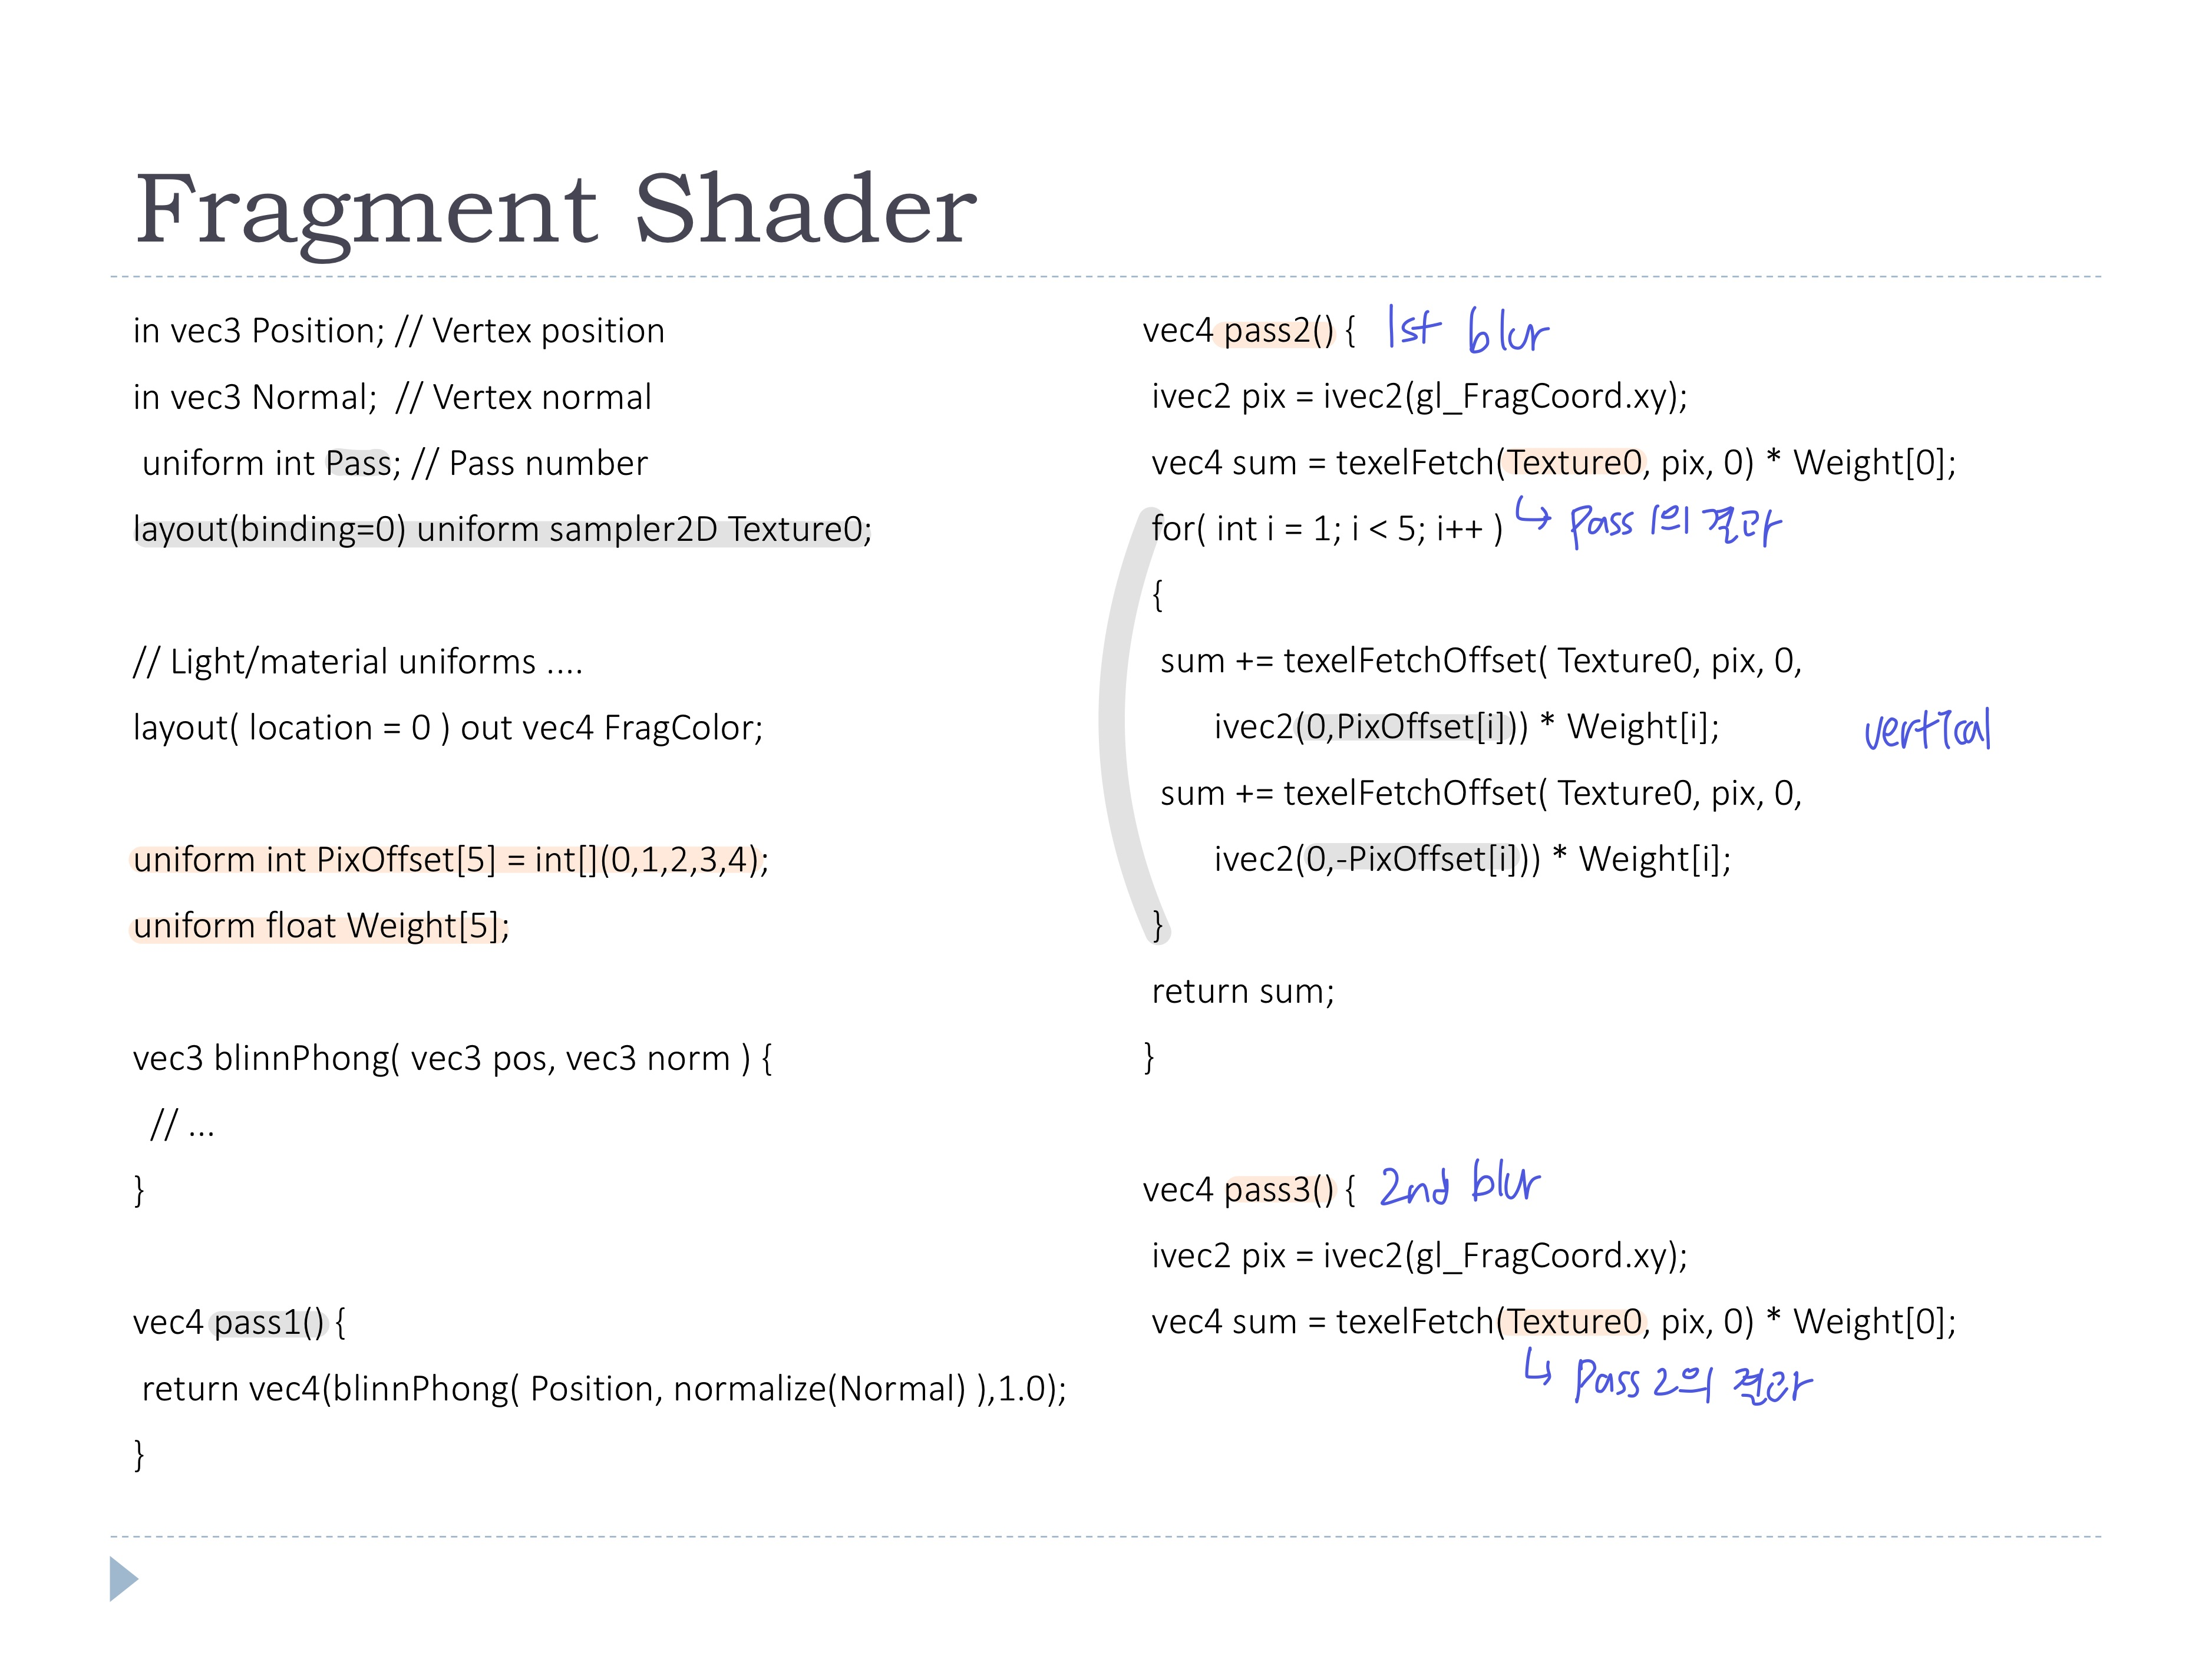
- 2개의 1차원 Gaussian를 사용한 two-pass 알고리즘
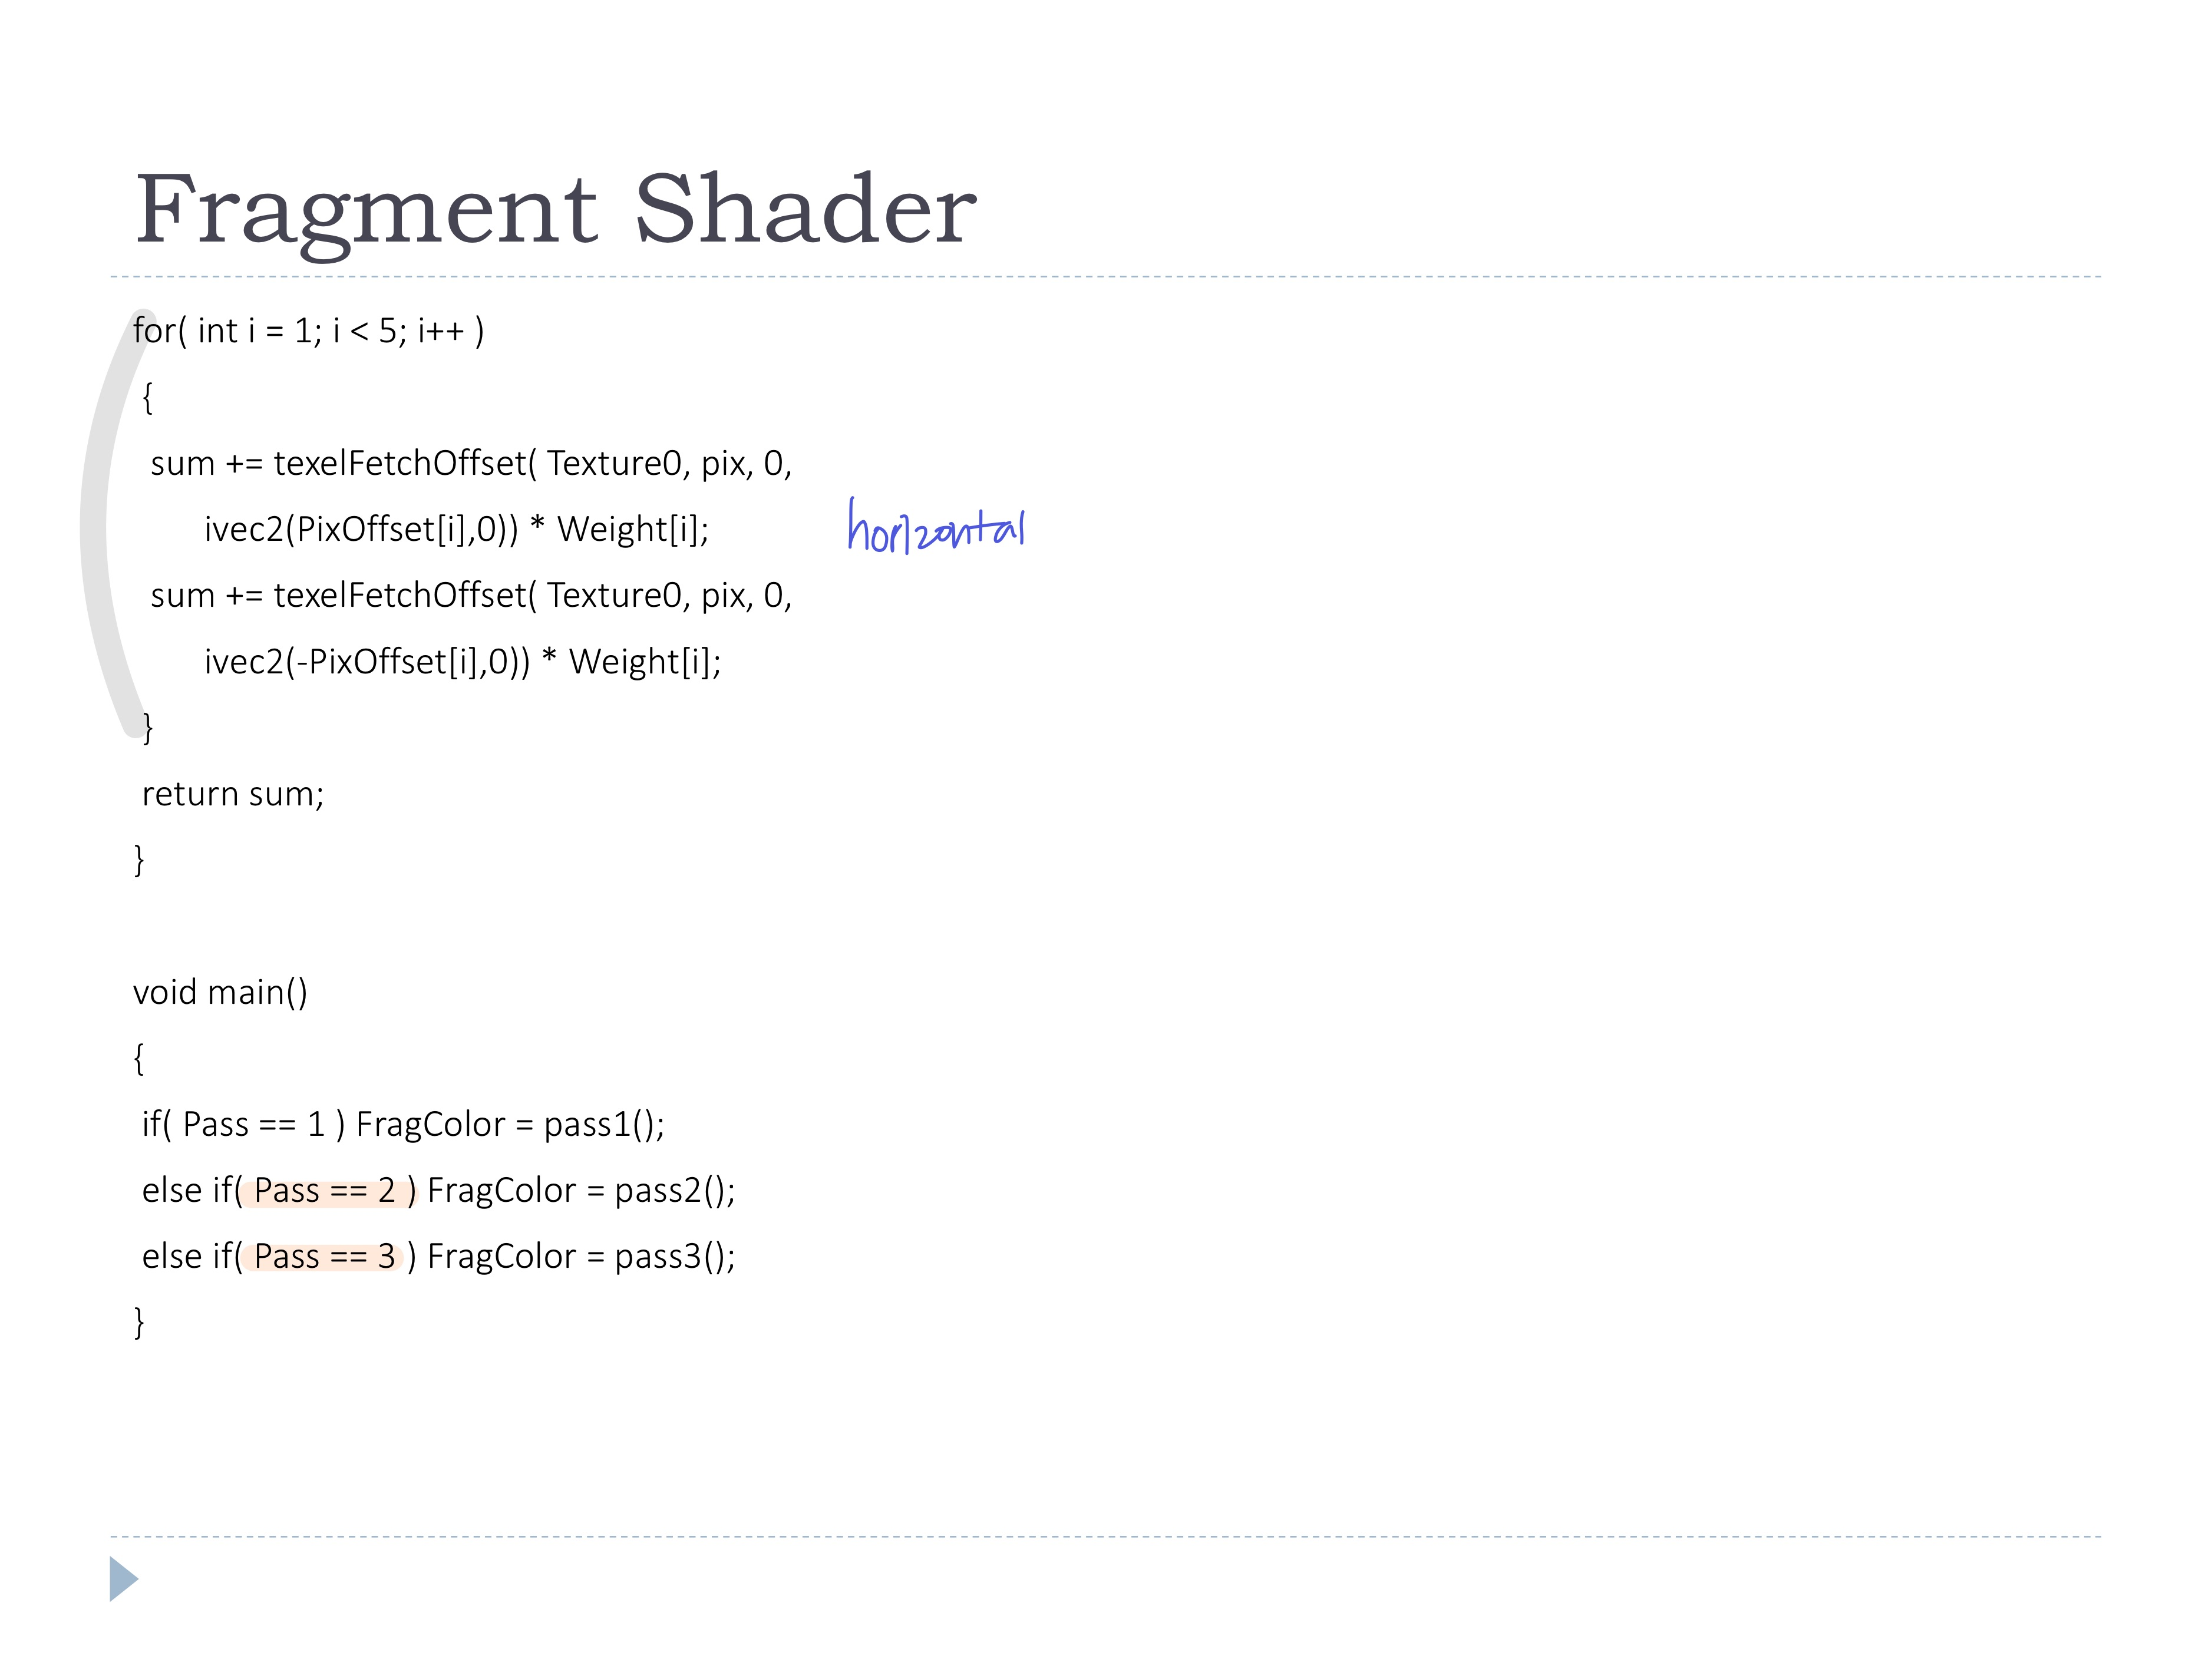
- 1st pass: vertical sum (sum over j) 및 temporary texture에 값 저장
- 2nd pass: 1pass의 값으로 horizontal sum (sum over i)

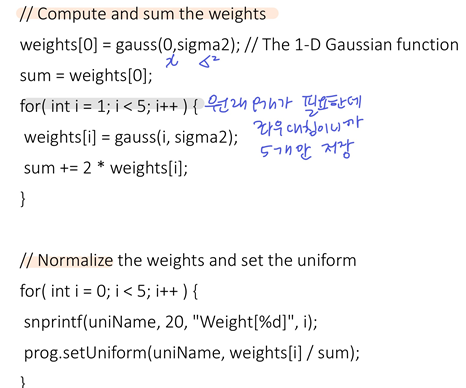
- Gaussian weight의 합은 무조건 1이 되도록 normalize!
- 각 weight를 전체합으로 나누면.. 다 더했을 때 1이 되겠죠 (정규화)
- 1보다 작으면 이미지가 어두워지고, 크면 밝아짐..

1. OpenGL Application 세팅
- 2개의 FBO 세팅
- 1st FBO: 3D씬 렌더링 및 저장, depth buffer 가짐
- 2nd FBO: Gaussian blur의 1st pass(중간 결과물) 저장, depth buffer 안가짐 (2D라서 depth test 필요 없음)
- Unifrom 변수
- width/height: 해상도
- Weight[]: Gaussian weights를 정규화한 값들
- PixOffset[]: 블러될 픽셀로부터의 offset들
- Texture0: unit0에 texture binding해서 바로 shader 코드로 넘겨줌 (location으로 넘긴거 아님)(pass마다 다른 texture를 가질 수 있음)
2. fragment shader
- pass2에서는 vertical blur
- pass3에서는 horizontal blur
3. OpenGL Application 렌더링 과정
-
Pass 1
- 첫번째 FBO 바인딩, depth test 활성화
- uniform 변수
Pass를 1로 설정 - 좌표계 변환 및 모델 렌더링
void SceneBlur::pass1() { prog.setUniform("Pass", 1); glBindFramebuffer(GL_FRAMEBUFFER, renderFBO); glClear(GL_COLOR_BUFFER_BIT | GL_DEPTH_BUFFER_BIT); glEnable(GL_DEPTH_TEST); view = glm::lookAt(vec3(7.0f * cos(angle),4.0f,7.0f * sin(angle)), vec3(0.0f,0.0f,0.0f), vec3(0.0f,1.0f,0.0f)); projection = glm::perspective(glm::radians(60.0f), (float)width/height, 0.3f, 100.0f); . . . (draw) } -
Pass 2
- 두번째 FBO 바인딩, depth test 비활성화
- uniform 변수
Pass를 2로 설정 - model, view, projection mat을 identity mat로 설정 (다 1로 설정)
- Pass1의 텍스처를 unit0으로 bind해서 shader code로 넘겨줌
- Full screen quad 렌더링
void SceneBlur::pass2() { prog.setUniform("Pass", 2); glBindFramebuffer(GL_FRAMEBUFFER, intermediateFBO); glActiveTexture(GL_TEXTURE0); glBindTexture(GL_TEXTURE_2D, renderTex); glDisable(GL_DEPTH_TEST); glClear(GL_COLOR_BUFFER_BIT); model = mat4(1.0f); view = mat4(1.0f); projection = mat4(1.0f); setMatrices(); // Render the full-screen quad glBindVertexArray(fsQuad); glDrawArrays(GL_TRIANGLES, 0, 6); } -
Pass 3
- FBO unbind (defalut framebuffer로 돌아가기)
- uniform 변수 Pass를 3로 설정
- Pass2의 텍스처를 unit0으로 bind해서 shader code로 넘겨줌
- Full screen quad 렌더링
void SceneBlur::pass3()
{
    prog.setUniform("Pass", 3);

    glBindFramebuffer(GL_FRAMEBUFFER, 0);

    glActiveTexture(GL_TEXTURE0);
    glBindTexture(GL_TEXTURE_2D, intermediateTex);

    glClear(GL_COLOR_BUFFER_BIT);

    model = mat4(1.0f);
    view = mat4(1.0f);
    projection = mat4(1.0f);
    setMatrices();

    // Render the full-screen quad
    glBindVertexArray(fsQuad);
    glDrawArrays(GL_TRIANGLES, 0, 6);
}
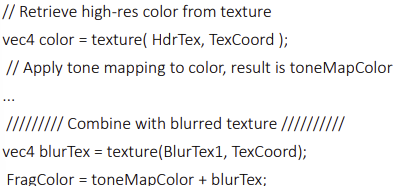
◾ HDR lighting with tone mapping
- High dynamic range
- dynamic range: 가장 큰 값과 작은 값 사이의 비율
◾ High dynamic range imaging (HDR imaging)
- 보통 모니터는 8-bits per color 지원해서 0~255 범위로 제한적임
- 하지만, Real scenes은 밝기의 범위가 훨씬 넓다
- Real scenes를 찍으면 일부 범위의 밝기만 저장된다 (너무 어둡거나, 너무 밝거나)
- 노출 시간을 다르게해서 여러장 찍어서 넓은 범위의 실수 밝기값을 저장
-> High dynamic range 이미지
◾ Tone mapping
- High dynamic range의 이미지를 제한된 range 디바이스에 rendering하기 High dynamic range를 0~255 범위로 바꿔주기
(HDR image compression) - 밝고 어두운 부분 모두 잘 보이게

◾ TMO
- Tone mapping해주는 함수
- local operator
- 바꾸고자 하는 픽셀의 주변 픽셀만 고려하여 결정
- global operator
- 전체 픽셀을 고려하여 각각의 픽셀값을 결정
- 사람 눈은 local하기 때문에 (전체를 한번에 보기 힘듦) 보통 local operator가 더 적절하다
- 그래도 global은 전체적으로 밝은지 어두운지를 확인할 수 있기 때문에,, 둘 다 고려하는게 좋다
ex) Global Operators
- 병렬처리하는 GPU에서 전체 픽셀을 고려하기는 어려우므로, 전체 이미지에 대한 부분은 CPU에서 계산
(아래의 log-average luminance 를 CPU에서 계산하는 코드가 나온다) - TMO (Tone mapping operator)
- 원본 이미지의 luminance값에 weight를 곱하여 새로운 luminance로 toon mapping
- 원본 luminance를 log-average luminance 로 나누고, 노출레벨과 비슷한 역할을 하는 를 곱해 전체적인 밝기를 조절 (weight)
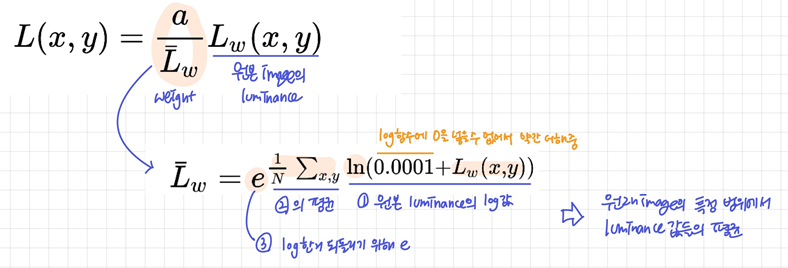
- Log를 적용하여 평균을 구하는 이유는: HDR은 linear하지 않은데, log를 취하면 linear해지기 때문
(linear하지 않으면 그 범위의 중간 값이라고 해도 중간 밝기를 가지지 않음) - 하지만, 밝은 부분과 어두운 부분이 너무 많이 줄어든다는 단점이 존재
- Modified TMO
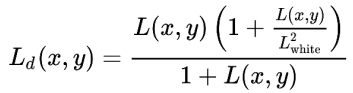
- : 최대 luminance값, 이거보다 밝으면 전부 화이트
-> 너무 밝은 픽셀이 적당히 줄어들도록 함 (너무 많이 줄어들지 않도록)
- : 최대 luminance값, 이거보다 밝으면 전부 화이트
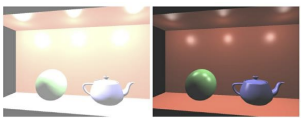
- TMO의 식은 Luminance만 고려하므로,, rgb가 고려되지 않음!
◾ Handling Color Images
- Luminance와 Color를 분리해서 color변화 없이 luminance만 계산하고(TMO), 새로운 Luminance를 적용하여 RGB 수정
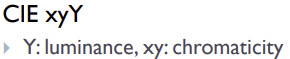
(color = hue = chromaticity) - Lumicance와 color를 분리하려면 CIE xyY공간 사용
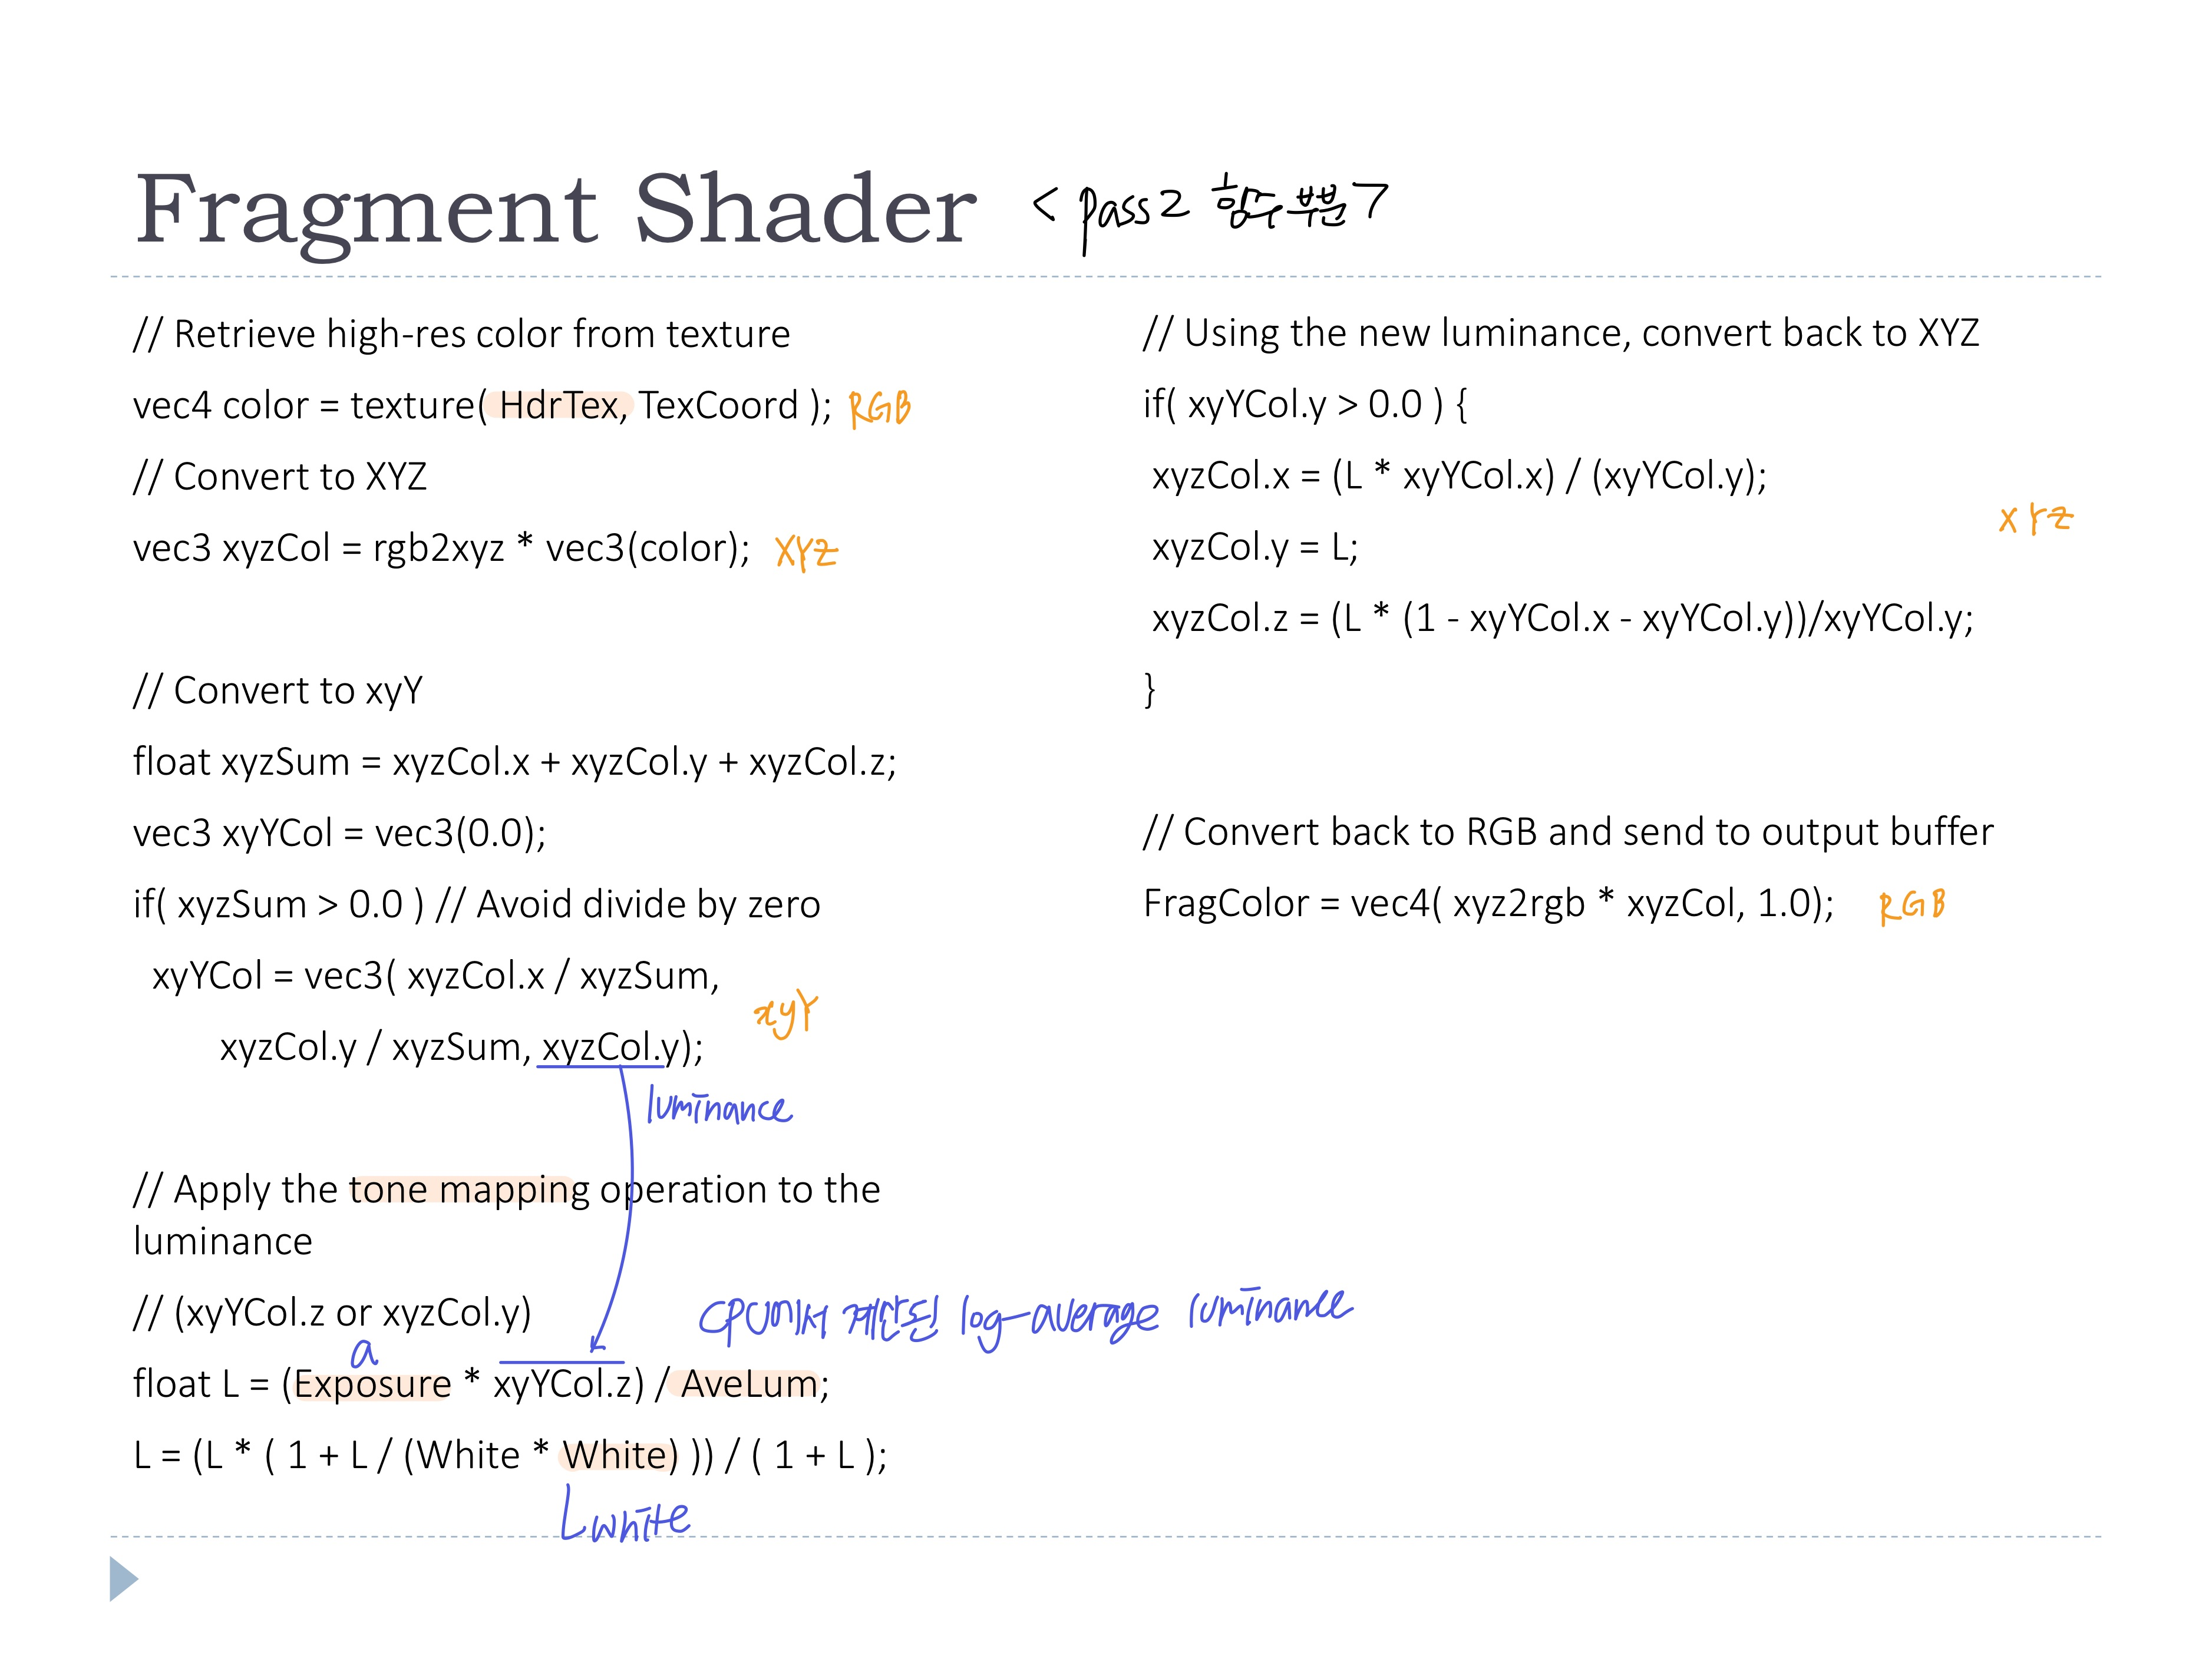
- RGB -> CIE XYZ 로 변환 (변환 행렬 사용)
- CIE XYZ -> CIE xyY 로 변환

- CIE xyY의 luminance Y로 TMO 계산하여 새로운 Y 얻기 (Tone mapping)
- 새로운 Y를 사용하여 CIE xyY -> CIE XYZ 변환
- CIE XYZ -> RGB
◾ code
1. OpenGL Application 세팅 과정
- high-resolution texture (HDR image)를 사용하기 위한 FBO 생성
- 실수값으로 저장하는 GL_RGB32F format으로 texture를 생성
void SceneToneMap::setupFBO()
{
    GLuint depthBuf;

    // Create and bind the FBO
    glGenFramebuffers(1, &hdrFBO);
    glBindFramebuffer(GL_FRAMEBUFFER, hdrFBO);

    // The depth buffer
    glGenRenderbuffers(1, &depthBuf);
    glBindRenderbuffer(GL_RENDERBUFFER, depthBuf);
    glRenderbufferStorage(GL_RENDERBUFFER, GL_DEPTH_COMPONENT, width, height);

    // The HDR color buffer
    glActiveTexture(GL_TEXTURE0);
    glGenTextures(1, &hdrTex);
    glBindTexture(GL_TEXTURE_2D, hdrTex);
    glTexStorage2D(GL_TEXTURE_2D, 1, GL_RGB32F, width, height); // 여기!!!
    glTexParameteri(GL_TEXTURE_2D, GL_TEXTURE_MIN_FILTER, GL_NEAREST);
    glTexParameteri(GL_TEXTURE_2D, GL_TEXTURE_MAG_FILTER, GL_NEAREST);

    // Attach the images to the framebuffer
    glFramebufferRenderbuffer(GL_FRAMEBUFFER, GL_DEPTH_ATTACHMENT, GL_RENDERBUFFER, depthBuf);
    glFramebufferTexture2D(GL_FRAMEBUFFER, GL_COLOR_ATTACHMENT0, GL_TEXTURE_2D, hdrTex, 0);

    GLenum drawBuffers[] = {GL_NONE, GL_COLOR_ATTACHMENT0};
    glDrawBuffers(2, drawBuffers);

    glBindFramebuffer(GL_FRAMEBUFFER, 0);
}
2. Fragment Shader
- Pass 1
- HDR 정보 저장
- Pass 2
- RGB -> XYZ -> xyY 변환 및 tone mapping
- xyY -> XYZ -> RGB
3. OpenGL Application 렌더링 과정
- Pass 1
- FBO 바인딩 및 3D씬 렌더링
- Log-average Luminance 계산(CPU)
- 텍스처로부터 데이터를 가져와 계산 및 shader 코드로 넘겨줌
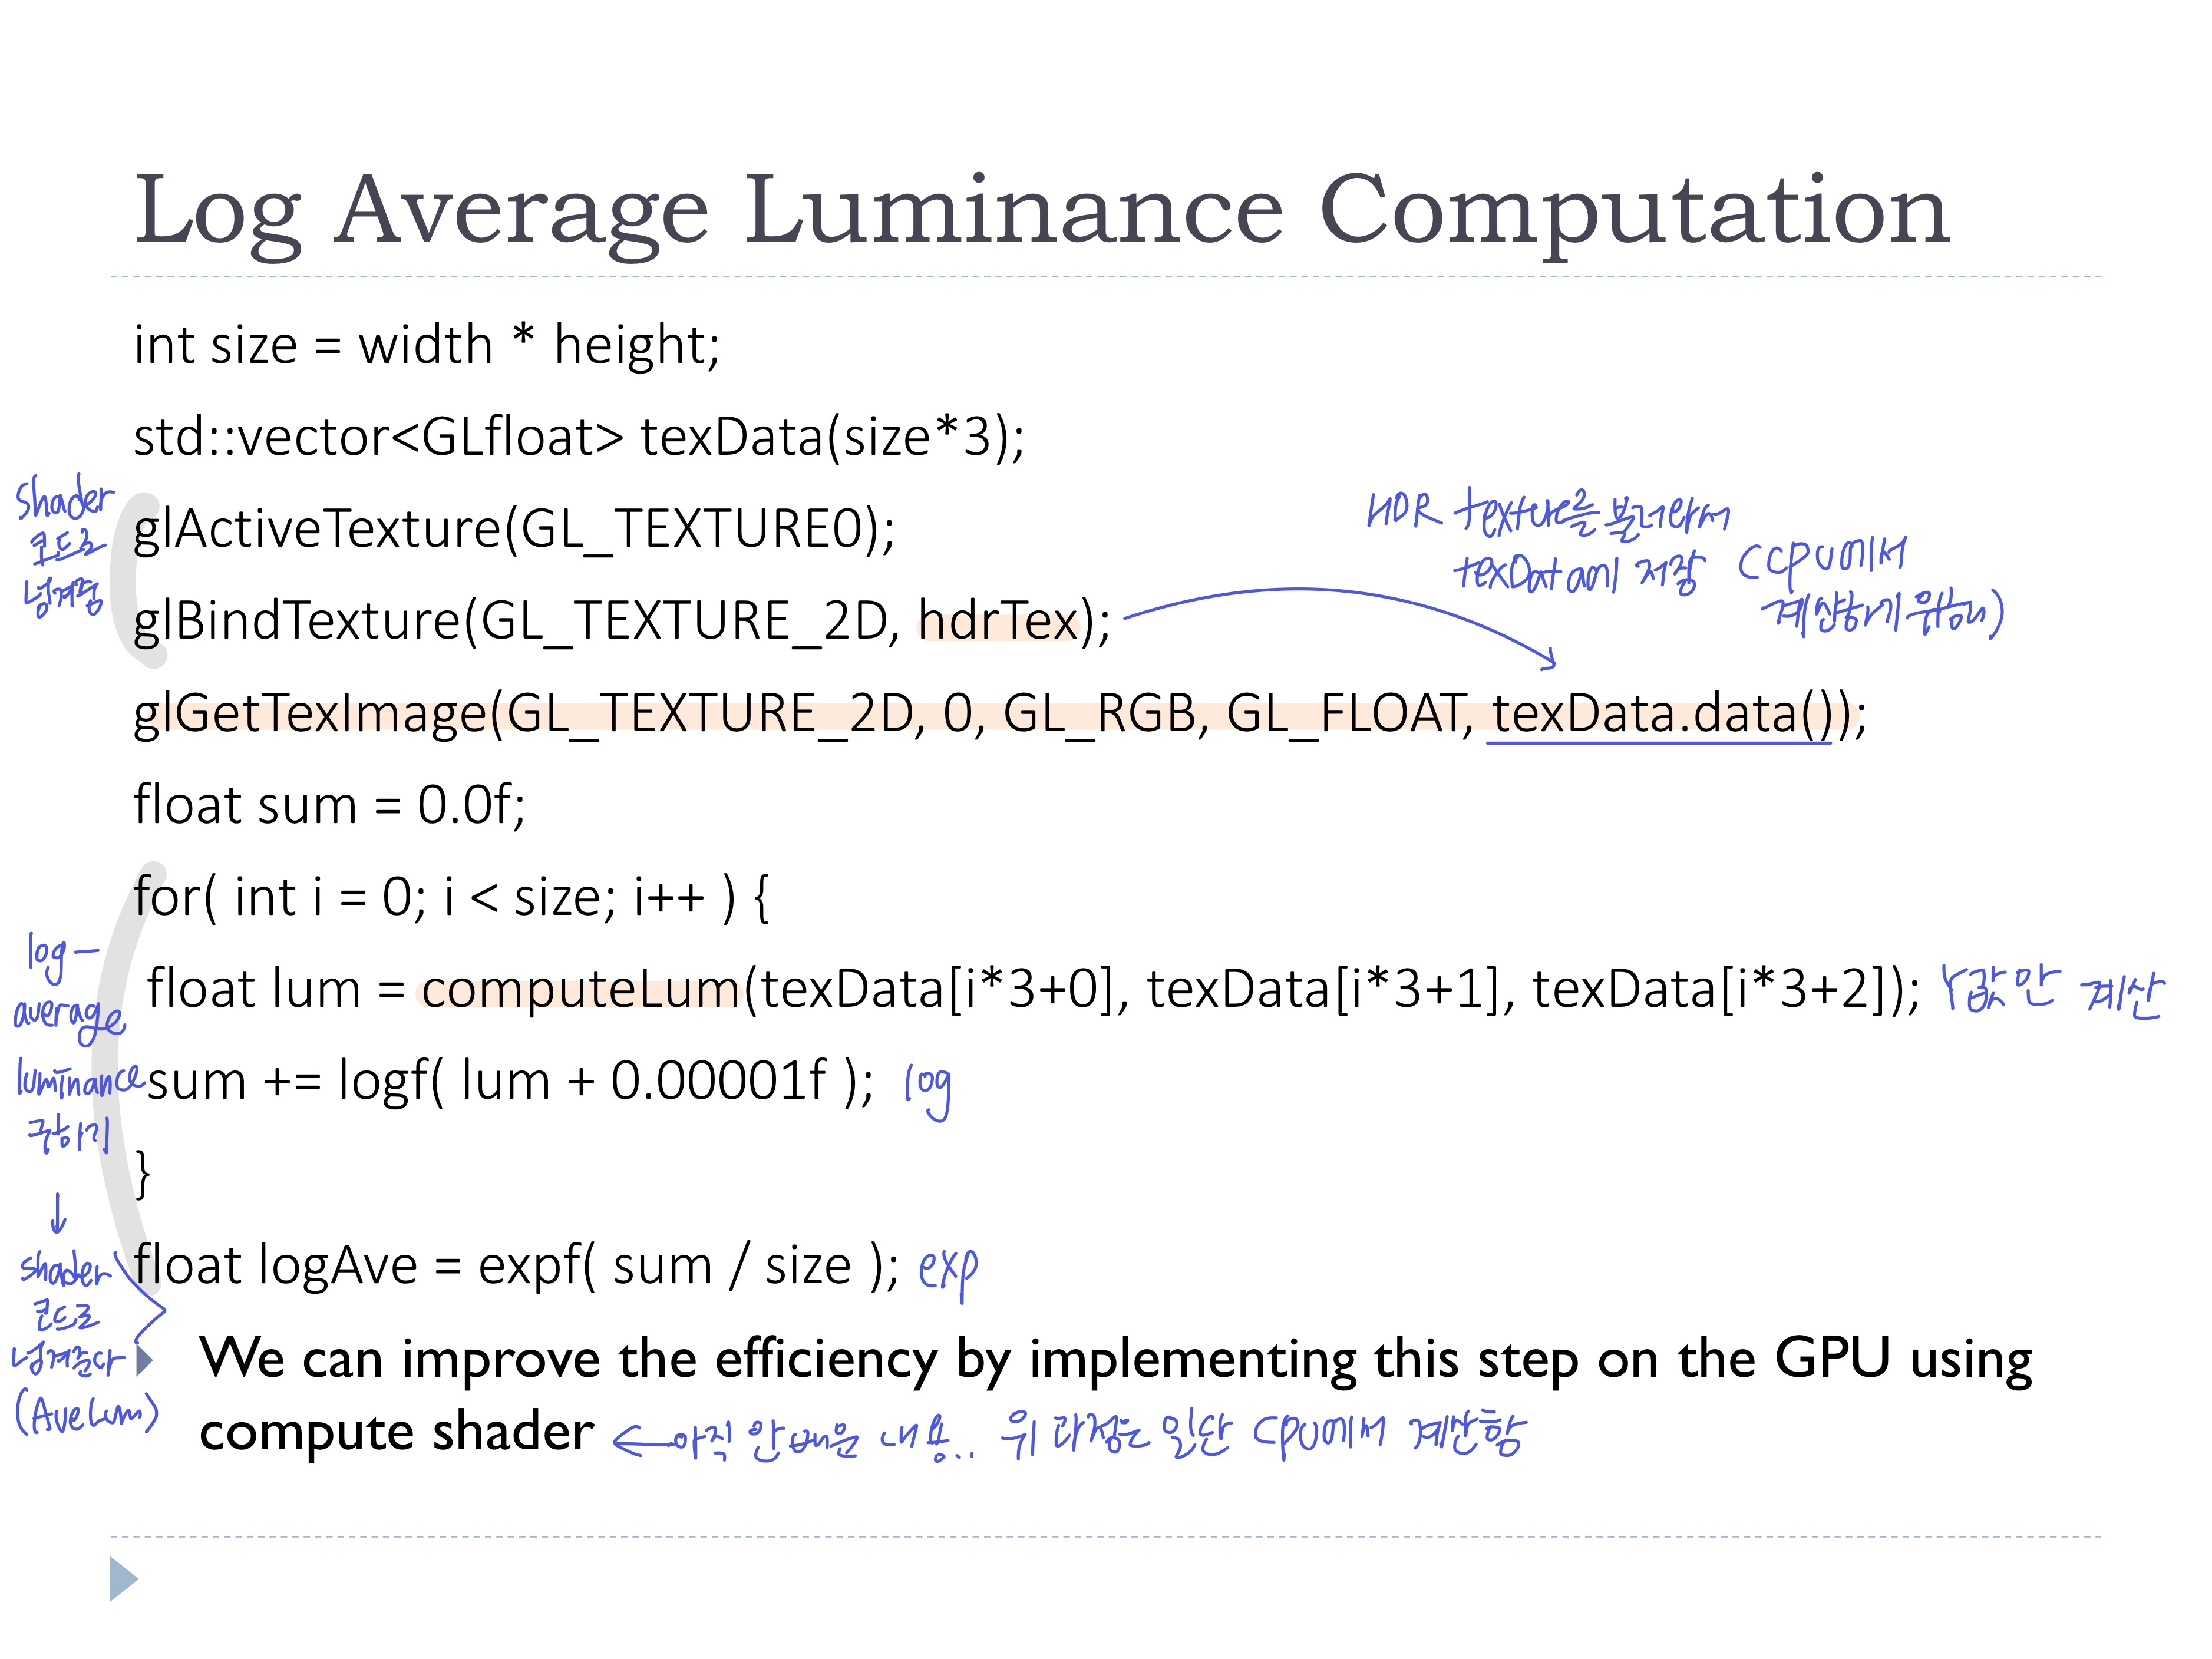
- 텍스처로부터 데이터를 가져와 계산 및 shader 코드로 넘겨줌
- Pass 2
- 기본 framebuffer로 세팅
- 변환행렬을 단위행렬로 바꾸기
- 쿼드 그리기
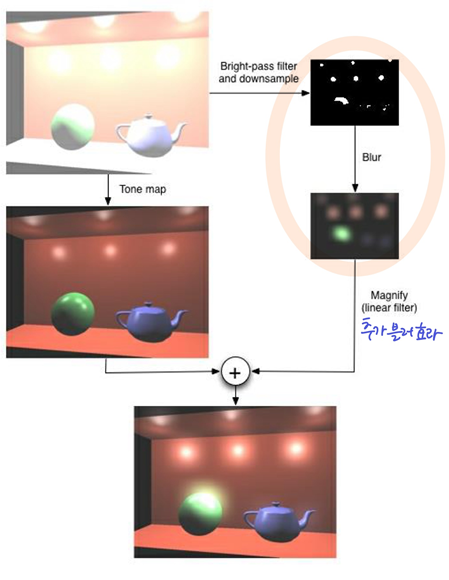
◾ Bloom effect
- 밝은 부분과 어두운 부분이 만나는 경계에서 밝은 부분이 어두운 부분을 침범
- 밝은 부분을 찾아서 블러 (주변으로 퍼지도록)
- HDR에 효과 적용했을 때 더 극대화
Algorithm
- HDR로 렌더링한 이미지에서 Thresholding하여 밝은 영역을 뽑아내고 (Bright-pass filter), 이미지 크기를 줄여 (downsmapling) 빠른 속도로 블러 적용할 수 있도록
(게다가, 다시 원래 크기의 이미지로 확대할 때 linear interpolation돼서 추가적인 블러효과) - tone mapping한 HDR이미지에 블러 이미지 추가!
Code
1st pass
- 3D씬 FBO에 렌더링 (HDR)
2nd pass
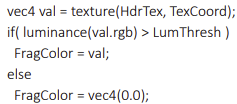
- fragment shader에서 1pass의 결과를 가진 텍스처를 사용해 Thresholding하여 밝은 부분의 값을 저장하고, 아닌 부분은 검정색으로 저장
- 이 결과를 FBO에 저장
- 이때 FBO는 1/8크기의 buffer를 가지며, 렌더 과정에서 view port도 작게 설정 (down sampling)
- 2pass blur이므로 2개의 텍스처를 생성하고, unit1과 unit2에 연결
// Bind the depth buffer to the FBO
glFramebufferRenderbuffer(GL_FRAMEBUFFER, GL_DEPTH_ATTACHMENT,
                          GL_RENDERBUFFER, depthBuf);

// Set the targets for the fragment output variables
GLenum drawBuffers[] = {GL_COLOR_ATTACHMENT0};
glDrawBuffers(1, drawBuffers);

// Create an FBO for the bright-pass filter and blur
glGenFramebuffers(1, &blurFbo);
glBindFramebuffer(GL_FRAMEBUFFER, blurFbo);

// Create two texture objects to ping-pong for the bright-pass filter
// and the two-pass blur
bloomBufWidth = width / 8;
bloomBufHeight = height / 8;
glGenTextures(1, &tex1);
glActiveTexture(GL_TEXTURE1);
glBindTexture(GL_TEXTURE_2D, tex1);
glTexStorage2D(GL_TEXTURE_2D, 1, GL_RGB32F, bloomBufWidth, bloomBufHeight);

glActiveTexture(GL_TEXTURE2);
glGenTextures(1, &tex2);
glBindTexture(GL_TEXTURE_2D, tex2);
glTexStorage2D(GL_TEXTURE_2D, 1, GL_RGB32F, bloomBufWidth, bloomBufHeight);

// Bind tex1 to the FBO
glFramebufferTexture2D(GL_FRAMEBUFFER, GL_COLOR_ATTACHMENT0, GL_TEXTURE_2D, tex1, 0);

glDrawBuffers(1, drawBuffers);
3rd, 4th passes
- 2pass의 결과를 가진 텍스처로 separalne gaussian 적용
5th pass
- 4pass 결과를 가진 텍스처의 크기를 키울 떄, blur효과를 적용하기 위해 NEAREST 대신 LINEAR로 filtering하여 mapping (up sampling)
- Hdr텍스처에 tone-mapping 적용하고 up sampling한 텍스처와 합친다
sampler object 사용함!
- linear와 nearest filtering이 필요해서 미리 만들어두기
// Set up two sampler objects for linear and nearest filtering
GLuint samplers[2];
glGenSamplers(2, samplers);
linearSampler = samplers[0];
nearestSampler = samplers[1];

GLfloat border[] = {0.0f,0.0f,0.0f,0.0f};
// Set up the nearest sampler
glSamplerParameteri(nearestSampler, GL_TEXTURE_MAG_FILTER, GL_NEAREST);
glSamplerParameteri(nearestSampler, GL_TEXTURE_MIN_FILTER, GL_NEAREST);
glSamplerParameteri(nearestSampler, GL_TEXTURE_WRAP_S, GL_CLAMP_TO_BORDER);
glSamplerParameteri(nearestSampler, GL_TEXTURE_WRAP_T, GL_CLAMP_TO_BORDER);
glSamplerParameterfv(nearestSampler, GL_TEXTURE_BORDER_COLOR, border);

// Set up the linear sampler
glSamplerParameteri(linearSampler, GL_TEXTURE_MAG_FILTER, GL_LINEAR);
glSamplerParameteri(linearSampler, GL_TEXTURE_MIN_FILTER, GL_LINEAR);
glSamplerParameteri(linearSampler, GL_TEXTURE_WRAP_S, GL_CLAMP_TO_BORDER);
glSamplerParameteri(linearSampler, GL_TEXTURE_WRAP_T, GL_CLAMP_TO_BORDER);
glSamplerParameterfv(linearSampler, GL_TEXTURE_BORDER_COLOR, border);

// We want nearest sampling except for the last pass.
glBindSampler(0, nearestSampler);
glBindSampler(1, nearestSampler);
glBindSampler(2, nearestSampler);- 이 코드에서는 3pass 결과를 unit2의 텍스처에 저장하고, 4pass 결과는 unit1의 텍스처에 저장하고있음..(굳이 순서 바꾸ㅓ서?)
- 마지막 pass에서 블러가 끝난 4pass 결과의 텍스처를 Linear로 filtering하기 위해 linear sampler obejct를 bind
void SceneHdrBloom::pass5()
{
prog.setUniform("Pass", 5);
// Bind to the default framebuffer, this time we're going to
// actually draw to the screen!
glBindFramebuffer(GL_FRAMEBUFFER,0);
glClear(GL_COLOR_BUFFER_BIT);
glViewport(0,0,width,height);
// In this pass, we're reading from tex1 (unit 1) and we want
// linear sampling to get an extra blur
glBindSampler(1, linearSampler);
// Render the full-screen quad
glBindVertexArray(fsQuad);
glDrawArrays(GL_TRIANGLES, 0, 6);
// Revert to nearest sampling
glBindSampler(1, nearestSampler);
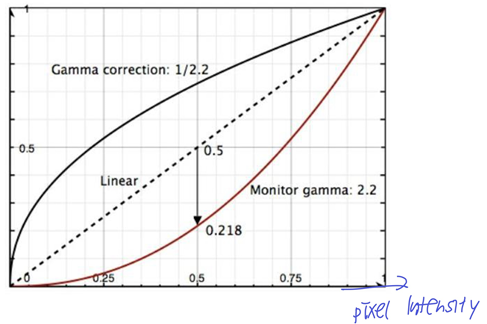
}◾ Gamma correction
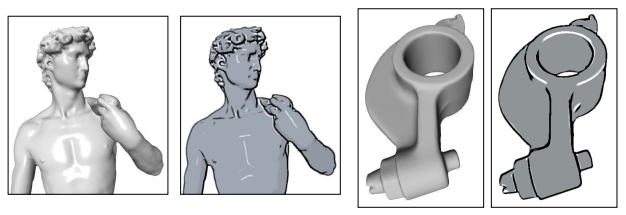
- 모니터는 non-lienar한 밝기를 가진다
- Gamma correction이 없으면 0.5의 밝기값이 1밝기의 반을 나타내지 못하고 더 어둡다
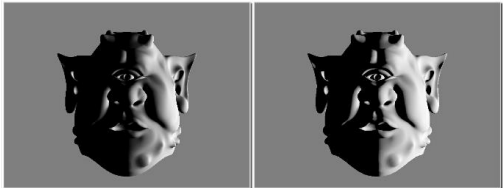 (왼-적용x, 오-적용)
 - 모니터의 픽셀값
P은 실제 픽셀값I의 제곱 (보통 는 2.0~2.4 범위를 가지고 주어짐)
- 그래서 실제 밝기값으로 나타내고 싶으면 위의 식을 반대로해서 제곱을 하면 됨!
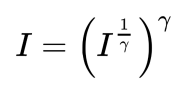
- fragment shader에서 최종 컬러값을 내보낼 때, 제곱을 해준다

- 저장된 텍스처가 gamma correction이 되어있는지 확인 필요
- 저장된 텍스처가 gamma correction이 되어있다면, 원본 데이터에 라이팅, RGB연산을 위해 제곱을 해줘야함 (원래대로 복구, decode)

( •̀ .̫ •́ )✧