Oracle 설치 매뉴얼준비
https://heekng.tistory.com/86
-> 이분의 블로그도 많은 도움이 되었다
운영체제별 설치 매뉴얼
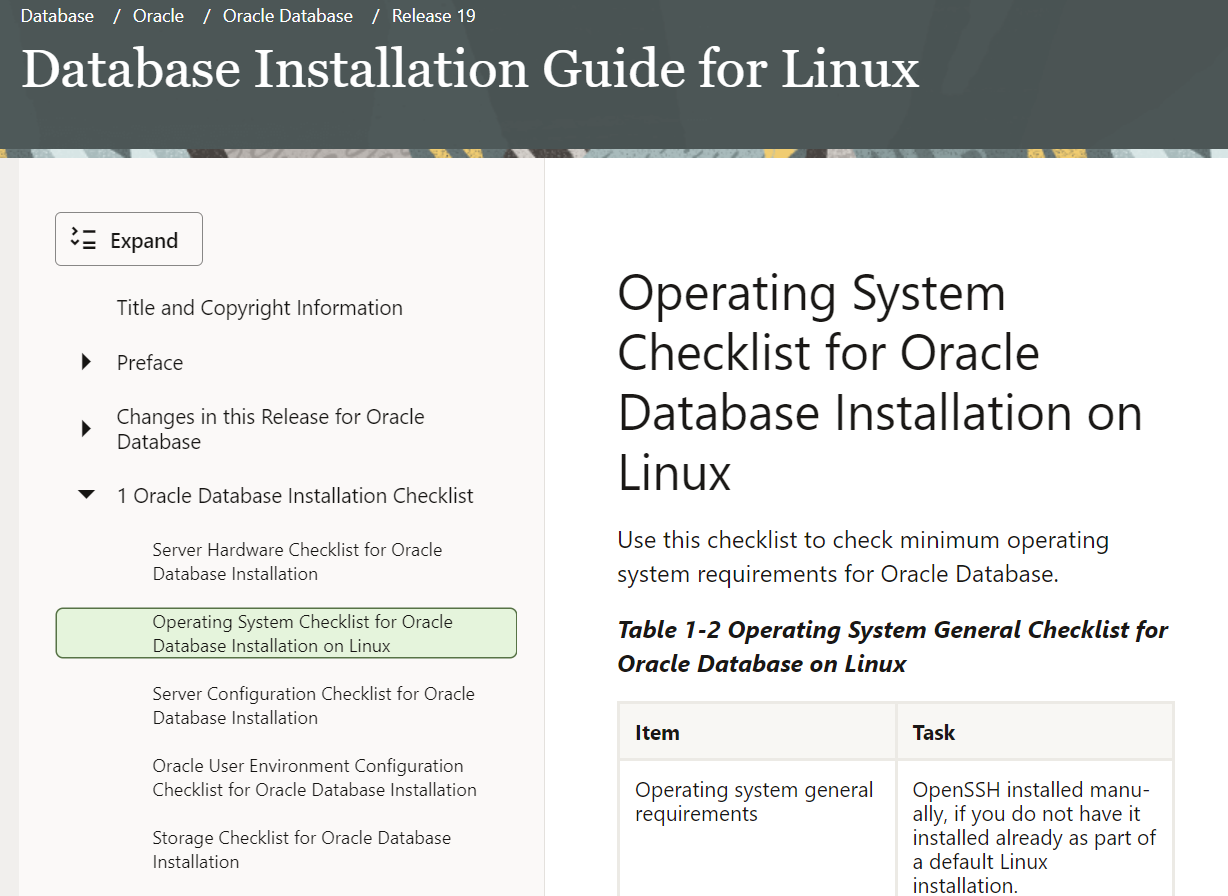
https://docs.oracle.com/en/database/oracle/oracle-database/19/install-and-upgrade.html
[출처 : Oracle 공식 홈페이지]
해당 링크로 들어가면 각종 운영체제별 매뉴얼을 볼 수 있다.
본인은 리눅스에 설치 할 것이므로 아래 매뉴얼을 따라 할 것이다.
리눅스 설치 매뉴얼
https://docs.oracle.com/en/database/oracle/oracle-database/19/ladbi/oracle-database-installation-checklist.html#GUID-E847221C-1406-4B6D-8666-479DB6BDB046
[출처 : Oracle 공식 홈페이지]
해당 링크로 들어가면 아래와 같은 html 방식의 매뉴얼 혹은 pdf 매뉴얼을 볼 수 있다.
그럼 오라클 데이터베이스 설치를 시작해보자
Preinstallation
1. Oracle DB 설치 전 체크
🔥 서버 하드웨어 체크
✔ 서버가 네트워크에 연결되어 있는지
✔ RAM : 1GB이상 (2GB 추천)
✔ CPU : Neoverse N1 아키텍처를 지원하는 CPU 권장
✔ Disk : 7.2 GB 이상
🔥 운영체제 체크
Linux x86-64 기준
✔ OpenSSH 설치
✔ ..........
🔥 서버 체크
✔ /tmp 디렉토리와 연결된 disk space 1GB 이상
✔ Swqp 메모리 : RAM이 1-2GB 사이이면 RAM x 2, 2-16GB이면 RAM 사이즈와 동일하게...
✔ Groups, Users : security 보장을 위해 설치 전 세팅
✔ 오라클 환경변수 unset : 이전에 설치한 바가 있다면, 이 변수도 설치 전 다 unset
# 1. 서버 RAM 확인
grep MemTotal /proc/meminfo
# 2. Swap 확인
grep SwapTotal /proc/meminfo
# 3. /tmp 디렉토리 내 용량 확인
df -h /tmp
# 4. 현재 사용가능한 RAM와 disk Swap 공간 확인
free
# 5. 시스템 아키텍처 확인 (x86_64 이 나와야 함)
uname -m
# 6. 공유메모리가 잘 mount 되었는지
df -h /dev/shm
2. Oracle DB에 필요한 패키지 사전설치
- root 계정으로 접속
su - root
- 사전 설치파일 설치
yum install -y oracle-database-preinstall-19c
yum install https://yum.oracle.com/repo/OracleLinux/OL7/latest/x86_64/getPackage/oracle-database-preinstall-19c-1.0-1.el7.x86_64.rpm
Oracle Database를 설치하기 전에 필요한 일반적인 시스템 라이브러리와 패키지를 설치하여 종속성을 충족시켜주어야 한다.
3. 커널 파라미터 & 자원 제한 설정
- root 계정으로 접속
su - root
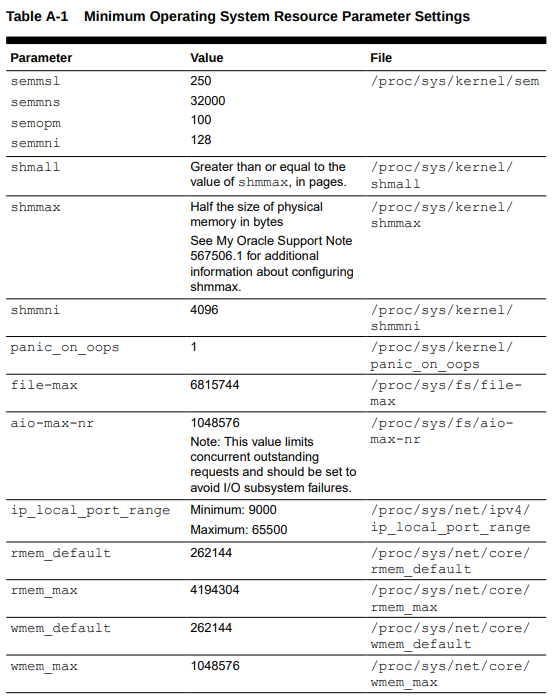
- 커널 파라미터 수정
시스템 성능 최적화, 자원관리를 위해 사용됨vi /etc/sysctl.conf
[출처 : Oracle 19c linux 설치 매뉴얼]
위의 표를 참고하여 파라미터 값을 수정해준다.kernel.sem = 250 32000 100 128 kernel.shmall = 484966 #shmmax / 페이지 사이즈 kernel.shmmax = 1986422374 #물리메모리 절반 byte값 kernel.shmmni = 4096 #세그먼트 개수 fs.file-max = 6815744 net.ipv4.ip_local_port_range = 1024 65000 net.core.rmem_default = 262144 net.core.wmem_default = 262144 net.core.rmem_max = 4194304 net.core.wmem_max = 1048576수정된 파라미터 적용하기
sysctl -p
- 자원제한 설정
리소스 제한을 설정하여 시스템 리소스의 과도한 사용을 방지vi /etc/security/limits.conf ############################## oracle soft nproc 2047 oracle hard nproc 16384 oracle soft nofile 1024 oracle hard nofile 65536 oracle soft stack 10240모두 수정 후 재부팅
reboot
4. 서버 유저, 그룹, 환경 설정
- 그룹 만들기
groupadd oinstall
groupadd dba
- 사용자 추가하기
useradd -G oinstall -G dba oracle
passwd oracle
5. Oracle 환경변수 설정
- oracle 계정으로 전환
su - oracle
- 환경변수 편집
vi /home/oracle/.bash_profile
#######################################
ORACLE_BASE=/u01/app/oracle
ORACLE_SID=XE
ORACLE_HOME=$ORACLE_BASE/product/19/$ORACLE_SID
ORACLE_HOME_LISTNER=$ORACLE_HOME/bin/lsnrctl
PATH=$ORACLE_HOME/bin:$PATH
export PATH
export ORACLE_BASE
export ORACLE_SID
export ORACLE_HOME
export ORACLE_LISTNER
export TMP=/tmp
export TMPDIR=$TMP
- 환경변수 적용
source ~/.bash_profile
질문 : ORACLE_HOME 환경변수 경로를 home 밑이 아니라 / 바로 밑으로 따로 만드는것이 궁금하다................... 그리고 root계정으로 환경변수 설정하는 것과 다른 계정으로 하는것의 차이
4. 서버 네트워크 설정
5. 서버 파일 시스템 설정
Installation
1. Oracle DB 설치 파일 다운 및 이동
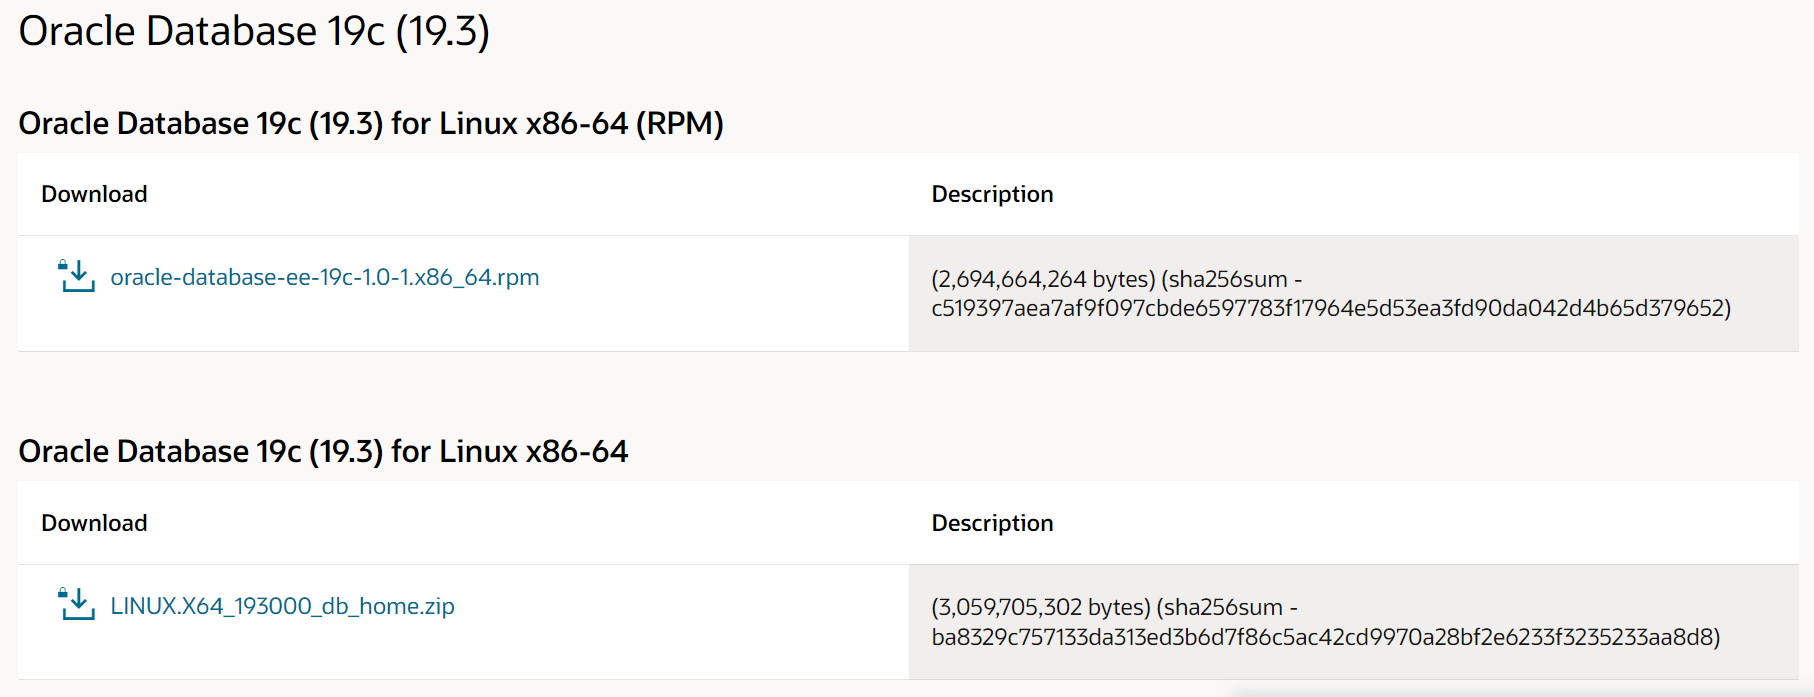
https://www.oracle.com/kr/database/technologies/oracle19c-linux-downloads.html
-> 여기서 다운받기
이렇게 두가지 종류가 있는데, RPM 버전은 RedHat Package Manager로 패키지 관리자를 통해 설치 및 업데이트가 용이함
본인은 둘 중 밑에 있는 아카이브 파일 형식으로 다운로드 하였다.
windows 에서 리눅스로 파일 이동은 MobaXterm 을 사용하였다.
2. Oracle DB 설치 파일 압축 해제
- 압축 풀고 넣을 폴더 만들기
$ORACLE_HOME 경로이다.mkdir -p /u01/app/oracle/product/19/XE
- 압축 해제
unzip example.zip -d $ORACLE_HOME
$ORACLE_HOME경로에 압축을 해제해주었다.
root 계정이 아닌걸로 하니 아래와 같이 permission에러가 떴따...

압축해제는 ,,,, 왜 일반 유저로 안되는지...? root로만 가능한건가??
[ojisu@db-master /]$ sudo mkdir -p /u01/app/oracle/product/19/XE
[sudo] password for ojisu:
ojisu is not in the sudoers file.  This incident will be reported.
그래서 아래와 같이 u01에 대한 권한이 아래와 같이 root 권한이 되었따....
(root에도 ojisu와 동일하게 환경변수 등록해주는게 맞는지?)[root@db-master /]# ls -al|grep u01 drwxr-xr-x. 3 root root 17 Sep 15 10:24 u01일단 ojisu로 바꿔줌
[root@db-master /]# chown -R ojisu:dba /u01
[root@db-master /]# ls -al|grep u01
drwxr-xr-x.   3 ojisu dba    17 Sep 15 10:24 u01
그리고 다 설치가 GUI로 하는게 많은데 CLI로 설치하는거 찾음
-> silent 모드로 해야함
https://medium.com/geekculture/oracle-database-19c-installation-on-linux-e184dde4ce03
외국 블로그인데..........역시 외국걸 찾아야함
-> 한국어로 하는 것도 있었음 ......................
3. 설치하기
자 이제 그럼 설치를 시작해보자
압축 푼 경로로 가면 위와 같이 파일들이 있을 것이다.
GUI와 CLI 방법 두가지가 있는데 필자는 CLI (slient mode)로 진행할 것이다.
1. GUI로 설치하는 방법 (x window 필요)./runInstalleryum install "GNOME Desktop" yum groupinstall -y "GNOME Desktop" "Graphical Administration Tools" ln -sf /lib/systemd/system/runlevel5.target /etc/systemd/system/default.target rpm -Uvh https://dl.fedoraproject.org/pub/epel/7/x86_64/e/epel-release-7- 6.noarch.rpm yum install epel-release yum install xrdp tigervnc-server systemctl start xrdp systemctl enable xrdp reboot
그런데..... ./runInstaller 를 실행하려는 와중 다음과 같은 오류가 뜸[ojisu@db-master db_1]$ ./runInstaller Can't load log handler "oracle.install.ivw.db.driver.DBConfigLogHandler" java.nio.file.NoSuchFileException: /u01/oraInventory/logs/InstallActions2023-09-18_09-05-15AM/installActions2023-09-18_09-05-15AM.log.lck java.nio.file.NoSuchFileException: /u01/oraInventory/logs/InstallActions2023-09-18_09-05-15AM/installActions2023-09-18_09-05-15AM.log.lck at sun.nio.fs.UnixException.translateToIOException(UnixException.java:86) at sun.nio.fs.UnixException.rethrowAsIOException(UnixException.java:102) at sun.nio.fs.UnixException.rethrowAsIOException(UnixException.java:107) at sun.nio.fs.UnixFileSystemProvider.newFileChannel(UnixFileSystemProvider.java:177) at java.nio.channels.FileChannel.open(FileChannel.java:287) at java.nio.channels.FileChannel.open(FileChannel.java:335) at java.util.logging.FileHandler.openFiles(FileHandler.java:478) at java.util.logging.FileHandler.<init>(FileHandler.java:344) at oracle.install.commons.base.logging.BasicLogHandler.<init>(BasicLogHandler.java:61) at oracle.install.ivw.common.driver.CommonConfigLogHandler.<init>(CommonConfigLogHandler.java:92) at oracle.install.ivw.db.driver.DBConfigLogHandler.<init>(DBConfigLogHandler.java:45) at sun.reflect.NativeConstructorAccessorImpl.newInstance0(Native Method) at sun.reflect.NativeConstructorAccessorImpl.newInstance(NativeConstructorAccessorImpl.java:62) at sun.reflect.DelegatingConstructorAccessorImpl.newInstance(DelegatingConstructorAccessorImpl.java:45) at java.lang.reflect.Constructor.newInstance(Constructor.java:423) at java.lang.Class.newInstance(Class.java:442) at java.util.logging.LogManager$5.run(LogManager.java:966) at java.security.AccessController.doPrivileged(Native Method) at java.util.logging.LogManager.loadLoggerHandlers(LogManager.java:958) at java.util.logging.LogManager.initializeGlobalHandlers(LogManager.java:1578) at java.util.logging.LogManager.access$1500(LogManager.java:145) at java.util.logging.LogManager$RootLogger.accessCheckedHandlers(LogManager.java:1667) at java.util.logging.Logger.getHandlers(Logger.java:1777) at java.util.logging.Logger.log(Logger.java:735) at java.util.logging.Logger.doLog(Logger.java:765) at java.util.logging.Logger.log(Logger.java:788) at java.util.logging.Logger.info(Logger.java:1490) at oracle.install.commons.util.Application.startup(Application.java:977) at oracle.install.commons.flow.FlowApplication.startup(FlowApplication.java:181) at oracle.install.commons.flow.FlowApplication.startup(FlowApplication.java:198) at oracle.install.commons.base.driver.common.Installer.startup(Installer.java:1106) at oracle.install.ivw.db.driver.DBConfigWizard.startup(DBConfigWizard.java:71) at oracle.install.ivw.db.driver.DBConfigWizard.main(DBConfigWizard.java:81) Launching Oracle Database Setup Wizard...
일단 무시하고 계속 가본다...
추후 설치 맨 마지막 단계에서InstallActions파일 관련 에러가 나서... 결국 이 디렉토리 새로 만듦.....[root@db-master /]# mkdir -p /u01/oraInventory/logs [root@db-master /]# chown -R ojisu:dba u01
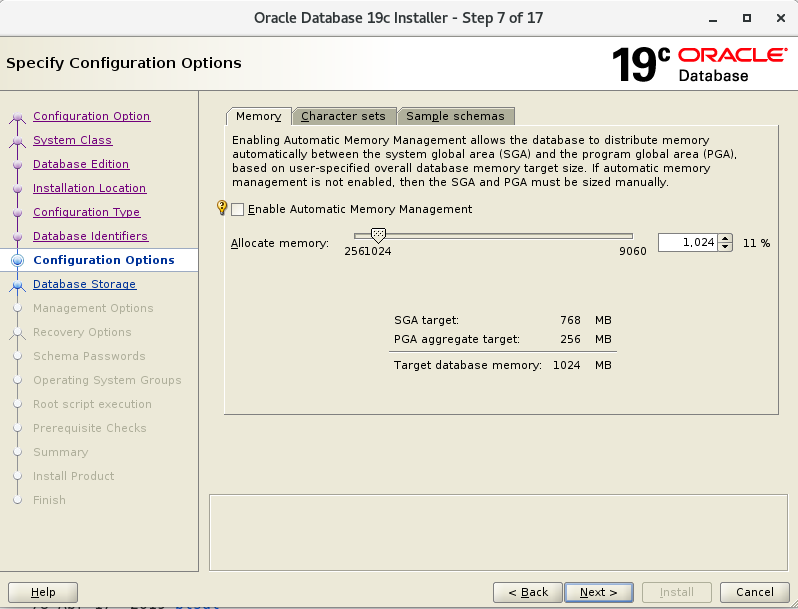
메모리 1기가로 설정....
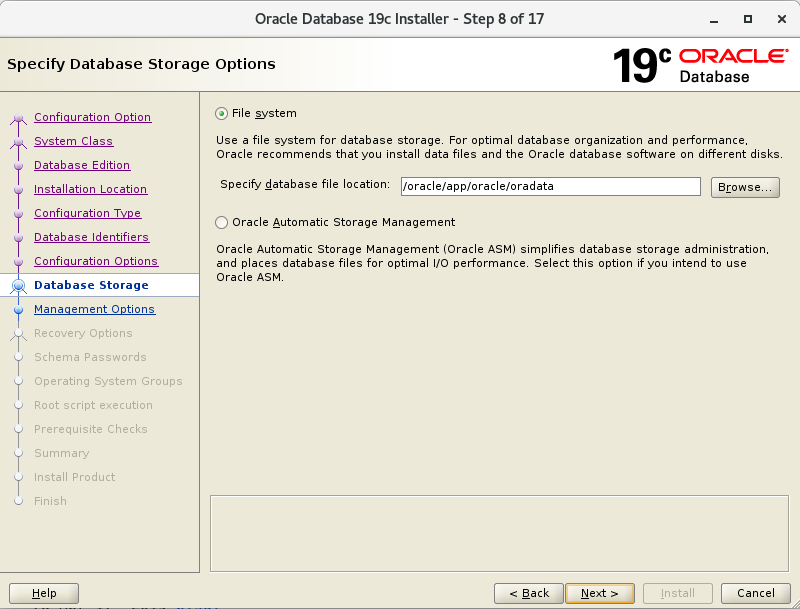
경로 설정....

- CLI로 설치하는 방법
하단에 계속됩니다.https://jack-of-all-trades.tistory.com/423
를 참고하였다.
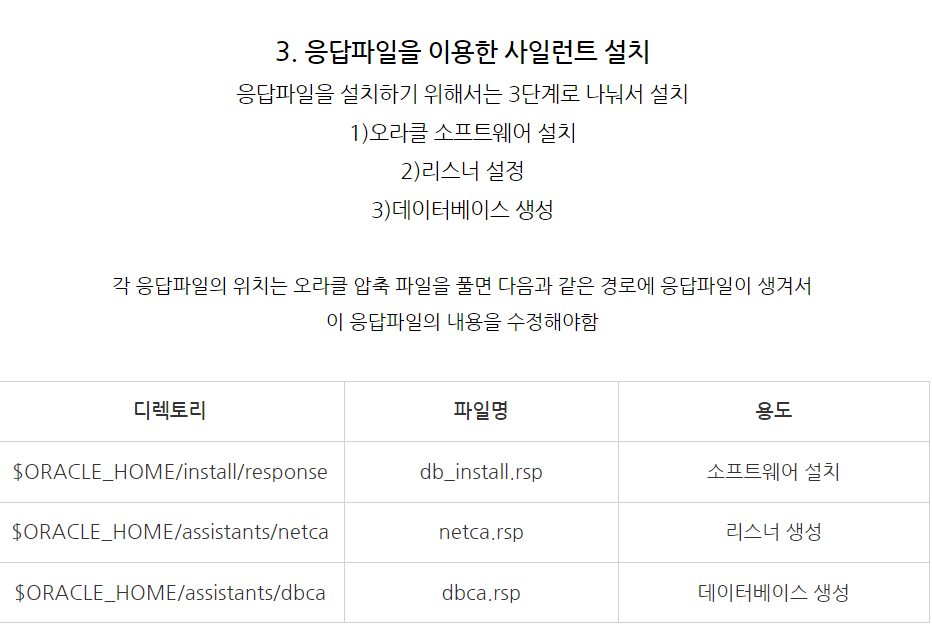
3-1. 오라클 소프트웨어 설치
오라클 DB 설치시 아래사진과 같이 보통 15~20단계 화면을 거치면서 설치를 위한 여러가지 정보를 입력해줘야 한다.
이런 입력정보를 미리 파일로(*.rsp) 만들어놓고, 설치시에 옵션으로 준다면 설치를 자동화할 수 있다.$ORACLE_HOME/install/response해당 경로에서
db_install.rsp파일을 찾을 수 있고, vi로 편집 가능하다.
위와 같이<파라미터 설명, 파라미터값>으로 되어있다.
각각의 파라미터에 대한 설명은 아래 참고....
https://fliedcat.tistory.com/106
(추후 파라미터 값 적을 것임)
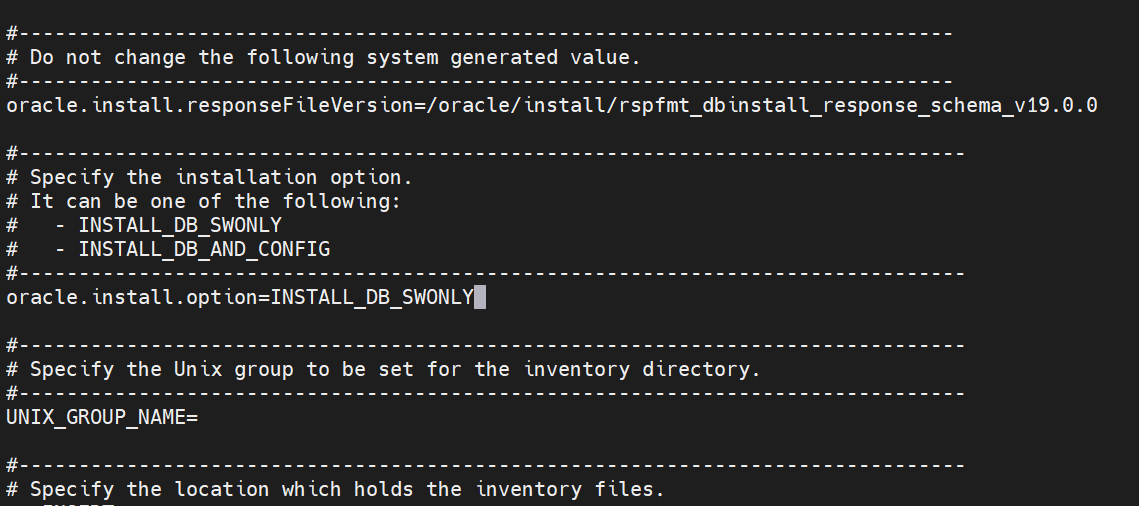
#------------------------------------------------------------------------------
# Do not change the following system generated value.
#------------------------------------------------------------------------------
oracle.install.responseFileVersion=/oracle/install/rspfmt_dbinstall_response_schema_v19.0.0

#-------------------------------------------------------------------------------
# Specify the installation option.
# It can be one of the following:
#   - INSTALL_DB_SWONLY
#   - INSTALL_DB_AND_CONFIG
#-------------------------------------------------------------------------------
oracle.install.option=INSTALL_DB_SWONLY

#-------------------------------------------------------------------------------
# Specify the Unix group to be set for the inventory directory.
#-------------------------------------------------------------------------------
UNIX_GROUP_NAME=dba

#-------------------------------------------------------------------------------
# Specify the location which holds the inventory files.
# This is an optional parameter if installing on
# Windows based Operating System.
#-------------------------------------------------------------------------------
INVENTORY_LOCATION=/u01/app/oracle/oraInventory
#-------------------------------------------------------------------------------
# Specify the complete path of the Oracle Home.
#-------------------------------------------------------------------------------
ORACLE_HOME=/u01/app/oracle/product/19/XE

#-------------------------------------------------------------------------------
# Specify the complete path of the Oracle Base.
#-------------------------------------------------------------------------------
ORACLE_BASE=/u01/app/oracle

#-------------------------------------------------------------------------------
# Specify the installation edition of the component.
#
# The value should contain only one of these choices.
#   - EE     : Enterprise Edition
#   - SE2     : Standard Edition 2


#-------------------------------------------------------------------------------

oracle.install.db.InstallEdition=EE
#---------------------------------------------------------------------------                                                                                ---
# The OSDBA_GROUP is the OS group which is to be granted SYSDBA privileges.
#---------------------------------------------------------------------------                                                                                ----
oracle.install.db.OSDBA_GROUP=dba

#---------------------------------------------------------------------------                                                                                ---
# The OSOPER_GROUP is the OS group which is to be granted SYSOPER privileges                                                                                .
# The value to be specified for OSOPER group is optional.
#---------------------------------------------------------------------------                                                                                ---
oracle.install.db.OSOPER_GROUP=dba

#---------------------------------------------------------------------------                                                                                ---
# The OSBACKUPDBA_GROUP is the OS group which is to be granted SYSBACKUP pri                                                                                vileges.
#---------------------------------------------------------------------------                                                                                ---
oracle.install.db.OSBACKUPDBA_GROUP=dba

#---------------------------------------------------------------------------                                                                                ---
# The OSDGDBA_GROUP is the OS group which is to be granted SYSDG privileges.
#---------------------------------------------------------------------------                                                                                ---
oracle.install.db.OSDGDBA_GROUP=dba

#---------------------------------------------------------------------------                                                                                ---
# The OSKMDBA_GROUP is the OS group which is to be granted SYSKM privileges.
#---------------------------------------------------------------------------                                                                                ---
oracle.install.db.OSKMDBA_GROUP=dba

#---------------------------------------------------------------------------                                                                                ---
# The OSRACDBA_GROUP is the OS group which is to be granted SYSRAC privilege                                                                                s.
#---------------------------------------------------------------------------                                                                                ---
oracle.install.db.OSRACDBA_GROUP=dba
이후 .... 설치 시작해줌
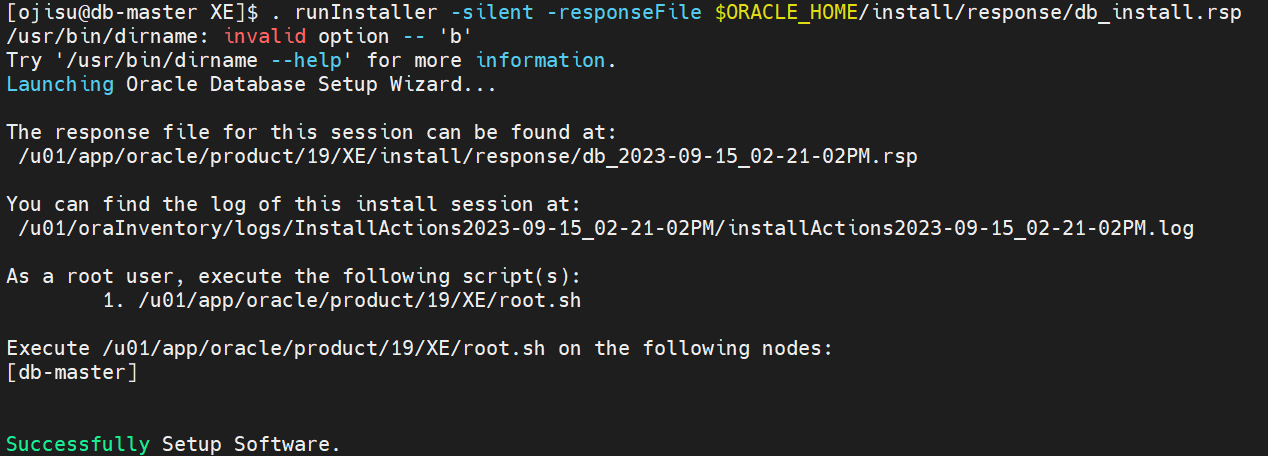
[ojisu@db-master XE]$ . runInstaller -silent -responseFile $ORACLE_HOME/install/response/db_install.rsp설치가 시작되고... 다되면 아래와 같이 메세지가 뜬다.
[ojisu@db-master XE]$ . runInstaller -silent -responseFile $ORACLE_HOME/install/response/db_install.rsp
/usr/bin/dirname: invalid option -- 'b'
Try '/usr/bin/dirname --help' for more information.
Launching Oracle Database Setup Wizard...
The response file for this session can be found at:
/u01/app/oracle/product/19/XE/install/response/db_2023-09-15_02-21-02PM.rsp
You can find the log of this install session at:
 /u01/oraInventory/logs/InstallActions2023-09-15_02-21-02PM/installActions2023-09-15_02-21-02PM.log
As a root user, execute the following script(s):
        1. /u01/app/oracle/product/19/XE/root.sh
Execute /u01/app/oracle/product/19/XE/root.sh on the following nodes:
[db-master]
Successfully Setup Software.
아래는 예전에 실패했던 버전 ....
[ojisu@db-master XE]$ . runInstaller -silent -responseFile $ORACLE_HOME/install/response/db_install.rsp
/usr/bin/dirname: invalid option -- 'b'
Try '/usr/bin/dirname --help' for more information.
Launching Oracle Database Setup Wizard...
[WARNING] [INS-13014] Target environment does not meet some optional requirements.
   CAUSE: Some of the optional prerequisites are not met. See logs for details. /u01/oraInventory/logs/InstallActions2023-09-13_03-40-09PM/installActions2023-09-13_03-40-09PM.log
   ACTION: Identify the list of failed prerequisite checks from the log: /u01/oraInventory/logs/InstallActions2023-09-13_03-40-09PM/installActions2023-09-13_03-40-09PM.log. Then either from the log file or from installation manual find the appropriate configuration to meet the prerequisites and fix it manually.
The response file for this session can be found at:
 /u01/app/oracle/product/19/XE/install/response/db_2023-09-13_03-40-09PM.rsp
You can find the log of this install session at:
 /u01/oraInventory/logs/InstallActions2023-09-13_03-40-09PM/installActions2023-09-13_03-40-09PM.log
As a root user, execute the following script(s):
        1. /u01/app/oracle/product/19/XE/root.sh
Execute /u01/app/oracle/product/19/XE/root.sh on the following nodes:
[db-master]
Successfully Setup Software with warning(s).
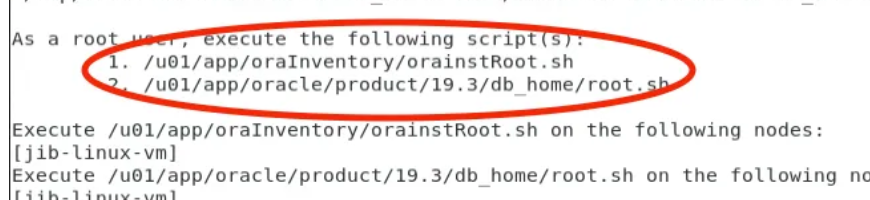
그럼 이제 ... 위에 결과 메세지에 적혀있듯이
As a root user, execute the following script(s): 1. /u01/app/oracle/product/19/XE/root.sh
root 유저로 sh 스크립트를 실행해줘야한다.
근데 난 왜..... 이중 하나밖에 안나오지..? ㅠ sh 파일 하나 어디갔지......INVENTORY_LOCATION=/u01/app/oracle/oraInventory ORACLE_HOME=/u01/app/oracle/product/19/XE ORACLE_BASE=/u01/app/oraclersp 파일 내 경로가 문제가 생긴 걸까.......
orainstRoot.sh가 나오지 않음
(근데 어떤 블로그에서는 이부분 생략하고 리스너 설정에 들어감 ..ㄷㄷ 뭐지)
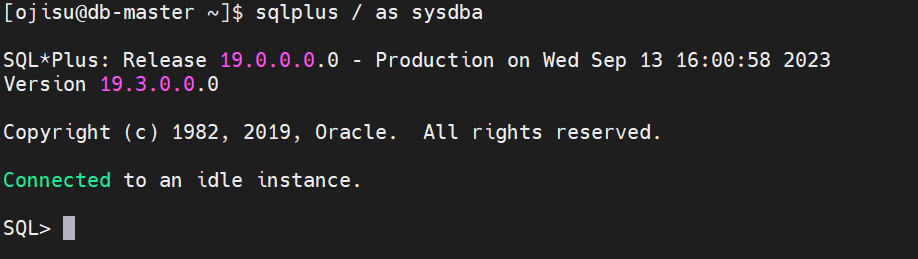
아래 명령을 통해 잘 설치 된 것을 볼 수 있다.
3-2. 리스너 생성
아래 경로로 가면 리스너를 설정하는 response 파일이 있다.
$ORACLE_HOME/assistants/netca/netca.rsp추가로 설정 할 것은 없어 일단은 바로 설치해줌... but 추후에 파라미터값 꼭 확인해보기
netca.rsp
3-3. 데이터베이스 생성
[ojisu@db-master ~]$ dbca -silent -createDatabase -responseFile $ORACLE_HOME                                                                                /assistants/dbca/dbca.rsp
[WARNING] [DBT-06208] The 'SYS' password entered does not conform to the Ora                                                                                cle recommended standards.
   CAUSE:
a. Oracle recommends that the password entered should be at least 8 characte                                                                                rs in length, contain at least 1 uppercase character, 1 lower case character                                                                                 and 1 digit [0-9].
b.The password entered is a keyword that Oracle does not recommend to be use                                                                                d as password
   ACTION: Specify a strong password. If required refer Oracle documentation                                                                                 for guidelines.
[WARNING] [DBT-06208] The 'SYSTEM' password entered does not conform to the                                                                                 Oracle recommended standards.
   CAUSE:
a. Oracle recommends that the password entered should be at least 8 characte                                                                                rs in length, contain at least 1 uppercase character, 1 lower case character                                                                                 and 1 digit [0-9].
b.The password entered is a keyword that Oracle does not recommend to be use                                                                                d as password
   ACTION: Specify a strong password. If required refer Oracle documentation                                                                                 for guidelines.
Prepare for db operation
10% complete
Copying database files
40% complete
Creating and starting Oracle instance
42% complete
46% complete
50% complete
54% complete
60% complete
Completing Database Creation
66% complete
69% complete
70% complete
Executing Post Configuration Actions
100% complete
Database creation complete. For details check the logfiles at:
 /u01/app/oracle/cfgtoollogs/dbca/first.
Database Information:
Global Database Name:first
System Identifier(SID):first
Look at the log file "/u01/app/oracle/cfgtoollogs/dbca/first/first.log" for fur                                                                             ther details.
그후 오라클 서버에 접속 후, database 확인해보려 하는데 안됨.
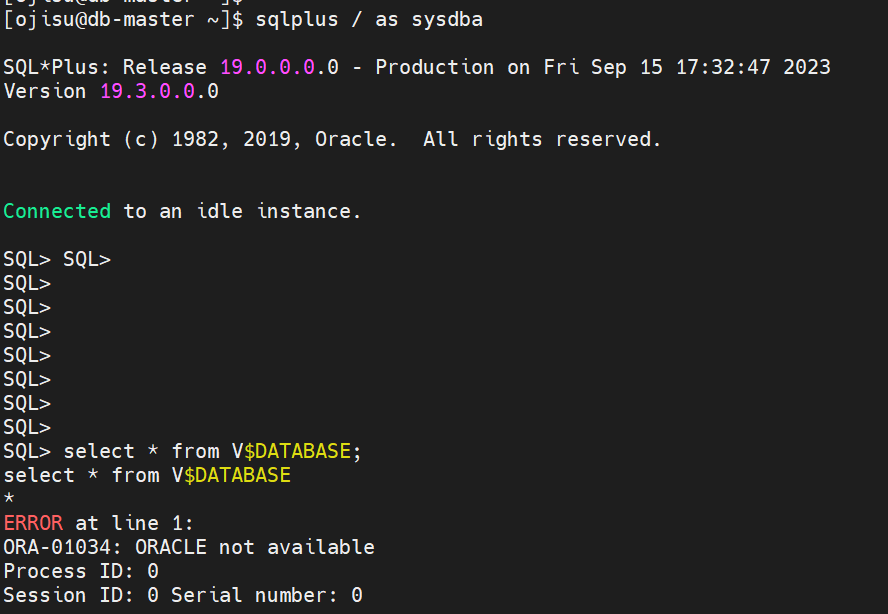
[ojisu@db-master ~]$ sqlplus / as sysdba
SQL*Plus: Release 19.0.0.0.0 - Production on Fri Sep 15 16:21:35 2023
Version 19.3.0.0.0
Copyright (c) 1982, 2019, Oracle.  All rights reserved.
Connected to an idle instance.
SQL> startup
ORA-01078: failure in processing system parameters
LRM-00109: could not open parameter file '/u01/app/oracle/product/19/XE/dbs/initXE.ora'
https://blog.naver.com/PostView.naver?blogId=kang1384&logNo=222458939912&parentCategoryNo=&categoryNo=9&viewDate=&isShowPopularPosts=true&from=search
에서 일단 보고 조치함
https://kimsouce.tistory.com/77
일단 이거 보고 함
하 근데 또 오류 뜸
SQL> startup pfile=/u01/app/oracle/product/19/XE/dbs/init.ora
ORA-00845: MEMORY_TARGET not supported on this system
Postinstallation
7. Oracle DB 설치 후 작업
