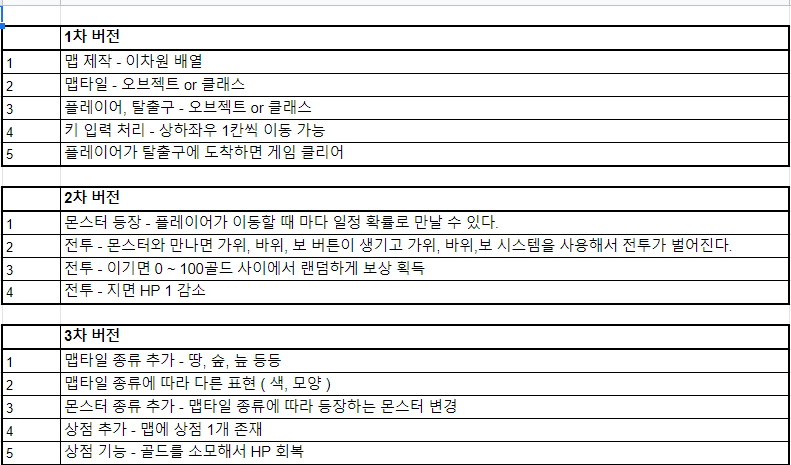
미션들을 수행하면서 게임을 만들어 보겠다.
완성본
파란색 = 영웅
빨간색 = 상점
검은색 = 탈출구
보라, 초록, 노랑 = 독속성, 숲속성, 땅속성
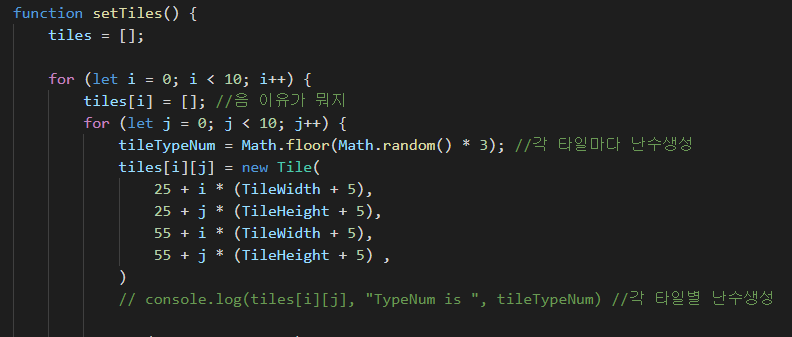
먼저 타일은 클래스 선언하고 2차배열을 통해 만들었다.
tiletypeNum은 추후에 설명할 개념이긴 한데 타일을 만들고 난 뒤에 타입별로 숫자를 0~2까지 설정해준 다음에 색깔을 주기 위한 변수이다.
class Tile {
    constructor(left, top, right, bottom) {
        this.left = left;
        this.top = top;
        this.right = right;
        this.bottom = bottom;
        this.color = "green";
        this.isExit = false;
    }
    draw() {
        if (true) {
            context.rect(this.left, this.top, TileWidth, TileHeight);
            context.fillStyle = this.color;
            context.fill();
        } //else if(tileTypeNum == 1) {
        //     context.rect(this.left, this.top, TileWidth, TileHeight);
        //     context.fillStyle = "yellow";
        //     context.fill();
        // }
    }
}
그다음은 타일을 돌아다닐 hero를 만들어보자.
hero 역시 내가 아직 친숙하지 않은 class로 만들어주겠다.
class Hero {
    constructor(left, top, right, bottom) {
        this.left = left;
        this.top = top;
        this.right = right;
        this.bottom = bottom;
        this.color = "blue";
    }
    draw() {
        if (true) {
            context.rect(this.left, this.top, heroWidth, heroHeight);
            context.fillStyle = this.color;
            context.fill();
        }
    }
}

function setHero() {

    myHero = new Hero(
        heroPsxLeft,
        heroPsxTop,
        heroPsxLeft + heroWidth, // draw할때 this.top인데 this.right이라 해서 ㅇ ㅣ값 추가해주면 y로 커짐.
        heroPsxTop + heroHeight
    )
    console.log(myHero);
}
클래스 안에 함수를 만들어주면 이 클래스만 prototype으로 사용할수 있다.
함수들을 잘 만들고 그려주지 않으면 볼수가 없다.
function drawTiles() { //타일마다 다르게 그려주기

    for (let i = 0; i < 10; i++) {
        for (let j = 0; j < 10; j++) {
            context.beginPath(); // 검은 벽 하나 그리기위해 포문 안에

            tiles[i][j].draw();

            context.closePath(); //얘네를 포문 밖에 두니까 한방에 그리고 마는 거임.
        }
    }
}

function drawHero() {
    context.beginPath();

    myHero.draw();

    context.closePath();
}

function drawAll() {

    drawTiles(); //타일 그려주기
    drawHero(); //히어로 그려주기
}


setInterval(drawAll, 100);
이러면 타일과 히어로를 볼수 있다.
그다음으로 히어로를 움직여보자. 방향키로 움직일 것이고 이벤트리스너를 만들어주어야한다.
document.addEventListener('keydown', keyDownEventHandler);

function keyDownEventHandler(e) {

    if (e.key == 'ArrowRight') {
        if (heroPsxLeft + heroWidth < 365) {
            heroMoveDirX = 35;
            // showMonster()
            heroPsxLeft += heroMoveDirX;
            myHero.left = heroPsxLeft;
            // console.log(myHero);
        }
        else if (heroPsxLeft + heroWidth >= 365) {
            console.log("15x추가불가")
            heroMoveDirX = 0;
        }
    }
    else if (e.key == 'ArrowLeft') {
        if (heroPsxLeft > 30) {
            // showMonster()
            // console.log("15x다운")
            heroMoveDirX = -35;
            heroPsxLeft += heroMoveDirX;
            myHero.left = heroPsxLeft; //myHero.left에 값을 넣어줘야 움직이네
        }
    }
    if (e.key == 'ArrowUp') {
        console.log("화살 위");
        if (heroPsxTop > 30) {
            // showMonster()
            heroMoveDirY = -35;
            heroPsxTop += heroMoveDirY;
            myHero.top = heroPsxTop;
        }
    }
    else if (e.key == 'ArrowDown') {

        if (heroPsxTop + 20 < 360) {
            console.log("화살아래")
            // showMonster()
            heroMoveDirY = 35;
            heroPsxTop += heroMoveDirY;
            myHero.top = heroPsxTop;
            // console.log(myHero);
        }
    }
    if (e.key == 'ArrowDown' ||
        e.key == 'ArrowUp' ||
        e.key == 'ArrowLeft' ||
        e.key == 'ArrowRight') {
        pcNum = Math.floor(Math.random() * 2);
        huntMoney = Math.floor(Math.random() * 10) + 15;
        metMarket();
        // console.log(tiles[0][0]);
        // console.log("밖에서 hp찍자", heroHp);
        showMonster();
        // console.log(pcNum);
    }
}
먼저 키다운이벤트 핸들러를 만들어주었음
타일을 벗어나지 않는 조건안에서 히어로를 움직일 크기를 정해주었다
heroMoveDirX = 35;
히어로는 35만큼 움직인다.
그리고 움직인만큼 히어로를 움직여줘야하기 때문에
heroPsxLeft += heroMoveDirX;
히어로의 왼쪽값을 더해주고 그 이후에 히어로에게 이 값을 전달해주어야 한다.
myHero.left = heroPsxLeft;
만약 조건에 맞지 않는다면
heroMoveDirX = 0; 만들어주면 움직이지 않는다.
그다음 탈출구를 만나면 게임이 끝나야한다.
let randomI = Math.floor(Math.random() * 10);
let randomJ = Math.floor(Math.random() * 10);

function gameClear() {
    if (myHero.left - 5 == 25 + randomI * (TileWidth + 5) && myHero.top - 5 == 25 + randomJ * (TileHeight + 5)) {
        setTimeout(() => {
            window.location.reload(true);
            alert("Game Clear");
        }, 100);
    }
}
난수를 생성한 이유는 매번 탈출구의 위치가 바뀌어야하기 때문이다.
셋타임아웃을 설정한 이유는 화면에서 아직 탈출구에 히어로가 도착하지않았는데도 게임이 끝난 alert가 실행되었기 때문임.
이제는 움직이는 동안 몬스터가 출현할 확률을 만들어야합니다.
난수를 생성하고 생성된 난수로 조건을 만들면 매우 간단하게 확률로 만들수 있따.
  let monsterNum = Math.floor(Math.random() * 10);

  if(monsterNum < 1) {
  	alert("몬스터 출현")
  }
이런 식이다. 밑에 더 자세히 적어보자면
function showMonster() {

    const playdiv = document.getElementById("play");

    let monsterNum = Math.floor(Math.random() * 10);
    console.log(monsterNum);
    let isMeetMonster = false; //포문을 두개다 빠져나가는
    for (let i = 0; i < 10; i++) {
        for (let j = 0; j < 10; j++) {
            if (isCollisionRectToRect(tiles[i][j], myHero)) {
                if (monsterNum < 2) {
                    if (tiles[i][j].color == "green") {
                        console.log(tiles[i][j]);
                        alert("초록괴물을 만나다");
                        isMeetMonster = true;
                        playdiv.style.visibility = "visible";
                        break;
                    } else if (tiles[i][j].color == "yellow") {
                        console.log(tiles[i][j]);
                        alert("노란괴물을 만나다");
                        isMeetMonster = true;
                        playdiv.style.visibility = "visible";
                        break;
                    } else if (tiles[i][j].color == "purple") {
                        console.log(tiles[i][j]);
                        alert("독괴물을 만나다");
                        isMeetMonster = true;
                        playdiv.style.visibility = "visible";
                        break;
                    }
                } else {
                    playdiv.style.visibility = "hidden";
                }
            } else (console.log("지나가요"))
        }
        if (isMeetMonster == true) break; //첫 for문을 빠져나갈때
    }

    document.getElementById("hHp").innerHTML = `HP: ${heroHp}`
    document.getElementById("hMoney").innerHTML = `money: ${heroMoney}`
}
다른 조건은 일단 보지말고 난수를 설정해서 if문을 통해 확률 준 부분을 주의깊게 봅시다.
이 함수는 방향키가 움직일때 마다 작동한다.
각 타일마다 확률을 따지고 알러트가 뜨는것임.
과제는 몬스터를 만나면 가위바위보를 해야함.
pcNum = Math.floor(Math.random() * 2);

function Scissor() {
    console.log("가위")
    myNum = 0;
    if (pcNum == 2) {
        console.log("내가 이김")
        heroMoney += huntMoney
        alert("내가 이김")
    } else if (pcNum == 1) {
        console.log("내가 짐");
        alert("내가 짐")
        heroHp -= 1

    } else if (pcNum == 0) {
        console.log("무승부");
        alert("무승부")
    }
    console.log(heroHp);
    return heroHp;
}

function Rock() {
    console.log("바위")
    myNum = 1;
    if (pcNum == 0) {
        console.log("내가 이김")
        heroMoney += huntMoney
        alert("내가 이김")
    } else if (pcNum == 2) {
        console.log("내가 짐");
        alert("내가 짐")
        heroHp -= 1

    } else if (pcNum == 1) {
        console.log("무승부");
        alert("무승부")
    }
    console.log(heroHp);
    return heroHp;
}

function Paper() {
    console.log("보")
    myNum = 2;
    if (pcNum == 0) {
        console.log("내가 짐")
        alert("내가 짐")
        heroHp -= 1

    } else if (pcNum == 1) {
        console.log("내가 이김");
        heroMoney += huntMoney
        alert("내가 이김")
    } else if (pcNum == 2) {
        console.log("무승부");
        alert("무승부")
    }
    console.log(heroHp);
    return heroHp;
}
0,1,2 중 난수가 발생하도록 했고 상황에 따라 이기거나 지는 것을 판단 -> 이기면 money 증가, 진다면 hp 소모 등 케이스를 두었음.
하이라이트는 각 타일 타입 생성과 상점생성.
다음편에 이어서 하겠음.
