앞서
이 글은 NestJS Interceptor 공식 문서를 번역하며 공부하기 위한 목적으로 작성하는 글입니다. 번역이 정확하지 않을 수 있음을 알려드립니다.
Interceptors
Interceptor는 @Injectable() 데코레이터로 annotate 되는 클래스이다. NestInterceptor 인터페이스를 반드시 implement 해야 한다.
Interceptor 는 관점 지향 프로그래밍(AOP) 기술에서 많은 영감을 받아서 만들어진 좋은 다양한 기능을 가진 집합이다. Interceptors는 다음과 같은 것들을 할 수 있다.
- 메소드 실행 전/후에 다른 logic을 bind
- 함수에서 리턴된 값을 변형
- 함수에서 throw 된 예외를 변형
- 기본 함수의 기능을 extend
- 특정 조건 하에서 함수를 완전히 override
Basics
Interceptor는 두 개의 인자를 갖는 intercept() 메서드를 포함한다. 첫 번째 인자는 ExecutionContext instance 이다. (Guard 에서의 그것과 같다.) ExecutionContext는 ArgumentHost로 부터 상속된다. 우리가 Exception Filter에서 봤던 그것이다.
Execution Context
ArgumentHost를 확장함으로써, ExecutionContext는 현재 실행되고 있는 프로세스에 대한 쓸만한 기능들을 제공한다.
Call Handler
두 번째 인자는 CallHandler이다. CallHandler 인터페이스는, 인터셉터 내에서 route handler의 메서드를 호출하는 데 쓸 수 있는 handle() 메서드를 포함한다. 만약 handle() 메서드를 intercept() 메서드 내에서 호출하지 않는다면, route handler 메서드는 실행될 수 없다.
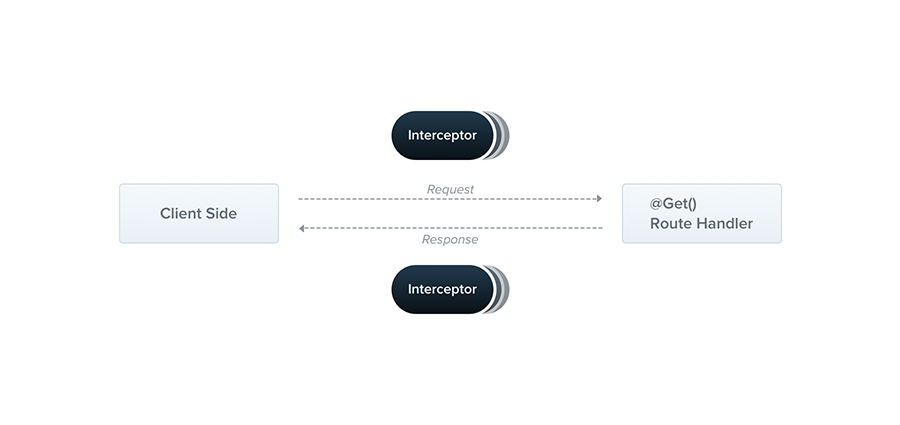
intercept() 메서드는 효과적으로 request/response 를 wrap 한다고 볼 수 있다. 결과적으로, 마지막 route handler의 실행 전/후 모두에 custom logic을 포함할 수 있게 된다. 이제 handle() 호출 전에 실행되는 intercept() 메서드 내에 코드를 작성하면 된다는 것이 명확하다.
하지만 이후에 일어나는 일에 어떻게 우리가 영향을 미칠 수 있을까? 왜냐면, handle() 메서드는 Observable을 리턴하기 때문에, 우리는 response를 더 바꿀 수 있는RxJS 의 powerful 한 operator를 사용할 수 있다. AOP terminology 를 사용함으로써, route handler의 호출(handle() 의 호출)은, 우리가 추가하려는 logic이 삽입되는 point를 일컫는 Pointcut 이라 불린다.
예를 들어, POST /cats request가 들어왔다고 가정해보자. 이 request는 CatsController 내의 create() handler에 의해 처리될 것이다. 만약 handle() 메서드를 호출하지 않는 interceptor가 어디서 호출되었든 간에, create() 메서드는 실행되지 않는다. 일단 handle()이 호출되었다면(그리고 Observable이 return 되었다면), create() handler가 trigger 될 것이다. 그리고 한 번이라도 response stream 이 Observable을 통해 받아졌다면, 추가적인 기능들은 그 stream 내에서 실행될 것이고, 마지막 result 가 caller에게 return 될 것이다.
Aspect interception
첫 예제는, log user interaction 이다. LoggingInterceptor를 보자.
import { Injectable, NestInterceptor, ExecutionContext, CallHandler } from '@nestjs/common';
import { Observable } from 'rxjs';
import { tap } from 'rxjs/operators';

@Injectable()
export class LoggingInterceptor implements NestInterceptor {
  intercept(context: ExecutionContext, next: CallHandler): Observable<any> {
    console.log('Before...');

    const now = Date.now();
    return next
      .handle()
      .pipe(
        tap(() => console.log(`After... ${Date.now() - now}ms`)),
      );
  }
}
HINT
NestInterceptor<T, R>은 generic interface이다.T는Observable<T>의 타입을 의미하며,R은Observable<R>에 의해 wrap 된 value 의 타입이다.
NOTICE
Interceptor는 controller, provider, guard 등과 같이constructor를 통해 의존성을 주입할 수 있다.
handle()이 RxJS의 Observable을 리턴하기 때문에, 우리는 stream 을 조작하기 위한 다양한 operator를 선택할 수 있다. 위의 예제에서는, response cycle에 방해를 주지 않으면서, 우리의 observable stream의 정상적이거나 예외적인 termination 에 익명 logging function 을 호출하는 tap() operator를 사용했다.
(정상적이라는 말은 graceful termination 을 어떻게 번역할 지 몰라서 저렇게 해놨다.)
Binding interceptors
@UseInterceptor() decorator를 사용한다. 역시 controller, method, global scope 에서 사용 가능하다.
@UseInterceptors(LoggingInterceptor)
export class CatsController {}
CatsController 내에 있는 모든 handler가 LoggingInterceptor를 사용할 것이다. 만약 GET /cats 에 호출이 들어오면, 이런 output이 보일 것이다.
Before...
After... 1ms
글로벌하게 하는 것은 guard나 exception filter의 예제와 같이 main.ts 에서 하면 되지만, 의존성 주입이 불가능해진다. 역시 module에서 하면 된다.
//app.module.ts
import { Module } from '@nestjs/common';
import { APP_INTERCEPTOR } from '@nestjs/core';

@Module({
  providers: [
    {
      provide: APP_INTERCEPTOR,
      useClass: LoggingInterceptor,
    },
  ],
})
export class AppModule {}
Response mapping
우린 이미 handle() 메서드가 Observable을 return한다는 것을 안다. stream은 route handler에서 return 된 value를 포함하고 있고, 우리는 RxJS의 map() 을 사용해서 쉽게 이를 변형시킬 수 있다.
TransformInterceptor를 만들어보자.
//transform.interceptor.ts
import { Injectable, NestInterceptor, ExecutionContext, CallHandler } from '@nestjs/common';
import { Observable } from 'rxjs';
import { map } from 'rxjs/operators';

export interface Response<T> {
  data: T;
}

@Injectable()
export class TransformInterceptor<T> implements NestInterceptor<T, Response<T>> {
  intercept(context: ExecutionContext, next: CallHandler): Observable<Response<T>> {
    return next.handle().pipe(map(data => ({ data })));
  }
}
HINT
Nest interceptor는 동기/비동기 둘 다 작동한다. 필요하다면async를 붙이면 된다.
이제 누군가가 GET /cats로 호출하면, 응답은
{
  "data" : []
}
같은 형식으로 돌아온다.
interceptor는 application 전체에서 발생하는 요구 사항들에 대해 재사용가능한 solution을 만드는 것에 굉장히 뛰어나다. 에를 들어, 모든 null value를 empty string ''으로 바꿔야한다고 가정해보자. 우리는 한 줄의 코드를 작성하고 interceptor를 global하게 바인딩하는 것 만으로 이를 잘 해내줄 것이다.
import { Injectable, NestInterceptor, ExecutionContext, CallHandler } from '@nestjs/common';
import { Observable } from 'rxjs';
import { map } from 'rxjs/operators';

@Injectable()
export class ExcludeNullInterceptor implements NestInterceptor {
  intercept(context: ExecutionContext, next: CallHandler): Observable<any> {
    return next
      .handle()
      .pipe(map(value => value === null ? '' : value ));
  }
}
Exception Mapping
RxJS의 catchError()를 통해서, 던져진 예외 또한 override 할 수 있다.
//errors.interceptor.ts
import {
  Injectable,
  NestInterceptor,
  ExecutionContext,
  BadGatewayException,
  CallHandler,
} from '@nestjs/common';
import { Observable, throwError } from 'rxjs';
import { catchError } from 'rxjs/operators';

@Injectable()
export class ErrorsInterceptor implements NestInterceptor {
  intercept(context: ExecutionContext, next: CallHandler): Observable<any> {
    return next
      .handle()
      .pipe(
        catchError(err => throwError(new BadGatewayException())),
      );
  }
}
Stream overriding
우리가 가끔씩 handler에 calling 하는 것을 완전히 막고 다른 value를 return하고 싶을 때가 있을 것이다. 명확한 예제로, response time을 줄이기 위해 cache를 구현하고 싶을 때이다. cache로 부터 가져온 응답을 리턴하는 예제를 보자. 실제 사례에서, 우리는 TTL, cache invalidtaion, cache size 같은 다른 요인들을 생각해볼 수 있지만 생략하자.
//cache.interceptor.ts
import { Injectable, NestInterceptor, ExecutionContext, CallHandler } from '@nestjs/common';
import { Observable, of } from 'rxjs';

@Injectable()
export class CacheInterceptor implements NestInterceptor {
  intercept(context: ExecutionContext, next: CallHandler): Observable<any> {
    const isCached = true;
    if (isCached) {
      return of([]);
    }
    return next.handle();
  }
}
우리는 isCached 와 response인 []을 하드코딩했다. 중요한 점은, 우리는 RxJS의 of() 를 통해 새로운 stream을 리턴했다는 것이고, 이는 곧 route handler가 호출 되지 않았다는 것을 의미한다. 만약 누군가가 CacheInterceptor를 사용하는 endpoint에 호출했을 때, 곧바로 return이 될 것이다. 일반적인 solution을 만드려면, Reflector를 이용하고 custom decorator를 만들어라.
More Operators
RxJS의 연산자들을 통한 stream manipulation은 많은 가능성을 가져다 준다. 다른 예제를 살펴보자. 우리가 request에 timeout을 handle하고 싶을 수 있따. 만약 일정 시간 내에 endpoint에서 return을 해주지 못한다면, error response와 함께 terminate 시켜버릴 것이다.
//timeout.interceptor.ts
import { Injectable, NestInterceptor, ExecutionContext, CallHandler, RequestTimeoutException } from '@nestjs/common';
import { Observable, throwError, TimeoutError } from 'rxjs';
import { catchError, timeout } from 'rxjs/operators';

@Injectable()
export class TimeoutInterceptor implements NestInterceptor {
  intercept(context: ExecutionContext, next: CallHandler): Observable<any> {
    return next.handle().pipe(
      timeout(5000),
      catchError(err => {
        if (err instanceof TimeoutError) {
          return throwError(new RequestTimeoutException());
        }
        return throwError(err);
      }),
    );
  };
};
5초 후에, request는 cancle 될 것이다.
후기
기존 express 서버에서는 custom util을 이용해서 response의 형태를 설정했었는데, 이전 서버와 동일한 response를 클라이언트 개발자에게 보내줄 필요가 있었기 때문에 interceptor를 알아 보았다. @UseIntercpetor 데코레이터 하나로 손쉽게 적용이 가능하다는 점이 매력적이었다.