개요
현재 진행하는 프로젝트에서 SMS 인증 기능이 추가될 것이라는 말을 듣고, 아직 한 번도 안해본 기능이라 해보고 싶었다. 꽤나 애를 먹었고, 기능 구현에 이 글이 도움이 되기를 바란다. 다음과 같은 기술들의 개념이 필요하다.
- Node.js
- NestJS Framework
- Typescript
- async/await
API Docs
공식 API 문서 바로가기
API 문서에도 나와있지만, NCP 의 API 인증 방식은 꽤 특이하다.
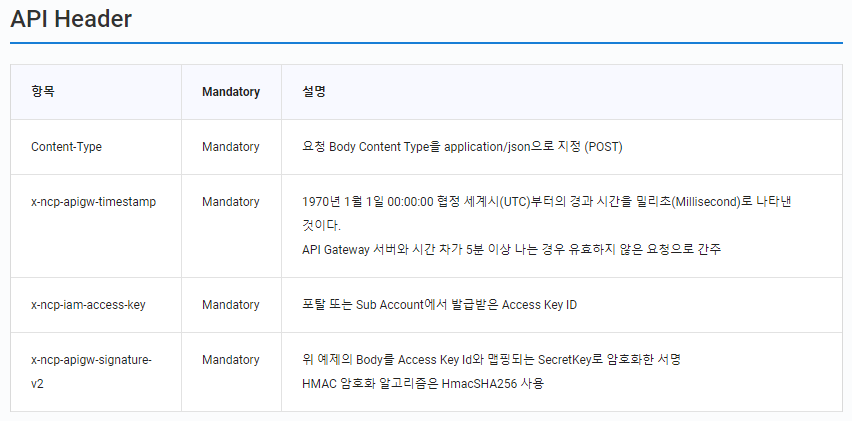
Content-Type 은 그냥 해도 되는데, timestamp를 찍어줘야 한다.
node.js 기준으로는 Date.now().toString() 으로 보내주면 된다.
access key 는 계정 관리 - 인증키 관리에서 Access Key ID를 쓰면 된다.
마지막으로 signature 가 가장 어려웠는데, 생성 가이드대로 했는데도 계속 인증키 오류가 나서 1시간 정도 썼었다. 우리가 해싱해줘야하는 string은 다음 형식이다.
{METHOD} {uri}
{timestamp}
{accesskey}
SMS API를 예제로 하면 다음과 같다.
POST /sms/v2/services/{serviceId}/messages
Date.now().toString()
{accessKey}
이후, 이렇게 만들어진 string을 crypto.createHmac() 함수를 통해, 계정 관리-인증키 관리에 있는 secret key로 해싱해주면 된다.
전체 코드는 다음과 같다.
import {
  InternalServerErrorException,
} from '@nestjs/common';
import { ConfigService } from '@nestjs/config';
import axios from 'axios';
import * as crypto from 'crypto';

@Injectable()
export class AppService {
  constructor(
    private readonly config: ConfigService, // .env
  ) {}

  private makeSignature(): string {
    const message = [];
    const hmac = crypto.createHmac('sha256', this.config.get('NCP_secretKey'));
    const space = ' ';
    const newLine = '\n';
    const method = 'POST';
    const timestamp = Date.now().toString();
    message.push(method);
    message.push(space);
    message.push(this.config.get('uri'));
    message.push(newLine);
    message.push(timestamp);
    message.push(newLine);
    message.push(this.config.get('NCP_accessKey'));
    //message 배열에 위의 내용들을 담아준 후에
    const signature = hmac.update(message.join('')).digest('base64');
    //message.join('') 으로 만들어진 string 을 hmac 에 담고, base64로 인코딩한다
    return signature.toString(); // toString()이 없었어서 에러가 자꾸 났었는데, 반드시 고쳐야함.
  }

  async sendSMS(phoneNumber: string): Promise<string> {
    const body = {
      type: 'SMS',
      contentType: 'COMM',
      countryCode: '82',
      from: this.config.get('hostPhoneNumber'), // 발신자 번호
      content: `문자 내용 부분 입니다.`,
      messages: [
        {
          to: phoneNumber, // 수신자 번호
        },
      ],
    };
    const options = {
      headers: {
        'Content-Type': 'application/json; charset=utf-8',
        'x-ncp-iam-access-key': this.config.get('NCP_accessKey'),
        'x-ncp-apigw-timestamp': Date.now().toString(),
        'x-ncp-apigw-signature-v2': this.makeSignature(),
      },
    };
    axios
      .post(this.config.get('url'), body, options)
      .then(async (res) => {
        // 성공 이벤트
      })
      .catch((err) => {
        console.error(err.response.data);
        throw new InternalServerErrorException();
      });

    return authNumber;
  }
}
마치며
처음 써본 api였는데, 사용법이 꽤 어려웠지만 네이버에서 제공하는 기능이니만큼 안정적일 것이고, 무엇보다 secret key로만 그치지 않고 암호화까지 하는 걸 보니 보안적인 측면에서도 괜찮을 것 같다. 성공적으로 문자 인증 서버를 NestJS를 통해 구축할 수 있었다.

안녕하세요 개발자님이 작성해주신 코드 참고하여 개발 중인 학생입니다! 위에 작성하신 코드중 makeSignature에서 호출하는 Date.now()와 헤더에서 호출하는 Date.now()가 1 millie seconds 정도 차이가 나 Authentication Failed가 발생하는 이슈가 있어 알려드리고자 합니다!