[Spring MVC] 스프링 MVC 2편 - 1. 타임리프 (기본기능)

- 해당 게시물은 인프런 "스프링 MVC 2편 - 백엔드 웹 개발 활용 기술" 강의를 참고하여 작성한 글입니다.
- 자세한 코드 및 내용은 강의를 참고해 주시길 바랍니다.
강의링크 -> 스프링 MVC 2편 (김영한)
📖 Section1. 타임리프 - 기본기능
📒 타임리프 특징
1) 서버 사이드 HTML 렌더링 (SSR)
타임리프는 백엔드 서버에서 HTML을 동적으로 렌더링하는 용도로 사용된다.
2) 네츄럴 템플릿
타임리프는 순수 HTML을 최대한 유지하는 특징이 있다. 타임리프로 작성한 파일은 HTML을 유지하기 때문에 웹 브라우저에서 파일을 직접 열어도 내용을 확인할 수 있고, 서버를 통해 뷰 템플릿을 거치면 동적으로 변경된 결과를 확인할 수 있다.
3) 스프링 통합 지원
타임리프는 스프링과 자연스럽게 통합되고, 스프링의 다양한 기능을 편리하게 사용할 수 있게 지원한다.
📒 타임리프 기본 표현식
✏️ 타임리프 사용선언
<html xmlns:th="http://www.thymeleaf.org">✏️ 타임리프 기본 표현식
-
간단한 표현
◦ 변수 표현식: ${...}
◦ 선택 변수 표현식: *{...}
◦ 메시지 표현식: #{...}
◦ 링크 URL 표현식: @{...}
◦ 조각 표현식: ~{...} -
리터럴
◦ 텍스트: 'one text', 'Another one!',…
◦ 숫자: 0, 34, 3.0, 12.3,…
◦ 불린: true, false
◦ 널: null
◦ 리터럴 토큰: one, sometext, main,… -
문자 연산
◦ 문자 합치기: +
◦ 리터럴 대체: |The name is ${name}| -
산술 연산
◦ Binary operators: +, -, *, /, %
◦ Minus sign (unary operator): - -
불린 연산
◦ Binary operators: and, or
◦ Boolean negation (unary operator): !, not -
비교와 동등
◦ 비교: >, <, >=, <= (gt, lt, ge, le)
◦ 동등 연산: ==, != (eq, ne) -
조건 연산
◦ If-then: (if) ? (then)
◦ If-then-else: (if) ? (then) : (else)
◦ Default: (value) ?: (defaultvalue) -
특별한 토큰
◦ No-Operation: _
📒 타임리프 기본 표현식
✏️ 텍스트 - text, utext
<ul>
  <li>th:text 사용 <span th:text="${data}"></span></li>
  <li>컨텐츠 안에서 직접 출력하기 = [[${data}]]</li>
</ul>
th:text="${data}"
[[${data}]] : 컨텐츠 안에서 직접 출력
Escape
HTML 엔티티
Unescape
<li>th:text = <span th:text="${data}"></span></li>
<li>th:utext = <span th:utext="${data}"></span></li>

<li><span th:inline="none">[[...]] = </span>[[${data}]]</li>
<li><span th:inline="none">[(...)] = </span>[(${data})]</li>
✏️ 변수 - SpringEL
<ul>Object
    <li>${user.username} = <span th:text="${user.username}"></span></li>
    <li>${user['username']} = <span th:text="${user['username']}"></span></li>
    <li>${user.getUsername()} = <span th:text="${user.getUsername()}"></span></li>
</ul>

<ul>List
    <li>${users[0].username} = <span th:text="${users[0].username}"></span></li>
    <li>${users[0]['username']} = <span th:text="${users[0]['username']}"></span></li>
    <li>${users[0].getUsername()} = <span th:text="${users[0].getUsername()}"></span></li>
</ul>

<ul>Map
    <li>${userMap['userA'].username} = <span th:text="${userMap['userA'].username}"></span></li>
    <li>${userMap['userA']['username']} = <span th:text="${userMap['userA']['username']}"></span></li>
    <li>${userMap['userA'].getUsername()} = <span th:text="${userMap['userA'].getUsername()}"></span></li>
</ul>

<h1>지역 변수 - (th:with)</h1>
<div th:with="first=${users[0]}">
    <p>처음 사람의 이름은 <span th:text="${first.username}"></span></p>
</div>
${...} : 변수 표현식
✏️ 유틸리티 객체와 날짜
타임리프에서 LocalDate, LocalDateTime, Instant를 사용하려면 추가 라이브러리가 필요하다. 스프링 부트 타임리프를 사용하면 해당 라이브러리가 자동으로 추가되고 통합된다.
<span th:text="${#temporals.format(localDateTime, 'yyyy-MM-dd HH:mm:ss')}"></span>타임리프는 더욱 다양한 형식을 지원하는 www.thymeleaf.org에서 살표볼 수 있다.
✏️ URL 링크
<li><a th:href="@{/hello}">basic url</a></li>
<li><a th:href="@{/hello(param1=${param1}, param2=${param2})}">hello query param</a></li>
<li><a th:href="@{/hello/{param1}/{param2}(param1=${param1}, param2=${param2})}">path variable</a></li>
<li><a th:href="@{/hello/{param1}(param1=${param1}, param2=${param2})}">path variable + query parameter</a></li>
단순 URL : @{/hello}
쿼리 파라미터 : @{/hello(param1=${param1}, param2=${param2})}
경로 변수 : @{/hello/{param1}/{param2}(param1=${param1}, param2=${param2})}
✏️ 리터럴
문자 리터럴은 항상 '(작은 따옴표)로 감싸야 한다. 그렇지만 공백 없이 쭉 이어진다면 하나의 의미있는 토큰으로 인지해서 다음과 같이 작은 따옴표를 생략할 수 있다.
<li>'hello' + ' world!' = <span th:text="'hello' + ' world!'"></span></li>
<li>'hello world!' = <span th:text="'hello world!'"></span></li>
<li>'hello ' + ${data} = <span th:text="'hello ' + ${data}"></span></li>
<li>리터럴 대체 |hello ${data}| = <span th:text="|hello ${data}|"></span></li>
✏️ 연산
자바와 크게 다르지 않고 HTML안에서 사용하기 때문에 HTML 엔티티를 사용하는
부분만 주의하면 된다.
- 비교연산: HTML 엔티티를 사용해야 하는 부분을 주의하자,
ex) > (gt), < (lt), >= (ge), <= (le), ! (not), == (eq), != (neq, ne) - 조건식: 자바의 조건식과 유사하다.
- Elvis 연산자: 조건식의 편의 버전
- No-Operation: _ 인 경우 마치 타임리프가 실행되지 않는 것 처럼 동작한다. 이것을 잘 사용하면 HTML의 내용 그대로 활용할 수 있다.
✏️ 속성 값 설정
- th:attrappend = <input type="text" class="text" th:attrappend="class=' large'" />
타임리프가 기존 속성을 지정한 속성으로 대체한 것을 확인할 수 있다.
th:* : 속성을 지정하면 타임리프는 기존 속성을 th:* 로 지정한 속성으로 대체한고 기존 속성이 없다면 새로 만든다.
th:attrappend : 속성 값의 뒤에 값을 추가한다.
th:attrprepend : 속성 값의 앞에 값을 추가한다.
th:classappend : class 속성에 자연스럽게 추가한다.
✏️ 반복
<table border="1">
  <tr>
    <th>username</th>
    <th>age</th>
  </tr>
  <tr th:each="user : ${users}">
    <td th:text="${user.username}">username</td>
    <td th:text="${user.age}">0</td>
  </tr>
</table>
th:each : List 뿐 아니라 배열, java.util.Iterable, java.util.Enumeration을 구현한 모든 객체를 반복에 사용할 수 있다. Map도 사용할 수 있는데 이 경우 변수에 담기는 값은 Map.Entry이다.
✏️ 조건부 평가
<tr th:each="user, userStat : ${users}">
  <td th:text="${userStat.count}">1</td>
  <td th:text="${user.username}">username</td>
  <td>
    <span th:text="${user.age}">0</span>
    <span th:text="'미성년자'" th:if="${user.age lt 20}"></span>
    <span th:text="'미성년자'" th:unless="${user.age ge 20}"></span>
  </td>
</tr>
타임리프는 해당 조건이 맞지 않으면 태그 자체를 렌더링하지 않는다. 만약 다음 조건이 false인 경우 span 자체가 렌더링 되지 않고 사라진다.
✏️ 주석
<h1>1. 표준 HTML 주석</h1>
<!--
<span th:text="${data}">html data</span>
-->

<h1>2. 타임리프 파서 주석</h1>
<!--/* [[${data}]] */-->

<!--/*-->
<span th:text="${data}">html data</span>
<!--*/-->

<h1>3. 타임리프 프로토타입 주석</h1>
<!--/*/
<span th:text="${data}">html data</span>
/*/-->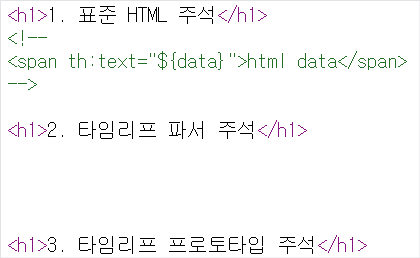
1) 표준 HTML 주석
자바스크립트의 표준 HTML 주석은 타임리프가 렌더링 하지 않고, 그대로 남겨둔다.
2) 타임리프 파서 주석 => 주로 사용!!
타임리프 파서 주석은 타임리프의 진짜 주석이다. 렌더링에서 주석 부분을 제거한다.
3) 타임리프 프로토타입 주석
HTML 파일을 그대로 열어보면 주석처리가 되지만, 타임리프를 렌더링 한 경우에만
보이는 기능이다. 잘사용하지는 않는다.
✏️ 블록
<th:block> 은 HTML 태그가 아닌 타임리프의 유일한 자체 태그이다.
<th:block th:each="user : ${users}">
    <div>
        사용자 이름1 <span th:text="${user.username}"></span>
        사용자 나이1 <span th:text="${user.age}"></span>
    </div>
    <div>
        요약 <span th:text="${user.username} + ' / ' + ${user.age}"></span>
    </div>
</th:block>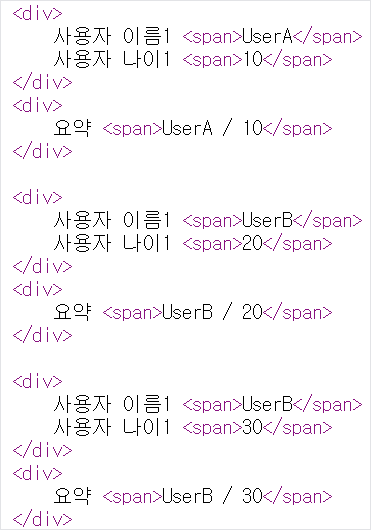
✏️ 자바스크립트 인라인
<!-- 자바스크립트 인라인 사용 전 -->
<script>
    var username = [[${user.username}]];
    var age = [[${user.age}]];

    //자바스크립트 내추럴 템플릿
    var username2 = /*[[${user.username}]]*/ "test username";

    //객체
    var user = [[${user}]];
</script>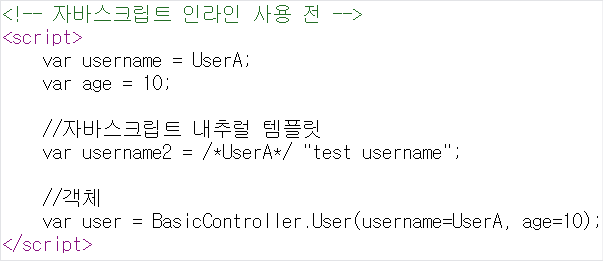
자바스크립트 인라인을 사용하지 않은 경우 3가지 문제가 생기는데, 인라인을 사용하면 해당 문제들이 어떻게 해결되는지 확인해보자.
<!-- 자바스크립트 인라인 사용 후 -->
<script th:inline="javascript">
    var username = [[${user.username}]];
    var age = [[${user.age}]];

    //자바스크립트 내추럴 템플릿
    var username2 = /*[[${user.username}]]*/ "test username";

    //객체
    var user = [[${user}]];
</script>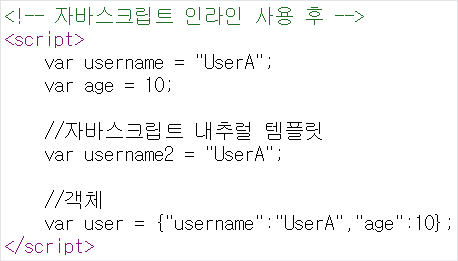
1) 텍스트 렌더링
2) 자바스크립트 내추럴 템플릿
3) 객체 : 객체를 JSON으로 자동으로 변환해준다.
✏️ 템플릿 조각
<footer th:fragment="copy">
    푸터 자리 입니다.
</footer>

<footer th:fragment="copyParam (param1, param2)">
    <p>파라미터 자리 입니다.</p>
    <p th:text="${param1}"></p>
    <p th:text="${param2}"></p>
</footer>th:fragment가 있는 태그는 다른곳에 포함되는 코드 조각이다.
<h2>부분 포함 insert</h2>
<div th:insert="~{template/fragment/footer :: copy}"></div>

<h2>부분 포함 replace</h2>
<div th:replace="~{template/fragment/footer :: copy}"></div>

<h2>부분 포함 단순 표현식</h2>
<div th:replace="template/fragment/footer :: copy"></div>

<h1>파라미터 사용</h1>
<div th:replace="~{template/fragment/footer :: copyParam ('데이터1', '데이터2')}"></div>
th:insert : 코드 조각을 현재 태그(div) 내부에 추가한다.
th:replace : 코드 조각이 현재 태그(div)를 대체한다.
✏️ 템플릿 레이아웃1
이전에는 일부 코드 조각을 가져와서 사용했다면, 개념을 더 확장해서 코드 조각을 레이아웃에 넘겨서 사용하는 방법에 대해 알아보자.
<html xmlns:th="http://www.thymeleaf.org">
<head th:fragment="common_header(title,links)">

  <title th:replace="${title}">레이아웃 타이틀</title>

  <!-- 공통 -->
  <link rel="stylesheet" type="text/css" media="all" th:href="@{/css/awesomeapp.css}">
  <link rel="shortcut icon" th:href="@{/images/favicon.ico}">
  <script type="text/javascript" th:src="@{/sh/scripts/codebase.js}"></script>

  <!-- 추가 -->
  <th:block th:replace="${links}" />

</head>
공통으로 사용할 레이아웃이다. tilte과 link같이 각 페이지마다 필요한 정보를 더 추가해서 사용할 수 있다.
<head th:replace="template/layout/base :: common_header(~{::title},~{::link})">
    <title>메인 타이틀</title>
    <link rel="stylesheet" th:href="@{/css/bootstrap.min.css}">
    <link rel="stylesheet" th:href="@{/themes/smoothness/jquery-ui.css}">
</head>common_header(~{::title},~{::link})에서 ::title은 현재 페이지의 title 태그들을 전달하고 ::link는 현재 페이지의 link 태그들을 전달한다.
✏️ 템플릿 레이아웃2
레이아웃은 head 정도에만 적용하는 것이 아니라 html 전체에 적용할 수 있다.
<!DOCTYPE html>
<html th:fragment="layout (title, content)" xmlns:th="http://www.thymeleaf.org">

<head>
    <title th:replace="${title}">레이아웃 타이틀</title>
</head>

<body>
<h1>레이아웃 H1</h1>

<div th:replace="${content}">
    <p>레이아웃 컨텐츠</p>
</div>

<footer>
    레이아웃 푸터
</footer>
</body>

</html>
html 전체가 적용된 레이아웃이다.
<!DOCTYPE html>
<html th:replace="~{template/layoutExtend/layoutFile :: layout(~{::title},~{::section})}"
      xmlns:th="http://www.thymeleaf.org">

<head>
    <title>메인 페이지 타이틀</title>
</head>

<body>
<section>
    <p>메인 페이지 컨텐츠</p>
    <div>메인 페이지 포함 내용</div>
</section>
</body>

</html>
Fragment vs Layout
- Fragment : 사이트 작은 경우 사용, 단순하지만 중복이 많음
- Layout : 페이지가 많아지고 관리가 중요해지면 사용