이벤트 객체의 공통 프로퍼티
앞서 말했듯이 이벤트 객체는 사용자에 의해 이벤트가 발생했을 때 동적으로 생성됩니다. 이렇게 동적으로 생성된 이벤트 객체를 활용하기 위해 자바스크립트에서는 이벤트 객체의 공통 프로퍼티를 제공합니다.
| 공통 프로퍼티 | 설명 | 타입 |
|---|---|---|
| type | 이벤트 타입 | string |
| 🌟 target | 이벤트를 발생시킨 DOM 요소 | DOM 요소 노드 |
| 🌟 currentTarget | 이벤트 핸들러가 바인딩된 DOM 요소 | DOM 요소 |
| eventPhase | 이벤트 전파 단계 | number |
| - | 0: 이벤트 없음, 1: 캡처링 단계, 2: 타깃 단계, 3: 버블링 단계 | - |
| bubbles | 이벤트를 버블링으로 전파하는지 여부 | boolean |
| cancelable | preventDefault 메서드를 호출하여 이벤트의 기본 동작을 취소할 수 있는지 여부 | boolean |
| defaultPrevented | preventDefault 메서드를 호출하여 이벤트를 취소했는지 여부 | boolean |
예를 들어, 체크박스 요소의 체크 상태(state)가 변경되면 현재 최신의 체크 상태를 출력해보도록 하자
<!DOCTYPE html>
<html>
  <body>
    <div class="boxWrapper">
      <input type="checkbox" />
      <em class="message">off</em>
    </div>
    <script>
      const $boxWrapper = document.querySelector(".boxWrapper");
      const $checkbox = document.querySelector("input[type=checkbox]");
      const $msg = document.querySelector(".message");

      $boxWrapper.onclick = (e) => {
        console.log("box wrap clicked!");
      };

      // change 이벤트가 발생하면 Event 타입의 이벤트 객체가 생성된다.
      $checkbox.onchange = (e) => {
        console.log(Object.getPrototypeOf(e) === Event.prototype); // true

        console.log("e.target:", e.target);
        console.log("e.currentTarget:", e.currentTarget);

        // e.target은 change 이벤트를 발생시킨 DOM 요소 $checkbox를 가리키고
        // e.target.checked는 체크박스 요소의 현재 체크 상태를 나타낸다.
        $msg.innerHTML = e.target.checked ? "on 😁 " : "off 🥲";
      };
    </script>
  </body>
</html>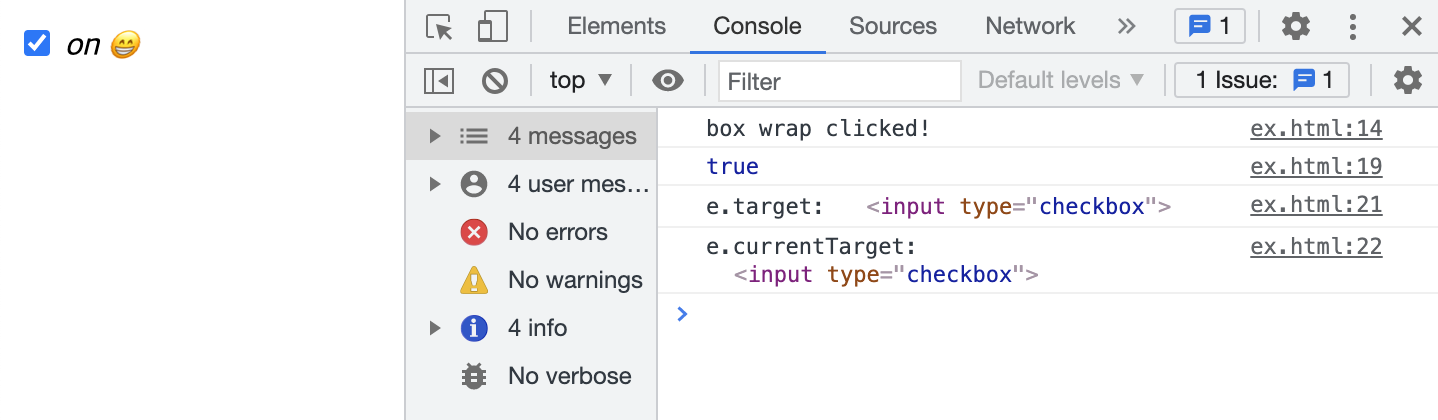
console.log("e.target:", e.target);내가 클릭한 이벤트 객체를 동적으로 가리키는 ① e.target은 querySelector로 선택한 $checkbox를 가리키고 있기 때문에 그대로 해당 요소 태그를 보여줍니다.
console.log("e.currentTarget:", e.currentTarget);내가 클릭한 이벤트 객체의 타깃의 현재 제일 상위 태그를 나타내는 ② currentTarget은 querySelector로 선택한 $checkbox가 제일 상위 태그이므로 해당 요소 태그를 보여줍니다.
이벤트 전파 (event propagation)
DOM 트리 (HTML을 파싱하여 트리형식으로 나타낸 자료구조) 상에 존재하는 모든 DOM 요소 노드에서 발생한 이벤트는 DOM 트리를 통해 전파됩니다. 이를 이벤트 전파(evnet propagation)라 합니다.
사용자의 다양한 입력을 통해 동적으로 생성되는 이벤트 객체는 이벤트를 발생시킨 타깃(target)을 중심으로 DOM 트리를 통해 전파됩니다. 전파되는 방향에 따라 3단계로 구분할 수 있습니다.
html > body > div 로만 이루어진 .html 파일
<!DOCTYPE html>
<html lang="en">
  <head>
    <meta charset="UTF-8" />
    <meta http-equiv="X-UA-Compatible" content="IE=edge" />
    <meta name="viewport" content="width=device-width, initial-scale=1.0" />
    <title>Document</title>
  </head>
  <style>
    body {
      width: 100%;
      height: 100vh;
    }

    div {
      background-color: hotpink;
    }
  </style>
  <body>
    <div>Click me</div>
  </body>
  <script>
    const html = document.querySelector("html");
    const body = document.querySelector("body");
    const div = document.querySelector("div");
  </script>

<!-- 김버그 님의 예제 코드 [https://www.youtube.com/watch?v=7gKtNC3b_S8&list=PLz33gzRxuWIAsQaxKYqHMjuqZkY3fCdVv&index=1] -->
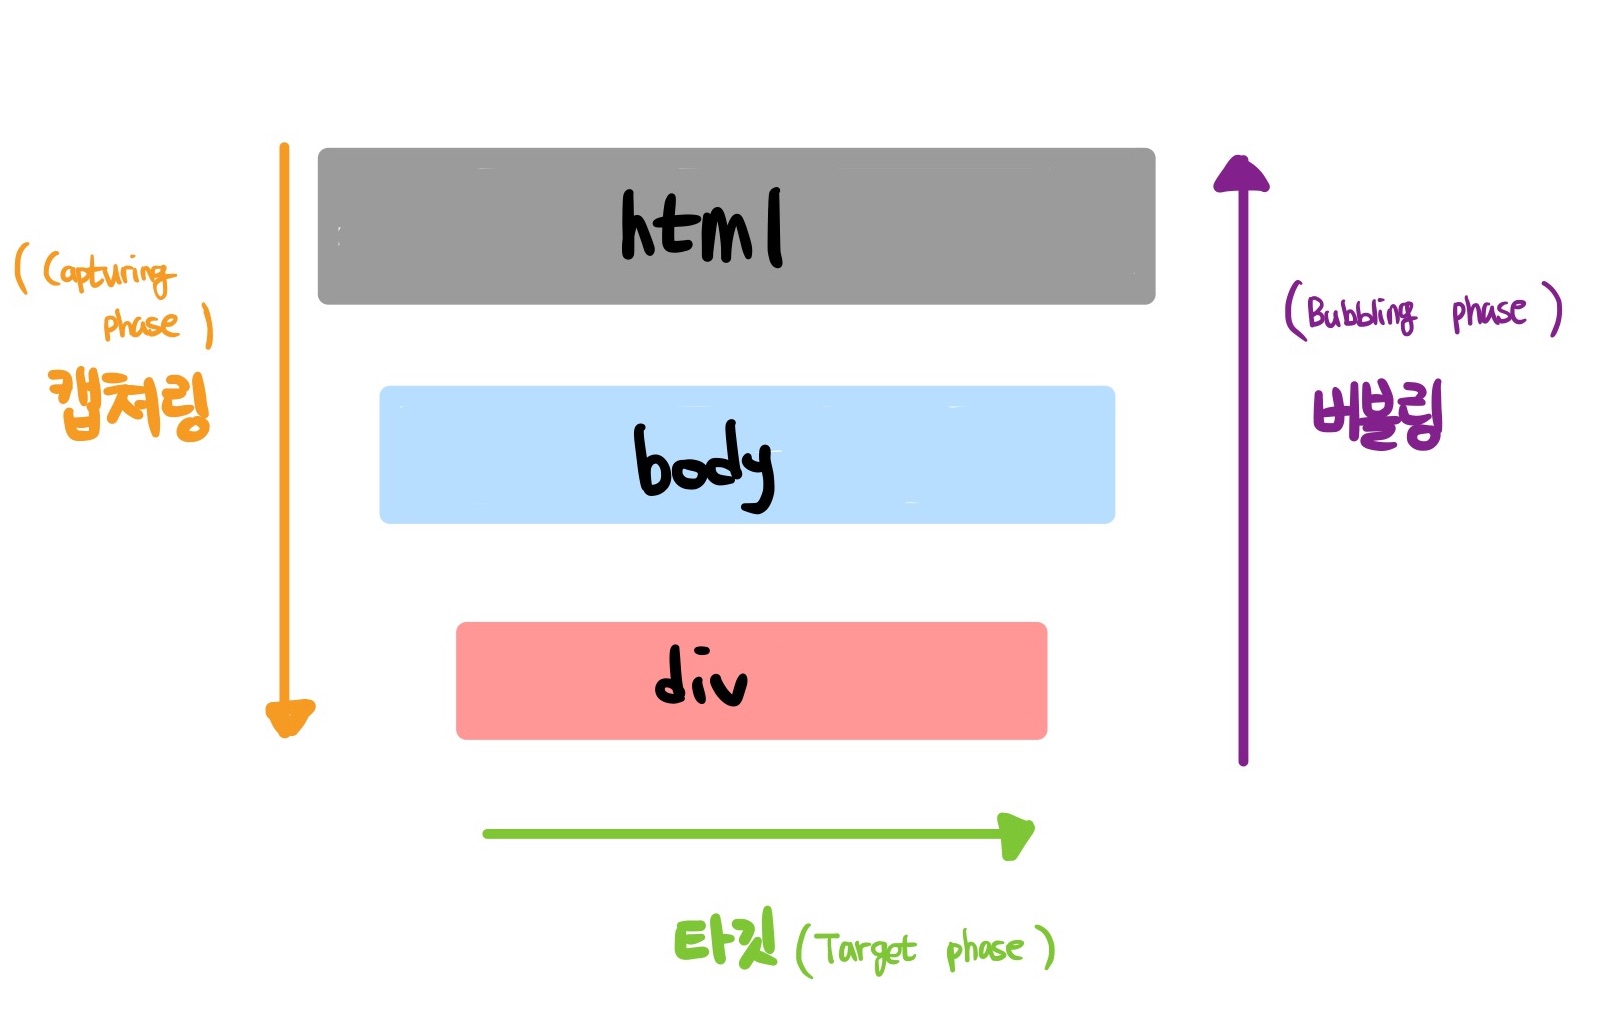
- 캡처링 단계(capturing phase) : 이벤트가 상위 요소에서 하위 요소 방향으로 전파
- 타깃 단계(target phase) : 이벤트가 이벤트 타깃에 도달
- 버블링 단계(bubbling phase) : 이벤트가 하위 요소에서 상위 요소 방향으로 전파
브라우저는 기본적으로 이벤트 버블링 단계에서 이벤트를 캐치하므로 해당 코드에서 DIV 태그를 클릭한다면 다음과 같이 동작할 것입니다
html.addEventListener("click", () => console.log("HTML"));
body.addEventListener("click", () => console.log("BODY"));
div.addEventListener("click", () => console.log("DIV"));

>>>

DIV
BODY
HTML
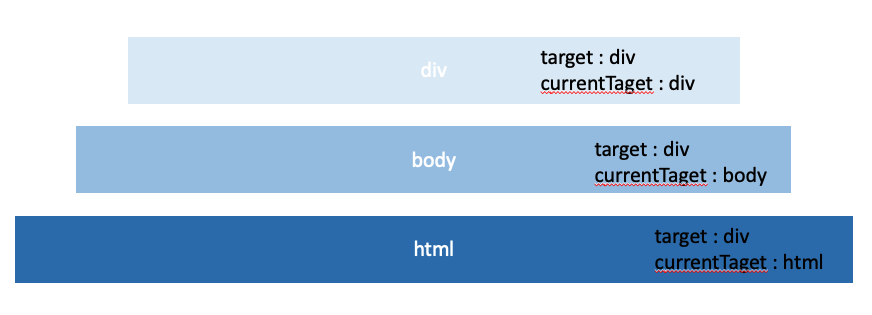
이벤트 캡처링 단계라면 HTML > BODY > DIV 순으로 ① 상위 노드에서 ② 하위 노드로 내려오며 이벤트를 캐치할 수 있지만, 이벤트 버블링 단계라면 현재 우리가 클릭하고자 한 이벤트 객체의 타깃인 <div> 에 도달한 후 다시 해당 ② 하위 노드에서 ① 상위 노드로 돌아가는 과정에서 이벤트를 캐치하기 때문입니다.

물론 addEventListener 메서드의 세번째 인수(argument)로 옵션인 [, useCaputure] 자리에 boolean 값인 true를 넣어준다면, 캡처링 단계에서도 이벤트 객체를 캐치할 수 있습니다. (기본값으로는 false로, 버블링 단계에서 이벤트 객체를 캐치합니다 )
html.addEventListener("click", () => console.log("HTML"), true);
body.addEventListener("click", () => console.log("BODY"), true);
div.addEventListener("click", () => console.log("DIV"));

>>>

HTML
BODY
DIV
이벤트 위임 (event delegation)
연속되는 태그에 대해서 공통적으로 이벤트를 줘야할 때 우리가 이벤트 핸들러를 바인딩할 해당 요소의 부모 요소에게 이를 위임하여 이벤트를 진행하는 것을 이벤트 위임 (event delegation) 이라 합니다.
<!DOCTYPE html>
<html>
<head>
<title>eventDelegation</title>
<meta charset="UTF-8" />
<style>
body {
font-family: sans-serif;
}
.btn-number {
background-color: yellowgreen;
}
</style>
</head>
<body>
<div class="container">
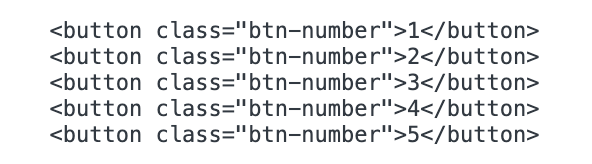
<button class="btn-number">1</button>
<button class="btn-number">2</button>
<button class="btn-number">3</button>
<button class="btn-number">4</button>
<button class="btn-number">5</button>
</div>
<script>
const div = document.querySelector("div");
div.addEventListener("click", (e) => {
console.log(e.target.innerHTML);
});
</script>
</body>
</html>
<!-- 화라리님의 예제 코드 [https://www.youtube.com/watch?v=ktqUrPxgQvo&list=PLz33gzRxuWIAsQaxKYqHMjuqZkY3fCdVv&index=3]-->만약 공통되는 button 태그에 대해서 이벤트를 준다면, 버튼별 이벤트 ① onclick 또는 ② addEventListener 메서드를 사용하여 각 버튼에 해당되는 로직을 바인딩해줘야 할 것입니다.
하지만 이벤트 위임(event delegation) 을 통해 부모 요소에 이 작업을 위임하여 현재 클릭하는 타깃 (e.target)에 대한 값을 출력할 수 있습니다.
만약 이벤트 위임시에 e.currentTarget을 주면 어떻게 될까요?
e.target / e.currentTarget
의도와는 달리 부모를 나타내는 ul이 가지는 요소 button에 대한 모든 요소 태그를 볼 수 있을 것입니다!
DOM 요소의 기본 동작 조작
리액트에서 정말 생각없이 많이 썼던 메서드입니다. 이번 기회에 확실히 언제 사용해야 하는지 알게 되어 좋습니다 👍
e.preventDefault >> DOM 요소의 기본 이벤트 동작 중단
e.stopPropagation >> 이벤트 전파(propagation) 중단
e.preventDefault
리액트에서 폼 요소를 통해 서버로 데이터를 전달할 경우, 불필요한 redirect를 막기 위해 폼 요소에 e.preventDefault 메서드를 자주 사용했었습니다. 이처럼 e.preventDefault 메서드는 요소 태그의 기본 동작을 중단합니다.
<!DOCTYPE html>
<html>
  <body>
    <a href="https://www.google.com">go</a>
    <input type="checkbox" />
    <script>
      document.querySelector("a").onclick = (e) => {
        // a 요소의 기본 동작을 중단한다.
        e.preventDefault();
      };

      document.querySelector("input[type=checkbox]").onclick = (e) => {
        // checkbox 요소의 기본 동작을 중단한다.
        e.preventDefault();
      };
    </script>
  </body>
</html>
e.stopPropagation
e.stopPropagation 메서드는 앞서 배웠던 stop Propagation 즉, 이벤트 전파를 중지시키는 메서드입니다. 이벤트 객체의 경우 상위 태그에도 같은 이벤트가 존재한다면 (예를 들면 click 어트리뷰트가 두 요소 모두 존재하는 경우) 상위 태그의 해당 콜백 함수를 호출하는 특징이 있습니다.
<!DOCTYPE html>
<html>
  <style>
    body {
      margin: 0;
      padding: 0;
    }
    div {
      width: 100%;
      height: 100vh;
      background-color: tomato;
      display: flex;
      justify-content: center;
      align-items: center;
    }

    button {
      width: 100px;
      height: 30px;
      display: flex;
      justify-content: center;
      align-items: center;
    }
  </style>
  <body>
    <div>
      <button>Button</button>
    </div>
    <script>
      const div = document.querySelector("div");
      const button = document.querySelector("button");

      div.addEventListener("click", () => {
        console.log("DIV");
      });

      button.addEventListener("click", (e) => {
        e.stopPropagation();
        console.log("BUTTON");
      });
    </script>
  </body>
</html>기본적으로 브라우저에서는 버블링 단계에서 이벤트가 동작하기 때문에, div 내부의 button만 콘솔을 찍기 위해서는 이벤트의 위임을 막는 e.stopPropagation() 메서드를 사용한다.
브라우저는 확실하게 이벤트가 발생한 button의 콜백함수를 실행하고, 상위에 있는 요소에 동일한 이벤트(click)가 등록 되어 있는지 탐색한다.
탐색 중 동일한 이벤트가 등록 되어 있는 요소가 있다면 해당 콜백 함수를 실행한다.
따라서 div 태그 내부에 button 태그의 click 이벤트를 발생시켜도, 상위 요소인 div 태그에도 click 이벤트가 있다면 해당 이벤트도 동작하게 한다.(브라우저의 default로 설정된 동작 원리이다)
이벤트 핸들러 내부의 this
① 이벤트 핸들러 어트리뷰트 방식
이벤트 핸들러 함수도 일반함수와 같이 함수 내부에서 사용하는 this는 전역 객체 window를 가리킨다.
<!DOCTYPE html>
<html>
  <body>
    <button onclick="handleClick()">Click me</button>
    <script>
      function handleClick() {
        console.log(this); // window
      }
    </script>
  </body>
</html>
단, 이벤트 핸들러를 호출할 때 인수로 전달한 this는 이벤트를 바인딩한 DOM 요소를 가리킨다.
<!DOCTYPE html>
<html>
  <body>
    <button onclick="handleClick(this)">Click me</button>
    <script>
      function handleClick(button) {
        console.log(button); // 이벤트를 바인딩한 button 요소
        console.log(this); // window
      }
    </script>
  </body>
</html>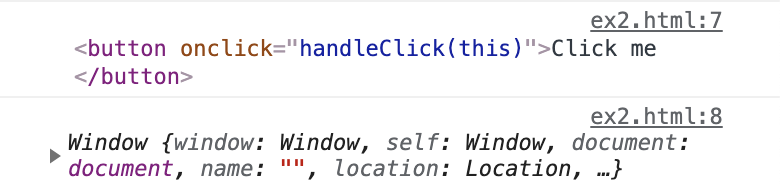
② 이벤트 핸들러 프로퍼티 방식과 ③addEventListner 방식
② 이벤트 핸들러 프로퍼티 방식 과 ③ addEventListner 방식 모두 이벤트 핸들러 내부의 this는 이벤트를 바인딩한 DOM 요소를 가리킨다.
즉, 이벤트 핸들러 내부의 this는 이벤트 객체의 currentTarget 프로퍼티와 같다.
<!DOCTYPE html>
<html>
  <body>
    <button class="btn1">0</button>
    <button class="btn2">0</button>
    <script>
      const $button1 = document.querySelector(".btn1");
      const $button2 = document.querySelector(".btn2");

      // ② 이벤트 핸들러 프로퍼티 방식
      $button1.onclick = function (e) {
        // this는 이벤트를 바인딩한 DOM 요소를 가리킨다.
        console.log(this); // $button1
        console.log(e.currentTarget); // $button1
        console.log(this === e.currentTarget); // true

        // $button1의 innerHTML을 1 증가시킨다.
        ++this.innerHTML;
      };

      // ③ addEventListener 메서드 방식
      $button2.addEventListener("click", function (e) {
        // this는 이벤트를 바인딩한 DOM 요소를 가리킨다.
        console.log(this); // $button2
        console.log(e.currentTarget); // $button2
        console.log(this === e.currentTarget); // true

        // $button2의 innerHTML을 1 증가시킨다.
        ++this.innerHTML;
      });
    </script>
  </body>
</html>
화살표 함수로 정의한 이벤트 핸들러 내부의 this는 상위 스코프의 this를 가리킨다. (ES6의) 화살표 함수는 생성자 함수 (constructor)가 아니다. 따라서 인스턴스를 생성할 때 필요한 자기 자신을 참조하는 this 바인딩이 존재하지 않는다. 단지, 상위 스코프의 this를 참조할 뿐이다.
<!DOCTYPE html>
<html>
  <body>
    <button class="btn1">0</button>
    <button class="btn2">0</button>
    <script>
      const $button1 = document.querySelector(".btn1");
      const $button2 = document.querySelector(".btn2");

      // ② 이벤트 핸들러 프로퍼티 방식
      $button1.onclick = (e) => {
        // 화살표 함수 내부의 this는 상위 스코프의 this를 가리킨다.
        console.log(this); // window
        console.log(e.currentTarget); // $button1
        console.log(this === e.currentTarget); // false

        // this는 window를 가리키므로 window.innerHTML에 NaN(undefined + 1)을 할당한다.
        ++this.innerHTML;
      };

      // ③ addEventListener 메서드 방식
      $button2.addEventListener("click", (e) => {
        // 화살표 함수 내부의 this는 상위 스코프의 this를 가리킨다.
        console.log(this); // window
        console.log(e.currentTarget); // $button2
        console.log(this === e.currentTarget); // false

        // this는 window를 가리키므로 window.innerHTML에 NaN(undefined + 1)을 할당한다.
        ++this.innerHTML<;
      });
    </script>
  </body>
</html>
false
false레퍼런스