ALB Controller
- EKS Cluster Name 환경 변수 설정
AWS_REGION=ap-northeast-2
Cluster_Name=[[Cluster_Name]]
VPC_ID=$(aws ec2 describe-vpcs --query 'Vpcs[*].VpcId' --output text)- 먼저 ALB-ingress-controller 생성할 Forder 생성
mkdir alb-ingress-controller && cd alb-ingress-controller- Cluster에 대한 IAM OIDC Create(만약 제 콘솔 생성 부분을 보셨다면 OIDC 확인만하면 됩니다!!!!!)
eksctl utils associate-iam-oidc-provider \
    --region ${AWS_REGION} \
    --cluster ${Cluster_Name} \
    --approve

#OIDC provider URL 확인
aws eks describe-cluster --name ${Cluster_Name} --query "cluster.identity.oidc.issuer" --output text
ids=$(aws eks describe-cluster --name ${Cluster_Name} --query "cluster.identity.oidc.issuer" --output text | cut -c 50-90)
#/id/ 뒤에 있는 값을 복사 후 아래 [[id]] 부분에 붙여넣기!
aws iam list-open-id-connect-providers | grep $ids- OIDC 생성 확인!!

- OIDC 확인 !!

결과값이 출력되면 IAM OIDC identity provider가 Cluster에 생성된 것입니다!
- EKS ALB Ingress Controller를 기동하기 위한 Policy를 생성합니다.
#Policy 가져오기
curl -o iam-policy.json https://raw.githubusercontent.com/kubernetes-sigs/aws-load-balancer-controller/main/docs/install/iam_policy.json

#Policy 생성
aws iam create-policy \
    --policy-name AWSLoadBalancerControllerIAMPolicy \
    --policy-document file://iam_policy.json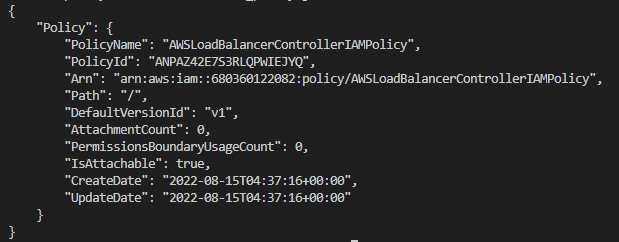
5. 위에 생성한 Policy를 사용해서 ServiceAccount 생성합니다.
eksctl create iamserviceaccount \
	--region $AWS_REGION \
    --cluster $Cluster_Name \
    --namespace kube-system \
    --name aws-load-balancer-controller \
    --attach-policy-arn arn:aws:iam::$ACCOUNT_ID:policy/AWSLoadBalancerControllerIAMPolicy \
    --override-existing-serviceaccounts \
    --approve
Alb-ingress-controller Configuration(2가지 방법)
- Helm
- Yaml
YAMl Version
- 인증서 구성을 Webhook에 삽입할 수 있도록 Cert-manager를 설치합니다.
kubectl apply --validate=false -f https://github.com/jetstack/cert-manager/releases/download/v1.5.3/cert-manager.yaml- Load Balancer Controller yaml file Download
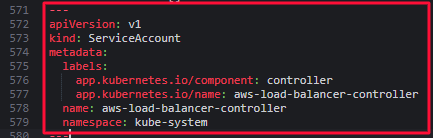
wget https://github.com/kubernetes-sigs/aws-load-balancer-controller/releases/download/v2.4.1/v2_4_1_full.yaml- 다운 받은 파일을 수정합니다.
- Cluster Name
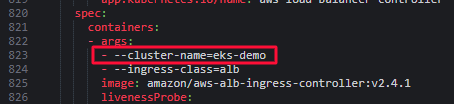
- 아까전에 Service Account는 이미 생성했기때문에 해당 내용을 삭제한 후, Yaml 파일을 저장합니다. 영역 표시 한 곳을 모두 삭제합니다.
- AWS Load Balancer Controller File Deploy
kubectl apply -k "github.com/aws/eks-charts/stable/aws-load-balancer-controller/crds?ref=master"
kubectl apply -f v2_4_1_full.yaml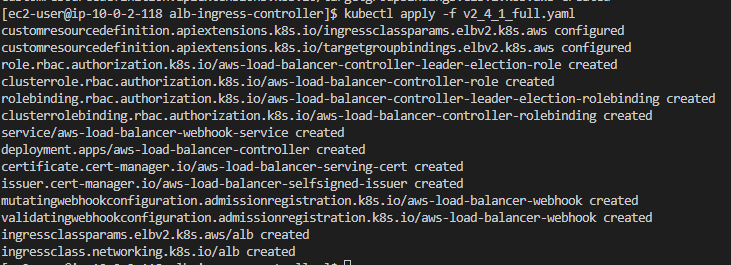
5. 실행 확인
kubectl get deployment -n kube-system aws-load-balancer-controller- 확인 2 (service account)
kubectl get sa aws-load-balancer-controller -n kube-system -o yaml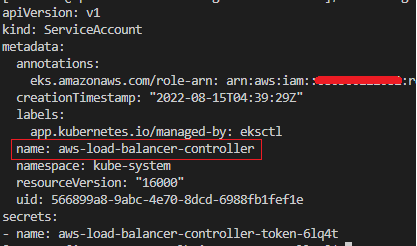
Helm Version
- Helm Install
curl https://raw.githubusercontent.com/helm/helm/master/scripts/get-helm-3 > get_helm.sh
chmod 700 get_helm.sh
./get_helm.sh- Helm repo Create and Update
helm repo add eks https://aws.github.io/eks-charts && helm repo update- Helm Use AWS Load Balancer Controller Install
helm install aws-load-balancer-controller eks/aws-load-balancer-controller \
    -n kube-system \
    --set clusterName=${Cluster_Name} \
    --set serviceAccount.create=false \
    --set serviceAccount.name=aws-load-balancer-controller \
    --set image.repository=602401143452.dkr.ecr.ap-northeast-2.amazonaws.com/amazon/aws-load-balancer-controller \
    --set region=ap-northeast-2 \
    --set vpcId=${VPC_ID}

확인
kubectl get deployment -n kube-system aws-load-balancer-controller
예를 들어 error: exec plugin: invalid apiVersion "client.authentication.k8s.io/v1alpha1
"이러한 에러가 나온다? 그럼 아래 명령어를 실행합니다.
curl -L https://git.io/get_helm.sh | bash -s -- --version v3.8.2
helm으로 생성한 alb-controller를 삭제하고 싶으면 아래 명령을 사용합니다.

helm delete aws-load-balancer-controller -n kube-system
Devops가 되고 싶은 청소년
감사해요 덕분에 에러 해결했어요~ :)