
지난시간 rewind
<div th:if="${session.USERID != null}">
<p th:text="|${session.USERNAME}님 로그인|"></p>
<a class="btn btn-outline-primary" th:href="@{member/logout.do}">로그아웃</a>
<a th:href="@{/member/update.do}">정보수정</a>
<a th:href="@{/member/delete.do}">회원탈퇴</a>
<div th:if="${#strings.equals(session.ROLE,'SELLER')}">
<a th:href="@{/seller/home.do}">판매자홈</a>
</div>
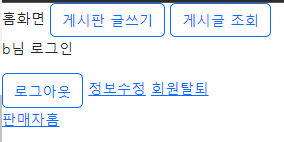
</div>지난시간에 홈화면(html)에 적어두었던 코드의 일부로, 오늘 실습에서는 회원의 역할군이 "SELLER"일때 생성되는 판매자 홈페이지를 구성해보도록 하겠다.
디자인은 나중에
먼저 판매자홈을 클릭하게 되면
이러한 모습을 띄게 되는데,<hr> 선 아래의 영역에 기능들이 바뀔 수 있도록 구성했다.
아래부터는 오늘 구현한 코드들이다.
판매자 메인페이지(SellerHome.html)
<!DOCTYPE html>
<html>
<head>
    <meta charset='utf-8'>
    <meta http-equiv='X-UA-Compatible' content='IE=edge'>
    <meta name='viewport' content='width=device-width, initial-scale=1'>
    <title>판매자 홈화면</title>
    <link rel="stylesheet" th:href="@{/css/bootstrap.min.css}">
</head>

<body>
    <a class="btn btn-outline-primary" th:href="@{/home.do}">홈으로</a>
    <a class="btn btn-outline-primary" th:href="@{/seller/home.do(menu=1)}">물품일괄추가</a>
    <a class="btn btn-outline-primary" th:href="@{/seller/home.do(menu=2)}">물품관리(일괄수정, 일괄삭제)</a>
    <a class="btn btn-outline-primary" th:href="@{/seller/home.do(menu=3)}">주문관리</a>
    <hr />
    <div th:if="${#strings.equals(param.menu, '1')}">
        <h3>물품일괄추가</h3>
        <form th:action="@{/seller/home.do?menu=1}" method="post">
            <th:block th:each="num: ${#numbers.sequence(1,4)}">
                <input type="text" name="name[]" th:value="|물품명${num}|" placeholder="물품명" />
                <input type="text" name="content[]" value="b" placeholder="물품내용" />
                <input type="text" name="price[]" th:value="${1000+num}" placeholder="물품가격" />
                <input type="text" name="quantity[]" value="100" placeholder="물품수량" />
                <br />
            </th:block>
            <input type="submit" value="일괄추가" />
        </form>
    </div>
    <div th:if="${#strings.equals(param.menu, '2')}">
        <h3>물품관리</h3>
        <form th:action="@{/seller/home.do?menu=2}" method="post" id="form2">
            <table class="table table-hover table-striped text-center" style="border: 1px solid;">
                <thead>
                    <tr style="background-color: rgb(255, 237, 237);">
                        <th></th>
                        <th>물품번호</th>
                        <th>물품명</th>
                        <th>물품내용</th>
                        <th>물품가격(원)</th>
                        <th>물품수량(개)</th>
                        <th>등록일</th>
                    </tr>
                </thead>
                <tbody>
                    <!-- 'ItemController'로부터 전달받은 "list" -->
                    <tr th:each="obj : ${list}">
                        <td><input type="checkbox" name="chk[]" th:value="${obj.no}" /></td> <!--번호를 명시해주어야 체크시 구별가능.-->
                        <td th:text="${obj.no}"></td>
                        <td th:text="${obj.name}"></td>
                        <td th:text="${obj.content}"></td>
                        <td th:text="${obj.price}+원"></td>
                        <td th:text="${obj.quantity}"></td>
                        <td th:text="${obj.regdate}"></td>
                    </tr>
                </tbody>
            </table>
            <input type="hidden" name="btn" id="btn" />
            <input type="submit" class="btn btn-outline-secondary" value="일괄수정" onclick="updateItemAction()" />
            <input type="submit" class="btn btn-outline-danger" value="일괄삭제" onclick="deleteItemAction()" />
        </form>
    </div>

    <div th:if="${#strings.equals(param.menu, '3')}">
        <h3>주문관리</h3>

    </div>


    <script>
        const btn    = document.getElementById('btn');
        const form2  = document.getElementById('form2');

        function deleteItemAction() {
            if( confirm('삭제할까요?') ) {
                btn.value='일괄삭제';
                form2.submit();
            }
        }

        function updateItemAction() {
                btn.value='일괄수정';
                form2.submit();
        }
    </script>
</body>

</html>
상단의 메뉴 버튼들을 누르면 /seller/home.do?menu= + 1, 2, 3 으로 주소를 구분하되도록 했다.
먼저 물품일괄추가기능이다.
[ SellerController.java 생성 ]
package com.example.controller;

import java.util.ArrayList;
import java.util.List;

import javax.servlet.http.HttpSession;

import org.springframework.stereotype.Controller;
import org.springframework.ui.Model;
import org.springframework.web.bind.annotation.GetMapping;
import org.springframework.web.bind.annotation.PostMapping;
import org.springframework.web.bind.annotation.RequestMapping;
import org.springframework.web.bind.annotation.RequestParam;

import com.example.dto.Item;
import com.example.mapper.ItemMapper;

import lombok.RequiredArgsConstructor;
import lombok.extern.slf4j.Slf4j;

@Controller
@RequestMapping(value = "/seller")
@Slf4j
@RequiredArgsConstructor
public class SellerController {

    final HttpSession httpSession;
    final ItemMapper iMapper;

    /* --------------------------------------------------------------------------------------------- */

    // 127.0.0.1:9090/ROOT/seller/home.do
    @GetMapping(value = "/home.do")
    public String homeGET(
            Model model,
            @RequestParam(name = "menu", defaultValue = "0", required = false) int menu) {

        if (menu == 1) {
        } else if (menu == 2) {
            String userid = (String) httpSession.getAttribute("USERID");
            List<Item> list = iMapper.selectItemSellerList(userid);
            model.addAttribute("list", list);
        }
        return "/seller/home";
    }

    /* --------------------------------------------------------------------------------------------- */

    // 127.0.0.1:9090/ROOT/seller/home.do?menu=1
    @PostMapping(value = "/home.do")
    public String homePOST(
            @RequestParam(name = "menu", defaultValue = "0", required = false) int menu,
            /* -------------------------------1번메뉴------------------------------- */
            @RequestParam(name = "name[]", required = false) String[] name,
            @RequestParam(name = "content[]", required = false) String[] content,
            @RequestParam(name = "price[]", required = false) long[] price,
            @RequestParam(name = "quantity[]", required = false) long[] quantity,
            /* -------------------------------2번메뉴------------------------------- */
            @RequestParam(name = "chk[]", required = false) long[] no,
            @RequestParam(name = "btn", required = false) String btn) {

        if (menu == 0) {
            return "redirect:home.do?menu=1";
        }

        if (menu == 1) { // 일괄등록
            List<Item> list = new ArrayList<>();
            for (int i = 0; i < name.length; i++) {
                Item item = new Item();
                item.setName(name[i]);
                item.setContent(content[i]);
                item.setPrice(price[i]);
                item.setQuantity(quantity[i]);
                item.setSeller((String) httpSession.getAttribute("USERID")); // 로그인 확인
                list.add(item);
            }
            log.info("seller.do => {}", list.toString());
            int ret = iMapper.insertItemBatch(list);
            log.info("seller.do => {}", ret);

            return "redirect:home.do?menu=1";
        } else if (menu == 2) {
            log.info("seller.do => {}, {}", no, btn);

            if (btn.equals("일괄삭제")) {
                int ret = iMapper.deleteItemBatch(no);
                log.info("seller.do => {}", ret);
            } else if (btn.equals("일괄수정")) {
                // 체크한 항목 정보를 가지고 있음.
                // redirect => get으로 이동후에 화면표시
                httpSession.setAttribute("chk[]", no);
                return "redirect:updatebatch.do";
            }
        }
        return "redirect:home.do?menu=" + menu;
    }

    /* --------------------------------------------------------------------------------------------- */

    @GetMapping(value = "/updatebatch.do")
    public String updateBatchGET(Model model) {
        long[] no = (long[]) httpSession.getAttribute("chk[]");
        log.info("updatebatch.do[GET] => {}", no);

        List<Item> list = iMapper.selectItemNoList(no);
        log.info("updatebatch.do[GET] => {}", list.toString());
        model.addAttribute("list", list);
        return "/item/updatebatch";
    }

    @PostMapping(value = "/updatebatch.do")
    public String updateBatchPOST(
                @RequestParam(name = "no[]") long[] no,
                @RequestParam(name = "name[]") String[] name,
                @RequestParam(name = "content[]") String[] content,
                @RequestParam(name = "price[]") long[] price,
                @RequestParam(name = "quantity[]") long[] quantity) {
        List<Item> list = new ArrayList<>();
        for(int i=0; i < no.length; i++) {
            Item item = new Item();
            item.setNo(no[i]);
            item.setName(name[i]);
            item.setContent(content[i]);
            item.setPrice(price[i]);
            item.setQuantity(quantity[i]);
            list.add(item);
        }
        log.info("updatebatch.do[POST] => {}", list.toString());

        int ret = iMapper.updateItemBatch(list);
        log.info("updatebatch.do[POST] => {}", ret);
        return "redirect:home.do?menu=2";
    }

}
1. 물품일괄추가
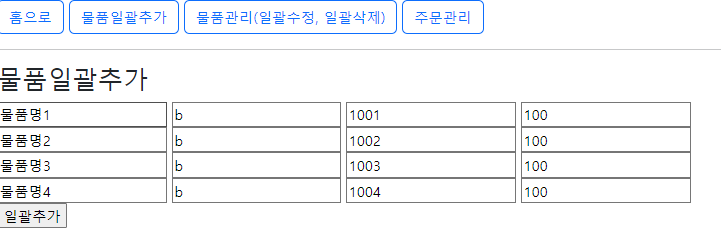
1-1. Post (controller)
@PostMapping(value = "/home.do")
    public String homePOST(
            @RequestParam(name = "menu", defaultValue = "0", required = false) int menu,
            /* -------------------------------1번메뉴------------------------------- */
            @RequestParam(name = "name[]", required = false) String[] name,
            @RequestParam(name = "content[]", required = false) String[] content,
            @RequestParam(name = "price[]", required = false) long[] price,
            @RequestParam(name = "quantity[]", required = false) long[] quantity,
            /* -------------------------------2번메뉴------------------------------- */
            @RequestParam(name = "chk[]", required = false) long[] no,
            @RequestParam(name = "btn", required = false) String btn) {

        if (menu == 0) {
            return "redirect:home.do?menu=1";
        }

        if (menu == 1) { // 일괄등록
            List<Item> list = new ArrayList<>();
            for (int i = 0; i < name.length; i++) {
                Item item = new Item();
                item.setName(name[i]);
                item.setContent(content[i]);
                item.setPrice(price[i]);
                item.setQuantity(quantity[i]);
                item.setSeller((String) httpSession.getAttribute("USERID")); // 로그인 확인
                list.add(item);
            }
            log.info("seller.do => {}", list.toString());
            int ret = iMapper.insertItemBatch(list);
            log.info("seller.do => {}", ret);

            return "redirect:home.do?menu=1";

        }
Mapper의 경우에는 물품을 추가하고 제외하는 기능이기에 기존에 만든 ItemMapper를 사용했다.
1-2. Mapper (itemMapper.java)
// 물품 일괄등록
    public int insertItemBatch( List<Item> list );
1-3. Mapper (itemMapper.xml)
<!-- 물품 일괄등록 -->
    <insert id="insertItemBatch" parameterType="list">
        INSERT INTO item(no, name, content, price, quantity, seller)
        SELECT SEQ_ITEM_NO.NEXTVAL, T1.* FROM(
            <foreach item="obj" collection="list" separator="UNION ALL">
                SELECT '${obj.name}' NAME, '${obj.content}' CONTENT, ${obj.price} PRICE,
                ${obj.quantity} QUANTITY, '${obj.seller}' SELLER FROM DUAL
            </foreach>
        ) T1
    </insert>
Controller에서도 반복문을 사용해 물품을 추가하는 형식이기 때문에 <foreach>를 사용해서 반복문을 구현하였다.
다음으로는 물품관리 기능이다.
2. 물품관리 (일괄수정 및 삭제)
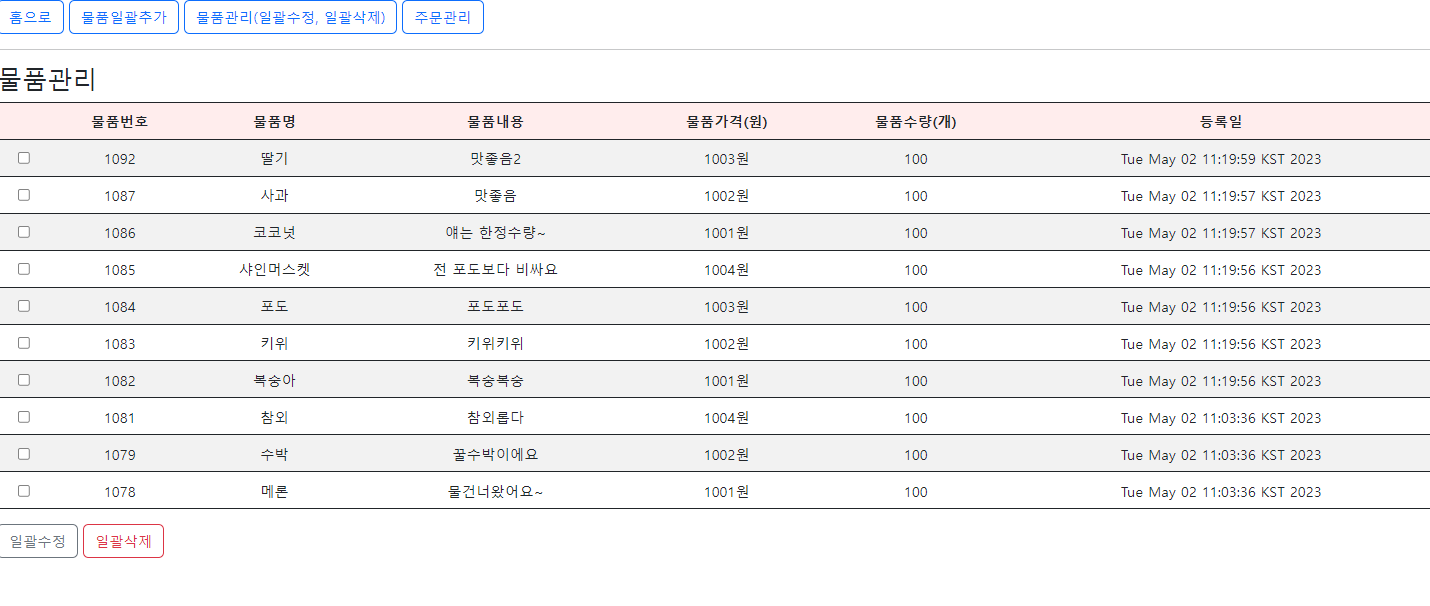

체크박스로 물품을 선택하여 세부 항목을 수정하거나 삭제할 수 있도록 기능을 구성하였다.
먼저 수정기능부터 살펴보자.
2-1-1. 수정화면 (updatebatch.html)
<!DOCTYPE html>
<html>

<head>
    <meta charset='utf-8'>
    <meta http-equiv='X-UA-Compatible' content='IE=edge'>
    <meta name='viewport' content='width=device-width, initial-scale=1'>
    <title>일괄수정</title>
    <link rel="stylesheet" th:href="@{/css/bootstrap.min.css}">
</head>

<body>
    <h3>일괄수정</h3>

    <form th:action="@{/seller/updatebatch.do}" method="post">
        <table>
            <tr th:each="obj : ${list}">
                <td><input name="no[]" type="text" th:value="${obj.no}" readonly/></td>
                <td><input name="name[]" type="text" th:value="${obj.name}" placeholder="물품명" /></td>
                <td><input name="content[]" type="text" th:value="${obj.content}" placeholder="물품내용" /></td>
                <td><input name="price[]" type="number" th:value="${obj.price}" placeholder="물품가격" /></td>
                <td><input name="quantity[]" type="number" th:value="${obj.quantity}" placeholder="물품수량" /></td>
            </tr>
        </table>
        <a th:href="@{/seller/home.do(menu=2)}">물품관리</a>
        <input type="submit" value="일괄수정">
    </form>
</body>

</html>
일괄 수정과 같은 경우에는 다른 화면으로 전환되어 넘어가기때문에, 새로운 화면을 만들어주었다.
2-1-2. Get & Post (controller)
컨트롤러의 경우에는 조금 특이하게 Post와 Get방식을 둘 다 사용했다.
DB에 저장된 정보를 GET으로 받아오고, 수정하고자 하는 정보들을 Post방식으로 전송해야하기 때문이다.
	@GetMapping(value = "/updatebatch.do")
    public String updateBatchGET(Model model) {
        long[] no = (long[]) httpSession.getAttribute("chk[]");
        log.info("updatebatch.do[GET] => {}", no);

        List<Item> list = iMapper.selectItemNoList(no);
        log.info("updatebatch.do[GET] => {}", list.toString());
        model.addAttribute("list", list);
        return "/item/updatebatch";
    }

    @PostMapping(value = "/updatebatch.do")
    public String updateBatchPOST(
                @RequestParam(name = "no[]") long[] no,
                @RequestParam(name = "name[]") String[] name,
                @RequestParam(name = "content[]") String[] content,
                @RequestParam(name = "price[]") long[] price,
                @RequestParam(name = "quantity[]") long[] quantity) {
        List<Item> list = new ArrayList<>();
        for(int i=0; i < no.length; i++) {
            Item item = new Item();
            item.setNo(no[i]);
            item.setName(name[i]);
            item.setContent(content[i]);
            item.setPrice(price[i]);
            item.setQuantity(quantity[i]);
            list.add(item);
        }
        log.info("updatebatch.do[POST] => {}", list.toString());

        int ret = iMapper.updateItemBatch(list);
        log.info("updatebatch.do[POST] => {}", ret);
        return "redirect:home.do?menu=2";
    }
// @PostMapping (menu=2)

  		// 127.0.0.1:9090/ROOT/seller/home.do?menu=2
        else if (menu == 2) {
            log.info("seller.do => {}, {}", no, btn);

            if (btn.equals("일괄삭제")) {
                int ret = iMapper.deleteItemBatch(no);
                log.info("seller.do => {}", ret);
            } else if (btn.equals("일괄수정")) {
                // 체크한 항목 정보를 가지고 있음.
                // redirect => get으로 이동후에 화면표시
                httpSession.setAttribute("chk[]", no); // 체크박스로 물품 번호들 담아서 전송
                return "redirect:updatebatch.do";
            }
        }
Get으로 받아온 정보들은 List<Item> 형식으로 updatebatch.html 화면으로 전송했고,
Post로 보내줄 정보들 역시 List<Item>의 형태로 Mapper에 전송하였다.
2-1-3. Mapper (ItemMapper.java)
// 물품 일괄수정
   public int updateItemBatch ( List<Item> list );
2-1-4. Mapper (ItemMapper.xml)
물품 일괄수정! ★
<!-- 물품번호에 해당하는 항목 반환 -->
    <select id="selectItemNoList" parameterType="arraylist" resultType="com.example.dto.Item">
            <foreach collection="array" item="tmp" separator=" , " open=" SELECT * FROM item WHERE no IN ( "  close=" )">
                #{tmp}
            </foreach>
    </select>

	<!-- 물품 일괄수정 -->
    <update id="updateItemBatch" parameterType="arraylist">
    UPDATE item SET
        name = (CASE
            <foreach collection="list" item="tmp" separator=" ">
                WHEN NO=#{tmp.no} THEN #{tmp.name}
            </foreach>
        END),
        content = (CASE
            <foreach collection="list" item="tmp" separator=" ">
                WHEN NO=#{tmp.no} THEN #{tmp.content}
            </foreach>
        END),
        price = (CASE
            <foreach collection="list" item="tmp" separator=" ">
                WHEN NO=#{tmp.no} THEN #{tmp.price}
            </foreach>
        END),
        quantity = (CASE
            <foreach collection="list" item="tmp" separator=" ">
                WHEN NO=#{tmp.no} THEN #{tmp.quantity}
            </foreach>
        END)
    WHERE no IN (
        <foreach collection="list" item="tmp" separator=" , ">
            #{tmp.no}
        </foreach>
    )
    </update>
기존에 있던 정보를 받아와야하기에 해당 물품번호의 정보를 불러오는 Select 기능도 추가하였다.
이번에는 삭제 기능이다.
2-2-1. Post (controller)
else if (menu == 2) {
            log.info("seller.do => {}, {}", no, btn);

            if (btn.equals("일괄삭제")) {
                int ret = iMapper.deleteItemBatch(no);
                log.info("seller.do => {}", ret);
            } else if (btn.equals("일괄수정")) {
                // 체크한 항목 정보를 가지고 있음.
                // redirect => get으로 이동후에 화면표시
                httpSession.setAttribute("chk[]", no);
                return "redirect:updatebatch.do";
            }
        }
위에서 이미 언급된 부분이다.
2-2-2. Mapper (ItemMapper.java)
// 물품 일괄삭제
    public int deleteItemBatch ( long[] no );
2-2-3. Mapper (ItemMapper.xml)
<!-- 물품 일괄삭제 -->
    <delete id="deleteItemBatch" parameterType="arraylist">
        DELETE FROM item WHERE no IN (
           <foreach collection="array" item="tmp" separator=" , ">
                #{tmp}
           </foreach>
        )
    </delete>
다음으로는 보안과 관련된 부분에 대해서 시큐리티 라이브러리를 새롭게 추가했다.
각 페이지마다 접근이 가능한 계정과 불가능한 계정을 규정하고, 올바르지 않은 접근에 대해서 차단을 하는 등의 기능을 수행한다.
시큐리티 라이브러리를 사용하기 위해 com.example.config의 경로에 새로운 패키지를 추가하였다.
SecurityConfig.java
package com.example.config;

import org.springframework.context.annotation.Bean;
import org.springframework.context.annotation.Configuration;
import org.springframework.security.config.annotation.web.builders.HttpSecurity;
import org.springframework.security.config.annotation.web.configuration.EnableWebSecurity;
import org.springframework.security.web.SecurityFilterChain;

import lombok.extern.slf4j.Slf4j;

@Configuration // 환경설정파일. 서버가 구동되기전에 호출됨.
@EnableWebSecurity // 시큐리티를 사용
@Slf4j // 출력용 (log.info)
public class SecurityConfig {

    @Bean // 객체를 생성한다. (자동으로 호출됨.)
    // 설정 초기에는 모든 페이지를 로그인을 해야하는 페이지로 전환
    public SecurityFilterChain filterChain(HttpSecurity http) throws Exception {
        log.info("SecurityConfig => {}", "start filter chain");
        // 로그인, 로그아웃, 권한설정 등등..

        return http.build();
    }
}
이후 새로운 라이브러리를 정상적으로 사용하기 위해서 기본 프로젝트에 미리 생성한 시큐리티의 경로를 추가해준다.
FirstSpringStudyApplication.java
package com.example.first_spring_study;

import org.mybatis.spring.annotation.MapperScan;
import org.springframework.boot.SpringApplication;
import org.springframework.boot.autoconfigure.SpringBootApplication;
import org.springframework.context.annotation.ComponentScan;
import org.springframework.context.annotation.PropertySource;

// 새로운 패키지를 생성하고 역할을 부여하면 반드시 이 실행파일에 등록해야 함.


@SpringBootApplication
@PropertySource(value = {"classpath:global.properties"}) // 직접 만든 환경설정 파일 위치, (classpath ==> resources와 동일함.)
@MapperScan(basePackages={"com.example.mapper"}) // 매퍼 위치 설정
@ComponentScan(basePackages={
	"com.example.controller",
	"com.example.service",
	"com.example.config"}) // 컨트롤러, 서비스 위치, 시큐리티 환경설정

public class FirstSpringStudyApplication {

	// 서버 키고 끄는건 사용할때와 끝마칠때 한번씩만 누르면 됨!
	public static void main(String[] args) {
		SpringApplication.run(FirstSpringStudyApplication.class, args);
	}
}
새롭게 적용이 된 시큐리티 라이브러리를 확인해보는 방법은 간단하다.
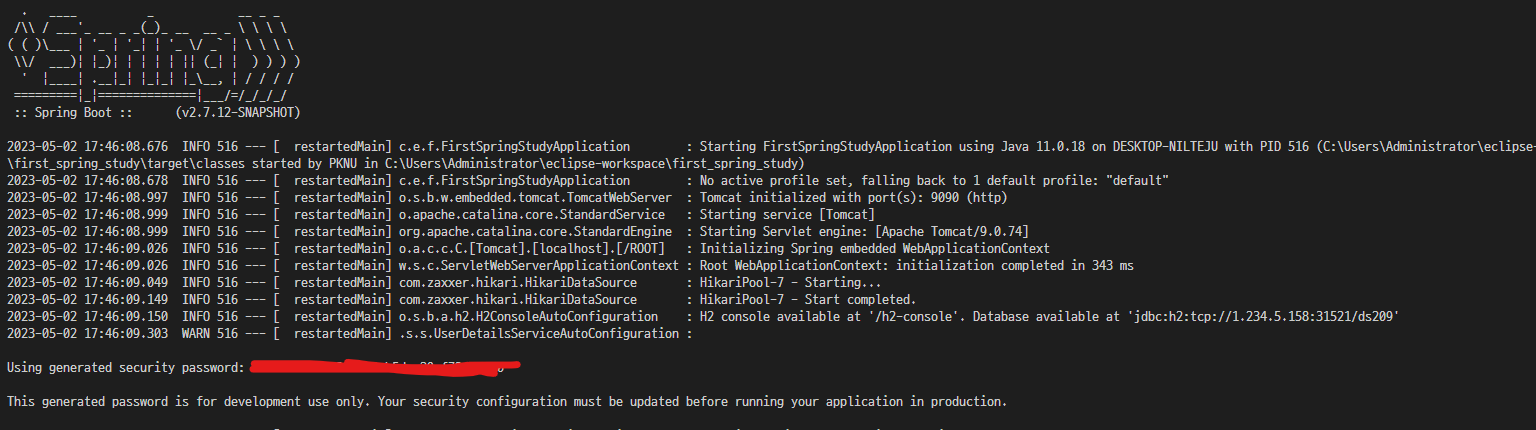
서버를 구동하면 서버 터미널에서 시큐리티 패스워드 솔트값을 새롭게 지정해준다.
이는 로그인페이지와 같이 세션에 사용자의 정보를 등록하는 페이지에서 자동으로 적용이 되게 된다.
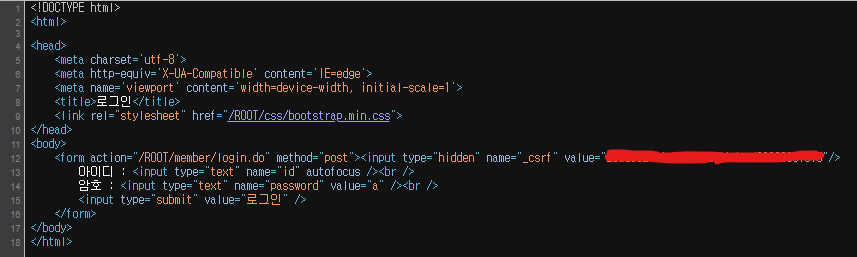
로그인 화면의 소스코드를 확인하면위와같이 form 태그 뒤에 새롭게 시큐리티 암호의 솔트값이 추가된 것을 확인할 수 있다.