
모듈화된 프로젝트에 TCA를 도입하면서, 구조적으로 신경 써야 할 부분들이 예상보다 많았습니다.
이번 글에서는 두 가지 이슈에 대해 이야기해보려고 합니다.
- 독립된 Feature 환경에서 하위 Reducer를 어떻게 조합할 것인가
- Action 구조가 커지면서 생기는 복잡성 관리
🎯 모듈화된 TCA 구조에서 Feature 조합과 View 추상화
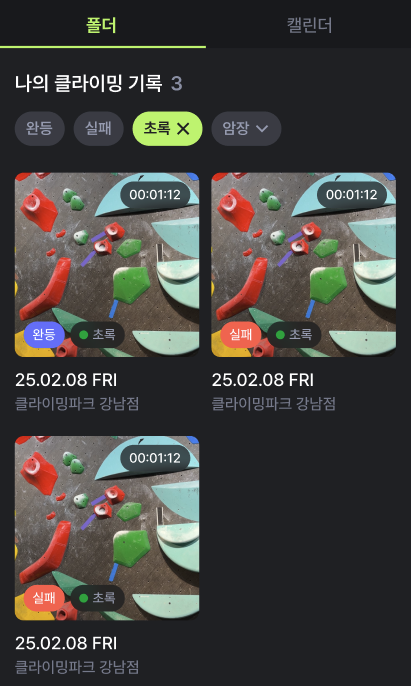
✅ 폴더 탭 화면
아래는 저희 프로젝트에서 구현한 폴더 탭(FolderTab) 화면입니다.
폴더 탭은 클라이밍 기록을 폴더 형태로 모아 보여주는 메인 화면이며,
폴더(그리드 기반 뷰)와 캘린더(날짜 기반 뷰)를 함께 포함하고 있는 구조로 설계되어 있습니다.
✅ Feature 간 의존 관계 구조
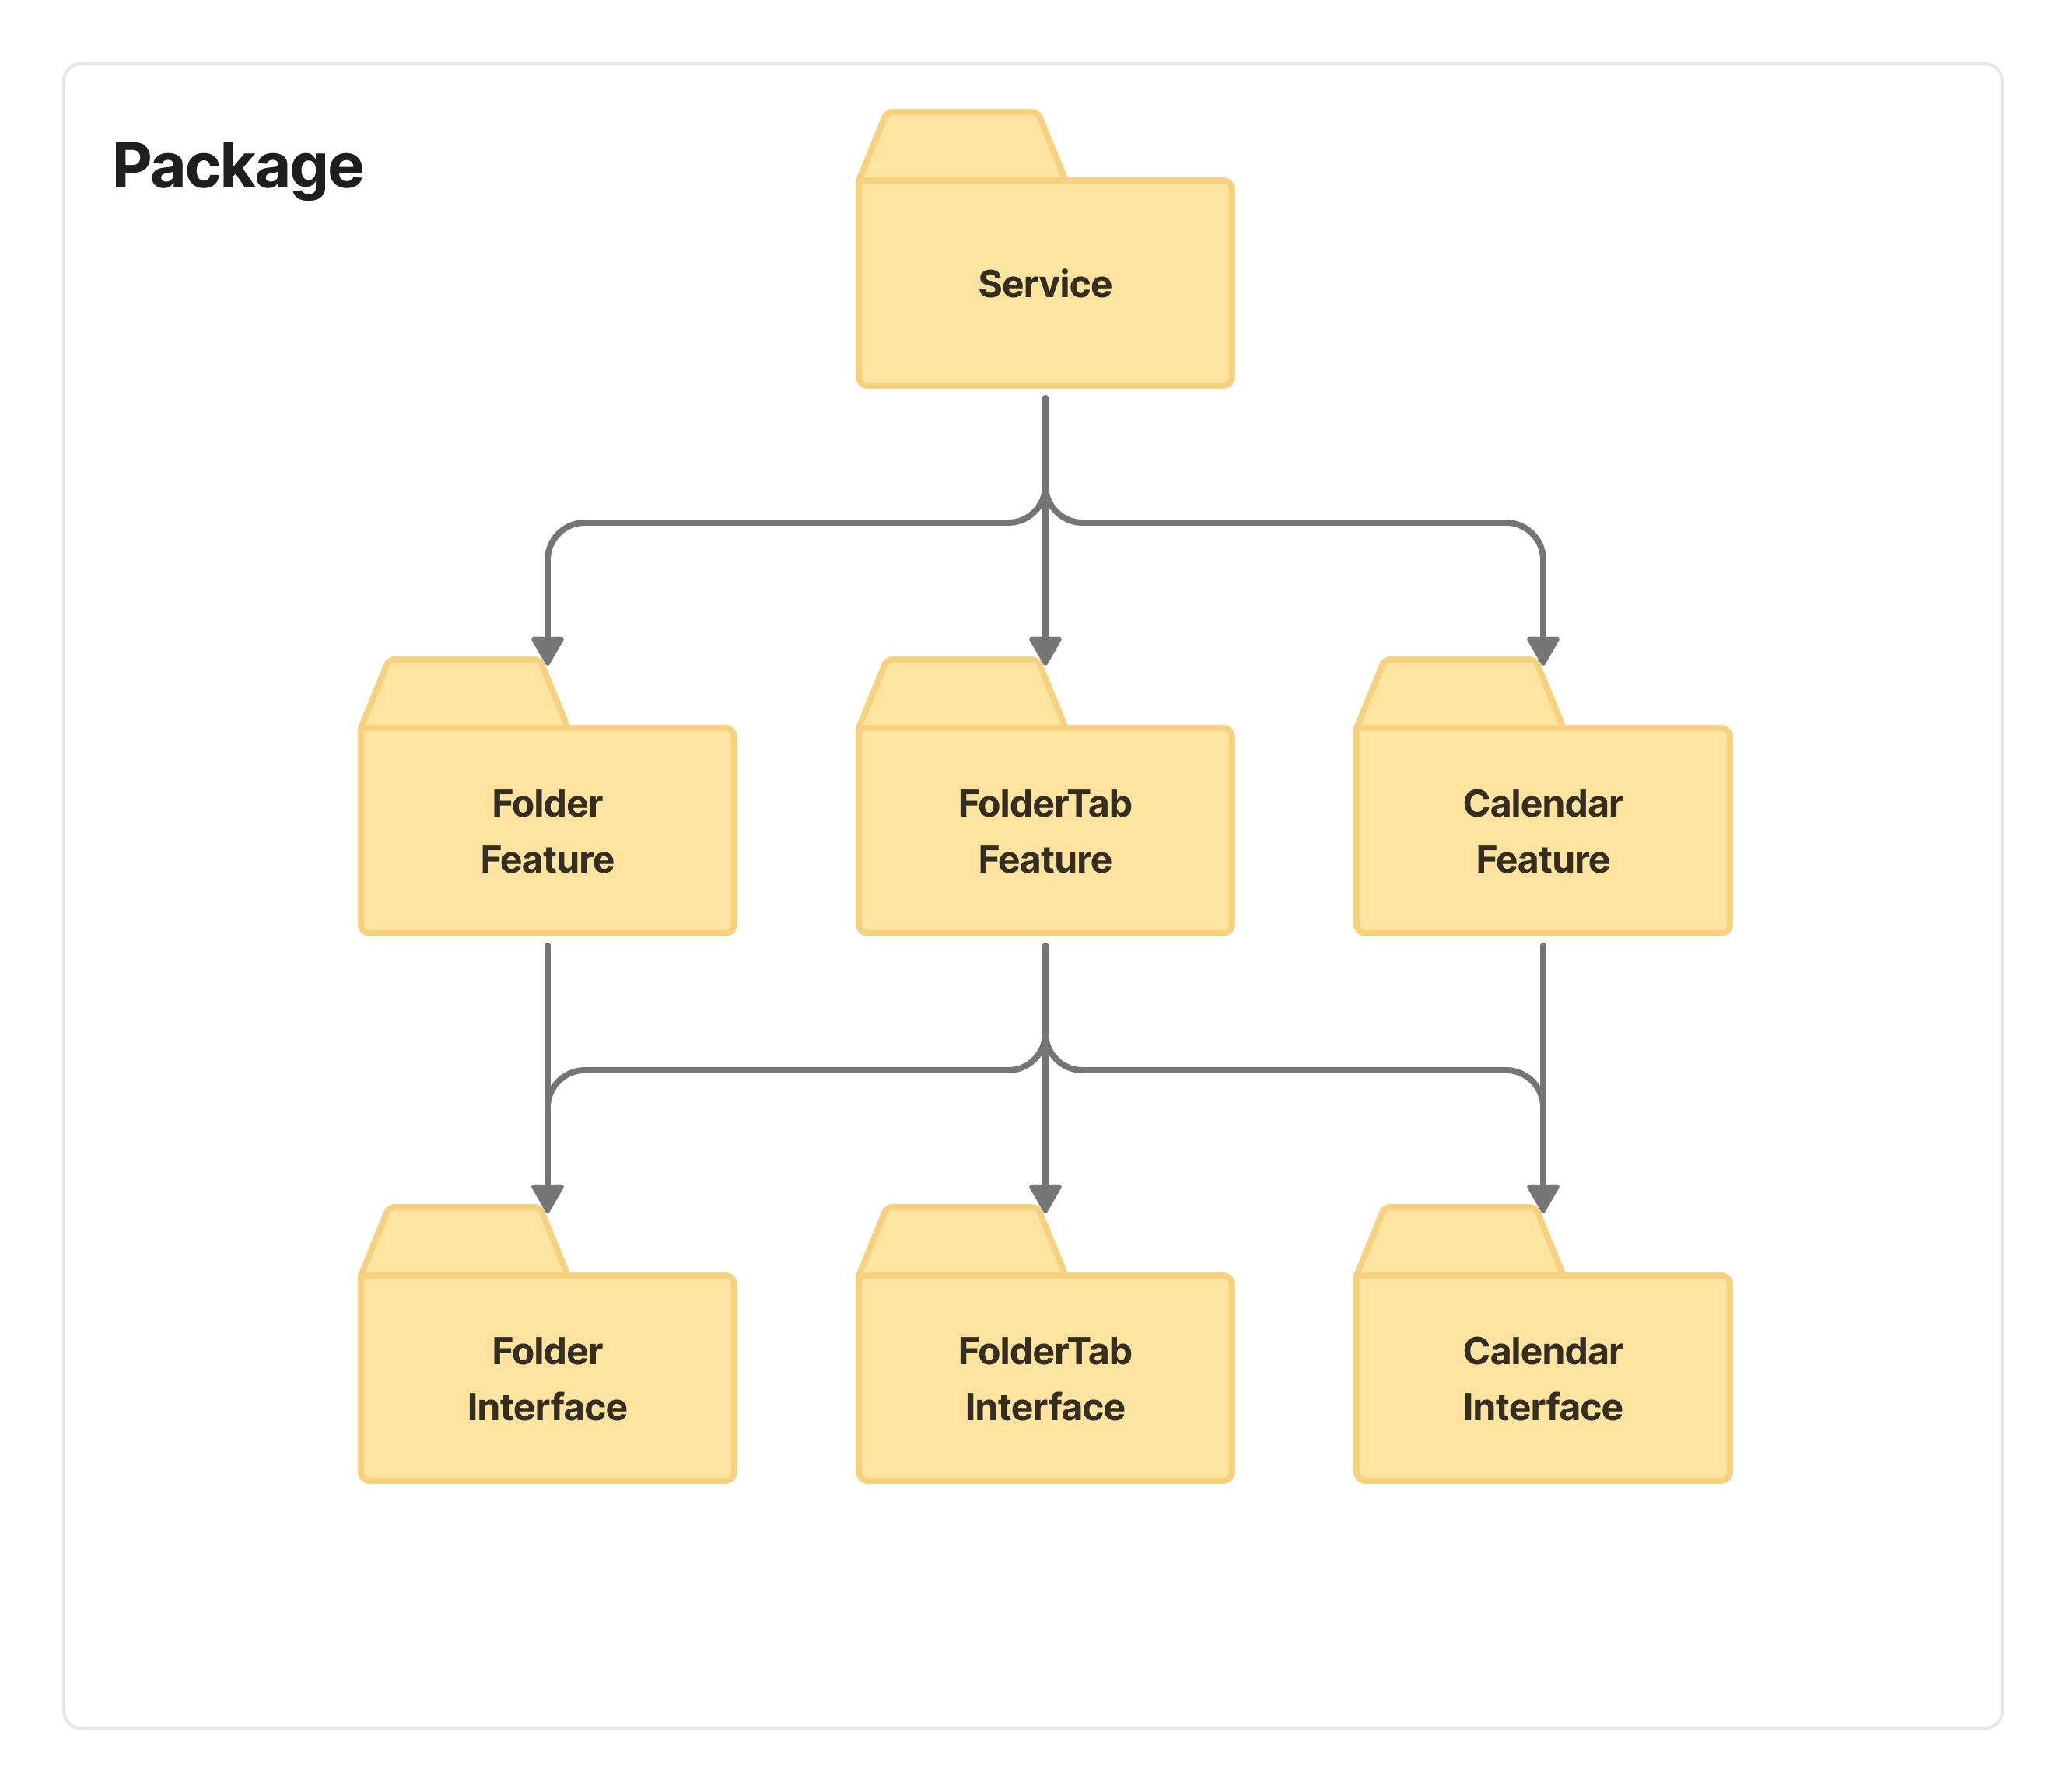
아래 다이어그램은 위에서 보여드릴 화면의 주요 Feature 모듈 구성을 입니다.
FolderTabFeature, FolderFeature, CalendarFeature는 서로의 구현체를 알지 못합니다.
대신, Feature가 외부에 제공하는 Interface 계층에만 의존합니다.
이 구조에서 중요한 포인트는 FolderTabFeature가 FolderFeature와 CalendarFeature를 직접 참조하지 않고,
각 Feature가 제공하는 Interface만을 의존한다는 점입니다.
즉, Feature 간에는 직접적인 구현 의존성을 제거하고,
상위 모듈인 Service에서 필요한 구현체를 주입받아 사용하는 방식으로 구성되어 있습니다.
🧩 독립적인 Feature에서 Reducer 조합
✅ Interface 모듈을 기반으로 Reducer 추상화 시도
위에서 간단히 소개한 폴더 탭 화면을 만들기 위해,
View와 Reducer를 추상화해 재사용성과 유연성을 높이려는 시도를 했습니다.
우선 Reducer의 프로토콜을 Interface 모듈에 위치시키고, Feature 내부에서는 구현체를 만들어서
외부에서 주입받는 구조를 만들어보려 했습니다.
즉, FolderTabFeature는 FolderFeature나 CalendarFeature의 구체 타입을 모르고,
외부에서 주입받은 Reducer를 조합하는 방식으로 구성하고자 했습니다.
Calendar Interface
protocol CalendarReducerInterface: Reducer {}

// State
@ObservableState
public struct CalendarState: Equatable {

    public init() {

    }
}

// Action
enum CalendarAction {}

public protocol CalendarReducerProtocol: Reducer where State == SubViewState, Action == SubViewAction {}
Calendar Feature
public struct CalendarFeature: CalendarReducerProtocol {
    public init() {}

    public var body: some Reducer<CalendarState, CalendarAction> {}
}
FolderTabFeature
// FolderTabFeature에서 사용
@Reducer
public struct MainFeature {

    private let calendarFeature: CalendarReducerProtocol

    public init(calendarFeature: CalendarReducerProtocol) {
        self.calendarFeature = calendarFeature
    }

    @ObservableState
    public struct State: Equatable {}

    public enum Action {}

    public var body: some Reducer<State, Action> {

        Reduce { state, action in
            switch action {
            default: .none
            }
        }
        .ifLet(\.subViewState, action: \.subViewAction) {
            calendarFeature // ❌ 추상타입 불가능
        }
    }
}
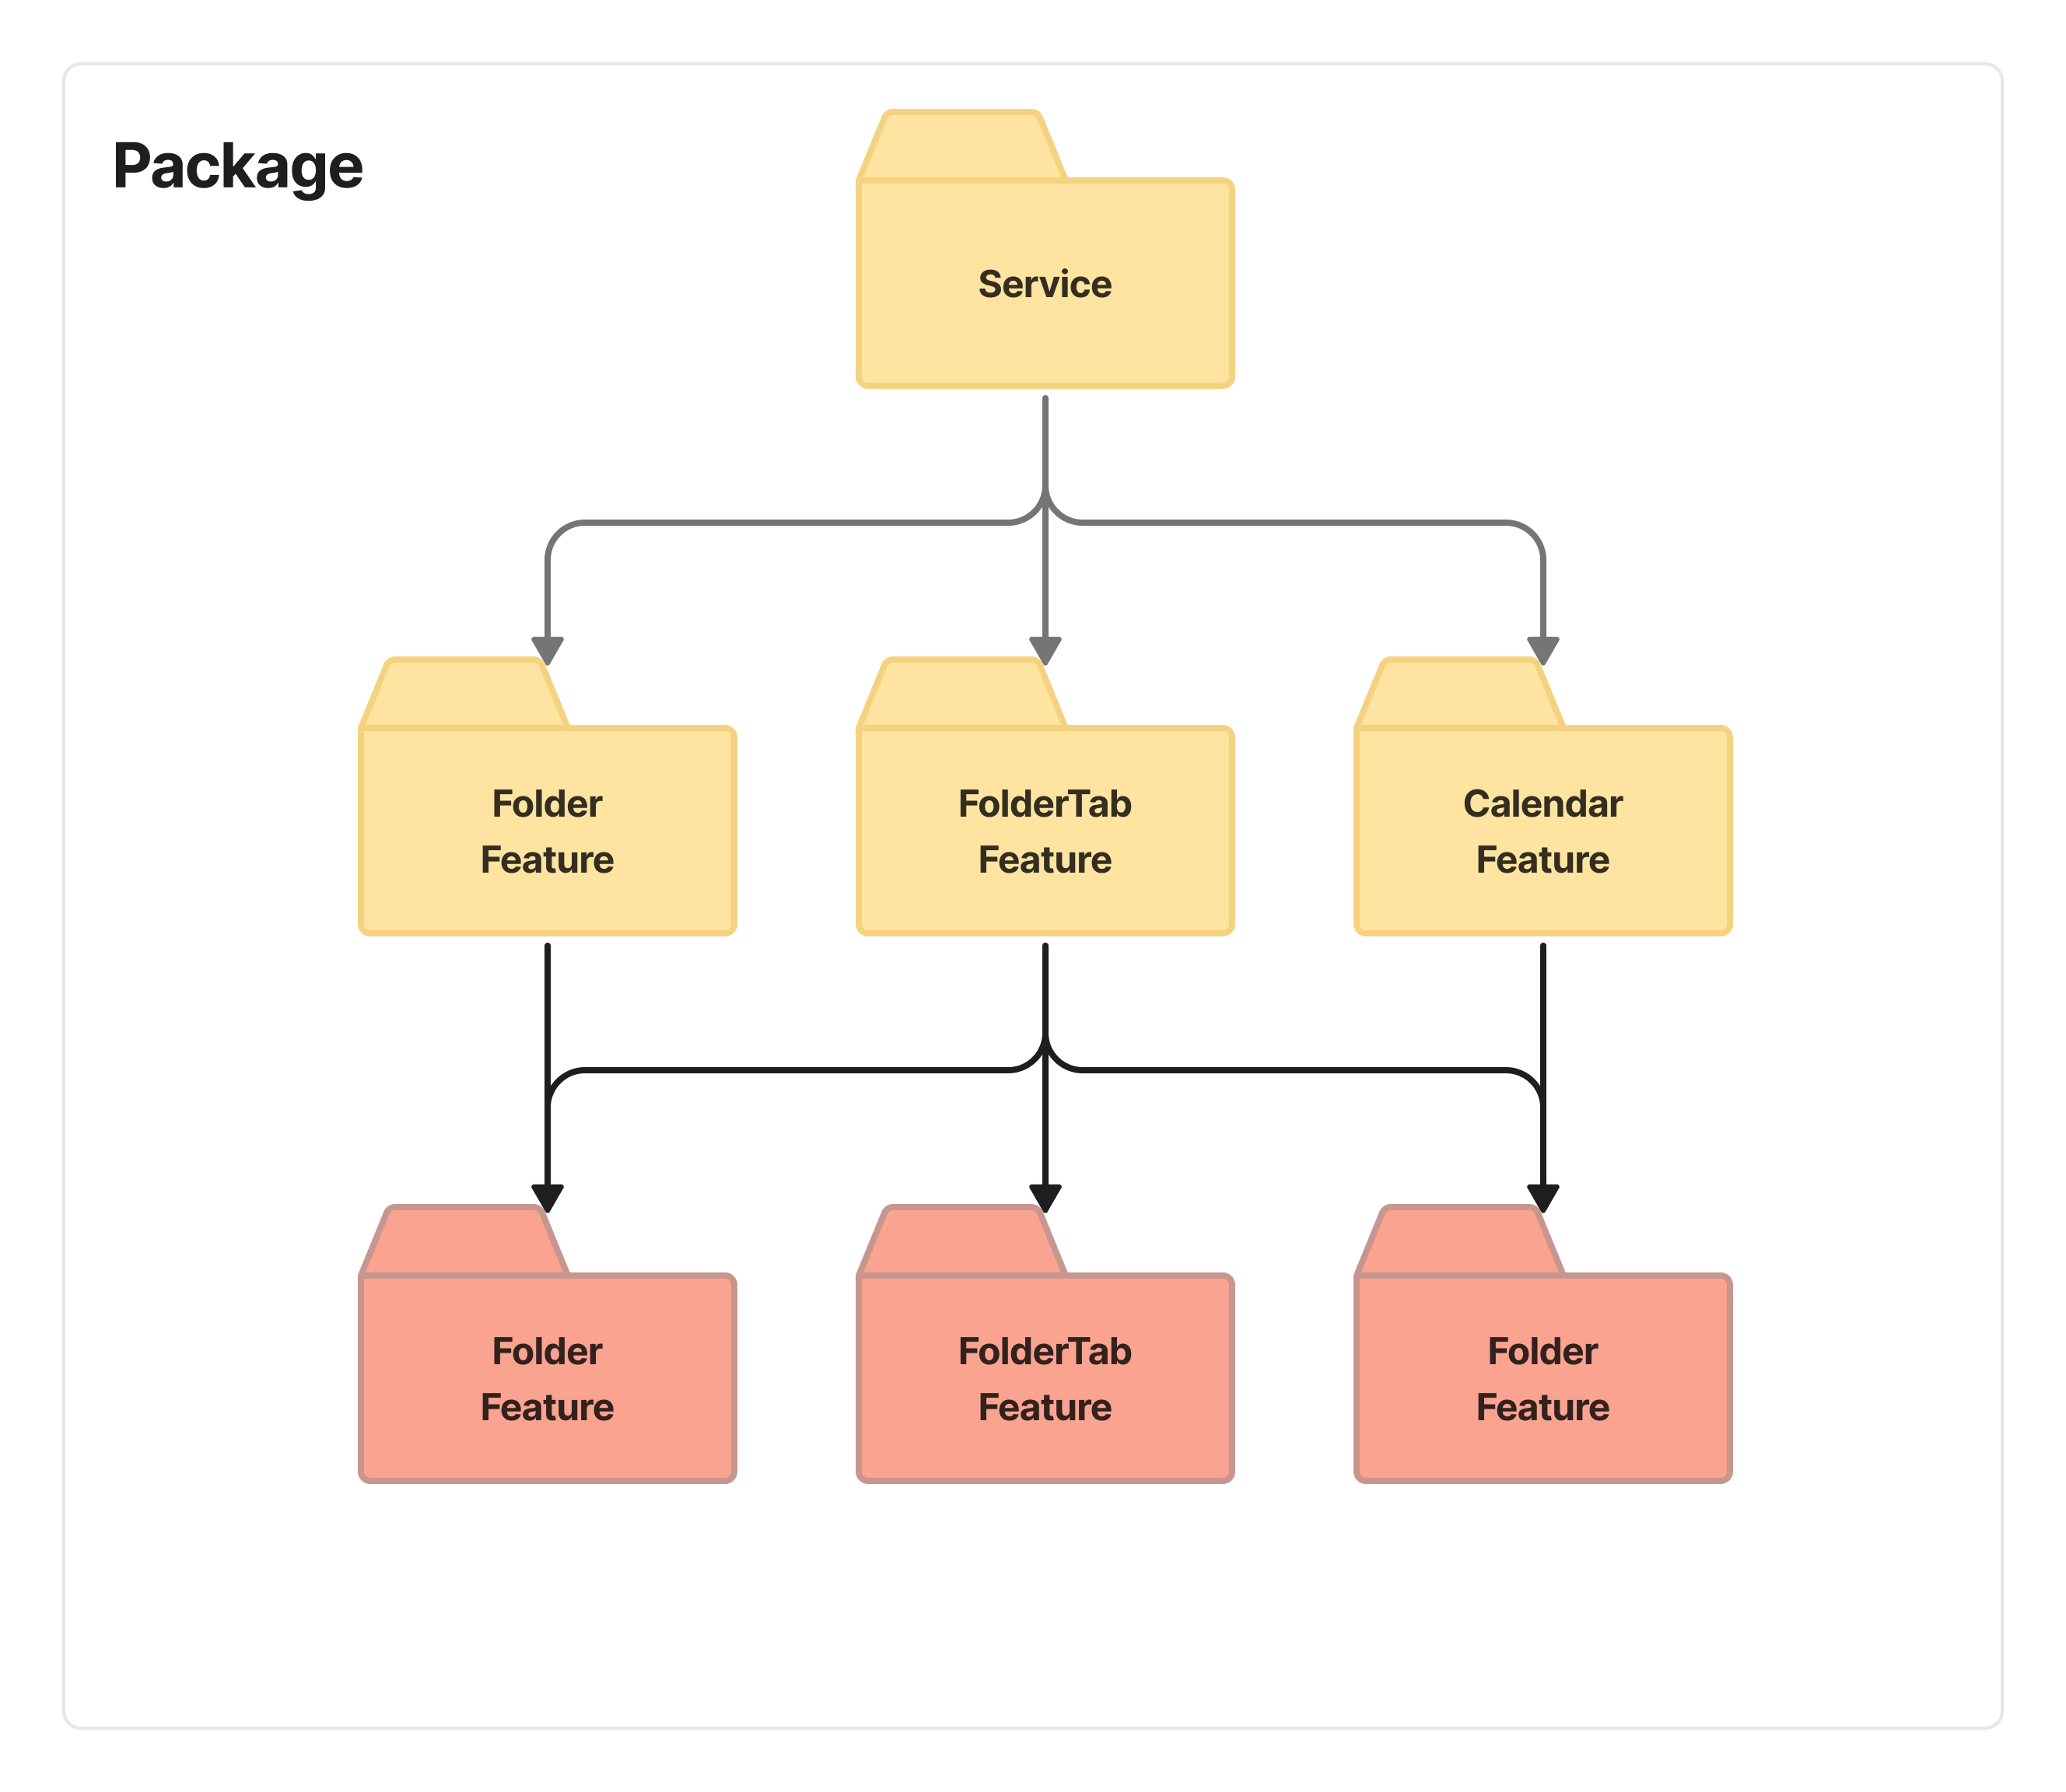
✅ TCA에서 Reducer 추상화 한계
위와 같이 분리를 했지만 TCA 구조상, Reducer는 scope나 ifLet에서
구체 타입으로 명시되어야만 조합이 가능하기 때문에 이 시도는 결국 실패 했습니다 😅😅
이 말은 곧, 다른 Feature에서 해당 Reducer의 구현체를 모른 채로는 조립이 불가능하다는 뜻입니다.
그래서 Reducer를 다른 Feature에서도 조합할 수 있게 Interface 모듈에 위치시키는 방식으로 타협했습니다.
🧩 View와 Store 분리: Factory Method
✅ View를 숨기고 Store만 주입하는 구조
모듈 경계 밖에서는 View의 구체 구현을 알 필요도, 알 수도 없기 때문에,
View 생성 과정을 Factory Method 패턴으로 추상화했습니다.
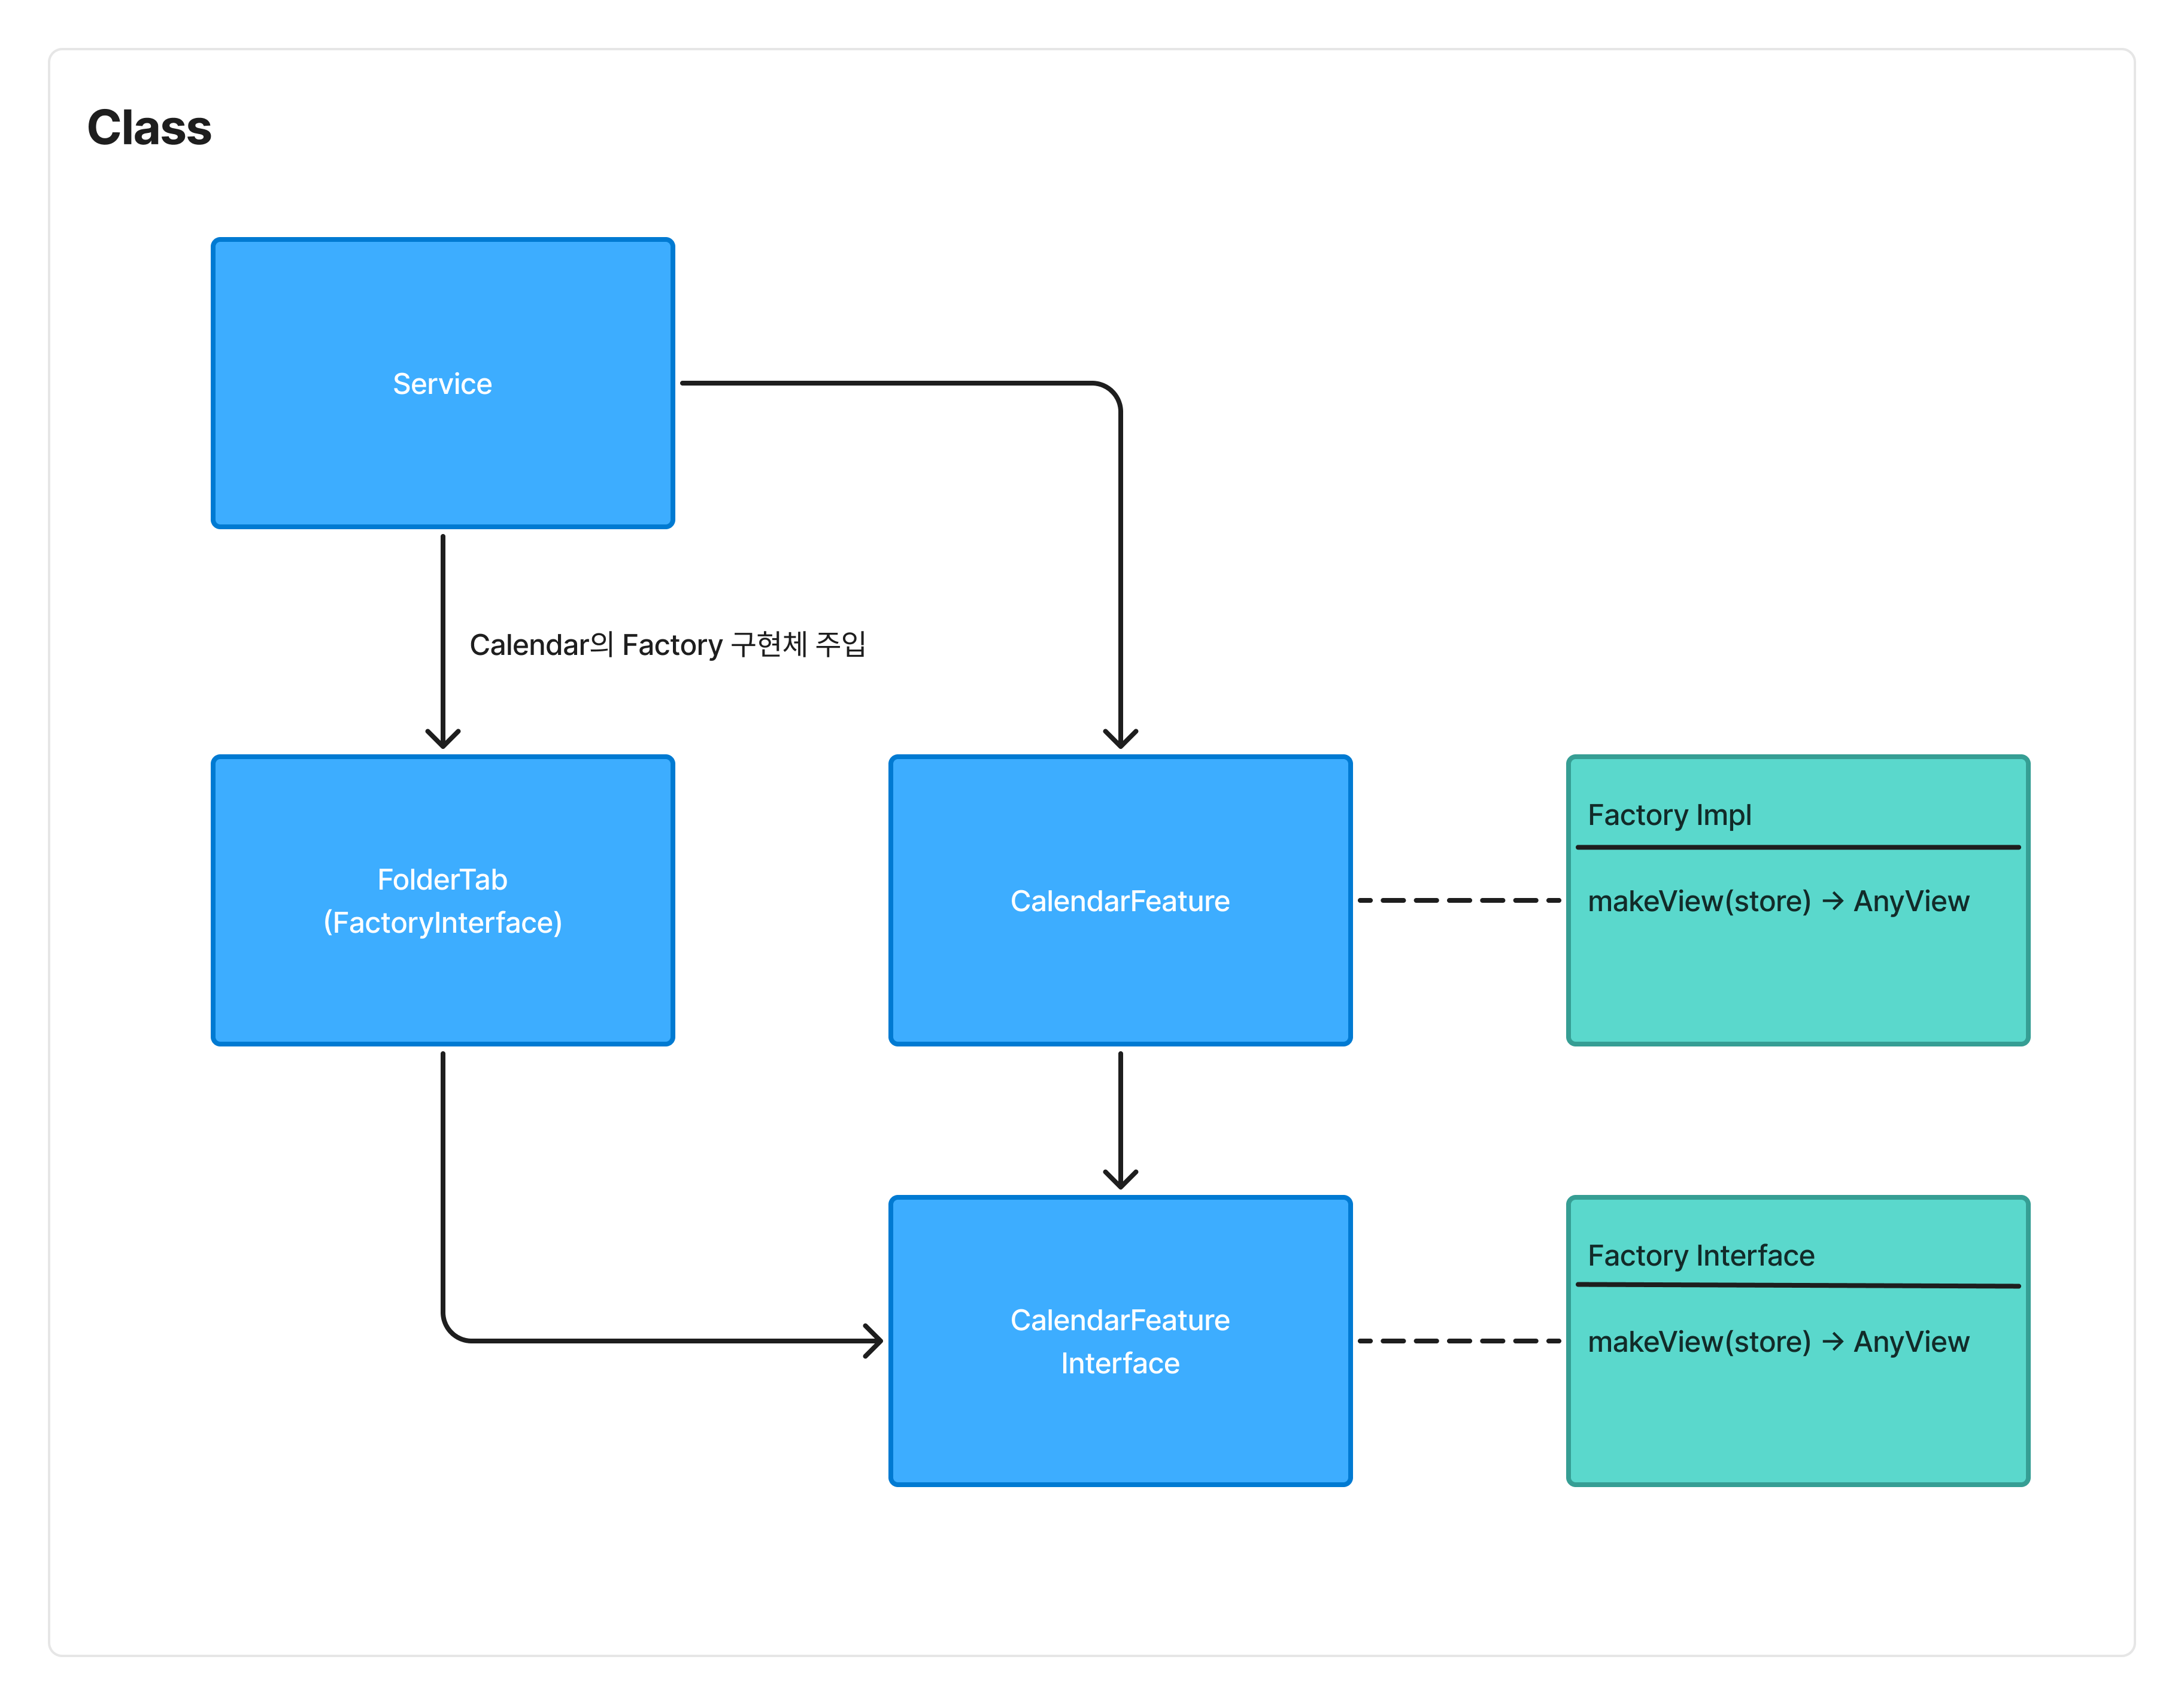
상위 모듈(Root)에서 부모 Feature(FolderFeature) 에 Factory를 주입 하고 ,
Factory 인자로 Store 받아서 자식 Feature(CalendarFeature)의 View를 생성하도록 구성했습니다.
이 방식은 모듈 간의 결합도를 낮추면서도,
TCA의 View-Store 구조를 그대로 유지할 수 있다는 점에서 좋았습니다.
Calendar Interface(자식 인터페이스)
@Reducer
public struct CalendarFeature {
    public init() {}

    @ObservableState
    public struct State: Equatable {
        public init() {}
    }

    public enum Action {}

    public var body: some Reducer<State, Action> {
    	switch action {
        default:
            return .none
        }
    }
}

// View 구현을 추상화하기 위한 Factory Interface
public protocol CalendarFactoryProtocol {
    func makeView(store: StoreOf<CalendarFeature>) -> AnyView
}
Calendar Feature(자식 구현체)
// Factory 구현체
public final class SubViewFactory: SubViewViewFactoryProtocol {
    public init() {}

    public func makeView(store: StoreOf<SubViewFeature>) -> AnyView {
        return AnyView(SubView(store: store))
    }
}
ForderTabFeature(부모)
public struct MainView: View {
    private let store: StoreOf<MainFeature>
    private let calendarFactory: CalendarFactoryProtocol

    public init(
        store: StoreOf<MainFeature>,
        calendarFactory: CalendarFactoryProtocol
    ) {
        self.calendarFactory = calendarFactory
        self.store = store
    }

    public var body: some View {
        VStack {
            IfLetStore(store.scope(state: \.subViewState, action: \.subViewAction)) { store in
                calendarFactory.makeView(store: store)
            }
        }
    }
}
RootFeature(Feature들의 최상위 모듈)
MainView(
	store: store,
	calendarFactory: CalendarFactory()
)
✅ 구조 그래프
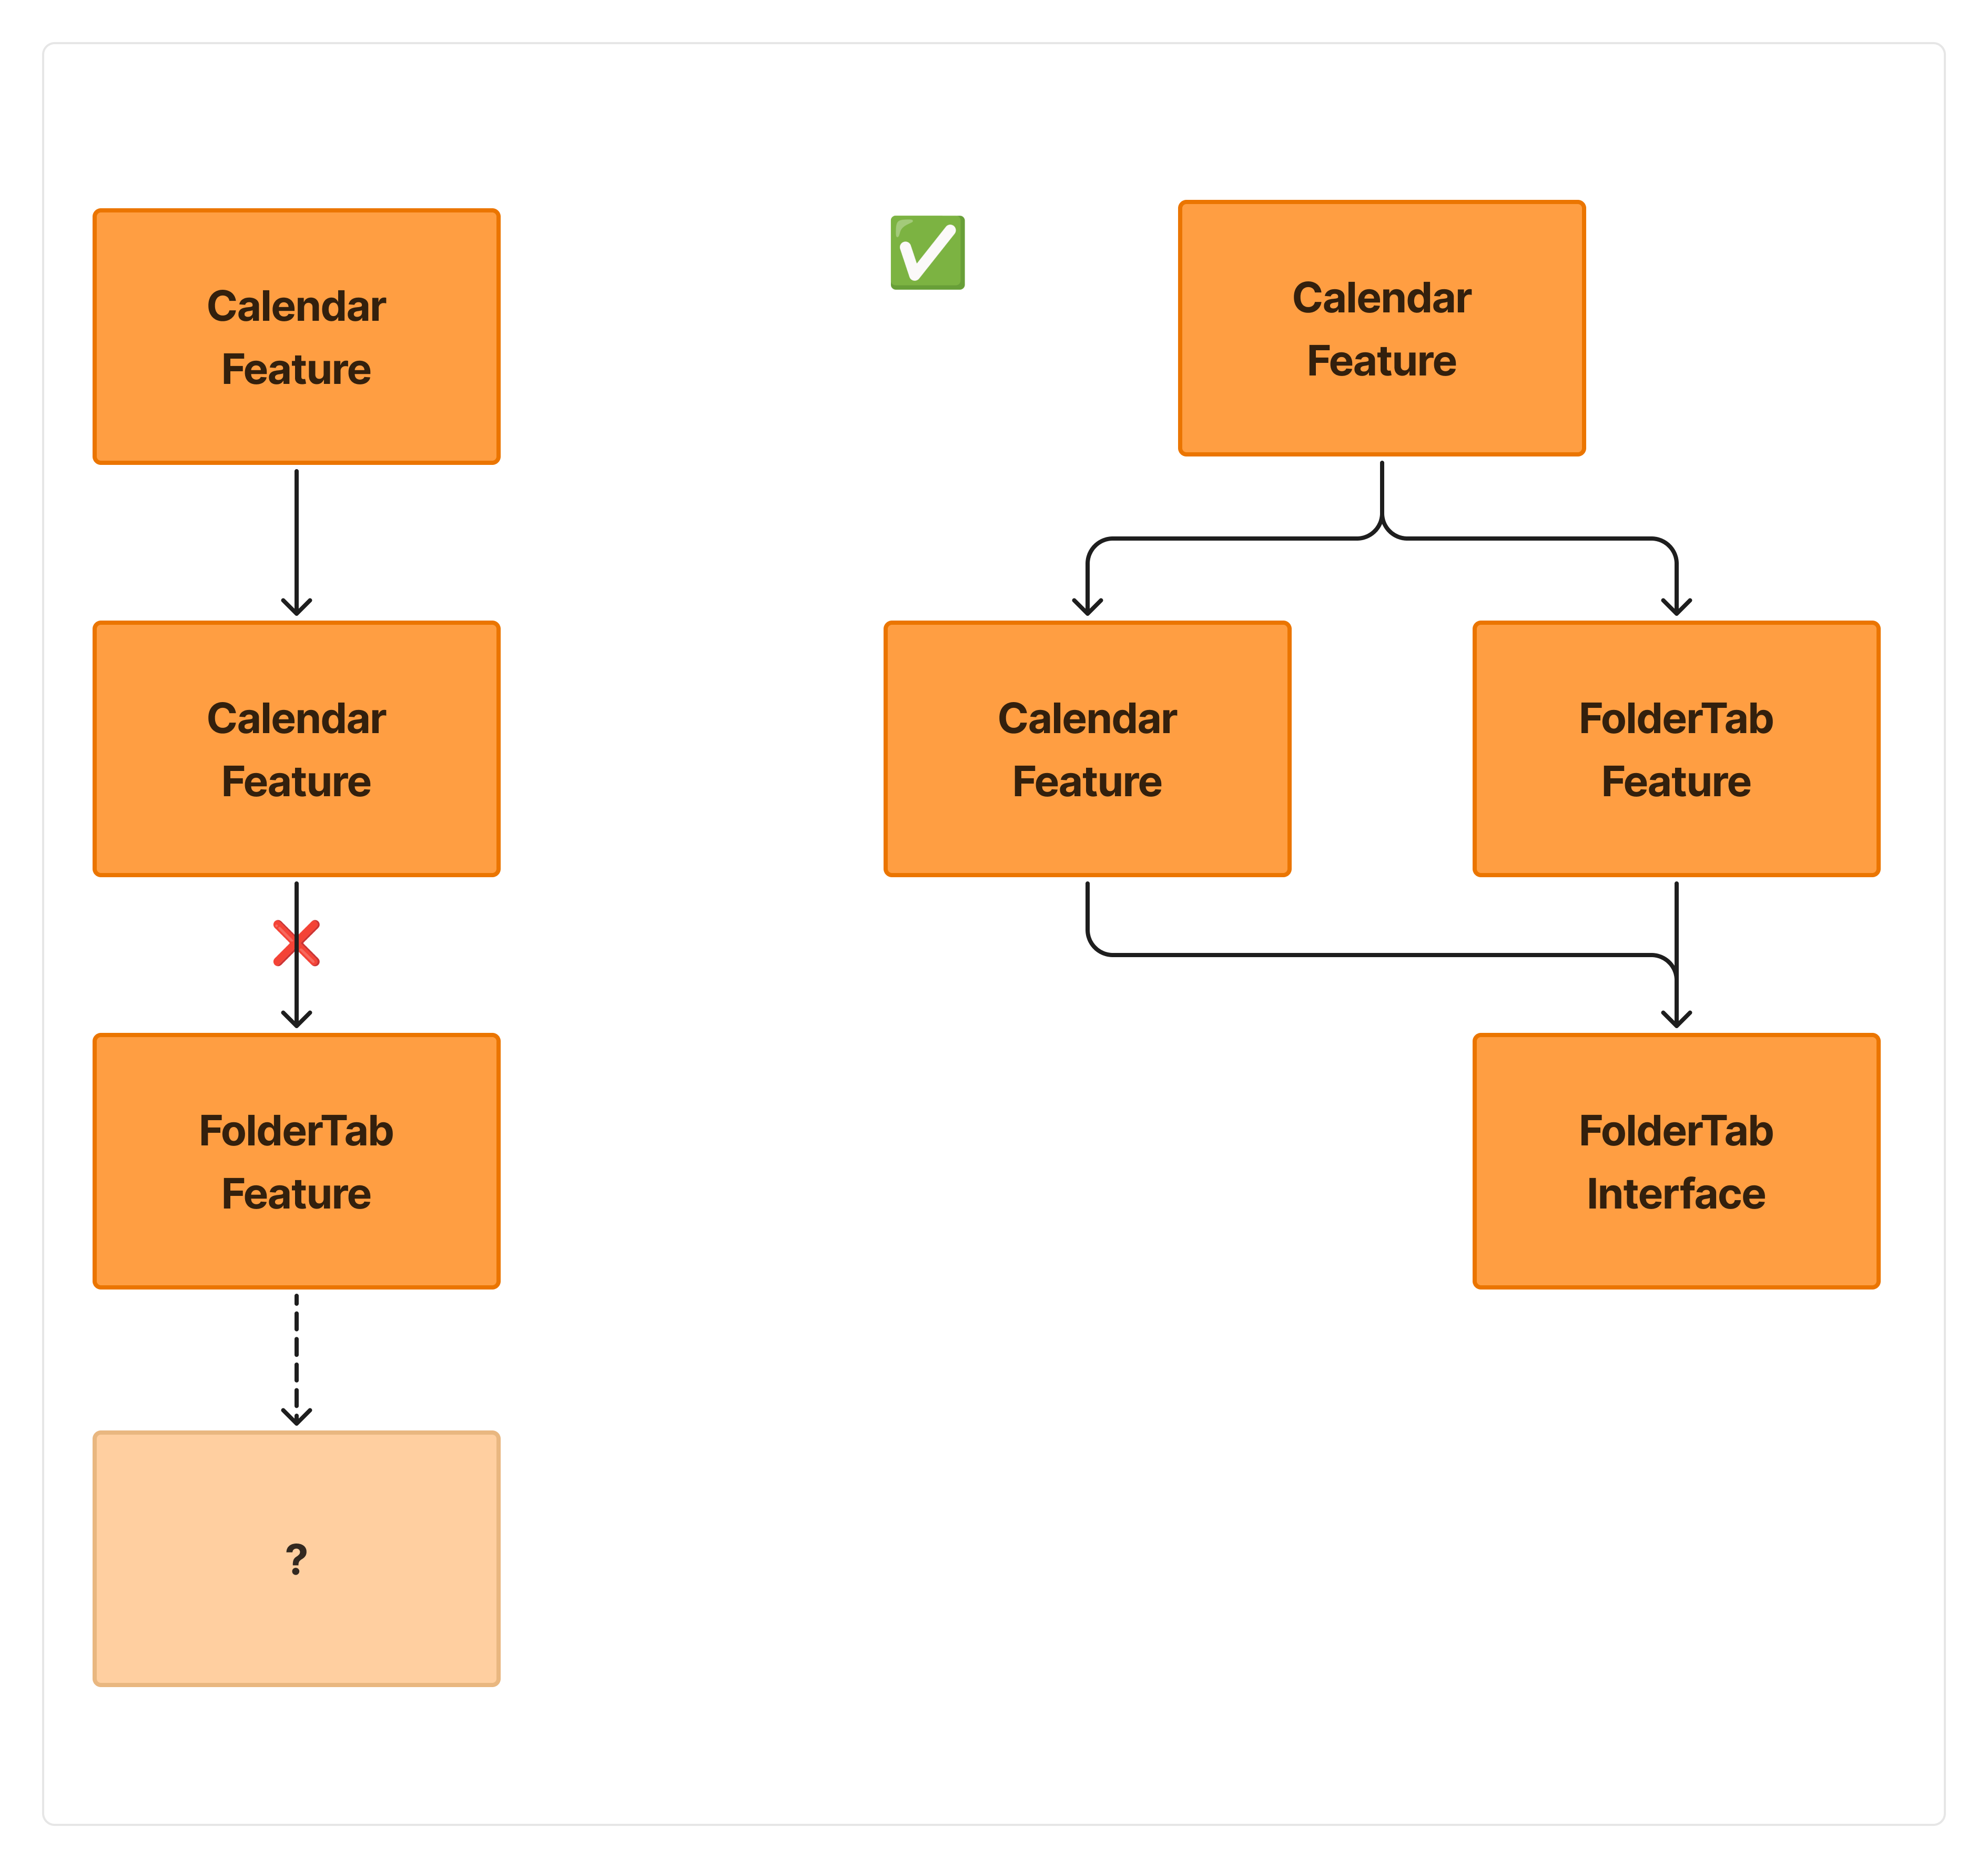
🧩 그래서 View만 추상화하는게 의미가 있는 걸까?
결론적으로 의미가 있는 행위라고 생각합니다.
Reducer, State, Action은 TCA 구조상 외부에 공개되어야지만 조합이 가능하기 때문에 노출시킬 수 밖에 없습니다.
하지만 View를 직접 사용하려면 해당 View가 정의된 모듈을 상위 모듈에서 의존해야 합니다.
이렇게 되면 자연스럽게 하위 모듈에 대한 의존성이 생기고,
하위 모듈이 또 다른 모듈을 의존하고 있다면,
전체 구조가 깊은 수직 의존 관계로 연결되기 쉬워집니다.
이런 구조는 모듈 분리를 어렵게 만들기 때문에,
View 생성을 추상화하여 모듈 구조를 만드는 것이 더 유연하고 안전한 선택이라고 생각했습니다.
🎯 커지는 Action 구조, 어떻게 관리할 것인가
✅ Reducer 내부 Action 관리
처음에는 별다른 규칙 없이 Reducer 안에 Action을 나열하는 방식으로 코드를 작성했습니다.
하지만 Action의 수가 많아지고,어떤 Action이 어떤 의도에서 작성된 것인지
구분하기 어려워져 가독성이 급격히 나빠졌습니다.
특히, 비슷한 이름의 Action이 여러 번 나오거나,
자식 Feature와 연결되는 Action이 섞여 있는 경우
Reducer를 읽는 것 자체가 부담스러워졌습니다.
그래서, Action의 역할과 의도에 따라 Core 함수로 명확히 분리하는 방법을 도입했습니다.
구체적으로 아래와 같이 분류 했습니다.
reducerCore(&state, action): Feature의 전체 ActionchildActionCore(&state, action): 하위 Feature로부터 전달된 Action을 처리- 의도별 Action Core (ex. userActionCore, asyncActionCore)
func reducerCore(_ state: inout State, _ action: Action) -> Effect<Action>
func childActionCore(_ state: inout State, _ action: Child.Action) -> Effect<Action>
func userActionCore(_ state: inout State, _ action: Action) -> Effect<Action>
func asyncActionCore(_ state: inout State, _ action: Action) -> Effect<Action>
추가적으로, 채널톡 기술 블로그에서도 Action 분리에 대해 좋은 인사이트를 얻을 수 있었습니다.
채널톡 기술 블로그: Swift Composable Architecture 를 도입하며 겪었던 문제와 해결법
글을 보면서 좋았던 부분은 Action을 명확히 분류하고,
View에서 모든 Action에 접근할 수 있지만 ViewAction이라는 별도 분리된 Action 타입을 통해
View에서는 오직 ViewAction만 다룰 수 있도록 제한한 방식이었습니다.
✅ 적용 전과 후 코드 비교
Before
var body: some Reducer<State, Action> {
    Reduce { state, action in
        switch action {
        case .onAppear:
			return .none
        case .fetchData:
			return .run { send in
            	do {
					let response = try await dataFetch
                    await send(.fetchSuccess(response))
                } catch {
                	await send(.errorHandler(error))
                }
            }
        case .childAction(.didTapButton):
        	state.isButtonTapped = true
			return .none
        case .fetchSuccess(let data):
        	state.data = data
			return .none
        case .errorHandler(error):
        	print(error)
        	return .none
        }
    }
}
After
var body: some Reducer<State, Action> {
	Reduce(reducerCore)
}

func reducerCore(_ state: inout State, _ action: Action) -> Effect<Action> {
	switch action {
    case .onAppear:
        return viewActionCore(&state, action)

    case .childAction(let action):
        return childActionCore(&state, action)

    case .fetchData
        return asyncActionCore(&state, action)

    case .fetchSuccess, .errorHandler:
    	return innerActionCore(&state, action)
    default:
        return .none
    }
}

func viewActionCore(_ state: inout State, _ action: Action) -> Effect<Action> {
	switch action {
    case .onAppear:
        return .none
    default:
        return .none
    }
}

func childActionCore(_ state: inout State, _ action: ChildAction) -> Effect<Action> {
	switch action {
    case .didTapButton:
        state.isButtonTapped = true
        return .none
    }
}

func asyncActionCore(_ state: inout State, _ action: Action) -> Effect<Action> {
	switch action {
    case .fetchData:
        return .run { send in
            do {
                let response = try await fetchData()
                await send(.fetchSuccess(response))
            } catch {
                await send(.errorHandler(error))
            }
        }
    }
}

func innerActionCore(_ state: inout State, _ action: Action) -> Effect<Action> {
    switch action {
    case .fetchSuccess(let data):
        state.data = data
        return .none

    case .errorHandler(let error):
        state.errorMessage = error.localizedDescription
        return .none

    default:
        return .none
    }
}
코드 라인은 분명 길어졌지만,
Action들이 용도에 따라 명확하게 분리된 구조를 만들 수 있었습니다.
이번 글에서는 전체 코드를 가져오기에는 분량이 너무 많아질 것 같아, 예시 코드로 대체 했습니다.
현재처럼 Action 수가 적은 상황에서는
"이 정도로 분리하는 게 오히려 리소스 낭비 아닐까?"
라는 생각이 들 수 있습니다.
하지만 결국 프로젝트가 커지면서
Action이 늘어나고 복잡도가 높아질수록,
Before 구조처럼 모든 로직을 Reducer에 나열하는 방식은
가독성 저하와 유지보수 어려움을 불러올 수밖에 없습니다.
따라서 초기에 어느 정도의 규칙과 분리 기준을 세워두는 것이
장기적으로는 안정적이고 확장성 있는 코드베이스를 만드는 데 도움이 된다고 생각합니다.
🎯 마무리
모듈화된 환경에서 TCA를 적용하면서 느낀 점은,
완전한 추상화는 어렵지만, 명시적으로 조합하고 구조를 명확히 드러내는 것이
TCA가 지향하는 철학에 가까운 것 같다는 생각을 했습니다.
그리고 Action은 Feature가 커질수록 구분이 애매해지고 관리가 어려워질 수 있기 때문에,
초기부터 명확한 기준을 세워 분리하고,
각 Action의 역할과 의도를 쉽게 파악할 수 있도록 구조화하는 것이
장기적인 유지보수성과 확장성을 위해 중요하다고 느꼈습니다.
혹시 더 좋은 방법을 알고 계신다면 피드백 부탁드립니다! 🙇